Kleenmaid T070W Скачать руководство пользователя страница 5

5

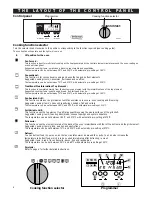
1 - Time of day (display from 0h00 to 23h59)
2 - Thermometer
3 - Cook time display
4 - End of cook time display
5 - Selected temperature display
6 - “Programme” button

U

S

I

N

G


Y

O

U

R


O

V

E

N

1. Setting the time of day

Press button 

” 3 times until the indicator 11 for

setting the time of day comes on.

The time of day display flashes to show you that
setting is now possible.

Press the or 

” buttons to set the time of day.

Press button 

The indicator 11 for setting the time of day goes out.

Only the “H” continues to flash.

2. Cooking immediately

Select the mode of cooking

Turn the cook function selector knob to the setting you
require.

Set the cooking temperature

For each mode of cooking selected, the oven will 
suggest the most commonly used temperature. It is
possible to adjust this temperature by pressing the or
buttons 

(depending on your recipe).

Each time the or buttons are pressed the pre-set
temperature is altered by 5 °C.

Following these actions the oven heats up:

•These stages on the thermometer indicate
the increase in temperature inside the oven.

•3 beeps will indicate to you that the set tem-
perature has been reached.

When a cooking cycle has been completed, the cooling

fan continues to operate for a short while, to protect the
oven’s components.

To reduce this time, leave the door open for a few minutes.

NB 

3. Pre-programmed cooking

The countdown of the cook time starts immediately after

the or 

” buttons are released.

The “

” indicator goes out a few seconds after the

last action.
The end of cooking time is displayed automatically.

Following these 3 actions, the oven heats up

• The thermometer begins to fill.

At the end of cooking a series of beeps is emitted for a few
minutes.

The beeps can be switched off by positioning the cook
function selector at (OFF).

For a set cook time

For a set cook time and a selected finish time

Set the mode of cooking required and if necessary
adjust the temperature using the or buttons 8.

Press the “

” button 6 once.

The “

” indicator comes on.

The cook time flashes to indicate that adjustment is
now possible.

Press the or 

” buttons to set the required time. 

The first time that the “

” button is pressed, the fla-

shing stops.

Set the mode of cooking required and if necessary
adjust the temperature.

Press the “PROGRAMME” button 6 once.

The  indicator 

) comes on.

The cook time flashes

Press the or “COOK TIME” buttons 

) to set

the required time. 

The first time that the 7 ( 

)button is pressed, the

flashing stops.
At this point the oven starts to function.

The countdown of the cook time starts immediately

after the + or - “

” buttons 7 are released.

Press the “

” button a second time.

The “

” indicator 10 lights.

Set the end of cooking time 4 required by pressing

the or ( ) 

buttons 

7.

The “

” indicator 10 goes out a few seconds after

the last action. 
At this point the oven switches off.

Following these 5 actions, the start of heating is
delayed to ensure that cooking finishes at the end time
selected. 
When you have finished cooking, return the cook 
function selector to (OFF).

The cook time can be altered at any point by carrying out the
operation described at the beginning of the paragraph.

NB 

7 - “COOK TIME” + or - button.
8 - “TEMPERATURE” + or - button.
9 - Cook time indicator.
10 - End of cook time indicator
11 - Setting time of day indicator
12 - Pyrolysis locking

Содержание T070W

Страница 1: ...Owner s Manual Multi function Oven with Pyrolytic Cleaning Model TO70X Stainless Steel T070W White ...

Страница 2: ...afety use and what you can expect from your Kleenmaid Multifunction Oven We advise you to read this book carefully to get the best use of this appliance s technical qualities To ensure that your oven remains in perfect condition we have provided important advice for you on its care and cleaning FOR THE USER 2 ...

Страница 3: ...appliance Caring for the environment Connecting the appliance This appliance is exclusively for domestic use When cooking with fat or oil stay close by as these materials can catch fire if they overheat DO NOT STORE FLAMMABLE OBJECTS IN THE OVEN OR ON THE HEATING ZONES When plugging domestic electrical appliances into a socket nearby make sure that the power cable is not touching the heating zones...

Страница 4: ...sisted Grill This function combines the grill element with fan assistance to ensure even cooking and browning Suggested cooking items chickens breast wings kebabs fish and cultets The temperature can be set between 180 C and 230 C with automatic pre setting at 210 C Full Variable Grill This function uses the top element to grill large quantities using the whole surfaces of the grill shelf Suggeste...

Страница 5: ...utomatically Following these 3 actions the oven heats up The thermometer 2 begins to fill At the end of cooking a series of beeps is emitted for a few minutes The beeps can be switched off by positioning the cook function selector at 0 OFF For a set cook time For a set cook time and a selected finish time Set the mode of cooking required and if necessary adjust the temperature using the or buttons...

Страница 6: ...en door is opened some whitish residue may be noticed on the walls Once the oven has completely cooled simply wipe them off with a damp sponge During this operation the front of the oven becomes hotter than during cooking keep young children away Running a pyrolysis cycle immediately To save electricity and take advantage of the heat already accumulated in the oven it is preferable to start a pyro...

Страница 7: ...the appliance to cool down and check that the selector knob is at the 0 position Changing the bulb Warning Disconnect the appliance from the power supply before replacing the bulb Turn the cover B one quarter turn to the left Unscrew the bulb and replace it with a heat resistant 300 C bulb of the same size available from all Kleenmaid St George Stores or Kleenmaid St George Spare Parts on 1 800 07...

Страница 8: ...unit using 2 screws in the holes provided in the lateral uprights see fig 1 Drill a 3 mm hole beforehand in the wall of the unit to prevent the wood splitting Technical data Operating voltage 220 240 V 50 Hz Total electrical power consumption 3 365kW Power rating of grill 2 135kW 80 min pyrolysis cycle 3 1 kW Energy consumption heating to 175 C 0 30 kWh running for one hour at 175 C 0 60 kWh TOTAL...

Страница 9: ...ty device is well engaged the door can now only be opened by simultaneously pressing on the safety ratchet A Neutralising the safety device 1 Open the door 2 Lift the door stop B and push the ratchet A of the device to the left 3 Close the door and check it opens without pressing on the safety ratchet Use You have chosen to use the child safety device Open the door as shown below You have neutrali...

Страница 10: ...e Lower the thermostat setting Increase the cooking time 4 If the outside is too dry but is a good colour you have cooked it for too long and at too low a temperature Reduce the cooking time Increase the thermostat setting Multiple cooking It is possible to cook several dishes the same or different types simultaneously without flavour or odour being passed from one to the other as long as you choo...

Страница 11: ...tion Roast beef or Fan assisted heat 235 or 220 C 1st Dish on shelf 10 15 min 500g During cooking pre heat the oven Roast pork veal Fan assisted heat 180 200 C 1st Dish on shelf 35 40 min 500g Chicken Fan assisted heat 180 200 C 1st Dish on shelf 25 min 500g Guinea fowl rabbit Fan assisted heat 180 200 C 1st Dish on shelf 20 25 min 500g BAKING Brioche Fan assisted heat 160 C 1st Tin on shelf 35 mi...

Страница 12: ...d free of charge for parts and labour provided that all service is performed during normal working hours by Kleenmaid or their designated Agents Where the Appliance is installed outside the normal servicing area of the above the Purchaser must pay the cost of transporting the Appliance to and from the Agent or the Agent s travelling cost to and from the Purchaser s home What This Warranty Does Not...

Страница 13: ...iance Correct installation will avoid delays and unnecessary service calls Once installation is complete read this booklet carefully and get to know the controls and the features of your new appliance For appliance please phone 1300 652 100 Kleenmaid St George Store 131308 We reserve the right to alter the specifications with no influence on the operation of the appliance This instruction manual c...

Страница 14: ...Washers Dryers Dishwashers Ovens Cooktops Rangehoods Sinks Waste Disposals Taps Cookware Refrigerators Freezers Vacuum Cleaners For sales information on the full range of quality kitchen and laundry appliances phone 13 13 08 For service related enquires phone 1300 652 100 ...

Отзывы: