KLAUDIO KD-CLN-LP200T Скачать руководство пользователя страница 4

iv

User Manual


- 6mm ID Plastic Tubing


- 10mm ID Plastic Tubing


- 13mm ID Plastic Tubing


- External Pump


- Water Filter Assembly


- Bracket, Tube Fittings, and Attachment Strap for Filter


- Reservoir


- User Manual


- AC Power Cable (U.S. plug)

Included Hardware

flat-head screw driver

Required Tools

During installation, you may need the following tools:

Содержание KD-CLN-LP200T

Страница 1: ...English v1 0 TM KD CLN LP200T Ultrasonic Vinyl Record Cleaner User s Manual...

Страница 2: ...s a prohibited action ABOUT SIGNS Throughout this document critical information is highlighted in gray colored boxes The following symbols are intended to help prevent any situation which may cause pe...

Страница 3: ...o not tilt or move while operating Keep unit level whenever water is inside Always drain water from the cleaner completely before transporting CAUTION Before power ing on the system the AC POWER SELEC...

Страница 4: ...ID Plastic Tubing External Pump Water Filter Assembly Bracket Tube Fittings and Attachment Strap for Filter Reservoir User Manual AC Power Cable U S plug Included Hardware flat head screw driver Requ...

Страница 5: ...onfiguration 5 Water Sources 5 Reservoir Filter and Pump Installation 6 Optional Cooling Unit 11 Connecting the Power Cable 12 Adjusting Washing and Drying Settings 12 Understanding the LED Progress B...

Страница 6: ...1 User Manual Chapter 1 Overview...

Страница 7: ...Power Outputs AC Plug and Voltage Switch Outlet and Inlet Water Lines Overview Power Switch Display Panel Velcro Strap Filter Pads and Bracket Filter Core Filter Fittings Power Cable 6mm ID Tubing Pu...

Страница 8: ...technology allows powerful waves to remove debris without dam aging the disc The entire washing and drying process can be adjusted from 2 to 10 minutes Cleaning status is conveniently displayed throu...

Страница 9: ...4 Chapter 2 Setup Setup...

Страница 10: ...e rear of the unit use a small flat head screwdriver to adjust the AC voltage switch 115V 60Hz or 230V 50Hz The incorrect setting can permanently damage the electronics This condition is not covered b...

Страница 11: ...6 Reservoir Filter and Pump Installation The LP cleaner must be located above its reservoir It is recommended to place the cleaner on a table with the reservoir on the floor below Setup...

Страница 12: ...ighten fittings to avoid damaging the filter assembly threads The larger elbow fitting is placed on the lid cap inlet The smaller elbow fitting is placed on the side of the filter body outlet The LP c...

Страница 13: ...the compression nut This is the drain line Attach the available end of the 6mm tubing from the filter to the Water In connection on the cleaner Tighten the compression nut Connect the pump cable to t...

Страница 14: ...ndle Place the filter assembly onto the bracket with the larger filter inlet above the reservoir opening Use the velcro strap to secure the filter assembly and bracket to the reservoir handle Drop the...

Страница 15: ...notch in the filter bracket to help hold the drain line tube at the proper height above water level The smaller notch on the other bracket arm is for retaining the pump electrical cord The 13mm drain...

Страница 16: ...ump into the reservoir alongside the cleaner s pump Plug the power adapter into a wall outlet and connect the small barrel plug to the cooling unit The cooling unit will run automatically whenever the...

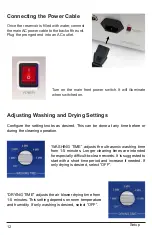
Страница 17: ...ultrasonic washing time from 1 5 minutes Longer cleaning times are intended for especially difficult to clean records It is suggested to start with a short time period and increase if needed If only...

Страница 18: ...he preset time DRAINING The wash basin is emptying back into the reservoir Drying Cycle 0 25 50 75 100 Indicates the current drying progress based on the preset time Once finished the Completed green...

Страница 19: ...14 Chapter 3 Operation Operation...

Страница 20: ...lar to the floor The cleaning drying process will automatically start Once finished the Completed green LED will illuminate Insert a new disc to start again Maintenance When tap or bottled drinking wa...

Страница 21: ...nal cooling unit Three repeating beeps Water level is too high Make sure the drain line is not kinked elevated or submerged in the reservoir If using the optional tap water kit there may be too little...

Страница 22: ...n authorized repair service No responsibility is assumed for any special incidental or consequential damages due to a defective Klaudio product In order to obtain warranty service contact our RMAdepar...

Страница 23: ...www klaudio com Printed in Korea TM...

Отзывы: