background image

24

ES

FUNCIONAMIENTO

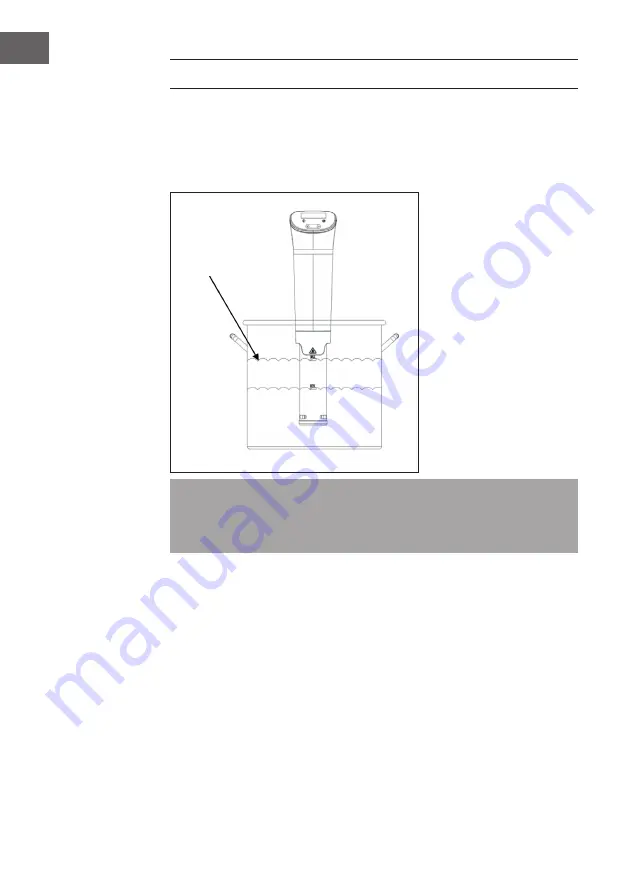
Llene una olla con agua. Preste atención a las escalas que presenta el aparato (ver 
imagen). El nivel de agua debe quedar entre las marcas MIN y MAX indicadas en la 
parte frontal del termostato. Tenga en cuenta que el nivel de agua sube al introducir 
alimentos en la olla. Por ello, no añada demasiada agua.

Atención

: Cuando la temperatura de agua sube, el agua empieza a evaporarse. 

El cocedor al vacío cuenta con una alarma que se activa cuando el nivel de 
agua es bajo. Cuando el nivel de agua es demasiado bajo, el aparato se apaga 

automáticamente.

Encender el aparato

Mantenga pulsado el botón POWER en el panel de control durante más de 5 
segundos. El indicador superior muestra la temperatura configurada. El indicador 
central muestra la temperatura de agua actual. El indicador inferior muestra el tiempo 
elegido y el tiempo transcurrido actual.

Botón SET

Pulse una vez el botón SET para configurar la hora. Pulse dos veces el botón para 
configurar los minutos. Cuando los dígitos de la hora o minutos parpadean en el 
display, utilice los botones [+] o [-] para configurar la hora.

Nivel de agua 
entre las marcas 

MIN y MAX

Содержание Quickstick Flex 10032905

Страница 1: ...10032905 10032906 Quickstick Flex Sous vide Stick ...

Страница 2: ......

Страница 3: ...ellste Bedienungsanleitung und weitere Informationen rund um das Produkt zu erhalten INHALTSVERZEICHNIS Sicherheitshinweise 4 Bedienfeld 5 Bedienung 6 Entkalkung 7 Fehlersuche und Fehlerbehebung 8 Hinweise zur Entsorgung 8 TECHNISCHE DATEN Artikelnummer 10032905 10032906 Stromversorgung 220 240 V 50 60 Hz KONFORMITÄTSERKLÄRUNG Hersteller Chal Tec GmbH Wallstraße 16 10179 Berlin Deutschland Dieses ...

Страница 4: ...bel nicht von der Arbeitsfläche hängen Schalten Sie das Gerät aus und ziehen Sie den Stecker bevor Sie es reinigen oder wenn Sie es länger nicht benutzen Ziehen sie den Stecker nicht am Kabel aus der Steckdose sondern halten Sie ihn beim Abziehen mit der Hand fest Halten Sie das Gerät von anderen Wärmequellen heißen Gegenständen und offenem Feuer fern Wickeln Sie das Kabel immer komplett ab Wickel...

Страница 5: ...5 DE BEDIENFELD Power und Start Taste Einstellungs Taste ...

Страница 6: ...attet der einen niedrigen Wasserstand anzeigt Wenn der Wasserstand unter die Min Marke fällt schaltet sich das Gerät automatisch ab Gerät einschalten Drücken Sie länger als 5 Sekunden auf die POWER Taste am Bedienfeld Die obere Zeile zeigt die eingestellte Temperatur an Die mittlere Zeile zeigt die aktuelle Wassertemperatur an In der unteren Zeile sehen Sie die eingestellte Zeit und die aktuelle L...

Страница 7: ...uf die SET Taste um den Signalton zu stoppen Wenn Sie eine Zeit eingestellt haben wird nach 1 Minute die restliche Laufzeit angezeigt Gerät ausschalten Sobald die eingestellte Zeit abgelaufen ist ertönt der Signalton erneut alle drei Sekunden Er erinnert Sie daran das Essen zu entnehmen Schalten Sie das Gerät aus indem Sie 5 Sekunden lang auf die POWER Taste drücken ENTKALKUNG Bei häufiger Benutzu...

Страница 8: ... zeigt den Fehlercode E02 an Der digitale Thermostat ist kaputt Wenden Sie sich an den Kundendienst oder einen Fachbetrieb in Ihrer Nähe HINWEISE ZUR ENTSORGUNG Befindet sich die linke Abbildung durchgestrichene Mülltonne auf Rädern auf dem Produkt gilt die Europäische Richtlinie 2012 19 EU Diese Produkte dürfen nicht mit dem normalen Hausmüll entsorgt werden Informieren Sie sich über die örtliche...

Страница 9: ...ility Scan the QR code to get access to the latest user mannual and other information about the product CONTENT Safety Instructions 10 Control Panel 1 1 Operation 12 Descaling 13 Troubleshooting 14 Hints on Disposal 14 TECHNICAL DATA Item number 10032905 10032906 Power supply 220 240 V 50 60 Hz DECLARATION OF CONFORMITY Producer Chal Tec GmbH Wallstraße 16 10179 Berlin Germany This product is conf...

Страница 10: ...other than that supplied Check that it is not possible to pull or trip over the cord or any extension cord The appliance must not be used together with a timer switch or a separate remote control system Turn off the appliance and remove the plug from the socket before cleaning or when the appliance is not in use Avoid pulling the cord when removing the plug from the socket Instead hold the plug Ke...

Страница 11: ...11 EN CONTROL PANEL Power and Start Button Setting Button ...

Страница 12: ...s equipped with an alarm that indicates a low water level If the water level falls below the minimum level the unit switches off automatically Switch on the Device Press the POWER button on the control panel for more than 5 seconds The upper line shows the set temperature The middle row shows the current water temperature In the bottom line you see the set time and the current runtime SET Button P...

Страница 13: ...and press the SET button for 2 seconds to stop the beep If you have set a time the remaining running time is displayed after 1 minute Switching off the Unit When the set time has elapsed the beep will sound again every three seconds It reminds you to take the food out Turn the unit off by pressing the POWER button for 5 seconds DESCALING With frequent use descaling should be done every month or mo...

Страница 14: ... thermostat is broken Contact the customer service or a specialist company in your area HINTS ON DISPOSAL According to the European waste regulation 2012 19 EU this symbol on the product or on its packaging indicates that this product may not be treated as household waste Instead it should be taken to the appropriate collection point for the recycling of electrical and electronic equipment By ensu...

Страница 15: ...le QR Code pour accéder à la dernière version du mode d emploi et à d autres informations concernant le produit SOMMAIRE Consignes de sécurité 16 Panneau de commande 17 Utilisation 18 Détartrage 19 Identificatione et résolution des problèmes 20 Informations sur le recyclage 20 FICHE TECHNIQUE Numéro d article 10032905 10032906 Alimentation 220 240 V 50 60 Hz DÉCLARATION DE CONFORMITÉ Fabricant Cha...

Страница 16: ...n pendre sur le bord du plan de travail Éteignez et débranchez l appareil avant de le nettoyer ou lorsque vous ne l utilisez pas pendant une longue période Ne débranchez pas la fiche de la prise en tirant sur le câble mais tenez la toujours en main pour la retirer Tenez l appareil à l écart des autres sources de chaleur des objets chauds et des flammes libres Déroulez toujours le câble complètemen...

Страница 17: ...17 FR PANNEAU DE COMMANDE Touche d alimentation et de démarrage Touche de paramétrage ...

Страница 18: ...ipé d une alarme qui indique un faible niveau d eau Si le niveau d eau descend au dessous du minimum l appareil s éteint automatiquement Allumer l appareil Appuyez sur le bouton POWER du panneau de commande pendant plus de 5 secondes La ligne supérieure indique la température réglée La ligne du milieu montre la température actuelle de l eau La ligne du bas indique la durée réglée et la durée écoul...

Страница 19: ... deux secondes pour arrêter le bip Si vous définissez une durée la durée restante s affichera au bout d 1 minute Eteindre l appareil Une fois la durée écoulée le bip retentit toutes les trois secondes Il vous rappelle de récupérer les aliments Éteignez l appareil en appuyant sur la touche POWER pendant 5 secondes DÉTARTRAGE En cas d utilisation fréquente nous vous recommandons de détartrer l appar...

Страница 20: ...fiche le code erreur E02 Le thermostat numérique est cassé Contactez le service clientèle ou une entreprise spécialisée dans votre région INFORMATIONS SUR LE RECYCLAGE Vous trouverez sur le produit l image ci contre une poubelle sur roues barrée d une croix ce qui indique que le produit se trouve soumis à la directive européenne 2012 19 UE Renseignez vous sur les dispositions en vigueur dans votre...

Страница 21: ...ner acceso al manual de usuario más reciente y otra información sobre el producto ÍNDICE Indicaciones de seguridad 22 Panel de control 23 Funcionamiento 24 Retirar la cal 25 Detección y reparación de anomalías 26 Indicaciones sobre la retirada del aparato 26 DATOS TÉCNICOS Número de artículo 10032905 10032906 Fuente de alimentación 220 240 V 50 60 Hz DECLARACIÓN DE CONFORMIDAD Fabricante Chal Tec ...

Страница 22: ...alimentación no quede colgando del borde de la encimera Apague el aparato y desconecte el enchufe de la toma de corriente antes de limpiarlo o si no lo va a utilizar durante un largo periodo de tiempo Para desconectar el aparato no tire del cable sino del cuerpo del enchufe Mantenga el aparato lejos de las fuentes de calor objetos calientes y llamas abiertas Desenrolle el cable completamente No en...

Страница 23: ...23 ES PANEL DE CONTROL Botón de encendido apagado Botón de ajustes ...

Страница 24: ...nivel de agua es bajo Cuando el nivel de agua es demasiado bajo el aparato se apaga automáticamente Encender el aparato Mantenga pulsado el botón POWER en el panel de control durante más de 5 segundos El indicador superior muestra la temperatura configurada El indicador central muestra la temperatura de agua actual El indicador inferior muestra el tiempo elegido y el tiempo transcurrido actual Bot...

Страница 25: ... la señal acústica Si ha configurado un tiempo se visualizará en el display el tiempo restante después de 1 minuto Apagar el aparato Tanto pronto como el tiempo elegido haya finalizado se emitirá cada 3 segundos una señal acústica Dicha señal recuerda que hay que retirar la comida Para apagar el aparato mantenga pulsado durante 5 segundos el botón POWER RETIRAR LA CAL Si utiliza el aparato con muc...

Страница 26: ...l está averiado Póngase en contacto con el fabricante o el servicio técnico más cercano INDICACIONES SOBRE LA RETIRADA DEL APARATO Si el aparato lleva adherida la ilustración de la izquierda el contenedor de basura tachado entonces rige la directiva europea 2012 19 UE Este producto no debe arrojarse a un contenedor de basura común Infórmese sobre las leyes territoriales que regulan la recogida sep...

Страница 27: ...sitivo Scansionare il codice QR seguente per accedere al manuale d uso più attuale e per ricevere informazioni sul prodotto INDICE Avvertenze di sicurezza 28 Pannello dei comandi 29 Utilizzo 30 Decalcificazione 31 Ricerca e risoluzione dei problemi 32 Smaltimento 32 DATI TECNICI Numero articolo 10032905 10032906 Alimentazione 220 240 V 50 60 Hz DICHIARAZIONE DI CONFORMITÀ Produttore Chal Tec GmbH ...

Страница 28: ...he non possa cadere e non far penzolare il cavo di alimentazione dal piano di lavoro Spegnere il dispositivo e staccare la spina prima di pulirlo o se non viene utilizzato per lunghi periodi di tempo Non staccare la spina tirando dal cavo ma tenere saldamente la spina stessa Tenere il dispositivo lontano da fonti di calore oggetti bollenti e fiamme libere Srotolare sempre completamente il cavo Non...

Страница 29: ...29 IT PANNELLO DEI COMANDI Tasto Power e Start Tasto impostazioni ...

Страница 30: ...tura sottovuoto è dotato di un allarme che indica un livello dell acqua troppo basso Quando il livello si trova sotto al segno Min il dispositivo si spegne automaticamente Accendere il dispositivo Premere POWER sul pannello di controllo per più di 5 secondi La linea superiore indica la temperatura impostata La linea centrale indica la temperatura attuale dell acqua La linea inferiore indica il tem...

Страница 31: ...po dopo 1 minuto viene indicato il tempo rimanente Spegnere il dispositivo Non appena il tempo impostato è scaduto il segnale acustico viene emesso nuovamente ogni tre secondi Questo serve a ricordarvi di togliere gli alimenti dal contenitore Spegnere il dispositivo premendo POWER per 5 secondi DECALCIFICAZIONE Se il dispositivo viene utilizzato spesso consigliamo di decalcificarlo mensilmente o c...

Страница 32: ... mostra il codice di errore E02 Il termostato digitale è guasto Rivolgersi al servizio di assistenza ai clienti o a un azienda specializzata nelle vicinanze SMALTIMENTO Se sul prodotto è presente la figura a sinistra il bidone dei rifiuti con le ruote si applica la direttiva europea 2012 19 UE Questi prodotti non possono essere smaltiti con i rifiuti normali Informarsi sulle disposizioni vigenti p...

Страница 33: ......

Страница 34: ......

Отзывы: