17
EN
ignition button sited between the two knobs up to four times in rapid succession. This
will light the right hand burner. If not please repeat this process.
9. If the burner has not lit after two attempts, turn ‘OFF’ the gas tap and wait 5 minutes
before retrying the ignition sequence.
10. If the burner does not stay alight, please repeat step 8.
11. When the burner is lit, adjust the heat by turning the knob to the High/Low position.
12. To turn ‘OFF’ the barbecue, turn the cylinder valve or regulator switch to the ‘OFF’
position by following the regulator instructions. Turn all of the control knobs on the
appliance clockwise to the “OFF” position when the flames have extinguished.
WARNING
Risk of burns
If any burner fails to ignite, turn the control knob off (clockwise) and
also turn the cylinder valve off. Wait five minutes before attempting
to relight with ignition sequence.
After use, close the gas supply by either turning ‘OFF’ the switch on the regulator or
turning ‘OFF’ the cylinder valve.
In the event of light going out while the appliance is in use: turn all the controls, cylinder
valve and regulator switch to the ‘OFF’ position. Wait 5 minutes before attempting to
relight the appliance. If the problem persists after relighting, consult your gas dealer, or
the store where you purchased the barbecue, or a qualified gas engineer for assistance
or repair. Never try to rectify the problem yourself as this could result in serious injury
and/or property damage.
Clean the appliance of excess fat, before storage, with a damp cloth using a
mild detergent solution as the cleaning agent. Store the appliance in a clean dry
environment. Do not store your gas cylinder indoors. Store in a well ventilated area
away from direct sunlight.
To check for leaks
1.
Make 2-3 fluid ounces of leak-detecting solution by mixing one part dish soap
liquid with 3 parts water.
2. Ensure the control valve is ‘OFF’.
3. Connect the regulator to the cylinder and connect regulator with hose and outdoor
gas grill. Ensure the connections are secure then turn ON the gas.
4. Brush the soapy solution onto the hose and all joints. If bubbles appear you have
a leak, which must be rectified before use. Turn off the gas supply in the event of
gas leak.
5.
Retest after fixing the fault. Turn OFF the gas at the cylinder after testing.
6.
If detected leakage can not be rectified, do not attempt to fix the leakage but
consult your gas dealer.
Содержание Orfeo
Страница 2: ......
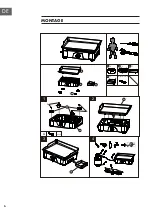
Страница 6: ...6 DE MONTAGE 1 2 3 1 1 A M4 12 4 A A 2 4PCS A 2 1 4 1 1 4 1 2 3 4 3 4 3 3 3 4 5 ...
Страница 15: ...15 EN ASSEMBLY 1 2 3 1 1 A M4 12 4 A A 2 4PCS A 2 1 4 1 1 4 1 2 3 4 3 4 3 3 3 4 5 ...
Страница 24: ...24 FR MONTAGE 1 2 3 1 1 A M4 12 4 A A 2 4PCS A 2 1 4 1 1 4 1 2 3 4 3 4 3 3 3 4 5 ...
Страница 33: ...33 IT MONTAGGIO 1 2 3 1 1 A M4 12 4 A A 2 4PCS A 2 1 4 1 1 4 1 2 3 4 3 4 3 3 3 4 5 ...
Страница 42: ...42 ES INSTALACIÓN 1 2 3 1 1 A M4 12 4 A A 2 4PCS A 2 1 4 1 1 4 1 2 3 4 3 4 3 3 3 4 5 ...
Страница 48: ...48 ES ...
Страница 49: ...49 ES ...
Страница 50: ......
Страница 51: ......
Страница 52: ......

