background image

42

EN

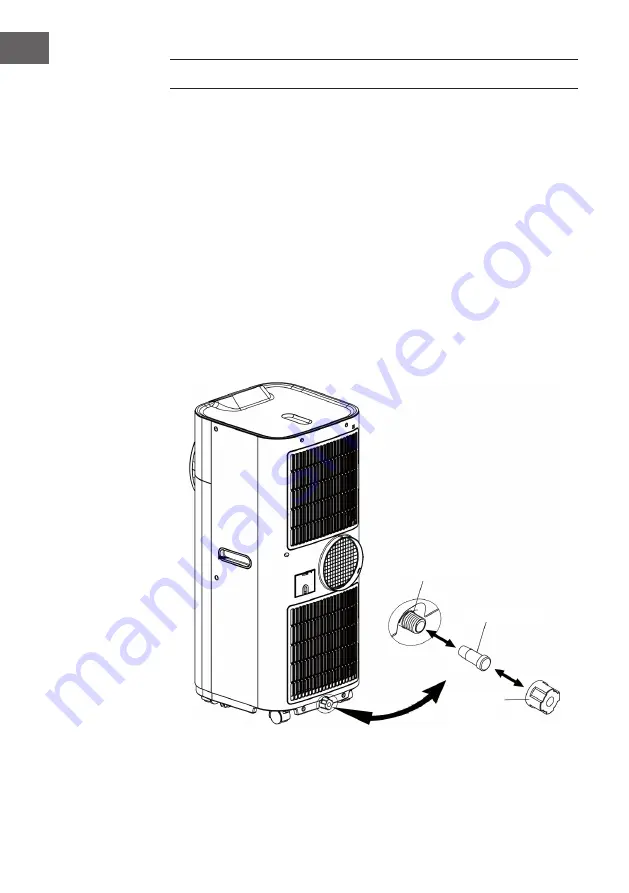
DRAINING THE WATER

During the cooling process, the unit extracts water from the humid air.

When the water tank is full, both the compressor and the motor switch off and the 

appliance emits a buzzing sound. Press any key to stop the buzzing. The "water 

tank full" indicator flashes.

To restart the cooling function, empty the water tank as follows:

1. 

Switch off the air conditioner and do not move it when the water tank is full.

2.  Place a container (e.g. a water bowl) under the drain opening.

3.  Remove the drain plug and the rubber plug from the drain opening and let 

the water drain off.

4.  When the container is almost full, put the rubber plug back on the drain hole 

and empty the water tray.

5.  Repeat the process until the unit is completely empty.

6.  Replace the rubber plug and screw the drain cap tight.

7.  Switch the device on. The full water tank or compressor indicator should now 

stop flashing.

Outlet

Rubber plug

Drain plug

Содержание 10040189

Страница 1: ...KRAFTWERK ECO SMART 11 Klimaanlage Air Conditioner Aire acondicionado Climatiseur Condizionatore d aria www klarstein com 10040189 10040190 ...

Страница 2: ......

Страница 3: ... el código QR para descargar el manual de instrucciones más reciente en su idioma FR Scannez le QR code pour télécharger le mode d emploi à jour dans votre langue IT Scansionate il codice QR per scaricare il manuale d uso attuale nella vostra lingua INHALTSVERZEICHNIS Technische Daten 4 Hinweise zum Kältemittel R290 5 Sicherheitshinweise 6 Geräteübersicht 8 Installation 9 Bedienfeld 12 Bedienung 1...

Страница 4: ...10040190 Stromversorgung 220 240 V 50 Hz Leistung 1060 W Kühlleistung 11 500 BTU 3 3 kW Luftdurchsatz max 388 m h Entfeuchtungsleistung 33 5 l h Kältemittel R290 240 g WiFi Standard 802 11 b g n WiFi Frequenz 2 4 GHz WiFi Sendeleistung max 20 dBm ...

Страница 5: ...m sicheren Umgang mit Kältemitteln gemäß einer branchenweit anerkannten Bewertungsspezifikation sichergestellt Wenn das Gerät nicht mehr funktioniert entsorgen Sie es fachgerecht Bewahren Sie das Gerät bei Nichtgebrauch an einem gut belüfteten Ort auf Bewahren Sie das Gerät so auf dass es nicht beschädigt wird Reparaturen dürfen nur vom Hersteller oder einem autorisierten Fachbetrieb durchgeführt ...

Страница 6: ...h geeignet Verwenden Sie das Gerät nicht wenn es repariert werden muss oder nicht richtig installiert wurde Verwenden Sie das Gerät nicht in den folgenden Bereichen in der Nähe von Wärmequellen in Bereichen in welchen Öl spritzen kann in Bereichen welche direktem Sonnenlicht ausgesetzt sind in Bereichen in welchen Spritzwasser auftreten kann in der Nähe von Badewannen in Waschräumen in der Nähe vo...

Страница 7: ...s nicht und tauschen Sie es keinesfalls in Wasser ein Ein falscher Umgang mit dem Netzkabel kann zu Schäden am Gerät und oder Stromschlägen führen Die nationalen Gasvorschriften müssen eingehalten werden Blockieren Sie keinesfalls die Belüftungsöffnungen Bedienen Sie das Gerät nicht ausschließlich dadurch dass Sie den Netzstecker in die Steckdose stecken oder herausziehen da es dadurch zu Stromsch...

Страница 8: ...ÜBERSICHT Vorderseite Rückseite 1 Bedienfeld 2 Halterung für die Fernbedienung 3 Luftauslass 4 Lufteinlass 5 Luftauslass 6 Lufteinlass 7 Wasserstopfen Wasserauslass 8 Lufteinlass 9 Kabelaufbewahrung 10 Lufteinlass ...

Страница 9: ...erhaften Wasserablauf 15 Aktivkohlefilter 16 Fernbedienung INSTALLATION Bevor Sie Ihre Klimaanlage in Betrieb nehmen müssen Sie den Abluftschlauch installieren damit die kondensierte Wärme des Geräts nach draußen abgeleitet werden kann Um den Abluftschlauch zu installieren führen Sie das Ende des Schlauchs durch ein vorhandenes Fenster und befestigen Sie ihn mit dem mitgelieferten Adapter Stellen ...

Страница 10: ...t überhitzt und abschaltet Auf den Abbildungen rechts ist die korrekte Positionierung dargestellt Der Schlauch kann von 30 cm auf 150 cm verlängert werden aber für maximale Effizienz sollte die kürzest mögliche Länge verwendet werden Hinweis Die Länge des Abluftschlauchs ist speziell auf die Spezifikationen des Geräts angepasst Ersetzen oder verlängern Sie diesen nicht durch einen anderen Schlauch...

Страница 11: ...ktivkohlefilters Nehmen Sie den Kunststofffilter aus dem Gerät heraus Nehmen Sie den Aktivkohlefilter aus der Plastiktüte Setzen Sie den Aktivkohlefilter in das Gerät ein Setzen Sie den Kunststofffilter wieder in das Gerät ein ...

Страница 12: ...Anzeige niedrige Ventilatorstufe 13 Anzeige mittlere Ventilatorstufe 14 Anzeige hohe Ventilatorstufe 15 IR Empfänger für Fernbedienung 16 Display 17 Anzeige automatischer Modus 18 Anzeige Entfeuchtungsmodus 19 Anzeige Kühlmodus 20 Anzeige Ventilatormodus 21 Anzeige WLAN 22 Taste WLAN Modus Alle Funktionen können auch mit der mitgelieferten Fernbedienung ausgeführt werden Die Fernbedienung benötigt...

Страница 13: ...r Modus und Kühlmodus auf Im automatischen Kühlmodus ist die Einstellung der Ventilatorstufe unwirksam das Gerät wählt die Ventilatorstufe automatisch Wenn die Umgebungstemperatur kleiner oder gleich 25 C ist läuft das Gerät im automatischen Ventilatormodus Die Anzeige Automatischer Modus und Ventilatormodus leuchtet auf Im automatischen Ventilatormodus kann die Ventilatorstufe manuell eingestellt...

Страница 14: ...aus wenn die Umgebungstemperatur niedriger als die eingestellte Temperatur ist Der Ventilator läuft auf der eingestellten Stufe weiter Steigt die Umgebungstemperatur über den eingestellten Wert wird die Kühlung wieder in Betrieb genommen Modus Funktion einstellen Drücken Sie die Taste Modus um den gewünschten Betriebsmodus auszuwählen Automatischer Modus Kühlmodus Ventilatormodus Entfeuchtungsmodu...

Страница 15: ...tisch aus Wenn Sie die Timer Taste drücken zeigt das Display die von Ihnen eingestellte n Stunde n an Wenn die Timer Taste nicht gedrückt wird läuft das Gerät kontinuierlich 2 Wenn Sie die Timer Taste drücken ohne die anderen Funktionen einzuschalten können Sie die Zeit die das Gerät in Betrieb sein soll voreinstellen Wenn Sie zum Beispiel den Timer auf 2 stellen geht das Gerät automatisch nach 2 ...

Страница 16: ... das als Katalysator funktioniert verändert die Geschwindigkeit einer chemischen Reaktion wenn es Licht ausgesetzt wird Er ist hilfreich bei der Bekämpfung von Bakterien Schimmel und schlechten Gerüchen Diese Funktion ist darauf ausgelegt dass sie so lange aktiviert bleibt wie das Gerät eingeschaltet ist Sie ist standardmäßig eingestellt und kann nicht über das Bedienfeld die Fernbedienung oder di...

Страница 17: ...iehe unten oder laden Sie diese direkt aus dem App Store oder bei Google Play herunter 2 Versichern Sie sich dass Ihr Smartphone mit demselben WLAN Netzwerk verbunden ist mit dem Ihr Klarstein Gerät verbunden werden soll 3 Öffnen Sie die Klarstein App 4 Melden Sie sich mit Ihrem Konto an Wenn Sie noch keinen Account haben registrieren Sie sich in der Klarstein App 5 Folgen Sie den Anweisungen der ...

Страница 18: ...ren Internet Provider Wichtig Bitte beachten Sie dass wenn Ihr WiFi Router über ein Dualband verfügt also sowohl im 2 4 GHz als auch im 5 GHz Band arbeitet Sie die SSIDs für jedes Band trennen und die 2 4 GHz SSID für die Verbindung verwenden müssen 4 Überprüfen Sie die Firewall Einstellungen Ihres WiFi Netzwerks Die Firewall Einstellung Ihres WiFi Netzwerks erlaubt der Klarstein App möglicherweis...

Страница 19: ...r Wassertank voll ist 2 Stellen Sie einen Behälter z B eine Wasserschale unter die Ablauföffnung 3 Entfernen Sie den Ablaufverschluss und den Gummistopfen von der Ablauföffnung und lassen Sie das Wasser ablaufen 4 Wenn der Behälter fast voll ist setzen Sie den Gummistopfen wieder auf die Ablauföffnung und leeren Sie die Wasserschale aus 5 Wiederholen Sie den Vorgang bis das Gerät vollständig entle...

Страница 20: ...in einen Abfluss 3 Der Ablaufschlauch kann durch einen Verlängerungsschlauch mit einem passenden Verbindungsstück verlängert werden Hinweise 1 Der Abfluss muss sich auf oder unterhalb der Höhe des Wasserauslasses des Geräts befinden 2 Die Anzeige Wassertank voll blinkt bei einem dauerhaften Wasserablauf nicht 3 Wenn Sie den Ablaufschlauch verlängern möchten können Sie ihn mit einem anderen Schlauc...

Страница 21: ...hiebefenster Hinweis Wenn die Fensteröffnung kleiner ist als die Mindestlänge des Dichtungsrahmens schneiden Sie das Ende auf der anderen Seite des Luftauslasses kurz genug ab damit der Dichtungsrahmen in die Fensteröffnung passt Schneiden Sie niemals das Loch ab Anpassung des Dichtungsrahmens für Schiebefenster Schieben Sie Rahmen B in Rahmen A und passen Sie die Größe des Rahmens an die Breite I...

Страница 22: ... an den drei offenen Seiten angebracht Die Seite an der das Fenster am Rahmen anliegt wird ausgelassen Den Fensterrahmen vorher reinigen und trocknen damit das Band haftet 1 2 3 Kleben Sie das Klettband links oben und unten am Fensterrahmen an Am besten schneiden Sie für jede Seite einen Streifen zu Kleben Sie das Klettband nun auch an die Innenseite des Fensters Kletten Sie die Fensterdichtung an...

Страница 23: ...rwenden Sie einen Staubsauger oder klopfen Sie den Filter leicht ab um losen Staub und Schmutz vom Filter zu entfernen und spülen Sie ihn dann gründlich unter fließendem Wasser nicht heißer als 40 C ab Lassen Sie den Filter vor dem Wiedereinsetzen gründlich trocknen Hinweis Betreiben Sie das Gerät niemals ohne die Filter Lagerung am Ende der Saison Leeren Sie den Wassertank bevor Sie das Gerät ein...

Страница 24: ...en geöffnet Befinden sich zu viele Personen im Raum Erzeugt etwas im Raum zu viel Wärme Das Gerät scheint keine Wirkung zu erzielen Ist der Filter verstaubt oder verschmutzt Ist der Lufteinlass oder auslass verstopft Liegt die Raumtemperatur unter der von Ihnen gewählten Temperatur Das Gerät ist sehr laut Ist das Gerät uneben aufgestellt so dass es zu Vibrationen kommt Ist der Boden unter dem Gerä...

Страница 25: ...halten Sie von Ihrer örtlichen Verwaltung oder Ihrem Hausmüllentsorgungsdienst Dieses Produkt enthält Batterien Wenn es in Ihrem Land eine gesetzliche Regelung zur Entsorgung von Batterien gibt dürfen die Batterien nicht im Hausmüll entsorgt werden Informieren Sie sich über die örtlichen Bestimmungen zur Entsorgung von Batterien Durch regelkonforme Entsorgung schützen Sie die Umwelt und die Gesund...

Страница 26: ...26 ...

Страница 27: ... Refrigerant R290 28 Safety Instructions 29 Device Overview 31 Installation 32 Control panel 35 Operation 36 Device Control by Smartphone 40 Draining the Water 42 Fixing the Window Seal 44 Cleaning and Maintenance 46 Troubleshooting 47 Disposal Considerations 48 Declaration of Conformity 48 TECHNICAL DATA Product code 10040189 10040190 Power supply 220 240 V 50 Hz Power 1060 W Cooling capacity 11 ...

Страница 28: ...y accredited assessment body This ensures competence for the safe handling of refrigerants according to an industry recognised assessment specification If the device stops working dispose of it properly Store the device in a well ventilated place when not in use Store the device so that it is not damaged Repairs may only be carried out by the manufacturer or an authorised specialist company Do not...

Страница 29: ... only suitable for indoor use Do not use the product if it needs to be repaired or if it has not been installed properly Do not use the product in the following areas near heat sources in areas where oil can splash in areas exposed to direct sunlight in areas where splash water can occur near bathtubs in washrooms near showers or swimming pools Never insert your fingers or other objects into the v...

Страница 30: ... and maintenance Do not pull the power cord deform or modify it or immerse it in water Incorrect handling of the power cord may result in damage to the equipment and or electric shock National gas regulations must be observed Do not block the ventilation openings Do not operate the appliance solely by inserting or removing the power plug as this may result in electric shock or fire due to heat Imm...

Страница 31: ...N DEVICE OVERVIEW Front side Back side 1 Control panel 2 Retainer for remote control 3 Air outlet 4 Air intake 5 Air outlet 6 Air intake 7 Water plug water outlet 8 Air intake 9 Cable storage 10 Air intake ...

Страница 32: ...14 Water drainage hose for permanent water drainage 15 Activated carbon filter 16 Remote control INSTALLATION Before you start up your air conditioner you must install the exhaust hose so that the condensed heat from the unit can be discharged outside To install the exhaust hose pass the end of the hose through an existing window and secure it with the provided adapter Make sure that the distance ...

Страница 33: ...e unit will overheat and shut down The correct positioning is shown in the illustrations right The hose can be extended from 30 cm to 150 cm but for maximum efficiency the shortest possible length should be used Note The length of the exhaust air hose is specifically adapted to the specifications of the appliance Do not replace or extend this with any other hose from your household as this may cau...

Страница 34: ...of the activated carbon filter Remove the plastic filter from the appliance Take the activated carbon filter out of the plastic bag Put the activated carbon filter into the device Put the plastic filter back into the unit ...

Страница 35: ...tank full indicator 12 Low fan speed indicator 13 Medium fan speed indicator 14 High fan speed indicator 15 IR receiver for remote control 16 Display 17 Automatic mode indicator 18 Dehumidification mode indicator 19 Cooling mode indicator 20 Fan mode indicator 21 WiFi indicator 22 WiFi mode button All functions can also be performed with the supplied remote control The remote control requires a CR...

Страница 36: ...mode and cooling mode indicators light up In automatic cooling mode the fan speed setting is ineffective the unit selects the fan speed automatically If the ambient temperature is less than or equal to 25 C the unit runs in automatic fan mode The automatic mode and fan mode indicators light up In automatic fan mode the fan speed can be set manually The indicators of the current functions light up ...

Страница 37: ...cooling system switches off when the ambient temperature is lower than the set temperature The fan continues to run at the set level If the ambient temperature rises above the set value cooling will start up again Setting the functions Press the mode button to select the desired operating mode Automatic mode Cooling mode Fan mode Dehumidification mode dry The indicator of the selected mode lights ...

Страница 38: ...ically When you press the timer button the display shows the hour s you have set If the timer button is not pressed the unit runs continuously 2 If you press the timer button without switching on the other functions you can preset the time that the appliance is to be in operation For example if you set the timer to 2 the appliance will automatically go into operation after 2 hours Sleep mode 1 If ...

Страница 39: ...alyst A photocatalyst is a material that functions as a catalyst changes the rate of a chemical reaction when exposed to light It is helpful in fighting bacteria mould and bad odours This function is designed to remain activated as long as the unit is switched on It is set by default and cannot be controlled via the control panel the remote control or the smartphone app Self diagnosis This unit is...

Страница 40: ...e with your smartphone see below or download it directly from App Store or Google Play 2 Make sure your smartphone is connected to the same WiFi network that your Klarstein device is to be connected to 3 Open the Klarstein app 4 Sign in to your account If you do not have an account sign up in the Klarstein app 5 Follow the instructions from the app App Download Use the scan function of your smartp...

Страница 41: ...band of your access point please contact your internet provider company Important please note that if your WiFi router is dual band operating on both 2 4 GHz and 5 GHz band you need to separate the SSIDs for each band and use the 2 4 GHz SSID for connection 4 Firewall settings of your WiFi network the firewall setting of your WiFi network may not allow the Klarstein app to configure the WiFi setti...

Страница 42: ...he air conditioner and do not move it when the water tank is full 2 Place a container e g a water bowl under the drain opening 3 Remove the drain plug and the rubber plug from the drain opening and let the water drain off 4 When the container is almost full put the rubber plug back on the drain hole and empty the water tray 5 Repeat the process until the unit is completely empty 6 Replace the rubb...

Страница 43: ...e other end into a drain 3 The drain hose can be extended using an extension hose with a suitable connector Notes 1 The drain must be at or below the level of the water outlet of the appliance 2 The water tank full indicator does not flash when water is continuously draining 3 If you want to extend the drain hose you can connect it to another hose outer diameter OD 18 mm Drain plug Supplied drain ...

Страница 44: ... sliding windows Note If the window opening is smaller than the minimum length of the gasket frame cut the end on the other side of the air outlet short enough for the gasket frame to fit into the window opening Never cut the hole Adjusting the sealing frame for sliding windows Slide frame B into frame A and adjust the size of the frame to the width of your window Lock the locking screw C in the h...

Страница 45: ... sides The side where the window is against the frame is left out Clean and dry the window frame beforehand so that the tape adheres 1 2 3 Attach the Velcro tape on the left on the top and on the bottom of the window frame We recommend that you cut the tape into strips for each window side first Now attach the Velcro tape to the inner window sides Stick the window sealing to the Velcro strips on t...

Страница 46: ...an damage the housing Cleaning the filter Use a hoover or tap the filter lightly to remove loose dust and dirt from the filter then rinse it thoroughly under running water not hotter than 40 C Allow the filter to dry thoroughly before reinserting it Note Never operate the unit without the filter Storage at the end of the season Empty the water tank before running the unit in fan only mode for a fe...

Страница 47: ... or doors open Are there too many people in the room Is something in the room generating too much heat The device does not seem to have any effect Is the filter dusty or dirty Is the air inlet or outlet blocked Is the room temperature below the temperature you have set The device is very loud Is the unit set up unevenly so that vibrations occur Is the floor under the unit uneven The compressor is ...

Страница 48: ...act your local authority or your household waste disposal service This product contains batteries If there is a legal regulation for the disposal of batteries in your country the batteries must not be disposed of with household waste Find out about local regulations for disposing of batteries By disposing of them in accordance with the rules you are protecting the environment and the health of you...

Страница 49: ......

Страница 50: ......

Страница 51: ......

Страница 52: ......

Отзывы: