background image

36

IT

AVVERTENZE DI SICUREZZA

• Rimuovere il materiale di imballaggio e assicurarsi 

che nessun componente si sia danneggiato durante 

il trasporto. Se ci sono dei componenti danneggiati, 

contattare immediatamente il servizio clienti. 

• I bambini possono farsi male con il materiale di 

imballaggio e con i vecchi apparecchi. Smaltire 

immediatamente il materiale di imballaggio.

• Questo dispositivo può essere utilizzato da bambini a 

partire da 8 anni e da persone con limitate capacità 

fisiche e psichiche o con conoscenza ed esperienza 

limitate, solo se sono stati istruiti sulle modalità d’uso e 

comprendono i rischi e i pericoli connessi.

• Prima dell‘uso controllare la tensione sulla targhetta del 

dispositivo. Collegare il dispositivo solo ad una presa 

che corrisponde alla tensione indicata. 

• Utilizzare il dispositivo solo per lo scopo previsto come 

descritto nel manuale di istruzioni.

• Attenersi alle istruzioni per il montaggio. Una 

procedura errata può causare danni irreparabili al 

dispositivo. 

• Spegnere il dispositivo e staccare la spina dalla presa 

prima della pulizia o in caso di inutilizzo. 

• Se il dispositivo non funziona correttamente, spegnerlo 

immediatamente e contattare un centro assistenza nelle 

vicinanze.

• Se il cavo di alimentazione o la spina sono 

danneggiati, devono essere sostituiti dal produttore, 

da un centro assistenza autorizzato o da un tecnico 

qualificato.

• Non collegare il dispositivo a prese multiple. 

• Non utilizzare una prolunga.

Содержание 10035781

Страница 1: ...MANA PEAK Standventilator Stand Fan Ventilador de pie Ventilateur sur pied Ventilatore verticale www klarstein com 10035781 10035782 ...

Страница 2: ......

Страница 3: ...leitung und weitere Informationen rund um das Produkt zu erhalten INHALTSVERZEICHNIS Sicherheitshinweise 4 Geräteübersicht 7 Zusammenbau 8 Bedienung 9 Reinigung und Pflege 10 Hinweise zur Entsorgung 10 TECHNISCHE DATEN Artikelnummer 10035781 10035782 Stromversorgung 220 240 V 50 60 Hz Leistung 50 W HERSTELLER IMPORTEUR UK Hersteller Chal Tec GmbH Wallstraße 16 10179 Berlin Deutschland Importeur fü...

Страница 4: ...rheitsvorkehrungen vertraut gemacht wurden und die damit verbundenen Risiken verstehen Prüfen Sie vor der Benutzung die Spannung auf der Geräteplakette Schließen Sie das Gerät nur an Steckdosen an die der Spannung des Geräts entsprechen Benutzen Sie das Gerät nur für den vorgesehenen Verwendungszweck entsprechend der Beschreibung in der Bedienungsanleitung Halten Sie sich beim Zusammenbau genau an...

Страница 5: ... von einem Fachbetrieb überprüfen Wenn Sie das Gerät erstmals benutzen entfernen die alle Folien und das komplette Verpackungsmaterial Ziehen sie den Stecker nicht am Kabel aus der Steckdose sondern halten Sie ihn beim Abziehen mit der Hand fest Bevor Sie den Stecker in die Steckdose stecken versichern Sie sich dass das Gerät ausgeschaltet ist Ziehen Sie das Netzkabel nicht in die Länge Achten Sie...

Страница 6: ...stauen Sie es in der Originalverpackung an einem trockenen Ort Ziehen Sie immer den Stecker aus der Steckdose bevor Sie das Gerät reinigen warten verstauen oder wenn Sie es nicht mehr benutzen Benutzen Sie das Gerät nicht in der Nähe explosiver oder entflammbarer Stoffe oder Flüssigkeiten Das Gerät ist nicht für den kommerziellen Gebrauch sondern nur für Gebrauch im Haushalt und in ähnlichen Umgeb...

Страница 7: ...7 DE GERÄTEÜBERSICHT 1 Fernbedienung 6 Geschwindigkeit 2 Hauptteil 7 Timer 3 Netzstecker 8 Modus 4 Stand 9 Schwingen 5 Schraube 10 Ein Aus ...

Страница 8: ...ckungsmaterialien und Einsätze Drehen Sie das Gebläse auf den Kopf so dass Sie auf den Halter schauen können Befestigen Sie den Ständer um das Netzkabel herum 3 4 Befestigen Sie den Ständer am Gerät indem Sie ihn in die Öffnung an der Unterseite drücken Fixieren Sie den Ständer mit vier Schrauben ...

Страница 9: ...3 Modi Normal Natürlich Schlaf Der Standardmodus ist NORMAL Wenn Sie als Modus SCHLAF SL oder NATÜRLICH NT auswählen leuchtet die entsprechende Anzeige Timer einstellen Drücken Sie die Taste EIN AUS 10 um das Gerät einzuschalten Drücken Sie die Taste TIMER 7 um die gewünschte Zeitspanne 0 5 7 5 Stunden zu wählen Das Gerät bleibt nun bis zum Ablauf der gewählten Zeitspanne in Betrieb Nachdem der Ti...

Страница 10: ...esetzliche Regelung zur Entsorgung von elektrischen und elektronischen Geräten gibt weist dieses Symbol auf dem Produkt oder auf der Verpackung darauf hin dass dieses Produkt nicht im Hausmüll entsorgt werden darf Stattdessen muss es zu einer Sammelstelle für das Recycling von elektrischen und elektronischen Geräten gebracht werden Durch regelkonforme Entsorgung schützen Sie die Umwelt und die Ges...

Страница 11: ...e latest user manual and more product information CONTENTS Safety Instructions 12 Device Overview 15 Assembly 16 Operation 17 Cleaning and Care 18 Disposal Considerations 18 TECHNICAL DATA Item number 10035781 10035782 Power supply 220 240 V 50 60 Hz Power 50 W MANUFACTURER IMPORTER UK Manufacturer Chal Tec GmbH Wallstrasse 16 10179 Berlin Germany Importer for Great Britain Chal Tec UK limited Uni...

Страница 12: ...ppliance rating corresponds to the mains rating This appliance must only be used for the purpose for which it has been manufactured As a stand fan The manufacturer is not responsible for any damage caused by improper or incorrect use The installation assembly of the device will be made according to the indications of the manufacturer A wrong procedure may cause damages to persons animals or object...

Страница 13: ...f you use the device for the first time make sure to remove any label or protective sheet which blocks its proper functioning Plug and unplug the power cable with dry hands and hold it firmly Before plugging the plug into a wall outlet make sure that the unit is switched off Always unplug the power cable to avoid the overheating and avoid stretching it Make sure that all air intakes and outlets ar...

Страница 14: ...ealth If the fan must be stored for a long period and is not used regularly place the fan in its original packaging in a dry place Always remember to unplug the power cable of the device if it is not used for a long period before storing cleaning or performing any maintenance operation Do not use the appliance in the presence of potentially flammable or explosive liquids or gases This product is i...

Страница 15: ...15 EN DEVICE OVERVIEW 1 Remote control 6 Speed 2 Main part 7 timer 3 Power plug 8 Mode 4 Booth 9 Swing 5 Screw 10 On Off ...

Страница 16: ...ging and remove all packaging materials and inserts Turn the blower upside down so that you can look at the holder Fasten the stand around the power cord 3 4 Attach the stand to the device by pressing it into the opening on the bottom Fix the stand with four screws ...

Страница 17: ...Sleep The default mode is NORMAL If you select SLEEP SL or NATURAL NT as the mode the corresponding indicator lights Set the timer Press the ON OFF button 10 to turn on the power Press the TIMER button 7 to select the desired time period 0 5 7 5 hours The appliance will now remain in operation until the selected time period has elapsed After the timer has expired the unit will turn off Swing funct...

Страница 18: ...ntry this symbol on the product or on the packaging indicates that this product must not be disposed of with household waste Instead it must be taken to a collection point for the recycling of electrical and electronic equipment By disposing of it in accordance with the rules you are protecting the environment and the health of your fellow human beings from negative consequences For information ab...

Страница 19: ...l manual de usuario más reciente y otra información sobre el producto ÍNDICE DE CONTENIDOS Indicaciones de seguridad 20 Vista general del aparato 23 Montaje 24 Utilización 25 Limpieza y cuidado 26 Indicaciones sobre la retirada del aparato 26 DATOS TÉCNICOS Número de artículo 10035781 10035782 Suministro eléctrico 220 240 V 50 60 Hz Potencia 50 W FABRICANTE E IMPORTADOR REINO UNIDO Fabricante Chal...

Страница 20: ...iados Compruebe la tensión en la placa del aparato antes de su uso Conecte el aparato solo en enchufes que se correspondan con la corriente del aparato Utilice el aparato solo para el uso indicado en la descripción en el manual Siga cuidadosamente las instrucciones de montaje Un procedimiento incorrecto puede ocasionar daños irreparables en el aparato Apague el aparato y retire el cable del enchuf...

Страница 21: ... esté apagada No estire el cable de alimentación Asegúrese de que todas las entradas y salidas de aire estén libres y descubiertas para que el aparato no se sobrecaliente Compruebe que el cable de corriente no discurre por bordes puntiagudos o superficies calientes No cuelgue el aparato del techo o la pared a no ser que esté diseñado para esto Deje suficiente espacio alrededor del aparato para que...

Страница 22: ...e limpiarlo o repararlo No use el aparato cerca de sustancias o líquidos explosivos o inflamables El aparato no es apto para el uso comercial sino solo para el uso doméstico y en entornos similares Por ejemplo oficinas granjas hoteles moteles e instituciones que ofrecen Bed Breakfast ...

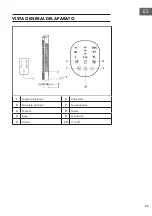
Страница 23: ...23 ES VISTA GENERAL DEL APARATO 1 Mando a distancia 6 Velocidad 2 Estructura principal 7 Temporizador 3 Enchufe 8 Modo 4 Base 9 Oscilación 5 Tornillo 10 On off ...

Страница 24: ... todo el material de embalaje Ponga el ventilador boca arriba de modo que pueda ver el punto de sujeción Fije la base alrededor del cable de alimentación 3 4 Fije la base presionándola contra el orificio situado en la parte inferior Fije la base con cuatro tornillos ...

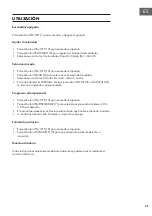
Страница 25: ... modo estándar es NORMAL Si elige los modos NOCHE SL o NATURAL NT se ilumina el indicador correspondiente Programar el temporizador Pulse el botón ON OFF 10 para encender el aparato Pulse el botón TEMPORIZADOR 7 para seleccionar el periodo de tiempo 0 5 7 5 horas deseado El aparato permanecerá en funcionamiento hasta que finalice el periodo indicado Cuando haya transcurrido el tiempo el aparato se...

Страница 26: ... legal relativa a la eliminación de aparatos eléctricos y electrónicos este símbolo estampado en el producto o en el embalaje advierte que no debe eliminarse como residuo doméstico En lugar de ello debe depositarse en un punto de recogida de reciclaje de aparatos eléctricos y electrónicos Una gestión adecuada de estos residuos previene consecuencias potencialmente negativas para el medio ambiente ...

Страница 27: ...ode pour accéder à la dernière version du mode d emploi et à d autres informations concernant le produit SOMMAIRE Consignes de sécurité 28 Aperçu de l appareil 31 Assemblage 32 Utilisation 33 Nettoyage et entretien 34 Informations sur le recyclage 34 FICHE TECHNIQUE Numéro d article 10035781 10035782 Alimentation 220 240 V 50 60 Hz Puissance 50 W FABRICANT ET IMPORTATEUR UK Fabricant Chal Tec GmbH...

Страница 28: ...sable et d en comprendre les risques associés Avant l utilisation vérifiez la tension sur la plaque signalétique de l appareil Branchez l appareil uniquement sur des prises fournissant la tension prévue Utilisez l appareil uniquement aux fins prévues et décrites dans ce mode d emploi Lors de l assemblage tenez vous en strictement aux indications fournies Un mauvais assemblage peut causer des dégât...

Страница 29: ...t Avant de brancher la fiche dans une prise murale assurez vous que l appareil est éteint Ne tendez pas le câble secteur Veillez à ce que toutes les entrées et sorties d air soient libres et non recouvertes pour que l appareil ne surchauffe pas Veillez à ce que le câble secteur ne passe pas sur des arêtes vives ou des surfaces coupantes N accrochez pas l appareil au plafond ou au mur sauf s il est...

Страница 30: ... l entretenir de le ranger ou lorsque vous ne l utilisez plus N utilisez pas l appareil à proximité de substances ou liquides inflammables ou explosifs L appareil n est pas destiné à une utilisation commerciale mais au cadre domestique et dans des conditions similaires Cela comprend les cuisines de bureaux les auberges hôtels motels et installations proposant des services de type bed breakfast ...

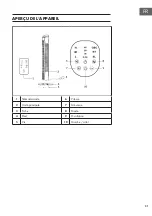
Страница 31: ...31 FR APERÇU DE L APPAREIL 1 Télécommande 6 Vitesse 2 Unité principale 7 Minuterie 3 Fiche 8 Mode 4 Pied 9 Oscillation 5 Vis 10 Marche arrêt ...

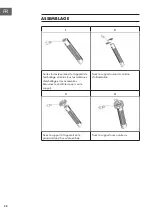
Страница 32: ...ballage et retirez tous les matériaux d emballage et les accessoires Retournez le ventilateur pour voir le support Fixez le support autour du cordon d alimentation 3 4 Fixez le support à l appareil en le poussant dans l ouverture en bas Fixez le support avec quatre vis ...

Страница 33: ...e Le mode par défaut est NORMAL Lorsque vous sélectionnez SLEEP SL ou NATURAL NT comme mode le voyant correspondant s allume Minuterie Appuyez sur MARCHE ARRÊT 10 pour allumer l appareil Appuyez sur bouton TIMER 7 pour sélectionner la durée souhaitée 0 5 à 7 5 heures L appareil reste maintenant en fonctionnement jusqu à écoulement de la durée sélectionnée Une fois la minuterie expirée l appareil s...

Страница 34: ...mination ou le recyclage des appareils électriques et électroniques dans votre pays ce symbole sur le produit ou sur l emballage indique que cet appareil ne doit pas être jeté avec les ordures ménagères Vous devez le déposer dans un point de collecte pour le recyclage des équipements électriques et électroniques La mise au rebut conforme aux règles protège l environnement et la santé de vos sembla...

Страница 35: ... codice QR seguente per accedere al manuale d uso più attuale e per ricevere informazioni sul prodotto INDICE Avvertenze di sicurezza 36 Descrizione del prodotto 39 Montaggio 40 Utilizzo 41 Pulizia e manutenzione 42 Avviso di smaltimento 42 DATI TECNICI Numero articolo 10035781 10035782 Alimentazione 220 240 V 50 60 Hz Potenza 50 W PRODUTTORE E IMPORTATORE UK Produttore Chal Tec GmbH Wallstraße 16...

Страница 36: ... connessi Prima dell uso controllare la tensione sulla targhetta del dispositivo Collegare il dispositivo solo ad una presa che corrisponde alla tensione indicata Utilizzare il dispositivo solo per lo scopo previsto come descritto nel manuale di istruzioni Attenersi alle istruzioni per il montaggio Una procedura errata può causare danni irreparabili al dispositivo Spegnere il dispositivo e staccar...

Страница 37: ...rire la spina nella presa assicurarsi che il dispositivo sia spento Non tirare il cavo di alimentazione Accertarsi che tutte le prese d aria non siano ostruite per evitare che il dispositivo si surriscaldi Accertarsi che il cavo di alimentazione non scorra su spigoli o superfici taglienti Non appendere il dispositivo al soffitto o alla parete a meno che il dispositivo non sia progettato per questo...

Страница 38: ...resa prima di eseguire la pulizia e la manutenzione del dispositivo prima di conservarlo o in caso di inutilizzo Non utilizzare il dispositivo vicino a sostanze o liquidi esplosivi o infiammabili Il dispositivo non è per un uso commerciale bensì domestico e in ambienti simili come cucine di uffici agriturismi hotel motel e bed breakfast ...

Страница 39: ...39 IT DESCRIZIONE DEL PRODOTTO 1 Telecomando 6 Velocità 2 Ventilatore 7 Timer 3 Spina 8 Modalità 4 Piedistallo 9 Oscillazione 5 Vite 10 On Off ...

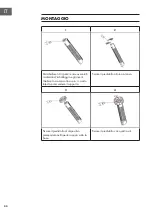
Страница 40: ...eriali d imballaggio e gli inserti Mettere la scocca sotto sopra in modo tale da poter vedere il supporto Fissare il piedistallo attorno al cavo 3 4 Fissare il piedistallo al dispositivo premendolo nell apertura posta sotto la base Fissare il piedistallo con quattro viti ...

Страница 41: ...lità normale naturale sleep La modalità di default è NORMALE Quando si seleziona SLEEP SL oppure NATURALE NT come modalità la spia corrispondente lampeggia Come impostare il timer Premere il tasto ON OFF 10 per accendere il dispositivo Premere il tasto TIMER 7 per selezionare il lasso di tempo 0 5 7 5 ore Il dispositivo resta acceso fino allo scadere del lasso di tempo selezionato Allo scadere del...

Страница 42: ...ositivi elettrici ed elettronici questo simbolo sul prodotto o sulla confezione segnala che questi prodotti non possono essere smaltiti con i rifiuti normali e devono essere portati a un punto di raccolta di dispositivi elettrici ed elettronici Grazie al corretto smaltimento dei vecchi dispositivi si tutela il pianeta e la salute delle persone da possibili conseguenze negative Informazioni riguard...

Страница 43: ......

Страница 44: ......

Отзывы: