background image

36

ES

INDICACIONES DE SEGURIDAD

•  Este aparato, incluido su motor, está diseñado únicamente para preparar alimentos 

a la parrilla.

•  Utilice exclusivamente el cable de alimentación incluido.
•  El cable debe comprobarse regularmente para detectar posibles daños. No utilice 

el aparato si el cable está averiado.

•  Los niños mayores de 8 años y las personas con discapacidades sensoriales, 

físicas o psíquicas solamente podrán utilizar el aparato si han sido previamente 
instruidas sobre su uso y conocen las indicaciones de seguridad y los riesgos 

asociados.

•  Mantenga el aparato y el cable de alimentación fuera del alcance de los niños.
•  Si el cable de alimentación o el enchufe están dañados, deberán ser sustituidos por 

el fabricante, un servicio técnico autorizado o una persona igualmente cualifi cada.

•  No ponga en marcha el aparato en un entorno húmedo ni bajo la lluvia.
•  Antes de limpiar el aparato, es necesario desconectar el cable de alimentación. 

Asegúrese de que el enchufe no se moje.

•  Compruebe regularmente los componentes eléctricos para detectar posibles 

daños. Si alguno está averiado, no continúe utilizando el aparato.

•  Nunca coloque el aparato sobre una base irregular.
•  Este aparato no ha sido concebido para un uso comercial, sino doméstico o para 

entornos similares. Entre estos se encuentran ofi cinas, granjas, hoteles, moteles e 
instalaciones que ofrecen servicio de alojamiento y desayuno.

•  Desconecte el enchufe y deje que el aparato se enfríe antes de limpiarlo y 

almacenarlo.

•  No utilice productos de limpieza abrasivos.
•  Nunca limpie el aparato bajo un chorro de agua, pues podría producirse un 

cortocircuito o una descarga eléctrica.

•  El motor de la parrilla solo debe utilizarse al aire libre con tiempo seco. No lo 

utilice con lluvia ni con humedad elevada.

   ATENCIÓN

Existe riesgo de quemaduras. Algunas piezas de la parrilla alcanzan 
temperaturas muy elevadas durante el funcionamiento. Tenga 
cuidado y utilice guantes durante su funcionamiento.

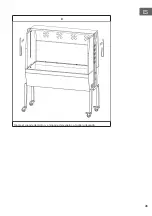
MONTAJE

Para el montaje, necesitará:

•  Llave hexagonal M6

•  Llave hexagonal M10
•  Llave abierta

•  Casquillo M6
•  Destornillador de estrella

Содержание 10035373

Страница 1: ...10035373 Sauenland Pro XL Spanferkelgrill Suckling Pig BBQ Grill Parrilla para lechón Barbecue de cochon de lait Griglia per maialino ...

Страница 2: ......

Страница 3: ...g Scannen Sie den folgenden QR Code um Zugriff auf die aktuellste Bedienungsanleitung und weitere Informationen rund um das Produkt zu erhalten INHALTSVERZEICHNIS Sicherheitshinweise 4 Zusammenbau 4 Bedienung 18 Reinigung und Pflege 18 Hinweise zur Entsorgung 18 TECHNISCHE DATEN Artikelnummer 10035373 Stromversorgung 220 240 V 50 60 Hz Motorleistung 15 W Maximale Beladung 70 kg HERSTELLER Chal Tec...

Страница 4: ...er nicht nass wird Überprüfen Sie das Gerät und die elektrischen Bauteile regelmäßig auf Verschleiß Sollten Teile kaputt sein benutzen Sie das Gerät nicht weiter Stellen Sie das Gerät niemals auf einen unebenen Untergrund Das Gerät ist nicht für den kommerziellen Gebrauch sondern nur für Gebrauch im Haushalt und in ähnlichen Umgebungen vorgesehen Dazu zählen Küchen in Büros Bauernhöfen Hotels Mote...

Страница 5: ...5 DE ...

Страница 6: ...hraube flach 25 Mutter M6 8 M10 Mutter 26 Rückseite 9 Räder ohne Bremse 27 Grill Körper 10 Seitliche Abdeckung 28 U Bolzen 11 M6 10 Sechskantschraube M6 Mutter 29 Fleischklammer 12 Scharnier aus Edelstahl 30 Entlüftungsabdeckung 13 Vordere Abdeckung 31 M8 Befestigung 14 Thermometer 32 Kette 15 Fenster 33 Sperrstift 16 Kreuzschlitzschraube 34 Rechte Abdeckung 17 Griff der vorderen Abdeckung 35 Kreu...

Страница 7: ...nd ohne Bremse an die Beine Befestigen Sie die Beine mit Sechskantschrauben M10 40 und die einstellbaren Stangen mit Schrauben M8 40 am Grillgehäuse 2 Montieren Sie die Seitenabdeckungen mit Sechskantschrauben M6 10 Unterlegscheiben und Muttern ...

Страница 8: ...8 DE 3 Befestigen Sie die hintere Abdeckung mit M6 10 Sechskantschrauben Unterlegscheiben und Muttern ...

Страница 9: ...9 DE 4 Befestigen Sie die Entlüftungsabdeckungen mit M6 Kreuzschrauben Unterlegscheiben und Muttern ...

Страница 10: ...10 DE 5 Befestigen Sie die Frontabdeckung und das Edelstahlscharnier mit M6 10 Schrauben Unterlegscheiben und M6 Muttern ...

Страница 11: ... das Theremometer und achten Sie darauf dass es in die richtige Richtung zeigt Befestigen Sie den vorderen Handgriff mit M6 Kreuzschrauben Befestigen Sie das Fenster mit M6 10 Sechskantschrauben Unterlegscheiben und Muttern ...

Страница 12: ...12 DE 7 Befestigen Sie den seitlichen Handgriff mit M6 Kreuzschrauben ...

Страница 13: ...13 DE 8 Montieren Sie die Motorhalterung und die Spießhalterung in der gewünschten Höhe ...

Страница 14: ...14 DE 9 Befestigen Sie den Motor ...

Страница 15: ...15 DE 10 Befestigen Sie die Kohlegitter die Grillgitter und den Spieß ...

Страница 16: ...16 DE 11 Fixieren Sie die Frontabdeckung und die Seitenabdeckung mit Hilfe des Verriegelungsbolzens und der Kette ...

Страница 17: ...17 DE 12 Der Zusammenbau ist jetzt beendet ...

Страница 18: ...it warmem Seifenwasser und einem weichen Lappen Wischen Sie den Motor nur mit einem feuchten Tuch ab Achten Sie darauf dass kein Wasser in den Motor eindringt Lagerung Schützen Sie den Motor vor Staub und Schmutz Wenn das Gerät länger nicht benutzt wickeln Sie es in Plastikfolie ein und lagern Sie es an einem trockenen Ort HINWEISE ZUR ENTSORGUNG Befindet sich die linke Abbildung durchgestrichene ...

Страница 19: ...by disregard of the instructions and improper use Scan the QR code to get access to the latest user manual and more product information CONTENT Safety Instructions 20 Assembly 20 Operation 34 Cleaning and Care 34 Hints for disposal 34 TECHNICAL DATA Item number 10035373 Power supply 220 240 V 50 60 Hz Engine power 15 W Maximum load 70 kg PRODUCER Chal Tec GmbH Wallstraße 16 10179 Berlin Germany ...

Страница 20: ...e that the plug does not get wet Check the unit and the electrical components regularly for wear If any parts are broken do not use the appliance any further Never place the appliance on an uneven surface The appliance is not intended for commercial use but only for domestic use and similar environments This includes kitchens in offices farms hotels motels and facilities that offer bed breakfast T...

Страница 21: ...21 EN ...

Страница 22: ...ew 24 M6 Washer 7 M10 Screw Flat 25 M6 Nut 8 M10 Nut 26 Back Cover 9 Wheels without Brake 27 Grill body 10 Side Cover 28 U Bolt 11 M6 10 Hex Head Screw M6 Nut 29 Meat Clip 12 Stainless Steel Hinge 30 Vent Cover 13 Front Cover 31 M8 Fixing 14 Thermometer 32 Chain 15 Window 33 Lock Pin 16 Crosshead Screw 34 Right Cover 17 Front Cover Handle 35 Cross Head Screw 18 L Screw 36 Side Handle ...

Страница 23: ...eels with brake and without brake on the legs Attach the legs to the grill housing with M10 40 hexagonal screws and the adjustable rods with M8 40 screws 2 Mount the side covers with M6 10 hexagonal bolts washers and nuts ...

Страница 24: ...24 EN 3 Secure the rear cover with M6 10 hex bolts washers and nuts ...

Страница 25: ...25 EN 4 Fasten the ventilation covers with M6 cross head screws washers and nuts ...

Страница 26: ...26 EN 5 Secure the front cover and stainless steel hinge with M6 10 screws washers and M6 nuts ...

Страница 27: ...27 EN 6 Mount the thermometer and make sure that it points in the right direction Fasten the front handle with M6 cross screws Fasten the window with M6 10 hexagonal screws washers and nuts ...

Страница 28: ...28 EN 7 Fasten the side handle with M6 cross screws ...

Страница 29: ...29 EN 8 Mount the motor mount and the spit mount at the desired height ...

Страница 30: ...30 EN 9 Mount the motor ...

Страница 31: ...31 EN 10 Fasten the coal grids the grill grids and the spit ...

Страница 32: ...32 EN 11 Secure the front cover and side cover with the locking bolt and chain ...

Страница 33: ...33 EN 12 Assembly is now complete ...

Страница 34: ...ipe the motor with a damp cloth Make sure that no water gets into the motor Storage Protect the motor from dust and dirt If the unit is not to be used for a long time wrap it in plastic foil and store it in a dry place HINTS FOR DISPOSAL According to the European waste regulation 2012 19 EU this symbol on the product or on its packaging indicates that this product may not be treated as household w...

Страница 35: ...as instrucciones y el uso inadecuado Escanee el siguiente código QR para obtener acceso a la última guía del usuario y más información sobre el producto ÍNDICE Indicaciones de seguridad 36 Montaje 36 Manejo 50 Limpieza y cuidado 50 Retirada del aparato 50 DATOS TÉCNICOS Número de artículo 10035373 Suministro eléctrico 220 240 V 50 60 Hz Potencia del motor 15 W Carga máxima 70 kg FABRICANTE Chal Te...

Страница 36: ...ción Asegúrese de que el enchufe no se moje Compruebe regularmente los componentes eléctricos para detectar posibles daños Si alguno está averiado no continúe utilizando el aparato Nunca coloque el aparato sobre una base irregular Este aparato no ha sido concebido para un uso comercial sino doméstico o para entornos similares Entre estos se encuentran oficinas granjas hoteles moteles e instalacion...

Страница 37: ...37 ES ...

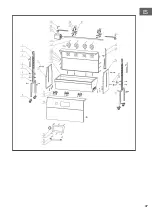
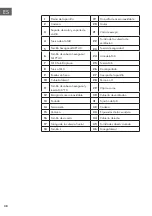
Страница 38: ...la M6 7 M10 Tornillo plano 25 Tuerca M6 8 Tuerca M10 26 Contraportada 9 Ruedas sin freno 27 Cuerpo de la parrilla 10 Cubierta lateral 28 Perno en U 11 Tornillo de cabeza hexagonal y tuerca M6 10 29 Clip de carne 12 Bisagra de acero inoxidable 30 Cubierta de ventilación 13 Portada 31 Fijación de M8 14 Termómetro 32 Cadena 15 Ventana 33 El pasador de la cerradura 16 Tornillo de cruceta 34 Cubierta d...

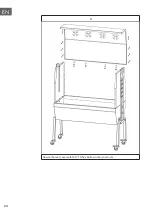
Страница 39: ... sin frenos en las patas Fije las patas con tornillos hexagonales M10 40 y las barras ajustables con tornillos M8 40 a la estructura de la parrilla 2 Monte las cubiertas laterales con tornillos hexagonales M6 10 arandelas y tuercas ...

Страница 40: ...40 ES 3 Fije la cubierta trasera con tornillos hexagonales M6 10 arandelas y tuercas ...

Страница 41: ...41 ES 4 Fije las cubiertas de ventilación con tornillos de estrella M6 arandelas y tuercas ...

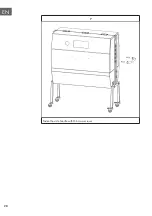
Страница 42: ...42 ES 5 Fije la cubierta delantera y la bisagra de acero inoxidable con tornillos M6 10 arandelas y tuercas M6 ...

Страница 43: ... ES 6 Monte el termómetro y asegúrese de que se oriente hacia la dirección correcta Fije el mango delantero con tornillos de estrella M6 Fije la ventana con tornillos hexagonales M6 10 arandelas y tuercas ...

Страница 44: ...44 ES 7 Fije las asas laterales con tornillos de estrella M6 ...

Страница 45: ...45 ES 8 Monte el soporte del motor y el soporte del espetón a la altura deseada ...

Страница 46: ...46 ES 9 Fije el motor ...

Страница 47: ...47 ES 10 Fije la rejilla para el carbón la rejilla de la parrilla y el espetón ...

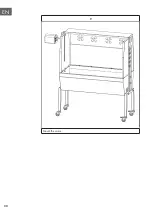
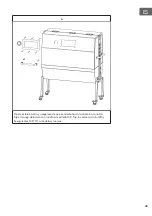
Страница 48: ...48 ES 11 Fije la cubierta delantera y la cubierta lateral con ayuda del tornillo de ajuste y de la cadena ...

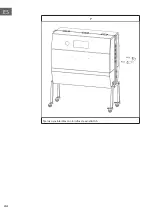
Страница 49: ...49 ES 12 Ha finalizado el montaje ...

Страница 50: ... y un paño suave Limpie el motor solamente con un paño húmedo Asegúrese de que el agua no se filtre al motor Almacenamiento Proteja el motor del polvo y la suciedad Si no utiliza el aparato durante un periodo prolongado de tiempo envuélvalo en una lámina plástica y guárdelo en un lugar seco RETIRADA DEL APARATO Si el aparato lleva adherida la ilustración de la izquierda el contenedor de basura tac...

Страница 51: ...t des consignes et à la mauvaise utilisation de l appareil Scannez le QR Code pour obtenir la dernière version du mode d emploi et des informations supplémentaires concernant le produit SOMMAIRE Consignes de sécurité 52 Assemblage 52 Utilisation 66 Nettoyage et entretien 66 Informations sur le recyclage 66 FICHE TECHNIQUE Numéro d article 10035373 Alimentation 220 240 V 50 60 Hz Puissance du moteu...

Страница 52: ...us que la fiche n est pas mouillée Vérifiez régulièrement le niveau d usure de l appareil et des composants électriques Si des pièces sont cassées cessez d utiliser l appareil Ne placez jamais l appareil sur une surface inégale L appareil n est pas destiné à un usage commercial mais uniquement à un usage domestique et similaire Il s agit notamment des cuisines des bureaux des fermes des hôtels des...

Страница 53: ...53 FR ...

Страница 54: ... M6 7 M10 Vis à plat 25 M6 Écrou 8 M10 Écrou 26 Couverture arrière 9 Roues sans frein 27 Corps du grill 10 Couverture latérale 28 U Bolt 11 Vis à tête hexagonale M6 10 et écrou M6 29 Clip sur la viande 12 Charnière en acier inoxydable 30 Couvercle de ventilation 13 Couverture 31 M8 fixation 14 Thermomètre 32 Chaîne 15 Fenêtre 33 Goupille de verrouillage 16 Vis à tête cruciforme 34 Couverture droit...

Страница 55: ...et sans frein sur les pieds Fixez les pieds au boîtier du barbecue avec des vis hexagonales M10 40 et les tiges réglables avec des vis M8 40 2 Montez les caches latéraux avec des boulons hexagonaux M6 10 des rondelles et des écrous ...

Страница 56: ...56 FR 3 Fixez le cache arrière avec des boulons hexagonaux M6 10 des rondelles et des écrous ...

Страница 57: ...57 FR 4 Fixez les caches de ventilation avec des vis Phillips M6 des rondelles et des écrous ...

Страница 58: ...58 FR 5 Fixez le cache avant et la charnière en acier inoxydable avec des vis M6 10 des rondelles et des écrous M6 ...

Страница 59: ... 6 Montez le thermomètre et assurez vous qu il pointe dans la bonne direction Fixez la poignée avant avec des vis cruciformes M6 Fixez la fenêtre avec des boulons hexagonaux M6 10 des rondelles et des écrous ...

Страница 60: ...60 FR 7 Fixez la poignée latérale avec des vis cruciformes M6 ...

Страница 61: ...61 FR 8 Montez le support du moteur et le support de la broche à la hauteur souhaitée ...

Страница 62: ...62 FR 9 Fixez le moteur ...

Страница 63: ...63 FR 10 Fixez les grilles à charbon les grilles du barbecue et la broche ...

Страница 64: ...64 FR 11 Fixez le capot avant et le capot latéral à l aide du boulon de verrouillage et de la chaîne ...

Страница 65: ...65 FR 12 L assemblage est terminé ...

Страница 66: ...rties du barbecue avec de l eau chaude savonneuse et un chiffon doux Essuyez le moteur uniquement avec un chiffon humide Assurez vous qu aucune eau ne pénètre dans le moteur Stockage Protégez le moteur de la poussière et de la saleté Si l appareil n est pas utilisé pendant une longue période enveloppez le dans une pellicule plastique et rangez le dans un endroit sec INFORMATIONS SUR LE RECYCLAGE V...

Страница 67: ...zione delle avvertenze di sicurezza e da un uso improprio del dispositivo Scansionare il codice QR seguente per accedere al manuale d uso più attuale e per ricevere informazioni sul prodotto INDICE Avvertenze di sicurezza 68 Assemblaggio 68 Utilizzo 82 Ulizia e manutenzione 82 Smaltimento 82 DATI TECNICI Numero articolo 10035373 Alimentazione 220 240 V 50 60 Hz Potenza motore 15 W Carico massimo 7...

Страница 68: ... dispositivo Non posizionare il dispositivo su fondi sconnessi Il dispositivo non è adatto a usi commerciali ma solo in casa e in contesti simili come cucine presso uffici agriturismi hotel motel e bed breakfast Spegnere il dispositivo staccare la spina e lasciarlo raffreddare prima di pulirlo o metterlo via Non utilizzare detergenti abrasivi Non pulire mai il dispositivo sotto acqua corrente altr...

Страница 69: ...69 IT ...

Страница 70: ...ella M6 7 M10 Vite piatta 25 Dado M6 8 M10 Dado 26 Copertina posteriore 9 Ruote senza freno 27 Corpo griglia 10 Copertura laterale 28 U Bolt 11 M6 10 Vite a testa esagonale e dado M6 29 Clip da carne 12 Cerniera in acciaio inossidabile 30 Copertura di sfiato 13 Copertura frontale 31 Fissaggio M8 14 Termometro 32 Catena 15 Finestra 33 Perno di bloccaggio 16 Vite a croce 34 Copertura a destra 17 Man...

Страница 71: ...quelle senza freni alle gambe di appoggio Fissare all alloggiamento della griglia le gambe con le viti esagonali M10x40 e le aste regolabili con le viti M8x40 2 Montare le coperture laterali con le viti esagonali M6x10 le rondelle e i dadi ...

Страница 72: ...72 IT 3 Fissare la copertura posteriore con le viti esagonali M6x10 le rondelle e i dadi ...

Страница 73: ...73 IT 4 Fissare le coperture di scarico dell aria con le viti a croce M6 le rondelle e i dadi ...

Страница 74: ...74 IT 5 Fissare la copertura anteriore e la cerniera in acciaio inox con le viti M6x10 le rondelle e i dadi ...

Страница 75: ...5 IT 6 Montare il termometro e assicurarsi che sia rivolto nella direzione giusta Fissare la manopola anteriore con le viti a croce M6 Fissare la finestra con le viti esagonali M6x10 le rondelle e i dadi ...

Страница 76: ...76 IT 7 Fissare l impugnatura laterale con le viti a croce M6 ...

Страница 77: ...77 IT 8 Montare il supporto del motore e il supporto dello spiedo all altezza desiderata ...

Страница 78: ...78 IT 9 Fissare il motore ...

Страница 79: ...79 IT 10 Fissare le griglie per la carbonella le griglie di cottura e lo spiedo ...

Страница 80: ...80 IT 11 Fissare la copertura anteriore e quelle laterali con i bulloni di bloccaggio e la catena ...

Страница 81: ...81 IT 12 L assemblaggio è concluso ...

Страница 82: ...ia con acqua e sapone e un panno morbido Pulire il motore solo con un panno leggermente inumidito Assicurarsi che non penetri acqua nel motore Stoccaggio Proteggere il motore da polvere e sporco Se non si usa il dispositivo per lunghi periodi avvolgerlo in pellicola di plastica e conservarlo in un luogo asciutto SMALTIMENTO Se sul prodotto è presente la figura a sinistra il cassonetto mobile sbarr...

Страница 83: ......

Страница 84: ......

Отзывы: