background image

22

ES

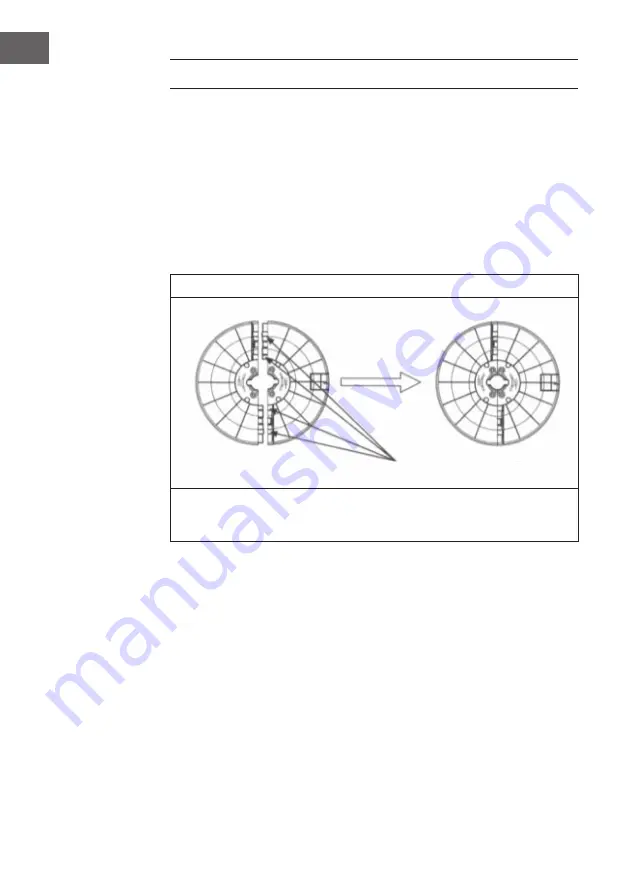
MONTAJE

1.  Retire ambas partes de la base del aparato de la caja y colóquelas de manera que 

puedan juntarse para formar una base completa para el dispositivo (vea la fig. 1).

2.  Tire del cable de alimentación a través del orificio de la base y lleve el orificio de 

la base a la misma altura que los orificios de la carcasa del ventilador. Asegure 

el cable de alimentación con la abrazadera debajo de la base del aparato para 

conectar la base a la carcasa del ventilador (vea la fig.2).

3.  Cuando la base del dispositivo está desmontada, desatornille los tornillos y luego 

separe la base del dispositivo (vea fig. 3).

1

Cuando las cuatro ubicaciones estén niveladas entre sí y aseguradas, encaje la parte 

frontal de la carcasa (se escuchará un sonido). Use el mismo método en la parte 

trasera.

Содержание 10032435

Страница 1: ...10032435 10032436 Turmventilator Tower Fan Ventilador de torre Ventilateur tour Ventilatore a torre ...

Страница 2: ......

Страница 3: ...g 3 Sicherheitshinweise 4 Geräteübersicht 5 Zusammenbau 6 Inbetriebnahme und Bedienung 7 Verwendung der Fernbedienung 9 Reinigung und Pflege 10 Hinweise zur Entsorgung 10 TECHNISCHE DATEN Artikelnummer 10032435 10032436 Stromversorgung 220 240 V 50 60 Hz Leistung 40 W Geräuschpegel 50 dB A KONFORMITÄTSERKLÄRUNG Hersteller Chal Tec GmbH Wallstraße 16 10179 Berlin Deutschland Dieses Produkt entspric...

Страница 4: ...ren und hoher Luftfeuchtigkeit aussetzen und das sich Säure Alkali Öl Insektizide Vorhänge und andere Gegenstände außerhalb der Reichweite des Geräts befinden so dass diese nicht eingesaugt werden können Babys und ältere Menschen sollten nicht direkt vor dem Ventilator sitzen oder liegen Stellen Sie den Ventilator nur auf ebene Oberflächen da dieser ansonsten umfallen könnte Überprüfen Sie vor der...

Страница 5: ...ie das Gerät nur für seinen vorgesehenen Verwendungszweck wie in der Bedienungsanleitung beschrieben Achten Sie darauf dass der Ventilator ausgeschaltet und der Netzstecker aus der Steckdose gezogen wurde bevor Sie das Schutzgehäuse abnehmen Hinweis zum Überhitzungsschutz Überhitzungsschutz Im Motor des Ventilators wurde eine Thermosicherung installiert Sollte der Motor aus einer Vielzahl von Grün...

Страница 6: ...he Höhe mit den Löchern im Ventilatorgehäuse Sichern Sie das Netzstromkabel mit der Klammer unter der Gerätebasis um die Gerätebasis mit dem Ventilatorgehäuse zu verbinden vgl Abb 2 3 Wenn die Gerätebasis demontiert ist drehen Sie zunächst die Schrauben heraus und nehmen Sie dann die Gerätebasis auseinander vgl Abb 3 1 Wenn die vier Stellen jeweils auf einer Höhe miteinander und festgemacht sind l...

Страница 7: ...is kraftvoll heraus Wenn sich die Klammer gelöst hat wenden Sie die gleiche Methode zum Entfernen der zweiten Klammer an INBETRIEBNAHME UND BEDIENUNG Wenn Sie das Gerät mit einer Fernbedienung verwenden jede Taste der Fernbedienung entspricht den Tasten auf dem Ventilator On Off Wenn diese Taste gedrückt wird geht der Ventilator an und startet mit niedriger Geschwindigkeit Wenn Sie diese Taste ern...

Страница 8: ...ie Ventilatorgeschwindigkeiten niedrig mittel und hoch ausgewählt werden 2 Natural wind Dieser Windmodus wechselt willkürlich zwischen den verschiedenen Geschwindigkeitsstufen hin und her wie es beim Wind in der freien Natur der Fall sein würde Der Modus natural wind verfügt wie der Modus normal wind über drei Windgeschwindigkeitsstufen 3 Sleep wind In diesem Windmodus können Sie ebenfalls drei Wi...

Страница 9: ...enung darauf dass das vordere Ende der Fernbedienung in Richtung des Empfängers am Ventilator zeigt Die Fernbedienung kann bis zu einer Distanz von 5 Metern verwendet werden wenn der Winkel nicht mehr als 30 Grad beträgt Vermeiden Sie direkte Sonneneinstrahlung auf den Empfänger da dieser dadurch beeinträchtigt werden kann Entnehmen Sie die Batterien aus dem Batteriefach der Fernbedienung wenn die...

Страница 10: ...e Abbildung durchgestrichene Mülltonne auf Rädern auf dem Produkt gilt die Europäische Richtlinie 2012 19 EU Diese Produkte dürfen nicht mit dem normalen Hausmüll entsorgt werden Informieren Sie sich über die örtlichen Regelungen zur getrennten Sammlung elektrischer und elektronischer Gerätschaften Richten Sie sich nach den örtlichen Regelungen und entsorgen Sie Altgeräte nicht über den Hausmüll D...

Страница 11: ...al Data 1 1 Declaration of Conformity 1 1 Safety Instructions 12 Product Description 13 Assembly 14 Use and Operation 15 Usage of the Remote Control 17 Care and Cleaning 18 Hints on Disposal 18 TECHNICAL DATA Artikelnummer 10032435 10032436 Stromversorgung 220 240 V 50 60 Hz Leistung 40 W Geräuschpegel 50 dB A DECLARATION OF CONFORMITY Producer Chal Tec GmbH Wallstraße 16 10179 Berlin Germany This...

Страница 12: ...e sucked in Babies and the elderly should not be directly under high wind for a long time Do not place the fan on uneven floor to prevent the fan from overturning Before use it is necessary to first check any damage with the power cord and the plug If the power cord is damaged in order to avoid danger it must be replaced by professional workers from the manufacturer s maintenance department or sim...

Страница 13: ...ed in the fan motor when the motor is overheated due to a variety of accidents and the motor temperature reaches the level to activate the thermal fuse the fuse will be blown out to cut off the power PRODUCT DESCRIPTION 1 Control Panel 2 Air outlet 3 Fan body 4 Base ...

Страница 14: ...he base with the holes on the fan body then secure the power cord under the base clip to tighten the base with the fan body As shown in Fig 2 3 When the base is disassembled screw out the screws first then take the base out The method to disassemble the base is as shown in Fig 3 1 After the four posts are aligned and wrapped firmly snap the base front inward a sound can be heard then use the same ...

Страница 15: ...ull the base out after the clip comes out use the same method to remove another clip USE AND OPERATION Operate using a remote control each button on the remote control is the same as that of an actual fan On Off When this button is pushed the fan will start at a low speed By pressing this button again the fan will stop working Fan body Basie Fixing screw Power cord ...

Страница 16: ...erent wind modes have following features 1 Normal wind the normal wind mode is simply the Low Medium High fan speed speeds 2 Natural wind the natural wind mode automatically selects wind speed randomly as you would find outdoors The natural wind also has low medium and high speeds 3 Sleeping wind the sleeping wind allows you to set a speed at low medium and high The wind speed of these three sleep...

Страница 17: ...d make sure that the head of the front of the remote control is aligned with the receiving window on the fan body The remote control can be about 5m from the front of the fan body it can be normally operated if the deviation is within 30 degrees Avoid direct sunlight on the receiving window so as not to affect the effect of the receiver If the remote control is not used for a long time remove the ...

Страница 18: ...or on its packaging indicates that this product may not be treated as household waste Instead it should be taken to the appropriate collection point for the recycling of electrical and electronic equipment By ensuring this product is disposed of correctly you will help prevent potential negative consequences for the environment and human health which could otherwise be caused by inappropriate wast...

Страница 19: ...ón de conformidad 19 Indicaciones de seguridad 20 Características del aparato 21 Montaje 22 Puesta en marcha y funcionamiento 23 Uso del mando a distancia 25 Limpieza y cuidado 26 Indicaciones sobre la retirada del aparato 26 DATOS TÉCNICOS Número de artículo 10032435 10032436 Suministro eléctrico 220 240 V 50 60 Hz Potencia 40 W Nivel de ruido 50 dB A DECLARACIÓN DE CONFORMIDAD Fabricante Chal Te...

Страница 20: ...turas o mucha humedad y tenga cuidado de que no tenga cerca ácidos álcali aceite insecticidas cortinas y otros objetos para que no sean succionados Los bebés y personas mayores no deben sentarse o tumbarse directamente delante del ventilador Coloque el ventilador solo en superficies planas ya que de lo contrario se podría caer Antes del uso compruebe siempre que el cable o enchufe no están dañados...

Страница 21: ...scribe en el manual de instrucciones Asegúrese de que el ventilador está apagado y desenchufado antes de retirar la carcasa de protección Avisos acerca del sobrecalentamiento Protección contra sobrecalentamiento En el motor del ventilador se ha instalado un fusible térmico Si el ventilador se sobrecaliente por algún motivo y alcanza una temperatura muy alta el fusible térmico se activa y el aparat...

Страница 22: ...ra que los orificios de la carcasa del ventilador Asegure el cable de alimentación con la abrazadera debajo de la base del aparato para conectar la base a la carcasa del ventilador vea la fig 2 3 Cuando la base del dispositivo está desmontada desatornille los tornillos y luego separe la base del dispositivo vea fig 3 1 Cuando las cuatro ubicaciones estén niveladas entre sí y aseguradas encaje la p...

Страница 23: ... de la base con fuerza hacia fuera Cuando ha aflojado la abrazadera use el mismo método para quitar la segunda abrazadera PUESTA EN MARCHA Y FUNCIONAMIENTO Si usa el aparato con un mando a distancia cada botón del mando se corresponde con una del ventilador On Off Si pulsa este botón el ventilador se enciende con la velocidad mínima Si lo pulsa de nuevo el ventilador se apaga Carcasa Base Tornillo...

Страница 24: ...al wind Los tres modos de viento tienen las siguientes características 1 Normal wind En este modo se puede seleccionar la velocidad del viento a baja media y alta 2 Natural wind Este modo de viento alterna al azar entre los distintos niveles de velocidad como lo haría en el viento en la naturaleza El modo natural y el modo normal disponen de tres niveles de velocidad 3 Sleep wind En este modo tamb...

Страница 25: ...usar el mando a distancia compruebe que el extremo delantero del mando apunta en dirección al receptor del ventilador El mando puede ser usado hasta una distancia de 5 metros a un ángulo máximo de 30 grados Evite exponer el receptor a los rayos solares ya que podrían afectarle Retire la batería del mando a distancia cuando no vaya a usarlo durante un largo periodo de tiempo Antes del uso coloque l...

Страница 26: ...europea directiva 2012 19 UE Este producto no debe arrojarse a un contenedor de basura común Infórmese sobre las leyes territoriales que regulan la recogida separada de aparatos eléctricos y electrónicos Respete las leyes territoriales y no arroje aparatos viejos al cubo de la basura doméstica Una retirada de aparatos conforme a las leyes contribuye a proteger el medio ambiente y a las personas a ...

Страница 27: ... Fiche technique 27 Déclaration de conformité 27 Consignes de sécurité 28 Aperçu de l appareil 29 Assemblage 30 Mise en service et utilisation 31 Utilisation avec la télécommande 33 Nettoyage et entretien 34 Conseils pour le recyclage 34 FICHE TECHNIQUE Numéro d article 10032435 10032436 Alimentation 220 240 V 50 60 Hz Puissance 40 W Niveau sonore 50 dB A DÉCLARATION DE CONFORMITÉ Fabricant Chal T...

Страница 28: ...z à ce que l appareil ne soit pas exposé à de fortes températures ou à l humidité et à ce que les acides alcalins l huile les insecticides les rideaux et autres objets soient hors de portée de la machine afin qu ils ne soient pas aspirés par celle ci Les bébés et les personnes âgées ne doivent pas être placés assis ou couchés directement devant le ventilateur Placez le ventilateur sur une surface ...

Страница 29: ...vers le gaz Utilisez l appareil exclusivement aux fins prévues et décrites dans ce mode d emploi Veillez à ce que le ventilateur soit éteint et à ce que la fiche soit débranchée avant de retirer le châssis de protection Conseil concernant la protection anti surchauffe Anti surchauffe le moteur du ventilateur comprend un thermo fusible Si le moteur pour une raison ou pour une autre surchauffe ou at...

Страница 30: ...tier du ventilateur Bloquez le câble d alimentation ave la pince sous la base de l appareil pour connecter celle ci au boîtier du ventilateur voir schéma 2 3 Si vous souhaitez démonter la base de l appareil desserrez d abord les vis et séparez ensuite les deux parties de la base de l appareil voir schéma 3 1 Lorsque vous avez aligné les quatre emplacements les uns avec les autres à la bonne hauteu...

Страница 31: ...appareil avec force Si la pince s est desserrée utilisez la même méthode pour retirer la deuxième pince MISE EN SERVICE ET UTILISATION Si vous utilisez l appareil avec une télécommande chaque bouton de la télécommande correspond à un bouton sur le ventilateur On Off Lorsque vous appuyez sur cette touche le ventilateur démarre avec la vitesse la plus lente Si vous appuyez de nouveau sur cette touch...

Страница 32: ...sleep wind brise douce et retourne ensuite à normal wind Voici les caractéristiques des trois modes 1 Normal wind dans ce mode de vent vous pouvez sélectionner la vitesse du ventilateur entre faible moyenne ou rapide 2 Natural wind ce mode de vent change arbitrairement la vitesse du vent comme si vous étiez dans la nature Le mode natural wind dispose tout comme le mode normal wind de trois vitesse...

Страница 33: ...ÉCOMMANDE Lorsque vous utilisez la télécommande assurez vous que l avant de la télécommande soit dirigé vers le récepteur du ventilateur La télécommande peut être utilisée jusqu à une distance de 5 mètres lorsque l angle ne dépasse pas 30 degrés Évitez les rayons directs du soleil sur le récepteur car cela pourrait l affecter Retirez les piles du compartiment à piles de la télécommande si vous ne ...

Страница 34: ...nne 2012 19 UE s applique poubelle à roues barrée d une croix Ces produits ne peuvent être jetés dans les poubelles domestiques courantes Renseignez vous concernant les règles appliquées pour la collecte d appareils électriques et électroniques Conformez vous aux réglementations locales et ne jetez pas vos anciens produits avec les ordures ménagères Le respect des règles de recyclage des vieux pro...

Страница 35: ...5 Dichiarazione di conformità 35 Avvertenze di sicurezza 36 Descrizione del prodotto 37 Montaggio 38 Messa in funzione e utilizzo 39 Utilizzo del telecomando 41 Pulizia e manutenzione 42 Avviso di smaltimento 42 DATI TECNICI Numero articolo 10032435 10032436 Alimentazione 220 240 V 50 60 Hz Potenza 40 W Livello di rumorosità 50 dB A DICHIARAZIONE DI CONFORMITÀ Produttore Chal Tec GmbH Wallstraße 1...

Страница 36: ...l dispositivo non sia esposto a temperature estremamente elevate o ad alti livelli di umidità Inoltre per evitare che vengano risucchiati tenere acidi alcali olio insetticidi tende e altri oggetti fuori dalla portata del dispositivo Bebè e anziani non devono stare seduti o sdraiati direttamente davanti al ventilatore Posizionare il ventilatore su superfici piane in modo che non cada Prima di ogni ...

Страница 37: ...me descritto nel manuale d uso Assicurarsi che il ventilatore sia spento e la spina scollegata dalla presa elettrica prima di togliere l alloggiamento protettivo Avvertenze sulla protezione da surriscaldamento Protezione da surriscaldamento nel motore del ventilatore si trova un termofusibile Se il motore dovesse surriscaldarsi per una serie di motivi e raggiungere una temperatura molto elevata il...

Страница 38: ... fori sull alloggiamento del dispositivo Fissare il cavo di alimentazione con i morsetti sotto alla base del dispositivo in modo da collegarla con l alloggiamento del ventilatore cfr immagine 2 3 Quando la base del dispositivo è smontata svitare le viti e smontare la base del dispositivo cfr immagine 3 1 Quando i quattro punti sono alla stessa altezza e sono fissati è possibile agganciare la parte...

Страница 39: ...se del dispositivo Quando il morsetto è smollato utilizzare lo stesso metodo per rimuovere l altro morsetto MESSA IN FUNZIONE E UTILIZZO Se si utilizza il dispositivo con un telecomando ogni tasto del telecomando corrisponde a un tasto sul ventilatore On Off Premendo questo tasto il ventilatore si attiva a bassa velocità Premendo nuovamente questo tasto il ventilatore si spegne Alloggiamento Base ...

Страница 40: ...di ventilazione presentano le seguenti caratteristiche 1 Normal wind in questa modalità la velocità del ventilatore può essere regolata su livello basso medio e alto 2 Natural wind in questa modalità la ventilazione cambia casualmente tra i diversi livelli di velocità proprio come il naturale comportamento del vento La modalità natural wind è dotata di tre livelli di velocità come la modalità norm...

Страница 41: ...O Quando si utilizza il telecomando assicurarsi che l estremità anteriore sia diretta al ricevitore del ventilatore Il telecomando può essere utilizzato a una distanza di 5 metri se l angolo non supera i 30 Evitare che i raggi solari colpiscano direttamente il ricevitore altrimenti le sue funzioni vengono limitate Se il telecomando non viene utilizzato per lunghi periodi togliere le pile dall appo...

Страница 42: ...ifiuti con le ruote si applica la direttiva europea 2012 19 UE Questi prodotti non possono essere smaltiti con i rifiuti normali Informarsi sulle disposizioni vigenti per la raccolta di dispositivi elettrici ed elettronici Attenersi alle disposizioni vigenti e non smaltire i vecchi dispositivi con i rifiuti domestici Grazie al corretto smaltimento dei vecchi dispositivi si tutela il pianeta e la s...

Страница 43: ......

Страница 44: ......

Отзывы: