7
DE
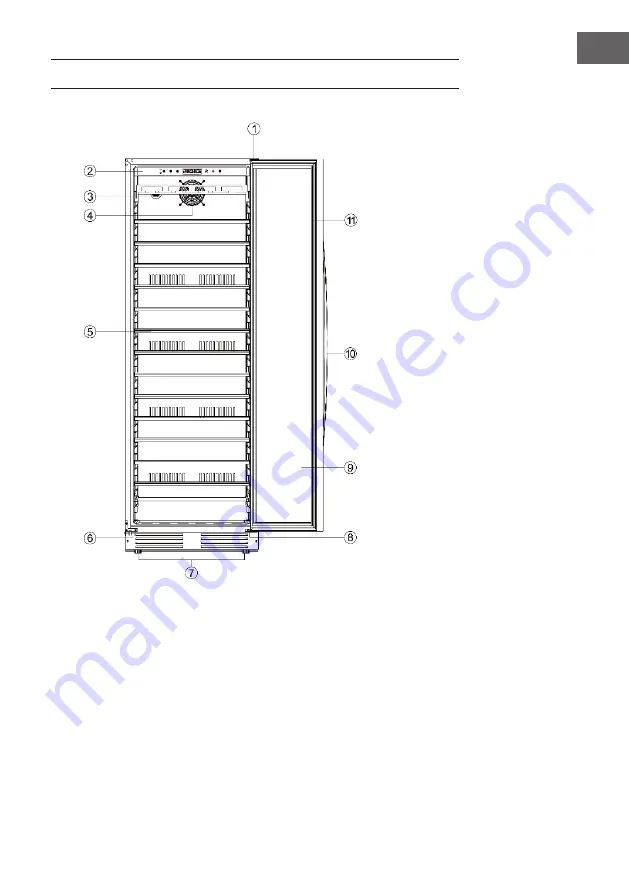
GERÄTEÜBERSICHT
1 oberes Türscharnier2 Bedienfeld und Licht3
Aktivkohlefilter
4 Ventilator 5 Kühlschrankfach6 Sockel
7 verstellbare Füße8 unteres Türscharnier9 Kühlschranktür10 Türgriff11 Türdichtung
Страница 1: ...www klarstein com VINOVILLA Weink hlschrank Wine Cooler Vinoteca Cave vin Frigorifero per vino 10032033 10034156...
Страница 2: ......
Страница 3: ...Zugriff auf die aktuellste Bedienungsanleitung und weitere Informationen rund um das Produkt zu erhalten INHALTSVERZEICHNIS Sicherheitshinweise 4 Ger te bersicht 7 Montage 8 Bedienung 10 Wechsel des...
Страница 4: ...rwenden Sie nach M glichkeit kein Verl ngerungskabel Falls Sie doch eines verwenden achten Sie darauf dass der Amperewert des angeschlossenen Ger ts den maximalen Amperewert des Netzkabels nicht bersc...
Страница 5: ...finden Um eine Kontamination von Lebensmitteln zu vermeiden beachten Sie bitte die folgenden Anweisungen Ein l ngeres ffnen der T r kann zu einem deutlichen Temperaturanstieg in den F chern des Ger te...
Страница 6: ...mperatur der auf dem Typenschild des Ger ts angegebenen Klimaklasse entspricht SN Niedrig Dieses K hlger t ist f r den Einsatz bei Umgebungstemperaturen von 10 32 C vorgesehen N Gem igt Dieses K hlger...
Страница 7: ...ER TE BERSICHT 1 oberes T rscharnier 2 Bedienfeld und Licht 3 Aktivkohlefilter 4 Ventilator 5 K hlschrankfach 6 Sockel 7 verstellbare F e 8 unteres T rscharnier 9 K hlschrankt r 10 T rgriff 1 1 T rdic...
Страница 8: ...ndestens 24 Stunden stehen zu lassen bevor es ans Stromnetz angeschlossen wird um zu gew hrleisten dass die K hlfl ssigkeit gleichm ig im K hlkreislauf verteilt ist Reinigen Sie den Innenraum des Ger...
Страница 9: ...hst niedrigen Energieverbrauch zu haben platzieren Sie das Ger t nicht in der Quelle von W rmequellen Heizung Herd etc und setzten Sie es nicht direkter Sonneneinstrahlung aus Vermeiden Sie es au erde...
Страница 10: ...en 1 Licht an und aus Modus Dies ist die Standardlichteinstellung Das Licht wird durch einen Sensor gesteuert und das Display des K hlschranks zeigt das Symbol an Beim ffnen der K hlschrankt r geht da...
Страница 11: ...nden ber 25 Grad liegt beginnt der Alarm zu piepen und die linke Seite des Displays zeigt die Symbole an Wenn die Temperatur des unteren K hlschrankbereichs f r l nger als 6 Stunden ber 25 C liegt wir...
Страница 12: ...ier welche es Ihnen erm glichen die Seite der K hlschrankt r zu ndern Bitte befolgen Sie hierf r folgende Anleitung 1 Drehen Sie die beiden Schrauben heraus die sich am unteren T rscharnier an der Dre...
Страница 13: ...n Sie die dekorativen Plastikabdeckungen am linken oberen Scharnierloch 6 Entfernen Sie die T rhalterung der linken Seite 7 Befestigen Sie das linke obere T rscharnier 8 Befestigen Sie das linke unter...
Страница 14: ...n daf r vorgesehenen L chern an der linken unteren Drehachse der T r 12 H ngen Sie die T r in die obere linke T raufh ngung ein und achten Sie darauf dass die T r an oberer und unterer Aufh ngung b nd...
Страница 15: ...er Stelle heraus wo Sie den T rgriff montieren m chten 2 Setzen Sie die Unterlegscheibe auf die Schrauben auf und f hren Sie beiden Schrauben dann in die Aussparungen in der T r ein 3 Stecken Sie den...
Страница 16: ...lkreislaufs werden die gek hlten Oberfl chen des Ger ts automatisch entfrostet Das Entfrostungswasser wird in einen Kondenswasserverdunstungsbeh lter geleitet der sich auf der R ckseite des Kompressor...
Страница 17: ...ie es wieder an den Strom anschlie en Wenn Sie das Ger t zum ersten Mal benutzen kann es vorkommen dass das Ger t einen Eigengeruch absondert Sollte dies der Fall sein lassen Sie das Ger t unbef llt f...
Страница 18: ...schaltet berpr fen Sie die Nennspannung des Ger ts berpr fen Sie den Sicherungsschalter und oder ob die Sicherung durchgebrannt ist Das Ger t ist nicht kalt genug berpr fen Sie die Temperaturkontrolle...
Страница 19: ...uates Schlie en der T r Das LED Display funktioniert nicht richtig Das Bedienfeld ist kaputt Die Leiterplatte PCB ist kaputt gegangen Das Ger t ist nicht eingesteckt Die Taste funktioniert nicht Vorge...
Страница 20: ...ger t nein Allgemeine Produktparameter Parameter Wert Parameter Wert Abmessungen mm H he 1760 Gesamtrauminhalt in dm3 oder L 433 Breite 595 Tiefe 695 EEI 189 Energieeffizienzklasse G Luftschallemissio...
Страница 21: ...h nein Lagerfach f r fri sche Lebensmittel nein Kaltlagerfach nein Null Sterne oder Eisbereiterfach nein Ein Stern Fach nein Zwei Sterne Fach nein Drei Sterne Fach nein Vier Sterne Fach nein Zwei Ster...
Страница 22: ...ktrischen und elektronischen Ger ten gebracht werden Durch regelkonforme Entsorgung sch tzen Sie die Umwelt und die Gesundheit Ihrer Mitmenschen vor negativen Konsequenzen Informationen zum Recycling...
Страница 23: ...er use Scan the QR code to get access to the latest user manual and more product information CONTENT Safety Instructions 24 Desciption of the Appliance 27 Installation Instruction 28 Operation 30 Reve...
Страница 24: ...hands while standing on a wet surface It is not recommended to use this refrigerator with an extension cord or power board Please ensure that the appliance is plugged directly into the electrical out...
Страница 25: ...e are no multiple sockets or power supplies on the back of the unit To avoid contamination of food please follow the instructions below A prolonged opening of the door can lead to a significant rise i...
Страница 26: ...re corresponds to the climate class indicated on the unit s nameplate SN Low This cooling unit is designed for use at ambient temperatures of 10 32 C N Moderate This cooling unit is intended for use a...
Страница 27: ...27 EN DESCIPTION OF THE APPLIANCE 1 Upper hinge 2 Control panel and light 3 Carbon filter 4 Fan 5 Shelf 6 Plinth 7 Adjustable feet 8 Lower hinge 9 Door 10 Handle 1 1 Door seal...
Страница 28: ...culation is necessary to avoid overheating To ensure sufficient ventilation observe the installation recommendations provided In order to avoid fire risk wherever possible ensure that the appliance is...
Страница 29: ...iance close to a heat source heater cooker etc do not expose it to direct sunlight and do not place it in a room which is too cold Plug the appliance into an exclusively easily accessible plug socket...
Страница 30: ...ight on and off mode The default setting of light will be controlled by sensor and LCD screen will show when door is opened the light will turn on automatically when door is closed the light will be t...
Страница 31: ...larm 3 High temperature alarm When inside temperature is above 25 C for over 6 hours it will beep to alarm and left side of LCD screen will display Press any key to stop the beeping alarm 4 Low humidi...
Страница 32: ...ft lower hinge and a right door support for you to reverse the door please follow below instructions 1 Unscrew the two screws which fix the door axis onto the lower hinge at the bottom of hinge then r...
Страница 33: ...unscrewing three screws 5 Remove the decorative plastic caps at left upper hinge hole and 6 Remove left door support 7 Install left upper hinge 8 Install left lower hinge 9 Insert decorative caps to...
Страница 34: ...34 EN 1 1 Turn the door by 180 and insert the door axis into bottom door axis hole 12 Put the door into left upper hinge axis align the door with lower hinge and fix door axis to left lower hinge...
Страница 35: ...Open the door and pull out the door gasket carefully only at the area where handle is to be installed 2 Insert the washer onto the screws then insert the two screws into two slots on the door 3 Align...
Страница 36: ...inishes the appliance s refrigerated surfaces are defrosted automatically The defrost water is channeled into a condensates evaporation tray which is located in the back of the appliance near the comp...
Страница 37: ...e solvents or abrasives When the appliance is switched on for the first time there may be a residual odour In that case run the appliance empty for a few hours at the coldest possible temperature The...
Страница 38: ...circuit breaker or if fuse has blown Appliance is not cold enough The external temperature is high A large quantity of bottles has been put into the cellar The appliance is opened frequently The door...
Страница 39: ...the event of a breakdown Despite the care we take during production a breakdown can never be totally ruled out Before contacting your retailer s after sales department please check that the appliance...
Страница 40: ...General product parameters Parameter Value Parameter Value Overall dimensions mm Height 1760 Total volume dm or L 433 Width 595 Depth 695 EEI 189 Energy efficiency class G Airborne acoustical noise e...
Страница 41: ...Wine storage Yes 433 12 A Cellar No Fresh food No Chill No 0 star or icemaking No 1 star No 2 star No 3 star No 4 star No 2 star section No Variable temperature compartment For 4 star compartments Fa...
Страница 42: ...ectronic equipment By disposing of it in accordance with the rules you are protecting the environment and the health of your fellow human beings from negative consequences For information about the re...
Страница 43: ...o QR para obtener acceso al manual de usuario m s reciente y otra informaci n sobre el producto NDICE DE CONTENIDOS Indicaciones de seguridad 44 Vista general del aparato 47 Montaje 48 Funcionamiento...
Страница 44: ...n las manos mojadas Si puede evitarlo no utilice cables alargadores Si a pesar de ello es necesaria su utilizaci n aseg rese de que el valor en amperios del aparato conectado no supere el valor m ximo...
Страница 45: ...a contaminaci n de los alimentos siga las siguientes instrucciones Una apertura prolongada de la puerta puede provocar un aumento significativo de la temperatura en los compartimentos del aparato ADVE...
Страница 46: ...la clase de clima indicada en la placa de identificaci n de la unidad SN Bajo Este refrigerador est concebido para un uso a temperaturas ambiente de 10 32 C N C lida Este refrigerador est concebido pa...
Страница 47: ...DEL APARATO 1 Bisagra superior 2 Panel de control y luz 3 Filtro de carb n activado 4 Ventilador 5 Compartimento refrigerante 6 Base 7 Patas de altura regulable 8 Bisagra inferior 9 Puerta 10 Asa 1 1...
Страница 48: ...pendant au moins 24 heures avant de le brancher afin de garantir une r partition uniforme du r frig rant dans tout le circuit de refroidissement Nettoyez l int rieur de l appareil avec un chiffon doux...
Страница 49: ...rgie la plus faible possible ne placez pas l appareil pr s d une source de chaleur chauffage cuisini re etc et ne l exposez pas l ensoleillement direct vitez galement de placer l appareil dans une pi...
Страница 50: ...e 3 segundos para elegir el modo de iluminaci n deseado 1 Modo Luz ON OFF Esta es la configuraci n est ndar La luz se controla mediante un sensor y el display del aparato muestra el icono Al abrir la...
Страница 51: ...ratura en el compartimento refrigerante inferior se encuentra durante m s de 6 horas por encima de 25 C empieza a sonar una alarma y la parte izquierda del display muestra el icono Pulse cualquier bot...
Страница 52: ...gra inferior izquierda para que pueda invertir la puerta por favor siga las instrucciones que se indican a continuaci n 1 Desenrosque los dos tornillos que se encuentran en la bisagra inferior del eje...
Страница 53: ...Retire los tapones de pl stico decorativos en el orificio de bisagra superior 6 Retire el soporte de la puerta en el lado izquierdo 7 Monte la bisagra superior izquierda 8 Monte la bisagra inferior iz...
Страница 54: ...cio previsto para ello en el eje inferior izquierdo de la puerta 12 Coloque la puerta en el soporte superior izquierdo y aseg rese de que la puerta est a ras con las suspensiones superior e inferior F...
Страница 55: ...uerta en el punto en el que desee instalar el tirador 2 Coloque las arandelas en los tornillos e inserte los dos tornillos en el orificio en la puerta 3 Coloque el tirador sobre los tornillos desde el...
Страница 56: ...do termina un ciclo de refrigeraci n las superficies refrigeradas del aparato se descongelan autom ticamente El agua de descongelaci n se canaliza en una bandeja de evaporaci n de condensados que se e...
Страница 57: ...por primera vez es posible que emita un olor En este caso deje el aparato funcionar vac o durante unas horas a temperatura m s baja El fr o eliminar el olor Limpie la cubierta de pl stico en el compa...
Страница 58: ...tensi n nominal del aparato Compruebe el interruptor de seguridad y o si el fusible est fundido El aparato no est lo suficientemente fr o Compruebe los ajustes de temperatura Compruebe si la temperat...
Страница 59: ...e la puerta cierre correctamente El display LED no funciona correctamente El panel de control est roto La placa conductora PCB est estropeada El aparato no est enchufado El bot n no funciona En caso d...
Страница 60: ...e refrigeraci n no Par metros generales del producto Par metro Valor Par metro Valor Dimensiones totales mm Altura 1760 Volumen total dm o L 433 Anchura 595 Profundidad 695 EEI 189 Clase de eficiencia...
Страница 61: ...de vinos s 433 12 A Compartimento bodega no Alimentos frescos no Helador no 0 estrellas Fabri caci n de hielo no 1 estrella no 2 estrellas no 3 estrellas no 4 estrellas no Secci n 2 estrellas no Comp...
Страница 62: ...cos y electr nicos Una gesti n adecuada de estos residuos previene consecuencias potencialmente negativas para el medio ambiente y la salud de las personas Puede consultar m s informaci n sobre el rec...
Страница 63: ...il Scannez le QR Code pour acc der la derni re version du mode d emploi et d autres informations concernant le produit SOMMAIRE Consignes de s curit 64 Aper u de l appareil 67 Montage 68 Utilisation 7...
Страница 64: ...ez pas l appareil la fiche de secteur ou au c ble avec les mains mouill es Si possible n utilisez aucune rallonge lectrique Si toutefois vous y tes contraint veillez ce que la puissance de la rallonge...
Страница 65: ...de l appareil Pour viter la contamination des aliments veuillez suivre les instructions ci dessous Une ouverture prolong e de la porte peut entra ner une augmentation significative de la temp rature...
Страница 66: ...mp rature ambiante correspond la classe climatique indiqu e sur la plaque signal tique de l appareil SN Basses Ce r frig rateur est destin tre utilis des temp ratures ambiantes de 10 32 C N Mod r es C...
Страница 67: ...re de porte sup rieure 2 Panneau de commande et clairage 3 Filtre charbon actif 4 Ventilateur 5 Compartiment r frig r 6 Base 7 Pieds r glables 8 Charni re de porte inf rieure 9 Porte de la cave vin 10...
Страница 68: ...plaques de cuisson ou de cuisini res gaz Assurez vous que la prise que vous utilisez reste facilement accessible m me apr s l installation de la cave vin Montage Cet appareil doit tre install dans une...
Страница 69: ...nergie la plus faible possible ne placez pas l appareil pr s d une source de chaleur chauffage cuisini re etc et ne l exposez pas l ensoleillement direct vitez galement de placer l appareil dans une p...
Страница 70: ...ge allum et teint Il s agit du r glage par d faut L clairage est contr l par un capteur et l cran de la cave vin affiche l ic ne Lorsque vous ouvrez la porte de la cave vin la lumi re s allume automat...
Страница 71: ...rature du compartiment sup rieur de la cave vin est sup rieure 25 degr s pendant plus de 6 heures l alarme retentit et l cran affiche l ic ne Si la temp rature de la zone inf rieure de la cave vin es...
Страница 72: ...ainsi qu une charni re inf rieure gauche ce qui vous permet de changer de c t la porte de la cave vin Veuillez suivre les instructions ci dessous 1 Retirez les deux vis situ es sur la charni re inf r...
Страница 73: ...stique d coratifs du trou de la charni re sup rieure gauche 6 Retirez le support de porte c t gauche 7 Fixez la charni re sup rieure gauche de la porte 8 Fixez la charni re inf rieure gauche de la por...
Страница 74: ...trous pr vus sur l axe de pivot inf rieur gauche de la porte 12 Accrochez la porte dans le support sup rieur gauche en vous assurant que la porte est align e avec les supports sup rieur et inf rieur...
Страница 75: ...n et tirez d licatement le joint de la porte l endroit o vous souhaitez monter la poign e de la porte 2 Placez la rondelle sur les vis puis ins rez les deux vis dans les renfoncements de la porte 3 In...
Страница 76: ...il sont automatiquement d givr es L eau de d givrage est dirig e vers un r servoir d vaporation de condensat situ l arri re du compresseur La chaleur produite par le compresseur vapore l eau de conden...
Страница 77: ...reil pour la premi re fois il peut d gager une odeur Si cela se produit faites fonctionner l appareil vide pendant quelques heures la temp rature la plus basse Le froid va liminer l odeur Nettoyez le...
Страница 78: ...on nominale de l appareil V rifiez le commutateur de fusible et ou l tat du fusible L appareil n est pas assez froid V rifiez le r glage du contr le de la temp rature V rifiez si la temp rature ambian...
Страница 79: ...rectement L cran LED fonctionne mal Le panneau de commande est endommag La carte m re PCB est hors service L appareil n est pas branch La touche ne fonctionne pas Proc dure en cas de dysfonctionnement...
Страница 80: ...n non Param tres g n raux du produit Param tre Valeur Param tre Valeur Dimensions hors tout mm Hauteur 1760 Volume total dm ou L 433 Largeur 595 Profondeur 695 EEI 189 Classe d efficacit nerg tique G...
Страница 81: ...du vin oui 433 12 A Cave non Alimentaires fra ches non Denr es hautement p rissables non Sans toile ou fabrication de glace non 1 toile non 2 toiles non 3 toiles non 4 toiles non Zone 2 toiles non Com...
Страница 82: ...ipements lectriques et lectroniques La mise au rebut conforme aux r gles prot ge l environnement et la sant de vos semblables des cons quences n gatives Pour plus d informations sur le recyclage et l...
Страница 83: ...itivo Scansionare il codice QR seguente per accedere al manuale d uso pi attuale e per ricevere informazioni sul prodotto INDICE Avvertenze di sicurezza 84 Descrizione del dispositivo 87 Montaggio 88...
Страница 84: ...di alimentazione con le mani bagnate Non utilizzare prolunghe Tuttavia se l utilizzo di una prolunga dovesse essere necessario assicurarsi che i valori ampere del dispositivo collegato non superino i...
Страница 85: ...la contaminazione degli alimenti seguire le seguenti istruzioni Un apertura prolungata dello sportello pu portare ad un significativo aumento della temperatura nei vani dell apparecchio AVVERTENZA Du...
Страница 86: ...temperatura ambiente corrisponda alla classe climatica indicata sulla targhetta dell unit SN Bassa Questo dispositivo adatto all uso a temperature ambiente di 10 32 C N Temperata Questo dispositivo ad...
Страница 87: ...rniera superiore dello sportello 2 Pannello di controllo e luce 3 Filtro ai carboni attivi 4 Ventola 5 Vano frigo 6 Basamento 7 Piedi regolabili 8 Cerniera inferiore dello sportello 9 Sportello 10 Man...
Страница 88: ...gorifero per 24 ore prima di collegarlo alla rete elettrica in modo che il liquido refrigerante possa distribuirsi omogeneamente nel circuito di raffreddamento Pulire l interno del frigo prima del pri...
Страница 89: ...bili Per ridurre al minimo il consumo energetico non posizionare il frigo vicino a fonti di calore stufe fornelli ecc e non esporlo alla luce solare diretta E vitare inoltre di posizionare il disposit...
Страница 90: ...il simbolo per 3 secondi per selezionare la modalit desiderata 1 Modalit luce on off questa l impostazione standard La luce viene controllata da un sensore e il display mostra il simbolo La luce si ac...
Страница 91: ...eratura nel frigo rimane sopra i 25 C per oltre 6 ore l allarme inizia a suonare e il display mostra il simbolo Per disattivare l allarme basta premere un tasto a piacere Per disattivare l allarme bas...
Страница 92: ...inistra e una cerniera inferiore destra che permettono di cambiare la direzione di apertura dello sportello Procedere nel rispetto delle seguenti indicazioni 1 Svitare entrambe le viti della cerniera...
Страница 93: ...tica sul foro della cerniera superiore sinistra 6 Rimuovere il supporto dello sportello sul lato sinistro 7 Fissare la cerniera superiore sinistra 8 Fissare la cerniera inferiore sinistra 9 Coprire il...
Страница 94: ...siti fori sull asse rotante inferiore sinistro dello sportello 12 Agganciare lo sportello al gancio superiore sinistro e assicurarsi che lo sportello sia a livello con gancio superiore e inferiore Fis...
Страница 95: ...nel punto in cui si desidera montare la maniglia 2 Mettere una rondella sulle viti e farle passare entrambe attraverso i fori sullo sportello 3 Inserire la maniglia sulle viti dal lato opposto e stri...
Страница 96: ...positivo vengono automaticamente sbrinate L acqua risultante viene convogliata in un contenitore di evaporazione della condensa che si trova sul lato posteriore del compressore Il calore prodotto dal...
Страница 97: ...prima volta pu capitare che compaia uno strano odore Se cos lasciare in funzione il frigo vuoto per qualche ora a temperatura minima Il freddo eliminer l odore Pulire la copertura in plastica sui rip...
Страница 98: ...la tensione nominale del dispositivo Controllare l interruttore di sicurezza e o se il fusibile bruciato Il dispositivo non raffredda a sufficienza Controllare l impostazione del controllo della tempe...
Страница 99: ...amente Il display a LED non funziona correttamente Il pannello di controllo guasto Il circuito stampato PCB guasto La spina non collegata Il tasto non funziona Procedimento in caso di malfunzionamento...
Страница 100: ...gerazione no Parametri di prodotto generali Parametri Valore Parametri Valore Dimensioni complessive mm Altezza 1760 Volume totale dm o L 433 Larghezza 595 Profondit 695 EEI 189 Classe di efficienza e...
Страница 101: ...tina s 433 12 A Temperatura moderata no Alimenti freschi no Raffreddamento no 0 stelle o produ zione di ghiaccio no 1 stella no 2 stelle no 3 stelle no 4 stelle no Sezione a 2 stelle no Scomparto a te...
Страница 102: ...elettronici Grazie al corretto smaltimento dei vecchi dispositivi si tutela il pianeta e la salute delle persone da possibili conseguenze negative Informazioni riguardanti il riciclo e lo smaltimento...
Страница 103: ......
Страница 104: ......