background image

12

Tips for Cooking

•  Smaller ingredients usually require a slightly shorter preparation time than larger ingredients.
•  A larger amount of ingredients only requires a slightly longer preparation time, a smaller amount of ingre-

dients only requires a slightly shorter preparation time.

•  Shaking smaller ingredients halfway through the preparation time optimises the end result and can help 

prevent unevenly fried ingredients.

•  Add some oil to fresh potatoes for a crispy result. Fry your ingredients in the airfryer within a few minutes 

after you added the oil.

•  Do not prepare extremely greasy ingredients such as sausages in the airfryer.
•  Snacks that can be prepared in an oven can also be prepared in the airfryer.
•  The optimal amount for preparing crispy fries is 500 grams.
•  Use pre-made dough to prepare filled snacks quickly and easily. Pre-made dough also requires a shorter 

preparation time than home-made dough.

•  You can also use the airfryer to reheat ingredients. To reheat ingredients, set the temperature to 150°C for 

up to 10 minutes.

Cleaning and Care

Clean the appliance after every use. The tank, baking tray , basket and the inside of the appliance have a 
non-stick coating. Do not use metal kitchen utensils or abrasive cleaning materials to clean them, as this may 
damage the non-stick coating.

1. 

Remove the mains plug from the wall socket and let the appliance cool down. Note: Remove the tank to 
let the airfryer cool down more quickly.

2.  Wipe the outside of the appliance with a moist cloth.
3.  Clean the tank, basket with hot water, some washing-up liquid and a non-abrasive sponge. You can use 

a degreasing liquid to remove any remaining dirt. Note: The tank and basket are dishwasher-proof. Tip: If 
dirt is stuck to the basket, or the bottom of the tank, fill the tank with hot water with some washing-up 
liquid. Put the basket in the tank and let the tank and the basket soak for approximately 10 minutes.

4.  Clean the inside of the appliance with hot water and a non-abrasive sponge.
5.  Clean the heating element with a cleaning brush to remove any food residues.
6.  Make sure all parts are clean and dry.
7.  Push the cord into the cord storage compartment. Fix the cord by inserting it into the cord fixing slot.

Hints on Disposal

According to the European waste regulation 2002/96/EG this symbol on the product 
or on its packaging indicates that this product may not be treated as household waste. 
Instead it should be taken to the appropriate collection point for the recycling of electrical 
and electronic equipment. By ensuring this product is disposed of correctly, you will help 
prevent potential negative consequences for the environment and human health, which 
could otherwise be caused by inappropriate waste handling of this product. For more de-
tailled information about recycling of this product, please contact your local council or your 
household waste disposial service.

Содержание 10030513

Страница 1: ...10030513 10030514 Heißluftfritteuse ...

Страница 2: ...n Anforderungen genügen ziehen Sie einen Elektriker oder Ihren Stromanbieter zu Rate Das Gerät ist nicht für den kommerziellen Gebrauch sondern nur für Gebrauch im Haushalt und in ähnlichen Umgebungen vorgesehen Lesen Sie sich alle Hinweise vor der Benutzung durch und bewahren Sie die Anleitung zum späteren Nach schlagen gut auf Reparaturen dürfen nur von Fachpersonal ausgeführt werden und sind er...

Страница 3: ...l müssen sich im Korb befinden um Kontakt zu den Heizstäben zu vermeiden Decken Sie den Lufteinlass und den Luftauslass während des Betriebs nicht ab Füllen Sie den Tank nicht mit Öl es könnte sich entzünden Fassen Sie die Innenseite des Geräts während des Betriebs nicht an Geräteübersicht 1 Verdeckter Griff 7 Frittierkorb Griff 2 Lufteinlass 8 Korb Entriegelungsknopf 3 Temperaturregler 80 200 C 9...

Страница 4: ...n von Spritzwasser oder an deren Wärmequellen Lassen Sie das Gerät während des Betriebs nicht unbeaufsichtigt Kinder physisch und körperlich eingeschränkte Menschen sollten das Gerät nur benutzen wenn sie vorher von einer Aufsichtsperson ausführlich mit den Funktionen und den Sicherheitsvorkehrungen vertraut ge macht wurden Das Gerät arbeitet mit hohen Temperaturen Achten Sie darauf dass sie sich ...

Страница 5: ...Schütteln oder Wenden nicht den Entriegelungs knopf 10 Wenn Sie den Signalton hören ist die eingestellte Zeit abgelaufen Ziehen Sie den Tank aus dem Gerät und stellen Sie ihn auf einen hitzeunempfindlichen Untergrund Falls die Zutaten noch nicht gar sind schieben Sie den Tank erneut ins Gerät und garen Sie die Zutaten noch ein paar Minuten länger 11 Um die Zutaten zu entnehmen drücken Sie auf den ...

Страница 6: ...ät schneller abkühlt 2 Wischen Sie die Außenseite mit einem feuchten Lappen ab 3 Reinigen Sie den Tank und den Korb mit heißem Wasser etwas Spülmittel und einem weichen Schwamm Entfernen Sie Fettflecken mit einem Fett Reiniger Der Tank und der Korb sind spülmaschinenfest Falls Fett am Boden des Tanks festklebt füllen Sie ihn mit heißem Wasser und etwas Spülmittel Lassen Sie den Tank 10 Minuten ein...

Страница 7: ...tert die Kochmöglichkei ten und ermöglicht es auch kleinere Fische oder Fleischstücke zu garen 1 Nehmen Sie den Frittierkorb aus dem Tank 2 Setzen Sie die Pfanne in den Korb 3 Legen Sie die Lebensmittel auf die Pfanne und starten Sie den Garprozess entsprechend der Gartabelle Kuchenform Eine Kuchenform erleichtert das Backen von Ku chen in der Fritteuse 1 Geben Sie den Teig in die Kuchenform 2 Set...

Страница 8: ... shown on the appliance alternating current This appliance is designed for domestic use only In case of professional use inappropriate use or failure to comply with the instructions the manufacturer accepts no responsibility and the guarantee will be void Read and follow the instructions for use Keep them for future use Do not operate any appliance with a damaged cord or plug or after the applianc...

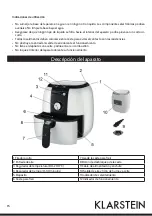
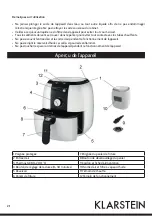
Страница 9: ...heating elements Do not cover the air inlet and the air outlet when the appliance is working Do not fill the tank with oil as this may cause a fire hazard Don t touch the inside of the appliance while it is operating Product Description 1 Concealed pull handle 7 Frying basket handle 2 Air inlet 8 Basket release button 3 Temperature knob 80 200 C 9 Mains power cord 4 Timer knob 0 30 minutes 10 Air ...

Страница 10: ...unattended This appliance is not designed to be used by people including children with a physical sensory or mental impairment or people without knowledge or experience unless they are supervised or given prior inst ructions concerning the use of the appliance by someone responsible for their safety Children must be supervised to ensure that they do not play with the appliance This electrical appl...

Страница 11: ...er the ingredients by fork or tongs Then put the tank back into the airfryer Caution Do not press the basket release button during shaking or turn over the ingredients 10 When you hear the timer bell the set preparation time has elapsed Pull the tank out of the appliance and place it on a heat resistant surface And check if the ingredients are ready If the ingredients are not ready yet simply slid...

Страница 12: ...cket and let the appliance cool down Note Remove the tank to let the airfryer cool down more quickly 2 Wipe the outside of the appliance with a moist cloth 3 Clean the tank basket with hot water some washing up liquid and a non abrasive sponge You can use a degreasing liquid to remove any remaining dirt Note The tank and basket are dishwasher proof Tip If dirt is stuck to the basket or the bottom ...

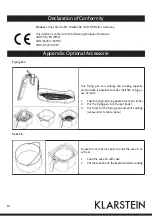
Страница 13: ...n This frying pan can enlarge the cooking capacity and to make it possible to cook small fish or big pi ece of meat 1 Take the original frying basket out of pot tank 2 Put the frying pan into the pot tank 3 Put food on the frying pan and start cooking please refer to table menu Cake Tin A cake tin can make it easier to cook the cake in an air fryer 1 Load the cake tin with cake 2 Put the cake tin ...

Страница 14: ...n del mismo Si no está seguro de que sus conexiones cumplan con estos requisitos contacte con un electricista o con su proveedor eléctrico Este aparato no ha sido concebido para un uso comercial sino doméstico o para entornos similares Lea atentamente todas las indicaciones y conserve este manual para consultas posteriores Las reparaciones deberán ser realizadas por personal autorizado y serán nec...

Страница 15: ... las resistencias No obstruya la entrada ni salida de aire durante el funcionamiento No llene el depósito con aceite podría entrar en combustión No toque el interior del aparato durante su funcionamiento Descripción del aparato 1 Tirador oculto 7 Asa de la cesta para freír 2 Entrada de aire 8 Botón de desbloqueo de la cesta 3 Regulador de temperatura 80 200 C 9 Cable de alimentación y enchufe 4 Re...

Страница 16: ...ara freír Indicaciones de uso Coloque el aparato en una superficie plana y resistente al calor lejos de salpicaduras y de otras fuentes de calor No deje el aparato en marcha si no se encuentra bajo supervisión Los niños y las personas con discapacidades físicas o psíquicas solamente podrán utilizar el aparato si han sido previamente instruidas sobre su uso y conocen las indicaciones de seguridad E...

Страница 17: ...tido el tiempo seleccionado habrá transcurrido Extraiga el depósito del aparato y colóquelo sobre una superficie resistente al calor Si los alimentos todavía no están listos vuelva a intro ducir el depósito en el aparato y fría los alimentos un par de minutos más 10 Para extraer los alimentos pulse el botón de desbloqueo y levante la cesta del depósito El depósito y los alimentos se encuentran a t...

Страница 18: ...ara que el aparato se enfríe más rápida mente 2 Limpie la parte exterior con un paño húmedo 3 Limpie la cesta y el depósito con agua caliente un poco de lavavajillas y una esponja suave Limpie las manchas de grasa con un quitagrasas El depósito y la cesta pueden lavarse en el lavavajillas Si la grasa se acumula en el fondo del depósito llénelo de agua caliente y un poco de lavavajillas Póngalo a r...

Страница 19: ...reír La sartén para freír aumenta las posibilidades de preparación y le permite preparar pequeñas porcio nes de pescado y carne 1 Retire la cesta del depósito 2 Coloque la sartén en la cesta 3 Introduzca los alimentos en la sartén e inicie el proceso siguiendo la tabla de preparación Molde para bizcocho Un molde facilita la preparación de bizcochos en la freidora 1 Añada la masa al molde 2 Coloque...

Страница 20: ...nt à une prise de terre correspondant à la tension supportée par l appareil En cas de doute sur la conformité de l installation électrique demander conseil à un électricien ou au fournisseur d électricité Cet appareil n est pas destiné à un usage commercial mais à un usage domestique ou équivalent Lire attentivement ce mode d emploi et le conserver en lieu sûr pour pouvoir s y référer ultérieureme...

Страница 21: ... Ne pas recouvrir l entrée d air et la sortie d air pendant le fonctionnement de l appareil Ne pas remplir le réservoir d huile car celle ci pourrait s enflammer Ne pas toucher les parois internes de l appareil pendant le fonctionnement de l appareil Aperçu de l appareil 1 Poignée protégée 7 Poignée du panier de friture 2 Entrée d air 8 Bouton de déverrouillage du panier 3 Thermostat 80 200 C 9 Co...

Страница 22: ...thermorésistante à l écart des éclaboussures d eau ou d autres sour ces de chaleur Ne pas laisser l appareil sans surveillance pendant son fonctionnement Les enfants ainsi que les personnes aux capacités physiques et mentales réduites ne doivent pas utiliser l appareil à moins d avoir assimilé dans le détail les consignes d utilisation et de sécurité données par la per sonne chargée de les surveil...

Страница 23: ...rrouillage pendant au moment de secouer ou de retourner 10 Lorsque le signal sonore se fait entendre cela signifie que la durée paramétrée est écoulée Sortir le réservoir de l appareil et le placer sur une surface thermorésistante Si les aliments ne sont pas encore cuits réintroduire le réservoir dans l appareil et cuire les aliments quelques minutes supplémentaires 11 Pour sortir les aliments app...

Страница 24: ...brancher l appareil de la prise Sortir le réservoir pour que l appareil refroidisse plus vite 2 Essuyer les parois externes avec une éponge humide 3 Nettoyer le réservoir et le panier à l eau chaude avec un peu de liquide vaisselle et une éponge souple Enle ver les taches de gras avec un produit dégraissant Le réservoir et le panier sont lavables au lave vaisselle Si de la graisse reste collée au ...

Страница 25: ... les possibilités de cuisson et permet également de cuire des petits poissons ou des morceaux de poisson 1 Sortir le panier de friture du réservoir 2 Placer la poêle dans le panier 3 Mettre les aliments dans la poêle et démarrer la cuisson en fonction du tableau de cuisson Moule à gâteau Un moule à gâteau facilite la cuisson de gâteau dans la friteuse 1 Introduire la pâte dans le moule à gâteau 2 ...

Страница 26: ...ivo Collegare il dispositivo solo ad una presa che corrisponde alla tensione indicata In caso di dubbi rivolgersi ad un elettricista Il dispositivo non è per uso commerciale bensì per uso domestico e in ambienti simili Prima dell uso leggere tutte le istruzioni e conservare il manuale per consultazioni future Le riparazioni possono essere eseguite solo da un tecnico competente e sono necessarie se...

Страница 27: ...o nel cestello per evitare il contatto con gli elementi riscaldanti Non ostruire le prese d aria quando il dispositivo è in uso Non riempire il serbatoio con olio potrebbe prendere fuoco Non toccare la parte interna del dispositivo durante l uso Descrizione del prodotto 1 Impugnatura 7 Impugnatura cestello 2 Ingresso aria 8 Tasto rilascio cestello 3 Manopola temperatura 80 200 C 9 Cavo e spina 4 M...

Страница 28: ...alore lontano da spruzzi d acqua o da altre fonti di calore Non lasciare il dispositivo incustodito durante l uso Questo dispositivo non deve essere utilizzato da persone compresi i bambini con capacità fisiche sensoriali o mentali ridotte da persone che manchino di esperienza e conoscenza del dispositivo a meno che siano attentamente sorvegliate o ben istruite relativamente all utilizzo del dispo...

Страница 29: ...ascio del cestello 10 Allo scadere del tempo viene emesso un segnale acustico Rimuovere il serbatoio dal dispositivo e posi zionarlo su una superficie resistente al calore Se gli ingredienti non sono ancora cotti inserire di nuovo il serbatoio nel dispositivo e cuocerli ancora per qualche minuto 11 Per rimuovere gli ingredienti premere il tasto di rilascio e sollevare il cestello dal serbatoio Il ...

Страница 30: ... possa raffreddarsi più rapidamente 2 Lavare la parte esterna con un panno umido 3 Pulire il serbatoio e il cestello con acqua calda con un po di detersivo e con una spugnetta morbida Rimuo vere le macchie di grasso con un detersivo specifico Il serbatoio e il cestello sono lavabili in lavastoviglie Se si incolla del grasso sul fondo del serbatoio versare acqua all interno e aggiungere un po di de...

Страница 31: ...na Padella La padella offre maggiori possibilità di cuocere ali menti come pesce e carne 1 Estrarre il cestello dal serbatoio 2 Inserire la padella nel cestello 3 Mettere gli alimenti in padella e avviare il proces so di cottura seguendo le indicazioni contenute nella tabella Teglia La teglia facilita la cottura di torte nel dispositivo 1 Introdurre l impasto nella teglia 2 Inserire la teglia nel ...

Отзывы: