background image

10

DE

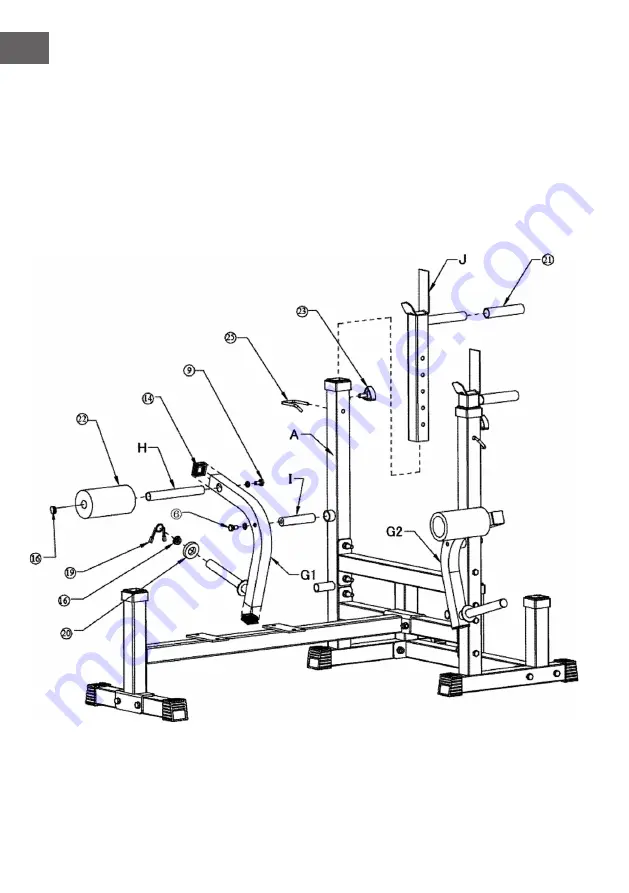
Schritt 2:

•  Befestigen Sie zwei von 38 Rohrstopfen (14) und eins von 25 Rohrstopfen 

(16) mit der Federklammer (19) an G1 und G2.

•  Montieren Sie H und I auf G1 und G2 mit einer M8x20-Schraube und 

einer Unterlegscheibe (9) sowie einer M10x20-Schraube und einer 
Unterlegscheibe (6).

•  Befestigen Sie eine von 25 Rohrstopfen (16) und zwei Schaumstoffrollen 

(22) auf H.

•  Bringen Sie zwei Haltegriffe (21) an J1 und J2 an.
•  Montieren Sie J1 / J2 auf A mit einer Verriegelung (25) und dem 

Dreikantgriff (23).

Содержание Workout Hero 3000

Страница 1: ...10006741 10029365 Workout Hero 3000 Hantelbank Weight bench Banc de musculation Banco de pesas Panca per bilanciere ...

Страница 2: ......

Страница 3: ... Sie den folgenden QR Code um Zugriff auf die aktuellste Bedienungsanleitung und weitere Informationen rund um das Produkt zu erhalten INHALTSVERZEICHNIS TECHNISCHE DATEN Artikelnummer 10006741 10029365 KONFORMITÄTSERKLÄRUNG Hersteller Chal Tec GmbH Wallstraße 16 10179 Berlin Deutschland Dieses Produkt entspricht den folgenden Europäischen Richtlinien 2011 65 EU RoHS DIN EN 957 Technische Daten 3 ...

Страница 4: ...en Sie Kinder und Haustiere von dem Gerät fern Es ist nur für den Gebrauch durch Erwachsene bestimmt Überprüfen Sie vor der Verwendung des Geräts ob alle Muttern und Schrauben fest angezogen sind Der Sicherheitsstandard des Geräts kann nur aufrechterhalten werden wenn es regelmäßig auf Beschädigungen und oder Verschleiß geprüft wird Verwenden Sie das Gerät immer wie angegeben Wenn Sie bei der Mont...

Страница 5: ... 3x M10x65 Schraube Mutter und Unterlegscheibe 5 4x M10x25 Schraube Mutter und Unterlegscheibe 6 2x M 10x20 Schrauben und Unterlegscheibe 7 2x M8x65 Schraube und Unterlegscheibe 8 4x M8x45 Schraube und Unterlegscheibe 9 6x M8x20 Schraube und Unterlegscheibe 10 6x Fuß Kappe 50 mm 11 6x Rohrbuchse 12 5x Rohrstopfen 50 mm 13 2x Rohrstopfen 45 mm 14 4x Rohrstopfen 38 mm ...

Страница 6: ...ng Ø 25 mm 18 2x Gummiabdeckung Ø 25x65 mm 19 3x Federklammer 20 3x Ø 25 mm Pufferscheibe 21 2x Haltegriff 22 8x Schaumstoffrolle 23 2x Dreikantgriff 24 1x Einstell Bolzen 25 2x Verriegelung 26 2x Einstell Druckknopf Bolzen 27 2x Karabiner Haken 28 1x Keilriemenscheibe und Buchsen ...

Страница 7: ...ohr C 1x Hauptrahmen D 1x hinteres Basisrohr E 1x Verbindungsrohr 1 F 2x Verbindungsrohr 2 G1 1x linker Butterfly Arm G2 1x rechter Butterfly Arm H 2x kurzes Schaumstoffrohr I 2x Butterfly Arm Stift J1 1x Einstell Rohr links J2 1x Einstell Rohr rechts ...

Страница 8: ...ahmen L 1x Rückenlehnen Rohr M 1x Beinverstellrahmen N 1x Beinverlängerungsrohr O 1x Arm Curl Rohr P 1x Hantelablage Q 3x Schaumstoffschlauch R Sitzpolster S Rückenpolster T Armlehne U Schulterstütze V Kabelzug 900 mm ...

Страница 9: ...en 10 den Rohrstopfen 11 und die Gummiabdeckung 18 auf A an Stecken Sie zwei Fuß Kappen 10 an B Montieren Sie eine Rohrbuchse 11 auf C und D Verschrauben Sie es mit 14 Stück M10x70 Schrauben den Muttern und Unterlegscheiben 3 sowie zwei M10x75 Schrauben ...

Страница 10: ...Sie H und I auf G1 und G2 mit einer M8x20 Schraube und einer Unterlegscheibe 9 sowie einer M10x20 Schraube und einer Unterlegscheibe 6 Befestigen Sie eine von 25 Rohrstopfen 16 und zwei Schaumstoffrollen 22 auf H Bringen Sie zwei Haltegriffe 21 an J1 und J2 an Montieren Sie J1 J2 auf A mit einer Verriegelung 25 und dem Dreikantgriff 23 ...

Страница 11: ...11 DE Schritt 3 Stecken Sie vier 60x30 mm Rohrstopfen 15 auf K Befestigen Sie zwei 50x50 mm Rohstopfen 12 und eine Keilriemenscheibe 28 mit einer M10x65 Schraube einer Mutter und einer Unterlegscheibe 4 ...

Страница 12: ...cheiben 8 Montieren Sie die Rückenlehne auf L mit zwei M8x65 Schrauben Muttern und Unterlegscheiben 7 Befestigen Sie L und K mit vier M10x25 Schrauben Muttern und Unterlegscheiben 5 einer M12x75 Schraube einer Mutter und Unterlegscheibe 1 sowie dem Einstell Bolzen 24 Bringen Sie die Teile R und S an ...

Страница 13: ...pfen 16 sowie eine 45x45 mm Rohrstopfen 13 Bringen Sie zwei Q Teile mit vier Schaumstoffrollen 22 und fünf Ø25mm Rundrohrstopfen 16 an Montieren Sie M und N mit einer M10x75 Schraube einer Mutter und einer Unterlegscheibe 2 Setzen Sie M in den Hauptteil ein und stellen Sie die Höhe mit dem Druckknopf Bolzen 26 ein ...

Страница 14: ...tigen Sie P und T an O mit zwei M10x65 Schrauben Muttern und Unterlegscheiben 4 sowie vier M8x20 Schrauben Muttern und Unterlegscheiben 9 Stellen Sie die Höhe mit dem Druckknopf Bolzen 26 ein nachdem Sie O eingesetzt haben ...

Страница 15: ... Schulterstütze U mit dem Kabel V Stellen Sie den Winkel der Rückenlehne mit dem Druckknopf Bolzen 26 ein PFLEGE UND WARTUNG Reinigen Sie die Hantelbank in regelmäßigen Abständen von Schmutz und Staub Benutzen Sie dazu ein feuchtes Tuch Verwenden Sie zur Reinigung niemals basische oder saure Reinigungsmittel benutzen Sie außerdem keinen Schwamm ...

Страница 16: ... Halten Sie diese Position 25 Sekunden Halten Sie diese Position 20 Sekunden Halten Sie diese Position 20 Sekunden Halten Sie diese Position 30 Sekunden Dehnen Sie jedes Bein ungefähr 25 Sekunden Halten Sie diese Position 30 Sekunden Halten Sie diese Position 20 Sekunden Halten Sie diese Position 5 Sekunden Halten Sie diese Position 20 Sekunden Dehnen Sie jedes Bein ungefähr 25 Sekunden Halten sie...

Страница 17: ...Informieren Sie sich über die örtlichen Regelungen zur getrennten Sammlung elektrischer und elektronischer Gerätschaften Richten Sie sich nach den örtlichen Regelungen und entsorgen Sie Altgeräte nicht über den Hausmüll Durch die regelkonforme Entsorgung der Altgeräte werden Umwelt und die Gesundheit Ihrer Mitmenschen vor möglichen negativen Konsequenzen geschützt Materialrecycling hilft den Verbr...

Страница 18: ......

Страница 19: ...ty Scan the QR code to get access to the latest user mannual and other information about the product CONTENT TECHNICAL DATA Item number 10006741 10029365 DECLARATION OF CONFORMITY Producer Chal Tec GmbH Wallstraße 16 10179 Berlin Germany This product is conform to the following European Directives 2011 65 EU RoHS DIN EN 957 Technical Data 19 Declaration of Conformity 19 Safety Instructions 20 Part...

Страница 20: ...eep children and pets away from the equipment The equipment is designed for adult use only Before using the equipment check the nuts and bolts are securely tightened The safety level of the equipment can only be maintained if it is regularly examined for damage and or wear and tear Always use the equipment as indicated If you find any defective components whilst assembling or checking the equipmen...

Страница 21: ...olt Nut and Washer 4 3x M10x65 Bolt Nut and Washer 5 4x M10x25 Bolt Nut and Washer 6 2x M10x20 Bolt and Washer 7 2x M8x65 Bolt and Washer 8 4x M 8x45 Bolt and Washer 9 6x M8x20 Bolt and Washer 10 6x Foot Cover 50 mm 11 6x Tube Bushing 12 5x Tube Plug 50 mm 13 2x Tube Plug 45 mm 14 4x Tube Plug 38 mm ...

Страница 22: ...bber Cover Ø 25 mm 18 2x Rubber Cover Ø 25x65 mm 19 3x Spring Clip 20 3x Ø 25 mm Buffer Washer 21 2x Grip Handle 22 8x Foam Roller 23 2x Triangle Handle 24 1x Degree Adjusting Bolt 25 2x Lock Catch 26 2x Adjusting Popper Pin 27 2x Gourd Buckle 28 1x Pulley and Bushing ...

Страница 23: ...nt Base Tube C 1x Main Frame D 1x Back Base Tube E 1x Connect Tube 1 F 2x Connect Tube 2 G1 1x Left Butterfly Arm G2 1x Right Butterfly Arm H 2x Short Foam Tube I 2x Butterfly Arm Pin J1 1x Adjustable Tube Left J2 1x Adjustable Tube Right ...

Страница 24: ... K 1x Seat Frame L 1x Backrest Tube M 1x Leg Adjustable Frame N 1x Leg Extension Tube O 1x Arm Curl Tube P 1x Weight Holder Q 3x Foam Tube R Seat Cover S Seat Rover T Arm Rest U Shoulder Rest V Cable 900 mm ...

Страница 25: ...ieces of foot covers 10 tube bushing 11 and rubber cover 18 on A Install 2 pieces of foot covers 10 on B Install 1 piece of tube bushing 11 on C and D Install 14 pieces of M10x70 bolts nuts and washers 3 and 2 pieces of M10x75 bolts 2 ...

Страница 26: ...d G2 Install H and I on G1 and G2 with 1 piece of M8x20 bolt and washer 9 and 1 piece of M10x20 bolt and washer 6 Install 25 pieces of tube plug 16 and 2 pieces of foam rollers 22 on H Install 2 pieces of grip handle covers 21 on J1 andJ2 Install J1 J2 on A with 1 piece of lock catch 25 and triangle handle 23 ...

Страница 27: ...27 EN Step 3 Install 4 pieces of 60x30 tube plugs 15 on K Install 2 pieces of 50x50 tube plugs 12 and 1 piece of pulley 28 M10x65 screw nut and washer 4 ...

Страница 28: ... screws nuts and washers 8 Install the backrest on L with 2 pieces of M8x65 screws nuts and washers 7 Install the L and K with 4 pieces of M10x25 screws nuts and washers 5 1 piece of M12x75 screw nut and washer 1 and the degree adjusting bolt 24 Install part R and S ...

Страница 29: ...25 mm tube plug 16 and 1 piece of 45x45 tube plug 13 Insert 2 pieces of Q 4 pieces of foam rollers 22 5 pieces of Ø 25 mm round tube plugs 16 Install M and N with 1 piece of M10x75 screw nut and washer 2 Instert M in the main body and adjust the height with the popper pin 26 ...

Страница 30: ...30 EN Step 6 Install P and T on part O with 2 pieces of M10x65 screws nuts and washers 4 and 4 pieces of M8x20 screws nuts and washers 9 Adjust the height with popper pin 26 after inserting the O ...

Страница 31: ... cable V The gourd buckle connects the shoulder rest U and the cable V Fix the angle of the backrest with the popper pin 26 CARE AND MAINTENANCE Clean the weight bench in regular intervals from dust and dirt Use a damp cloth for that Never use basic or acidic cleaners for cleaning do not use sponges for that too ...

Страница 32: ...ition 20 seconds hold this position 25 seconds hold this position 20 seconds hold this position 20 seconds hold this position 30 seconds Stretch every leg approximately 25 seconds hold this position 30 seconds hold this position 20 seconds hold this position 5 seconds hold this position 20 seconds Stretch every leg approximately 25 seconds hold this position 20 seconds hold this position 15 second...

Страница 33: ...te collection point for the recycling of electrical and electronic equipment By ensuring this product is disposed of correctly you will help prevent potential negative consequences for the environment and human health which could otherwise be caused by inappropriate waste handling of this product For more detailled information about recycling of this product please contact your local council or yo...

Страница 34: ......

Страница 35: ...ez le QR Code pour obtenir la dernière version du mode d emploi et à d autres informations concernant le produit SOMMAIRE FICHE TECHNIQUE Numéro d article 10006741 10029365 DÉCLARATION DE CONFORMITÉ Fabricant Chal Tec GmbH Wallstraße 16 10179 Berlin Allemagne Ce produit est conforme aux directives européennes suivantes 2011 65 UE RoHS DIN EN 957 Fiche technique 35 Déclaration de conformité 35 Cons...

Страница 36: ...ux domestiques éloignés de l appareil Ce dernier est destiné à un usage adulte uniquement Avant d utiliser l appareil assurez vous que toutes les vis et fixations sont bien serrées Le niveau de sécurité de l appareil ne peut être maintenu que s il est régulièrement inspecté afin de détecter tout signe éventuel de dommage et ou d usure Utilisez toujours l appareil comme spécifié Si vous remarquez d...

Страница 37: ... 3x vis M10x65 écrou et rondelle 5 4x vis M10x25 écrou et rondelle 6 2x vis M10x20 et rondelle 7 2x vis M8x65 et rondelle 8 4x vis M8x45 et rondelle 9 6x vis M8x20 et rondelle 10 6x vis embout de pied de 50 mm 11 6x bagues de tubes 12 5x bouchons de tubes de 50 mm 13 2x bouchons de tubes de 45 mm 14 4x bouchons de tubes de 38 mm ...

Страница 38: ... Ø 25 mm 18 2x protections en caoutchouc de Ø 25x65 mm 19 3x pinces à ressort 20 3x Ø 25 mm rondelles tampons 21 2x poignées 22 8x rouleaux de mousse 23 2x poignées triangulaires 24 1x boulon de réglage 25 2x verrouillages 26 2x perno del interruptor de ajuste 27 2x crochets de mousquetons 28 1x poulie et manchons ...

Страница 39: ... cadre principal D 1x tube arrière de la base E 1x tube de connexion 1 F 2x tube de connexion 2 G1 1x bras papillon gauche G2 1x bras papillon droit H 2x petits tubes de mousse I 2x tiges de bras papillon J1 1x tube de réglage gauche J2 1x tube de réglage droit ...

Страница 40: ...sier M 1x cadre réglable des jambes N 1x tube rallonge pour les jambes O 1x tube de curl pour les bras P 1x support d haltère Q 3x tuyaux de mousse R Siège rembourré S Dossier rembourré T Accoudoir U Support d épaules V Câble de traction 900 mm ...

Страница 41: ...ux embouts de pieds 10 le bouchon de tuyau 11 et la protection en caoutchouc 18 à A Fixez deux embouts de pieds 10 à B Montez une bague de tube 11 sur C et D Assemblez les avec 14 boulons M10x70 écrous et rondelles 3 et deux boulons M10x75 ...

Страница 42: ...ssort 19 de G1 et G2 Montez H et I sur G1 et G2 avec un boulon M8x20 et une rondelle 9 un boulon M10x20 et une rondelle 6 Fixez l un des 25 bouchons de tube 16 et deux rouleaux en mousse 22 sur H Fixez deux poignées 21 à J1 et J2 Montez J1 J2 sur A avec un verrouillage 25 et la poignée triangulaire 23 ...

Страница 43: ...43 FR Étape 3 Insérez quatre bouchons de tube de 60x30 mm 15 sur K Assemblez deux bouchons de tube de 50x50 mm 12 et une poulie à courroie trapézoïdale 28 avec une vis un écrou et une rondelle M10x65 4 ...

Страница 44: ...45 écrous et rondelles 8 Montez le dossier sur L avec deux boulons M8x65 des écrous et des rondelles 7 Fixez L et K à l aide de quatre boulons M10x25 écrous et rondelles 5 d un boulon M12x75 d un écrou et d une rondelle 1 et d un boulon de réglage 24 Fixez les pièces R et S ...

Страница 45: ...t un bouchon de tube de 45x45mm 13 Assemblez deux pièces Q à l aide de quatre rouleaux en mousse 22 et de cinq bouchons de tube rond de Ø25mm 16 Montez M et N avec un boulon M10x75 un écrou et une rondelle 2 Insérez M dans le corps principal et réglez la hauteur à l aide du boulon à bouton poussoir 26 ...

Страница 46: ... Étape 6 Fixez P et T à O à l aide de deux boulons M10x65 écrous et rondelles 4 et de quatre boulons M8x20 écrous et rondelles 9 Réglez la hauteur à l aide du boulon à bouton poussoir 26 après avoir inséré O ...

Страница 47: ...ns relient le support d épaules U au câble V Réglez l angle du dossier à l aide du boulon à bouton poussoir 26 ENTRETIEN ET MAINTENANCE Nettoyez régulièrement le banc de musculation pour retirer la saleté et la poussière Utilisez un chiffon humide N utilisez jamais de produit alcalin ou acide pour le nettoyage n utilisez pas non plus d éponge ...

Страница 48: ...n pendant 25 secondes Maintenez cette position pendant 20 secondes Maintenez cette position pendant 20 secondes Maintenez cette position pendant 30 secondes Maintenez cette position pendant 25 secondes Maintenez cette position pendant 30 secondes Maintenez cette position pendant 20 secondes Maintenez cette position pendant 5 secondes Maintenez cette position pendant 20 secondes Etirez chaque jambe...

Страница 49: ...2012 19 UE Renseignez vous sur les dispositions en vigueur dans votre région concernant la collecte séparée des appareils électriques et électroniques Respectez les et ne jetez pas les appareils usagés avec les ordures ménagères La mise en rebut correcte du produit usagé permet de préserver l environnement et la santé Le recyclage des matériaux contribue à la préservation des ressources naturelles...

Страница 50: ......

Страница 51: ... código QR para obtener acceso al manual de usuario más reciente y otra información sobre el producto ÍNDICE DATOS TÉCNICOS Número de artículo 10006741 10029365 DECLARACIÓN DE CONFORMIDAD Fabricante Chal Tec GmbH Wallstraße 16 10179 Berlín Alemania Este producto cumple con las siguientes directivas europeas 2011 65 UE RoHS DIN EN 957 Datos técnicos 51 Declaración de conformidad 51 Instrucciones de...

Страница 52: ...cualquiera de estos síntomas debe consultar a un médico antes de continuar el ejercicio Mantenga a los niños y a las mascotas alejados del aparato Está destinado para el uso de los adultos solamente Antes de utilizar la unidad compruebe que todos los tornillos y tuercas estén bien apretados El estándar de seguridad del dispositivo sólo se puede mantener si se revisa regularmente en cuanto a daños ...

Страница 53: ...x tornillos M10x65 tuerca y arandela 5 4x tornillos M10x25 tuerca y arandela 6 2x tornillos M 10x20 y arandelas 7 2x tornillos M8x65 y arandelas 8 4x tornillos M8x45 y arandelas 9 6x tornillos M8x20 y arandelas 10 6x tapa de pie 50 mm 11 6x manguitos de tubo 12 5x tapones para tubos de 50mm 13 2x tapones para tubos de 45 mm 14 4x tapones para tubos de 38mm ...

Страница 54: ...5 mm 18 2x cubierta de goma Ø 25x65 mm 19 3x abrazadera de resorte 20 3x arandela tampón Ø 25 mm 21 2x manija 22 8x rodillos de espuma 23 2x manija triangular 24 1x perno de ajuste 25 2x cierre 26 2x perno del interruptor de ajuste 27 2x gancho de carabina 28 1x polea de correa trapezoidal y casquillos ...

Страница 55: ...tubo base delantero D 1x tubo base trasero E 1x Tubo de unión 1 F 2x Tubo de unión 2 G1 1x brazo mariposa izquierdo G2 1x brazo mariposa derecho H 2x tubo de espuma corto I 2x pasador del brazo mariposa J1 1x tubo de ajuste izquierdo J2 1x tubo de ajuste derecho ...

Страница 56: ... 1x armazón de ajuste de patas N 1x tubo de extensión de pierna O 1x tubo para rizos de brazo P 1x estante para barras Q 3x mangueras de espuma R acolchados de asiento S acolchado del respaldo T reposabrazos U soporte de hombros V Cable de tracción 900 mm ...

Страница 57: ... las dos tapas de pie 10 el tapón de tubo 11 y la cubierta de goma 18 en A Coloque dos tapas de pie 10 en B Monte un casquillo de tubería 11 en C y D Atorníllelo con 14 tornillos M10x70 tuercas y arandelas 3 y dos tornillos M10x75 ...

Страница 58: ...2 con la abrazadera de resorte 19 Monte H e I en G1 y G2 utilizando un tornillo M8x20 y arandela 9 y un tornillo M10x20 o arandela 6 Coloque uno de los 25 tapones de tubo 16 y dos rodillos de espuma 22 en H Conecte dos manijas 21 a J1 y J2 Monte J1 J2 en A con un cierre 25 y el manillar triangular 23 ...

Страница 59: ...59 ES Paso 3 Inserte cuatro tapones de tubo de 60x30 mm 15 en K Sujete dos tapones de tubo 50x50 mm 12 y una polea de correa trapezoidal 28 con un tornillo M10x65 una tuerca y una arandela 4 ...

Страница 60: ...nillos M8x45 tuercas y arandelas 8 Monte el respaldo en L con dos tornillos M8x65 tuercas y arandelas 7 Atornille L y K con cuatro tornillos M10x25 tuercas y arandelas 5 un tornillo M12x75 una tuerca y arandela 1 y el perno de ajuste 24 Fije las piezas R y S ...

Страница 61: ...de Ø 25 mm 16 y un tapón de tubo de 45x45 mm 13 Sujete dos piezas Q con cuatro rodillos de espuma 22 y cinco tapones para tubo redondo de Ø25mm 16 Monte M y N utilizando un tornillo tuerca y arandela 2 M10x75 Inserte M en la parte principal y ajuste la altura con el perno del interruptor 26 ...

Страница 62: ...62 ES Paso 6 Sujete P y T a O con dos tornillos M10x65 tuercas y arandelas 4 y cuatro tornillos M8x20 tuercas y arandelas 9 Ajuste la altura con el perno del pulsador 26 después de haber insertado O ...

Страница 63: ...ina conectan el soporte de hombros U con el cable V Ajuste el ángulo del respaldo con el perno del pulsador 26 CUIDADO Y MANTENIMIENTO Limpie el banco de pesas de suciedad y polvo a intervalos regulares Para esto utilice un paño húmedo Nunca utilice productos de limpieza alcalinos o ácidos para la limpieza no utilice una esponja ...

Страница 64: ...ición durante 25 segundos Mantenga esta posición durante 20 segundos Mantenga esta posición durante 20 segundos Mantenga esta posición durante 30 segundos Mantenga esta posición durante 25 segundos Mantenga esta posición durante 30 segundos Mantenga esta posición durante 20 segundos Mantenga esta posición durante 5 segundos Mantenga esta posición durante 20 segundos Estire cada pierna por unos 25 ...

Страница 65: ... Infórmese sobre las leyes territoriales que regulan la recogida separada de aparatos eléctricos y electrónicos Respete las leyes territoriales y no arroje aparatos viejos al cubo de la basura doméstica Una retirada de aparatos conforme a las leyes contribuye a proteger el medio ambiente y a las personas a su alrededor frente a posibles consecuencias perjudiciales para la salud El reciclaje ayuda ...

Страница 66: ......

Страница 67: ...l dispositivo Scansionare il codice QR seguente per accedere al manuale d uso più attuale e per ricevere informazioni sul prodotto INDICE DATI TECNICI Numero articolo 10006741 10029365 DICHIARAZIONE DI CONFORMITÀ Produttore Chal Tec GmbH Wallstraße 16 10179 Berlino Germania Questo prodotto è conforme alle seguenti direttive europee 2011 65 UE RoHS DIN EN 957 Dati tecnici 67 Dichiarazione di confor...

Страница 68: ... medico prima di procedere con l allenamento Tenere bambini e animali domestici lontano dal dispositivo Il dispositivo può essere utilizzato solo da persone adulte Controllare prima di utilizzare il dispositivo se tutte le viti e i dati sono stretti saldamente Lo standard di sicurezza del dispositivo può essere garantito solo se viene controllato regolarmente per eventuali danneggiamenti e o usura...

Страница 69: ...ite dado rondella 3 pezzi M10x65 5 Vite dado rondella 4 pezzi M10x25 6 Vite e rondella 2 pezzi M10x20 7 Vite e rondella 2 pezzi M8x65 8 Vite e rondella 4 pezzi M8x45 9 Vite e rondella 6 pezzi M8x20 10 6 tappi per piedi d appoggio da 50 mm 11 6 boccole per tubo 12 5 tappi per tubo da 50 mm 13 2 tappi per tubo da 45 mm 14 4 tappi per tubo da 38 mm ...

Страница 70: ... coperture in gomma da Ø 25 mmx65 mm 19 3 fermi a molla 20 3 dischi di protezione da Ø 25 mm 21 2 impugnature 22 8 rulli in espanso 23 2x poignées triangulaires 24 1 bullone di regolazione 25 2 blocchi 26 2 bulloni tasti a pressione di regolazione 27 2 moschettoni 28 1 x puleggia a gola trapezoidale e boccole ...

Страница 71: ...le D 1 tubo base posteriore E 1 tubo di collegamento 1 F 2 tubi di collegamento 2 G1 1 braccio per Butterfly sinistro G2 1 braccio per Butterfly destro H 2 tubi corti in espanso I 2 perni braccio Butterfly J1 1 tubo di regolazione sinistro J2 1 tubo di regolazione destro ...

Страница 72: ... M 1 telaio di regolazione gambe N 1 tubo di prolunga gambe O 1 tubo per Arm Curl P 1 appoggio per bilanciere Q 3 tubi flessibili in espanso R Imbottitura seduta S Imbottitura schienale T Bracciolo U Sostegno spalle V Cavo di trazione da 900 mm ...

Страница 73: ...Montare due tappi per i piedi 10 i tappi del tubo 11 e le coperture in gomma 18 su A Inserire due tappi per piedi 10 su B Montare una boccola per tubo 11 su C e D Avvitare con 14 viti M10x70 i dadi le rondelle 3 e due viti M10x75 ...

Страница 74: ...ermo a molla 19 su G1 e G2 Montare H e I su G1 e G2 con una vite M8x20 una rondella 9 una vite M10x20 e una rondella 6 Fissare un tubo per tubo da 25 16 e due rulli in espanso 22 su H Montare due impugnature 21 su J1 e J2 Montare J1 J2 su A con un blocco 25 e l impugnatura triangolare 23 ...

Страница 75: ...75 IT 3 passaggio Inserire quattro tappi per tubo da 60x30 mm 15 su K Fissare due tappi per tubo da 50x50 mm 12 e una puleggia a gola trapezoidale 28 con una vite M10x65 un dado e una rondella 4 ...

Страница 76: ...K con quattro viti M8x45 dadi e rondelle 8 Montare lo schienale su L con due viti M8x65 dadi e rondelle 7 Fissare L e K con quattro viti M10x25 dadi e rondelle 5 una vite M12x75 un dado una rondella 1 e il bullone di regolazione 24 Montare i componenti R e S ...

Страница 77: ...tubo da Ø 25mm 16 e un tappo per tubo da 45x45 mm 13 Montare due componenti Q con quattro rulli in espanso 22 e cinque tappi per tubi tondi da Ø25mm 16 Montare M e N con una vite M10x75 un dado e una rondella 2 Inserire M nel componente principale e regolare l altezza con il bullone tasto a pressione 26 ...

Страница 78: ...78 IT 6 passaggio Fissare P e T a O con due viti M10x65 dadi rondelle 4 e quattro viti M8x20 dadi rondelle 9 Regolare l altezza con il bullone tasto a pressione 26 dopo aver inserito O ...

Страница 79: ...i uniscono i sostegni per le spalle U con il cavo V Regolare l inclinazione dello schienale con il bullone tasto a pressione 26 PULIZIA E MANUTENZIONE Pulire la panca a intervalli regolari da sporco e polvere Utilizzare un panno umido Non utilizzare mai detergenti basici o acidi per la pulizia e non utilizzare spugne ...

Страница 80: ...20 secondi Tenere la posizione per 25 secondi Tenere la posizione per 20 secondi Tenere la posizione per 20 secondi Tenere la posizione per 30 secondi Tenere la posizione per 25 secondi Tenere la posizione per 30 secondi Tenere la posizione per 20 secondi Tenere la posizione per 15 secondi Tenere la posizione per 20 secondi Distendere ogni gamba per circa 25 secondi Tenere la posizione per 20 seco...

Страница 81: ... normali Informarsi sulle disposizioni vigenti per la raccolta di dispositivi elettrici ed elettronici Attenersi alle disposizioni vigenti e non smaltire i vecchi dispositivi con i rifiuti domestici Grazie al corretto smaltimento dei vecchi dispositivi si tutela il pianeta e la salute delle persone da possibili conseguenze negative Il riciclo di materiali aiuta a diminuire il consumo di materie pr...

Страница 82: ......

Страница 83: ......

Страница 84: ......

Отзывы: