background image

43

EN

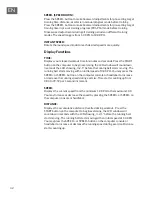
CALORIES: 

Displays the total calories burned during your workout. Press the START 
button on the computer to begin exercising, the LCD window will countdown 
3 seconds the LCD showing „3-2-1“ before the running belt starts moving. The 
running belt starts moving with an initial speed of 0.8 KPH. You may press the 
SPEED+ or SPEED- button on the computer console or handlebar to increase 
or decrease the running speed during exercise. Calorie starts counting up. 
(This data is a rough guide for comparison of different exercise sessions and 
should not be used in medical treatment).

PULSE: 

Displays your current heart rate in beats per minute (BPM). To activate, grip 
the hand pulse sensors during exercise and the pulse will display after 2-5 
seconds. For a more accurate reading, grip pulse sensors with both hands.

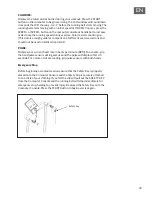
Emergency Stop

Before beginning a workout session ensure that the Safety Key is properly 
placed onto the Computer Console and the Safety Clip is securely attached 
to an article of your clothing. If you fall the clip will pull out the SAFETY KEY 
from the Computer Console and the running belt will stop immediately for 
emergency stop, helping to prevent injury. Replaced the Safety Key onto the 
Computer Console. Press the START button to begin exercise again.

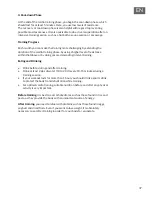
Safety key

Содержание Treado Advanced 2.0

Страница 1: ...10033230 Treado Advanced 2 0 Laufband Treadmill Pavimento móvil Tapis de course Marciapiede mobile ...

Страница 2: ......

Страница 3: ...ng und weitere Informationen rund um das Produkt zu erhalten INHALTSVERZEICHNIS Sicherheitshinweise 4 Einzelteile und Zusammenbau 6 Gerät falten 10 Cardiotraining im Überblick 11 Aufwärmung vor dem Training 14 Bedienung des Computers 16 Reinigung und Pflege 20 Anpassung des Laufbands 22 Bedienung per App 23 Fehlerbehebung 24 Hinweise zur Entsorgung 25 TECHNISCHE DATEN Artikelnummer 10033230 Stromv...

Страница 4: ...wie beispielsweise an Pools etc Der Sicherheitsabstand rund um das Gerät muss mindestens 0 5 Meter betragen Konsultieren Sie vor der Verwendung der Trainingsprogramme zwingend einen Arzt um feststellen zu lassen ob Sie körperliche oder gesundheitliche Probleme haben welche durch die Verwendung des Geräts ein Risiko für Ihre Gesundheit und Sicherheit darstellen könnten oder Sie daran hindern das Ge...

Страница 5: ...ende Hebetechniken und suchen Sie sich gegebenenfalls Hilfe einer weiteren Person Alle beweglichen Geräteteile z B Pedale Handgriffe Sattel etc müssen wöchentlich gewartet werden Überprüfen Sie diese vor jeder Verwendung Sollte etwas kaputt oder lose sein reparieren oder fixieren Sie das entsprechende Teil sofort Fahren Sie erst dann mit der Verwendung des Geräts fort wenn Sie den guten Ausgangszu...

Страница 6: ...E EINZELTEILE UND ZUSAMMENBAU Einzelteile für den Zusammenbau 28 20 19 9 M8 16 x 2 M8 40 x 2 Federscheibe M8 12 x 2 M6 20 x 1 1 Sicherheits schlüssel Notstopp x 1 Inbusschlüssel x 2 Schraubenschlüssel x 1 ...

Страница 7: ...llen Sie das Gerät in aufrechter Position auf eine ebene flache Oberfläche B Ziehen Sie den Knopf 28 leicht an indem Sie diesen gegen den Uhrzeigersinn in das Standrohr drehen und ziehen Sie diesen mit dem Schraubenschlüssel fest C Ziehen Sie den Federknopf 20 an indem Sie ihn im Uhrzeigersinn in das Loch im linken Standrohr 84 drehen ...

Страница 8: ...ie den Lenker 70 an beiden Enden des Standrohrs und ziehen Sie die Schrauben mit dem mitgelieferten Inbusschlüssel an C Schließen Sie das Kabel das vom Computerdisplay 5 kommt an die Hauptsteuerkabelbuchse an der rechten Lenkerhalterung des rechten Standrohrs an D Montieren Sie beide Lenkerabdeckungen 19 auf den Lenker 70 ...

Страница 9: ...9 DE 3 A Drehen Sie das Computerdisplay 5 nach oben oder unten um das Loch für die Inbusschraube auszurichten B Ziehen Sie die Computerdisplay 5 durch Anziehen der Zylinderschraube 9 fest ...

Страница 10: ...ition zu arretieren Um den Sicherheitsverschluss nicht zu verlieren schrauben Sie den Sicherheitsverschluss in aufrechter Position an den unteren und oberen Rahmen Auseinanderfalten Lösen Sie die Sicherheitsverriegelung am unteren Rahmen lösen Sie die ausziehbare Sicherheitsverriegelung und senken Sie den unteren Rahmen auf den Boden ab Schrauben Sie die Sicherheitsverriegelung an den unteren Rahm...

Страница 11: ...tehenden Trainingsergebnisse Ein optimales Training beinhaltet eine Aufwärmphase 1 eine intensivere Cardio Trainingsphase 2 sowie die abschließende Erholungsphase 3 Wenn Sie Fortschritte machen oder Kalorien verbrennen wollen sollten Sie diese 3 Phasen durchlaufen und so mindestens 20 30 Minuten auf dem Ergometer trainieren 1 Aufwärmphase Beginnen Sie Ihr Training immer mit einem geringen Widersta...

Страница 12: ...winnen Die anaerobe Energiegewinnung ist zwar in kleinem Umfang auch aktiv aber nur so weit als alle dadurch produzierte Milchsäure gleichzeitig wieder abgebaut werden kann In diesem aeroben Trainingsbereich sollten Sie den Großteil Ihres Trainings absolvieren Wenn Sie die Belastung weiter steigern dann kommen Sie irgendwann an eine Grenze an der die auf Sauerstoff basierte Energiegewinnung nicht ...

Страница 13: ...ng durchführen Essen und Trinken Trinken Sie vor während und nach dem Training Trinken Sie während des Trainings mindestens 2 Schluck Wasser 10 bis 20 cl alle 10 15 Minuten Wenn Ihr Training länger als 1 Stunde dauert sollten Sie ein Sportgetränk trinken um dem Körper vor dem Dehydrieren beim Sport zu schützen Für ein optimales Cardio Training ist eine angepasste Ernährung sowohl vor als auch nach...

Страница 14: ...14 DE AUFWÄRMUNG VOR DEM TRAINING ...

Страница 15: ...reckt nach oben Verbleiben Sie in dieser Position jeweils einige Sekunden pro Seite 4 Hüfte beugen beide Arme oben geschlossen Auch hier verbleiben Sie auf jeder Seite die Übung ist nun etwas intensiver da der zweite Arm mitzieht 5 Stellen sie sich auf ein Bein und halten den Spann mit der Hand Hier mobilisieren Sie ihr Fußgelenk und strecken den Oberschenkel leicht Stützen Sie sich gegebenenfalls...

Страница 16: ...heitsclip sicher an einem Kleidungsstück befestigt ist Hinweis Stehen Sie immer auf den Seitenschienen wenn Sie das Laufband starten Starten Sie das Laufband niemals wenn Sie auf dem Laufband stehen Funktionstasten START Drücken Sie die START Taste um das Training in einem anderen Trainingsmodus zu starten STOP Drücken Sie die STOP Taste um das Training in einem anderen Trainingsmodus zu beenden ...

Страница 17: ...ningszeit Distanz oder Kalorie einzustellen Drücken Sie die Taste SPEED um die Soll Trainingszeit im voreingestellten Trainingsprogramm P01 P16 vor dem Training nach oben zu korrigieren Sie können die Geschwindigkeit während aller Trainingszeiten in verschiedenen Trainingsmodi anpassen Der Geschwindigkeitsbereich reicht von 1 0 km h bis 10 0 km h PROG Programme Drücken Sie die Taste PROG um ein vo...

Страница 18: ...n Bewegung setzt Das Laufband läuft mit einer Anfangsgeschwindigkeit von 0 8 km h an Sie können die Tasten SPEED oder SPEED am Computerdisplay oder am Lenker drücken um die Laufgeschwindigkeit während des Trainings zu erhöhen oder zu verringern Die Zeit zählt von 0 00 bis 99 59 und wird in Schritten von 1 Sekunde hochgezählt SPEED Geschwindigkeit Zeigt die aktuelle Geschwindigkeit von minimal 1 0 ...

Страница 19: ...n und sollten keinesfalls bei einer medizinischen Behandlung zu Rate gezogen werden PULSE Puls Zeigt Ihren aktuellen Puls in Herzschlägen pro Minute BPM an Halten Sie zum Aktivieren dieser Funktion während des Trainings die Handpulssensoren fest Der Puls wird 2 5 Sekunden später angezeigt Umgreifen Sie zum Ermöglichen einer genaueren Messung beide Handpulssensoren Notfallstopp Überprüfen Sie vor j...

Страница 20: ...s zu Beschädigungen des Bildschirms führen könnte Lagerung Lagern Sie das Gerät in einer sauberen und trockenen Umgebung im Innenbereich Lassen Sie das Gerät nie im Außenbereich stehen und verwenden Sie es auch niemals draußen Stellen Sie sicher dass der Hauptschalter sich in der Position aus befindet und der Netzstromstecker aus der Wandsteckdose gezogen wurde bevor Sie das Gerät lagern Schmiermi...

Страница 21: ...aufbandes auf die Oberseite des Laufdecks Schalten Sie das Gerät ein und lassen Sie es für 3 5 Minuten bei niedriger Geschwindigkeit laufen damit das Schmiermittel sich gleichmäßig verteilt Hinweis Tragen Sie niemals zu viel Schmiermittel auf Sollte überschüssiges Schmiermittel herauslaufen wischen Sie dieses sofort ab ...

Страница 22: ...elieferten 6 mm Inbusschlüssel um an den hinteren Rolleneinstellschrauben zu drehen um das Band zu zentrieren Wenn sich das Laufband nach links verschiebt drehen Sie die linke Einstellschraube 1 4 Umdrehung im Uhrzeigersinn Das Laufband sollte dann beginnen sich selbst zu korrigieren Wenn sich das Laufband nach rechts verschiebt dann drehen Sie die rechte Einstellschraube 1 4 Umdrehung im Uhrzeige...

Страница 23: ...weils mit 1 4 Umdrehung im Uhrzeigersinn Schalten Sie dann den Hauptschalter wieder ein und starten Sie das Laufband mit einer Geschwindigkeit von 8 10 km h Laufen Sie auf dem Laufband weiter um festzustellen ob das Band noch rutscht Wiederholen Sie diesen Vorgang bis das Band nicht mehr rutscht BEDIENUNG PER APP Das Gerät lässt sich auch über die App FitShow bedienen Scannen Sie den folgenden QR ...

Страница 24: ...um Ersetzen der Sicherung Der Schutzschalter des Laufbands wurde aktiviert Warten Sie 5 Minuten und versuchen Sie erneut das Laufband einzuschalten Das Laufband schlingert Das Laufband wurde nicht fest genug gespannt Passen Sie die Spannung des Laufbands an Das Laufband stockt wenn darauf gegangen wird Es wurde nicht genug Schmiermittel auf dem Laufdeck aufgetragen Tragen Sie Schmiermittel auf Das...

Страница 25: ... Sie Altgeräte nicht über den Hausmüll Durch die regelkonforme Entsorgung der Altgeräte werden Umwelt und die Gesundheit ihrer Mitmenschen vor möglichen negativen Konsequenzen geschützt Materialrecycling hilft den Verbrauch von Rohstoffen zu verringern Das Produkt enthält Batterien die der Europäischen Richtlinie 2006 66 EG unterliegen und nicht mit dem normalen Hausmüll entsorgt werden dürfen Bit...

Страница 26: ......

Страница 27: ...l and other information about the product CONTENT Safety Instructions 28 Hardware and Assemply 30 Folding the Unit 34 Overview of Cardio Training 35 Warming Up before a Workout 38 Operating the Computer 40 Cleaning and Care 44 Belt Adjustment 46 Operation via App 47 Troubleshooting 48 Hints on Disposal 49 TECHNICAL DATA Item number 10033230 Power supply 220 240 V 50 60 Hz DECLARATION OF CONFORMITY...

Страница 28: ... areas such as swimming pool sauna etc For safety space the equipment must have at least 0 5 meter of free space all around it Before starting any exercise program you must consult your doctor to determine if you have any physical or health conditions that could create a risk to your health and safety or prevent you from using the equipment properly Your doctor s advice is essential if you are tak...

Страница 29: ... injure your back always use proper lifting techniques and or seek assistance if necessary All moveable accessories e g pedal handlebar saddle etc require weekly maintenance Check them before use every time If anything broken or loose please fix them immediately You may continue using them only after they return to good conditions Pay attention to the absence of a free wheel system which will caus...

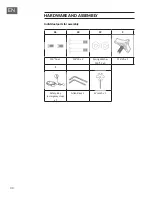
Страница 30: ...30 EN HARDWARE AND ASSEMBLY Individual parts for assembly 28 20 19 9 M8 16 x 2 M8 40 x 2 Spring Washer M8 12 x 2 M6 20 x 1 1 Safety Key emergency stop x 1 Allen Key x 2 Wrench x 1 ...

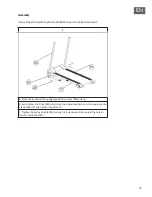
Страница 31: ...the treadmill in the upright position on a level flat surface B Semi tighten the Knob 28 by turning it in a clockwise direction into the holes on the Stand Tube 77 and tighten it by Wrench C Tighten the Spring Knob 20 by turning it in a clockwise direction into the hole on the Left Stand Tube 84 ...

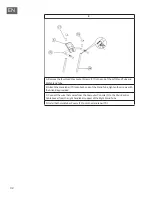
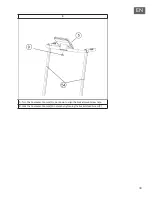
Страница 32: ... Attach the Handlebar 70 onto both ends of the Stand Tube tighten the screws with the Allen Key provided C Connect the wire that comes from the Computer Console 5 to the Main Control Cable Socket from the right handlebar support of the Right Stand Tube D Install both Handlebar Covers 19 onto the Handlebar 70 ...

Страница 33: ...33 EN 3 A Turn the Computer Console 5 up or down to align the Socket Head Screw hole B Lock the Computer Console 5 in place by tightening the Socket Head Screw 9 ...

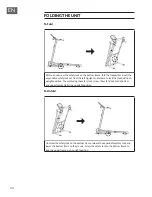
Страница 34: ... to lock the treadmill in an upright position To avoid losing the safety lock screw the safety lock to the bottom and upper frames whilst in an upright position To Unfold Unscrew the safety lock on the bottom frame release the expandable safety lock and lower the bottom frame to the ground Screw the safety lock to the bottom frame to lock the upper frame in an upright position ...

Страница 35: ...ted results An optimal training session includes 1 a warm up phase 2 an intensive cardio training phase and finally 3 a cool down phase If you want to progress or burn calories you should go through these 3 phases as well as exercise for at least 20 30 minutes on the ergometer 1 Warm up Phase Always start your training session with a low resistance level A warm up phase of 5 10 minutes is importan...

Страница 36: ...acilitate energy production At the same time the anaerobic production of energy is also active but only to a small extent The lactic acid produced in this process can be broken down to produce energy Most of your training should be aerobic training If you continue to increase the intensity you will eventually come to the threshold where aerobic energy production is no longer able to increase its o...

Страница 37: ...r by doing a more demanding interval training Eating and Drinking Drink before during and after training Drink at least 2 sips of water 10 to 20 cl every 10 15 minutes during a training session If your workout lasts for more than 1 hour you should drink a sports drink to protect the body from dehydration while training For optimal cardio training suitable nutrition before and after any physical ac...

Страница 38: ...38 EN WARMING UP BEFORE A WORKOUT ...

Страница 39: ...s position for several seconds on each side 4 Bend to the side and raise both arms above your head with palms together Again remain on each side for several seconds The exercise is now a bit more intense with the second arm joining 5 Stand on one leg and hold the instep of the other foot with your hand Mobilize it so as to stretch the thigh lightly If necessary hold onto something to keep your bal...

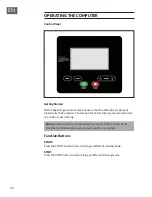
Страница 40: ...and the Safety Clip is securely attached to an article of your clothing Note Always stand on the side rails when you start the treadmill never start the treadmill while you are standing on the running belt Function Buttons START Press the START button to start training on different training mode STOP Press the STOP button to stop training on different training mode ...

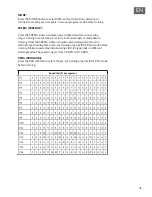
Страница 41: ...me distance or calorie in manual program mode before training Press the SPEED button to make upward adjustments for pre setting target training time in pre set training program P01 P16 mode before training Makes speed adjustments during all training periods on different training modes The speed range is from 1 0 KPH to 10 0 KPH PROG PROGRAM Press the PROG button to select the pre set training prog...

Страница 42: ...unning belt starts moving The running belt starts moving with an initial speed of 0 8 KPH You may press the SPEED or SPEED button on the computer console or handlebar to increase or decrease the running speed during exercise Time starts counting up from 0 00 to 99 59 per 1 second increment SPEED Displays the current speed from the minimum 1 0 KPH to the maximum 10 0 You may increase or decrease th...

Страница 43: ... should not be used in medical treatment PULSE Displays your current heart rate in beats per minute BPM To activate grip the hand pulse sensors during exercise and the pulse will display after 2 5 seconds For a more accurate reading grip pulse sensors with both hands Emergency Stop Before beginning a workout session ensure that the Safety Key is properly placed onto the Computer Console and the Sa...

Страница 44: ...readmill especially the computer console out of direct sunlight to prevent damage to the screen Storage Store the treadmill in a clean and dry indoor environment Never leave or use the unit outdoors Ensure the master power switch is off and the power cord is un plugged from wall outlet Lubrication Lubricating under the running belt will ensure superior performance and extend its life expectancy Af...

Страница 45: ... lubricant under the centre of the running belt on the top surface of the running deck Run on the treadmill at a slow speed for 3 to 5 minutes to evenly distribute lubricant Note Do not over lubricate running deck Any excess lubricant that comes out should be wiped off ...

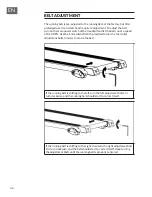
Страница 46: ...e the 6 mm Allen Wrench provided to turn the rear roller adjustment bolts in order to centre the belt If the running belt is shifting to the left turn the left adjustment bolt 1 4 turn clockwise and the running belt should start to correct itself If the running belt is shifting to the right then turn the right adjustment bolt 1 4 turn clockwise and the belt should start to correct itself Keep turn...

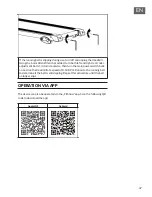
Страница 47: ... bolts 1 4 turn clockwise then turn the main power switch back on and run the treadmill at a speed of 8 10 KPH Run on to the running belt to determine if the belt is still slipping Repeat this procedure until the belt no longer slips OPERATION VIA APP The device can also be operated via the FitShow app Scan the following QR code to download the app Apple iOS Android ...

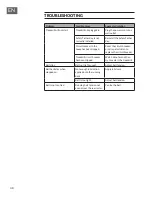
Страница 48: ...en tripped Reset the circuit breaker or call an electrician to replace the circuit breaker Treadmill circuit breaker has been tripped Wait 5 minutes and then try to restart the treadmill Belt slips Belt not tight enough Adjust belt tension Belt hesitates when stepped on Not enough lubrication applied onto the running deck Apply lubricant Belt is too tight Adjust belt tension Belt is not centred Ru...

Страница 49: ...l negative consequences for the environment and human health which could otherwise be caused by inappropriate waste handling of this product For more detailled information about recycling of this product please contact your local council or your household waste disposal service Your product contains batteries covered by the European Directive 2006 66 EC which cannot be dis posed of with normal hou...

Страница 50: ......

Страница 51: ...n sobre el producto ÍNDICE DE CONTENIDOS Indicaciones de seguridad 52 Piezas individuales y montaje 54 Plegar el dispositivo 58 Calentamiento antes del entrenamiento 62 Funcionamiento de la computadora 64 Limpieza y cuidado 68 Ajuste de la cinta de correr 70 Operación a través de la aplicación 71 Reparación de anomalías 72 Retirada del aparato 73 DATOS TÉCNICOS Número de artículo 10033230 Suminist...

Страница 52: ...enga una distancia de seguridad de 0 5 metros con el resto de los objetos Antes de iniciar el entrenamiento en el aparato se recomienda realizar un reconocimiento médico para determinar si tiene algún problema físico o de salud que puede suponer un riesgo para su salud o seguridad o impedir que pueda utilizar correctamente el aparato El consejo de su médico es esencial si toma medicamentos que afe...

Страница 53: ...ario Todas las piezas móviles p ej pedales manillar sillín etc deben tener un mantenimiento semanal Examínelos antes de cada uso del aparato Si una pieza está rota o suelta deberá repararla de inmediato Vuelva a utilizar el aparato cuando se encuentre en perfecto estado Tenga en cuenta que el aparato no tiene ningún sistema de rueda libre por lo que existe riesgo de accidente con un uso inadecuado...

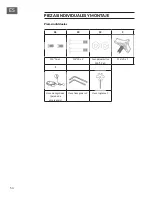
Страница 54: ...4 ES PIEZAS INDIVIDUALES Y MONTAJE Piezas individuales 28 20 19 9 M8 16 x 2 M8 40 x 2 Arandela elástica M8 12 x 2 M6 20 x 1 1 Llave de seguridad parada de emergencia Llave hexagonal x 2 Llave inglesa x 1 ...

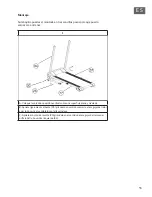
Страница 55: ...n posición vertical sobre una superficie plana y nivelada B Apriete ligeramente el botón 28 girándolo en sentido contrario a las agujas del reloj en el tubo vertical y apriételo con la llave inglesa C Apriete el botón de resorte 20 girándolo en el sentido de las agujas del reloj en el orificio del tubo vertical izquierdo 84 ...

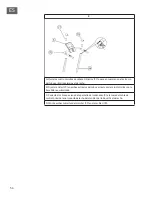
Страница 56: ... B Fije el manillar 70 en ambos extremos del tubo vertical y apriete los tornillos con la llave Allen suministrada C Conecte el cable que viene de la pantalla del ordenador 5 a la toma del cable de control principal en el soporte derecho del manillar del tubo vertical derecho D Monte ambas cubiertas del manillar 19 en el manillar 70 ...

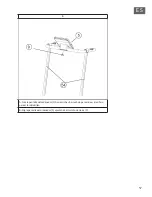
Страница 57: ...57 ES 3 A Gire la pantalla del ordenador 5 hacia arriba o hacia abajo para alinear el orificio para el tornillo Allen B Fije la pantalla del ordenador 5 apretando el tornillo de cierre 9 ...

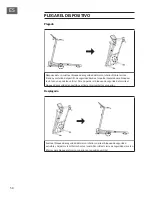
Страница 58: ...la cinta en una posición vertical Para no perder el bloqueo de seguridad atornille el bloqueo de seguridad en posición vertical al marco inferior y superior Desplegado Suelte el bloqueo de seguridad del marco inferior suelte el bloqueo de seguridad extraíble y baje el marco inferior hasta el suelo Atornille el cierre de seguridad al marco inferior para bloquear el marco superior en la posición ver...

Страница 59: ...l entrenamiento y los resultados del mismo Un entrenamiento óptimo incluye una fase de calentamiento 1 una fase intensiva de cardio 2 y una fase de recuperación final 3 Si hace progresos o quiere quemar calorías debe realizar estas 3 fases y entrenarse como mínimo durante 20 30 minutos en el ergómetro 1 Fase de calentamiento Comience su entrenamiento con una resistencia reducida Es importante real...

Страница 60: ...ción de energía aeróbica La obtención de energía anaeróbica es también activa a pequeña escala pero solo hasta cierto punto pues el ácido láctico producido en este proceso puede extraerse para producir energía Gran parte de su ejercicio debe consistir en un tipo de entrenamiento aeróbico Si continúa aumentando la carga llegará en algún momento a un límite donde su obtención de energía por oxígeno ...

Страница 61: ...por intervalos exigente Comida y bebida Beba antes durante y después del entrenamiento Durante el entrenamiento beba al menos 2 sorbos de agua 10 a 20 cl cada 10 15 minutos Si su entrenamiento dura más de 1 hora debe beberse una botella de deporte completa para proteger al cuerpo de la deshidratación durante la sesión Para un entrenamiento de cardio óptimo es muy importante una alimentación adecua...

Страница 62: ...62 ES CALENTAMIENTO ANTES DEL ENTRENAMIENTO ...

Страница 63: ...n del cuerpo 3 Doble la cadera con un brazo extendido hacia arriba Manténgase en esa posición unos segundos para cada lado 4 Flexione la cadera con ambos brazos unidos hacia arriba Manténgase también en esta posición para que el ejercicio sea un poco más intenso ya que el segundo brazo participa 5 Colóquese sobre una pierna y agarre el empeine con la mano Aquí moviliza la articulación del pie y es...

Страница 64: ...a del ordenador y de que el clip de seguridad esté bien sujeto a una prenda de vestir Nota Siempre párese en los rieles laterales al iniciar la cinta de correr Nunca encienda la cinta mientras esté de pie sobre ella Teclas de función START Pulse el botón START para iniciar el entrenamiento en otro modo de entrenamiento STOP Pulse el botón STOP para detener el entrenamiento en otro modo de entrenam...

Страница 65: ...tes de entrenar en el modo de programa manual Pulse el botón SPEED para aumentar el tiempo de entrenamiento objetivo en el programa de entrenamiento preestablecido P01 P16 antes del entrenamiento y ajustar la velocidad durante todos los tiempos de entrenamiento en diferentes modos de entrenamiento La gama de velocidades va desde 1 0 km h hasta 10 0 km h PROG Programas Pulse el botón PROG para sele...

Страница 66: ...8 km h Puede pulsar los botones SPEED o SPEED en la pantalla de la computadora o en el manillar para aumentar o disminuir la velocidad de marcha durante el entrenamiento El tiempo cuenta de 0 00 a 99 59 y se incrementa en intervalos de 1 segundo SPEED velocidad Muestra la velocidad actual de 1 0 km h mínimo a 10 0 km h máximo Puede aumentar o disminuir la velocidad pulsando SPEED o SPEED en la pan...

Страница 67: ... diferentes ejercicios y no deben ser consultados durante ningún tratamiento médico PULSE pulso Muestra su frecuencia cardíaca actual en latidos por minuto BPM Para activar esta función sujete los sensores de pulso de mano mientras hace ejercicio El pulso se visualiza 2 5 segundos después Para permitir una medición más precisa agarre ambos sensores de pulso de mano Parada de emergencia Antes de ca...

Страница 68: ...dañar la pantalla Almacenamiento Almacene la unidad en un ambiente interior limpio y seco Nunca deje la unidad al aire libre y nunca la use al aire libre Asegúrese de que el interruptor principal esté en la posición apagado y de que el enchufe de alimentación esté desconectado de la toma de corriente antes de guardar la unidad Lubricante La lubricación debajo de la cinta proporciona un rendimiento...

Страница 69: ...ad de la cinta en la parte superior de la plataforma de correr Encienda la unidad y póngala en marcha a baja velocidad durante 3 5 minutos para asegurarse de que el lubricante esté distribuido uniformemente Nota Nunca aplique demasiado lubricante Si se derrame demasiado lubricante límpielo inmediatamente ...

Страница 70: ... 6 mm suministrada para girar los tornillos de ajuste del rodillo trasero para centrar la cinta Cuando la cinta se mueva hacia la izquierda gire el tornillo de ajuste izquierdo 1 4 de vuelta en el sentido de las agujas del reloj La cinta debe empezar a corregirse a sí misma Cuando la cinta se mueve hacia la derecha gire el tornillo de ajuste derecho 1 4 de vuelta en el sentido de las agujas del re...

Страница 71: ...j 1 4 de vuelta cada vez A continuación vuelva a encender el interruptor principal y ponga en marcha la cinta a una velocidad de 8 10 km h Continúe corriendo en la cinta de correr para ver si la cinta todavía se desliza Repita hasta que la cinta deje de deslizarse OPERACIÓN A TRAVÉS DE LA APLICACIÓN El aparato también puede ser operado a través de la aplicación FitShow Escanee el siguiente código ...

Страница 72: ... electricista para que lo reemplace El disyuntor de la cinta ha sido activado Espere 5 minutos e intente encender la cinta de correr de nuevo La cinta de correr se desliza La cinta no está bien ajustada Ajuste la tensión de la cinta de correr La cinta se detiene cuando alguien camina sobre ella No se ha aplicado suficiente lubricante a la plataforma de correr Aplique lubricante La cinta estaba dem...

Страница 73: ...de la basura doméstica Una retirada de aparatos conforme a las leyes contribuye a proteger el medio ambiente y a las personas a su alrededor frente a posibles consecuencias perjudiciales para la salud El reciclaje ayuda a reducir el consumo de materias primas Este producto contiene pilas que según la Normativa europea 2006 66 EG no deben ser arrojadas al cubo de la basura común Infórmese sobre la ...

Страница 74: ......

Страница 75: ...informations concernant le produit SOMMAIRE Consignes de sécurité 76 Pièces détachées et assemblage 78 Pour replier l appareil 82 Aperçu de l entrainement cardio 83 Échauffement avant l entrainement 86 Utilisation de l ordinateur 88 Nettoyage et entretien 92 Réglage du tapis de course 94 Utilisation par application 95 Résolution des problèmes 96 Informations sur le recyclage 97 FICHE TECHNIQUE Num...

Страница 76: ... de sécurité autour de l appareil doit être d au moins 0 5 mètre Avant de suivre les programmes d exercices consultez un médecin pour déterminer si vous avez des problèmes physiques ou de santé qui pourraient mettre en danger votre santé et votre sécurité en utilisant l appareil ou vous empêcher de l utiliser correctement Les conseils de votre médecin sont essentiels si vous prenez des médicaments...

Страница 77: ...vent le dos et demandez l aide d une autre personne si nécessaire Tous les équipements mobiles pédales poignées selles etc doivent être entretenus chaque semaine Vérifiez les avant chaque utilisation Si quelque chose est cassé ou desserré réparez ou fixez la pièce correspondante immédiatement Ne poursuivez pas l utilisation de l appareil tant que vous n avez pas restauré le bon état initial Soyez ...

Страница 78: ...78 FR PIÈCES DÉTACHÉES ET ASSEMBLAGE Eléments pour l assemblage 28 20 19 9 M8 16 x 2 M8 40 x 2 Rondelle élastique M8 12 x 2 M6 20 x 1 1 Clé de sécurité arrêt d urgence x 1 Clé Allen x 2 Clé multiple x 1 ...

Страница 79: ...z l appareil en position verticale sur une surface horizontale et plane B Serrer légèrement le bouton 28 en le tournant en sens inverse des aiguilles d une montre dans le montant puis serrez celui ci avec la clé multiple C Serrez le bouton à ressort 20 en le tournant dans le sens des aiguilles d une montre dans le trou du montant gauche 84 ...

Страница 80: ... Fixez le guidon 70 aux deux extrémités des montants et serrez les vis avec la clé Allen fournie C Connectez le câble venant de l écran de l ordinateur 5 à la prise de câble de commande principale sur le support du guidon droit du montant droit D Montez les deux caches de guidon 19 sur le guidon 70 ...

Страница 81: ...81 FR 3 A Tournez l écran de l ordinateur 5 vers le haut ou le bas pour aligner le trou de la vis Allen B Fixez l écran de l ordinateur 5 en serrant la vis à tête cylindrique 9 ...

Страница 82: ...verrouiller le tapis de course en position verticale Pour ne pas perdre le verrou de sécurité vissez le en position verticale sur le cadre inférieur et supérieur Déplier Desserrez le loquet de sécurité du cadre inférieur desserrez le loquet de sécurité rétractable et abaissez le cadre inférieur au sol Vissez le loquet de sécurité sur le cadre inférieur pour verrouiller le cadre supérieur en positi...

Страница 83: ...ment comprend une phase d échauffement 1 une phase plus intense d entraînement cardio 2 et une phase finale de récupération 3 Si vous voulez progresser ou brûler des calories vous devez passer par ces 3 phases et vous entraîner pendant au moins 20 30 minutes sur l ergomètre 1 Phase d échauffement Commencez toujours votre entraînement avec une faible résistance La période d échauffement de 5 10 min...

Страница 84: ...n utilisant l oxygène de la production d énergie aérobie La production anaérobie est également active à petite échelle mais seulement dans la mesure où tout l acide lactique qu elle produit peut être dégradé en même temps Vous devriez passer la majeure partie de votre entraînement dans cette zone aérobie Si vous continuez à augmenter la charge alors vous finirez par arriver à une limite à partir d...

Страница 85: ... en suivant un entraînement par intervalles plus exigeant Manger et boire Buvez avant pendant et après l exercice Pendant l entraînement buvez au moins 2 gorgées d eau 10 à 20 cl toutes les 10 15 minutes Si votre entraînement dure plus d une heure prenez une boisson pour sportifs afin de protéger le corps de la déshydratation pendant l exercice Pour un entraînement cardio optimal une bonne aliment...

Страница 86: ...86 FR ÉCHAUFFEMENT AVANT L ENTRAINEMENT ...

Страница 87: ...les accompagnent la rotation du corps 3 Pliez vos hanches un bras tendu vers le haut Restez dans cette position une seconde de chaque côté 4 Pliez vos hanches les deux bras joints vers le haut Encore une fois maintenez cette position de chaque côté L exercice est un peu plus intense car le deuxième bras est également tendu 5 Tenez vous sur une jambe et tenez le cou de pied avec votre main Cela vou...

Страница 88: ...ip de sécurité est correctement fixé à un vêtement Remarque tenez vous toujours sur les rebords latéraux lors du démarrage du tapis de course Ne jamais démarrer le tapis de course en se tenant debout sur le tapis de course Touches de fonctions START Appuyez sur la touche START pour commencer l entraînement dans un autre mode d entraînement STOP Appuyez sur le bouton STOP pour arrêter l entraînemen...

Страница 89: ...r la durée de l exercice la distance ou les calories souhaités avant de commencer l entraînement Appuyez sur le bouton SPEED pour augmenter la durée d entraînement cible dans les programmes prédéfinis P01 P16 Vous pouvez ajuster la vitesse pendant toutes les périodes d entraînement dans différents modes d entraînement La plage de vitesse est de 1 0 km h à 10 0 km h PROG Programme Appuyez sur le bo...

Страница 90: ... de course commence à bouger Le tapis de course démarre à une vitesse initiale de 0 8 km h Vous pouvez appuyer sur les boutons SPEED ou SPEED sur l écran de l ordinateur ou sur le guidon pour augmenter ou diminuer la vitesse de course pendant l exercice La durée est comptée de 0 00 à 99 59 par incréments de 1 seconde SPEED vitesse Affiche la vitesse actuelle de 1 0 km h minimum à 10 0 km h maximum...

Страница 91: ...férents exercices et ne doivent jamais être consultées pour un traitement médical PULSE Pulsations Affiche votre fréquence cardiaque actuelle en battements par minute BPM Pour activer cette fonction maintenez les capteurs de pouls manuels pendant l exercice La fréquence cardiaque sera affichée 2 à 5 secondes plus tard Pour faciliter une mesure plus précise tenez les deux capteurs de pulsations en ...

Страница 92: ...ela pourrait endommager l écran Rangement Rangez l appareil à l intérieur dans un environnement propre et sec Ne laissez jamais l appareil à l extérieur et ne l utilisez pas non plus à l extérieur Assurez vous que l interrupteur principal est sur la position off et que la fiche secteur a été retirée de la prise murale avant de ranger l appareil Lubrifiant La lubrification sous le tapis de course o...

Страница 93: ...ant sous le tapis de course au dessus de la plateforme de course Allumez l appareil et faites le fonctionner pendant 3 à 5 minutes à basse vitesse pour répartir le lubrifiant uniformément Remarque n ajoutez jamais trop de lubrifiant Si vous en renversez un peu essuyez le tout de suite ...

Страница 94: ...tionner les vis de réglage du rouleau arrière afin de centrer la courroie Si le tapis de course se déplace vers la gauche tournez la vis de réglage gauche d un quart de tour dans le sens des aiguilles d une montre Le tapis roulant devrait alors commencer à se corriger Si le tapis roulant se déplace vers la droite tournez la vis de réglage droite de 1 4 de tour dans le sens des aiguilles d une mont...

Страница 95: ... des aiguilles d une montre Ensuite allumez à nouveau l interrupteur principal et démarrez le tapis de course à une vitesse de 8 10 km h Continuez à courir sur le tapis de course pour voir si la bande glisse encore Répétez ce processus jusqu à ce que la bande cesse de glisser UTILISATION PAR APPLICATION L appareil peut également être utilisé via l application FitShow Scannez le code QR suivant pou...

Страница 96: ...r Remplacez le fusible ou contactez un électricien pour remplacer le fusible Le disjoncteur de Attendez 5 minutes et essayez de rallumer le tapis de course Le tapis de course glisse Le tapis roulant a été activé Ajustez la tension du tapis de course Le tapis de course s arrêt quand on monte dessus Le tapis roulant n était pas assez serré Ajoutez du lubrifiant Ce n était pas assez Ajustez la tensio...

Страница 97: ...ez pas les appareils usagés avec les ordures ménagères La mise en rebut correcte du produit usagé permet de préserver l environnement et la santé Le recyclage des matériaux contribue à la préservation des ressources naturelles Ce produit contient des piles qui sont soumises à la directive européenne 2006 66 CE selon laquelle elles ne doivent pas être éliminées avec les ordures ménagères Renseignez...

Страница 98: ......

Страница 99: ...er ricevere informazioni sul prodotto INDICE Avvertenze di sicurezza 100 Singoli componenti e montaggio 102 Piegare il dispositivo 106 Descrizione dell allenamento cardio 107 Riscaldamento prima dell allenamento 110 Utilizzo del computer 112 Pulizia e manutenzione 116 Regolare il tapis roulant 118 Utilizzo tramite app 119 Correzione degli errori 120 Avviso di smaltimento 121 DATI TECNICI Articolo ...

Страница 100: ... ad es vicino a piscine ecc La distanza di sicurezza intorno al dispositivo deve essere di almeno 0 5 metri Prima di iniziare il programma di allenamento consultare assolutamente un medico per assicurarsi di non avere problemi fisici o di salute che potrebbero rappresentare un rischio per il vostro benessere o la vostra sicurezza attraverso l uso del dispositivo o che potrebbero impedire il corret...

Страница 101: ... tecnica di sollevamento appropriata e in caso chiedere l aiuto di un altra persona Tutti i componenti mobili ad es pedali impugnature sella ecc devono essere manutenuti settimanalmente Controllarli prima di ogni utilizzo Se qualcosa dovesse essere allentato o rotto procedere immediatamente alla riparazione o al fissaggio Utilizzare il dispositivo solo dopo aver ristabilito la condizione ottimale ...

Страница 102: ...LI COMPONENTI E MONTAGGIO Componenti singoli per il montaggio 28 20 19 9 M8 16 x 2 M8 40 x 2 Rondella M8 12x2 M6 20 x 1 1 Chiave di sicurezza arresto di emer genza x 1 Chiave a brugola x 2 Chiave multifunzione x 1 ...

Страница 103: ...o con l allenamento 1 A mettere il dispositivo in posizione verticale su una superficie piana B stringere leggermente la manopola 28 ruotandola in senso antiorario nel montante e stringerla con la chiave multifunzione C stringere la manopola a molla 20 ruotandola in senso orario nel foro sul montante sinistro 84 ...

Страница 104: ...l manubrio 70 a entrambe le estremità del montante e stringere le viti con la chiave a brugola inclusa in consegna C collegare il cavo che esce dal display del computer 5 all ingresso del cavo principale sul supporto del manubrio destro del montante destro D montare entrambe le coperture 19 al manubrio 70 ...

Страница 105: ...105 IT 3 A muovere il display del computer 5 in alto o in basso per mostrare il foro per la vite a brugola B fissare il display del computer 5 stringendo la vite cilindrica 9 ...

Страница 106: ...andare per bloccare il tapis roulant in posizione verticale Per non perdere il blocco di sicurezza avvitarlo in posizione verticale al telaio inferiore e superiore Aprire Aprire il blocco di sicurezza sul telaio inferiore sbloccare il blocco di sicurezza e abbassare il telaio sul pavimento Avvitare il blocco di sicurezza al telaio inferiore in modo da bloccare il telaio superiore in posizione vert...

Страница 107: ...amento e per i risultati ad esso collegati Un allenamento ottimale comprende una fase di riscaldamento 1 una fase di allenamento cardio più intensa 2 e la fase di recupero finale 3 Per fare progressi o bruciare calorie eseguire queste 3 fasi e allenarsi sull ergometro per almeno 20 30 minuti 1 Fase di riscaldamento Iniziare sempre l allenamento con una resistenza bassa Un periodo di riscaldamento ...

Страница 108: ...e anche la produzione di energia anaerobica sia attiva lo è solo in minima parte L acido lattico prodotto in questo processo può essere scomposto per produrre energia La maggior parte dell allenamento si dovrebbe completare nella fase di allenamento aerobico Se si aumenta ulteriormente l intensità si raggiunge un limite nel quale l energia aerobica non sarà più in grado di aumentare la sua produzi...

Страница 109: ...gnativo Mangiare e bere Bere prima durante e dopo l allenamento Bere almeno 2 sorsi d acqua 10 20 cl ogni 10 15 minuti durante l allenamento Se l allenamento dura più di 1 ora si consiglia di bere uno sport drink per idratarsi durante gli esercizi Per un allenamento cardio ottimale è molto importante seguire un alimentazione adeguata sia prima che dopo l attività fisica Prima dell allenamento è pr...

Страница 110: ...110 IT RISCALDAMENTO PRIMA DELL ALLENAMENTO ...

Страница 111: ...po 3 Piegare i fianchi un braccio disteso verso l alto Mantenere questa posizione per alcuni secondi per ogni lato 4 Piegare i fianchi con entrambe le braccia verso l alto tenendo le mani unite Anche in questo caso mantenere la posizione per ogni lato Questo esercizio è leggermente più intenso dato che anche il secondo braccio esercita tensione 5 Posizionarsi su una gamba e mantenere la tensione d...

Страница 112: ... sul display del computer e che la clip di sicurezza sia fissata agli indumenti Avvertenza stare sempre sulla barra laterale quando si avvia il tapis roulant Non avviare il tapis roulan quando si è in piedi sulla superficie scorrevole Tasti funzione START Premere Star per iniziare l allenamento in un altra modalità STOP Premere STOP per concludere l allenamento in un altra modalità ...

Страница 113: ...e desiderate in modalità manuale prima dell allenamento Premere SPEED per correggere verso l alto la durata di allenamento predefinito del programma P01 P16 prima dell allenamento La velocità può essere regolata durante tutte le durate di allenamento in diverse modalità di allenamento L intervallo di velocità va da 1 0 a 10 0 km h PROG programmi Premere PROG per selezionare un programma predefinit...

Страница 114: ...LCD conta alla rovescia da 3 a 1 prima di avviare il tapis roulant Il tapis roulant funziona con una velocità iniziale di 0 8 km h Premere SPEED o SPEED sul manubrio o sul display del computer per aumentare o diminuire la velocità durante l allenamento Il tempo viene contato da 0 00 a 99 59 minuti in intervalli di 1 secondo SPEED velocità Mostra la velocità attuale da 1 0 km h a 10 0 km h Premere ...

Страница 115: ...si esercizi e non devono essere assolutamente utilizzati come dati per cure mediche PULSE battito cardiaco Mostra i battiti cardiaci al minuto Per attivare questa funzione tenere i sensori saldamente durante l allenamento Il battito viene mostrato 2 5 secondi dopo Per un calcolo più preciso afferrare entrambi i sensori Arresto di emergenza Controllare prima di ogni sessione di allenamento che la c...

Страница 116: ...tta in quanto potrebbero risultare danneggiamenti allo schermo Stoccaggio Conservare il dispositivo al chiuso in un ambiente pulito e asciutto Non lasciare il dispositivo e non utilizzarlo all aperto Assicurarsi che l interruttore sia su off e che la spina sia stata staccata prima di stoccare il dispositivo Lubrificante La lubrificazione sotto al tapis roulant serve a garantire prestazioni ottimal...

Страница 117: ...entro del tapis roulant sul lato superiore del deck Accendere il dispositivo e lasciarlo funzionare a bassa velocità per 3 5 minuti in modo che il lubrificante si distribuisca in modo omogeneo Avvertenza non mettere mai troppo lubrificante Se dovesse fuoriuscire lubrificante in eccesso pulirlo immediatamente ...

Страница 118: ...zare la chiave a brugola da 6 mm inclusa in consegna per centrare il nastro girando le viti di regolazione sul retro Se il nastro si sposta verso sinistra ruotare in senso orario di di giro la vite sinistra Il nastro dovrebbe iniziare a correggersi da solo Se il nastro si sposta verso destra ruotare in senso orario di di giro la vite destra Il nastro dovrebbe iniziare a correggersi da solo Girare ...

Страница 119: ... in senso orario Accendere il dispositivo e far partire il tapis roulant a una velocità di 8 10 km h Correre sul tapis roulant per verificare se si sposta ancora Ripetere la procedura fino a quando il nastro non si sposta più UTILIZZO TRAMITE APP Il dispositivo può essere utilizzato tramite la app FitShow Scansionare i seguenti codici QR per scaricare la app Apple iOS Android ...

Страница 120: ...ttare un elettricista per farlo sostituire L interruttore di sicurezza del tapis roulant è stato attivato Attendere 5 minuti e provare a riaccendere il tapis roulant Il tapis roulant traballa Il nastro non è teso a sufficienza Regolare la tensione del nastro Il tapis roulant si ferma quando ci si cammina sopra Lubrificante insufficiente Aggiungere lubrificante Il nastro è troppo teso Regolare la t...

Страница 121: ...i con i rifiuti domestici Grazie al corretto smaltimento dei vecchi dispositivi si tutela il pianeta e la salute delle persone da possibili conseguenze negative Il riciclo di materiali aiuta a diminuire il consumo di materie prime Il prodotto contiene batterie che sono soggette alla direttiva europea 2006 66 CE e non possono essere smaltite con i normali rifiuti domestici Preghiamo di informarvi s...

Страница 122: ......

Страница 123: ......

Страница 124: ......

Отзывы: