background image

6

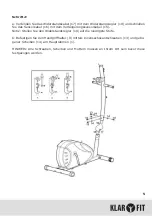
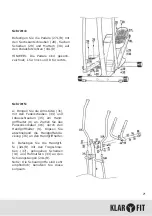
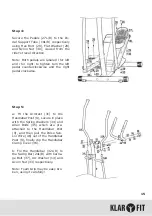
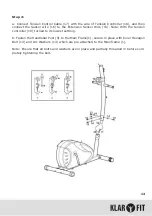
Schritt 3:

a:  Verbinden  Sie  die  Schwungstange  (24L/R)  mittels  Sechskantschraube  (21),  flacher 

Scheibe (22) und Mutter (23) mit dem Pedalstützrohr (18L/R).

b: Befestigen Sie die Schwungstange (24L/R) mit den Sechskantschrauben (25) und flachen 

Scheiben an der langen Achse des Handgriffhalters (9). Fixieren Sie anschließend das Pe

-

dalstützrohr (18L/R) mit den Verriegelungsbolzen (19L/R), Federscheiben (39) und Muttern 

(40L/R) an der Kurbel (49). Stecken Sie abschließend die Mutterkappen (20a),(20b),(41) 

auf.

HINWEIS: Alle Schrauben, Scheiben und Muttern müssen an Ihrem Ort sein bevor diese 

festgezogen werden.

Содержание 10006712

Страница 1: ...10006712 Crosstrainer ...

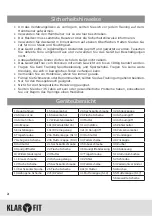
Страница 2: ...r für den Hausgebrauch geeignet Nicht für die therapeutische Benutzung geeignet Sollten Sie über 35 Jahre alt sein oder gesundheitliche Probleme haben konsultieren Sie vor Beginn des Trainings einen Mediziner Geräteübersicht 1 Hauptrahmen 15 Sensorkabel 28 Sechskantschraube 42 Abdeckkappe 2 Stütze vorne 16 Sensorkabel 29 Flache Scheibe 43 Schaumgriff 3 Stütze hinten 17 Widerstandskabel 30 Mutter 4...

Страница 3: ...3 ...

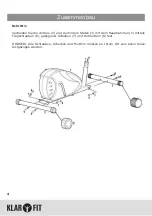
Страница 4: ...n Sie die vordere 2 und die hintere Stütze 3 mit dem Hauptrahmen 1 mittels Tragschrauben 6 gebogener Scheiben 7 und Hutmuttern 8 fest HINWEIS Alle Schrauben Scheiben und Muttern müssen an Ihrem Ort sein bevor diese festgezogen werden ...

Страница 5: ...it dem Verlängerungssensorkabel 15 Notiz Stellen Sie den Widerstandsregler 10 auf die niedrigste Stufe b Befestigen Sie den Handgriffhalter 9 mittels Innensechskantschrauben 13 und gebo gener Scheiben 14 am Hauptrahmen 1 HINWEIS Alle Schrauben Scheiben und Muttern müssen an Ihrem Ort sein bevor diese festgezogen werden ...

Страница 6: ...it den Sechskantschrauben 25 und flachen Scheiben an der langen Achse des Handgriffhalters 9 Fixieren Sie anschließend das Pe dalstützrohr 18L R mit den Verriegelungsbolzen 19L R Federscheiben 39 und Muttern 40L R an der Kurbel 49 Stecken Sie abschließend die Mutterkappen 20a 20b 41 auf HINWEIS Alle Schrauben Scheiben und Muttern müssen an Ihrem Ort sein bevor diese festgezogen werden ...

Страница 7: ...e die Armstütze 31 mit den Federscheiben 34 und Inbusschrauben 35 am Hand griffhalter 9 an Ziehen Sie das Pulssensorkabel 46 durch den Handgriffhalter 9 Klipsen Sie abschließend die Handgriffabde ckung 36 an den Handgriffhalter b Befestigen Sie die Handgrif fe 32L R mit den Tragschrau ben 37 gebogenen Scheiben 14 und Hutmuttern 33 an den Schwungstangen 24L R Notiz Die Schaumgriffe sind sehr empfin...

Страница 8: ...n Sie den Zähler 38 am Zählerhalter 45 Schließen Sie die Ka bel 46 15 an die Kabel des Zählers 38 an Befes tigen Sie den Halter am Hand griffhalter 9 an b Entfernen Sie die Batteriefachabdeckung auf der Rückseite des Zählers 38 und legen Sie 2 AA Batteri en ein Achten Sie hierbei auf die richtige Polung ...

Страница 9: ...te dürfen nicht mit dem normalen Hausmüll entsorgt wer den Informieren Sie sich über die örtlichen Regelungen zur getrennten Sammlung elektrischer und elektronischer Gerätschaften Richten Sie sich nach den örtlichen Regelungen und entsorgen Sie Altgeräte nicht über den Hausmüll Durch die regelkonforme Entsorgung der Altgeräte werden Umwelt und die Gesundheit ihrer Mitmenschen vor möglichen negativ...

Страница 10: ...straight If you feel pain or dizziness while exercising stop immediately and cool down The exercise bike is intended for home use down The exercise bike is not intended for therapeutic purposes Before beginning this or and exercise program consult your doctor This is especially important for people over the age of 35 or those with health problems Read all instruc tions before using the exercise bi...

Страница 11: ...11 ...

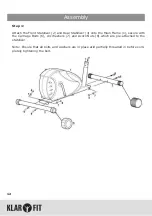
Страница 12: ... Stabilizer 3 onto the Main Frame 1 secure with the Carriage Bolts 6 Arc Washers 7 and Acorn Nuts 8 which are pre attached to the stabilizer Note Ensure that all bolts and washers are in place arid partially threaded in before com pletely tightening the bolt ...

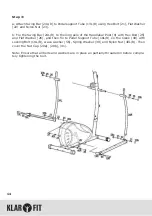
Страница 13: ...Wire 15 Note With the tension controller 10 turned to its lowest settinig b Fasten the Handlebar Post 9 to the Main Frame 1 secure in place with Inner Hexagon Bolt 13 and Arc Washers 14 which are pre attached to the Main frame 1 Note Ensure that all bolts and washers are in place and partially threaded in before com pletely tightening the bolt ...

Страница 14: ...ng axle of the Handlebar Post 9 with Hex Bolt 25 and Flat Washer 26 and then fix to Pedal Support Tube 18L R on the Crank 49 with Locking Bolt 19L R wave washer 56 Spring Washer 39 and Nylon Nut 40L R Then cover the Nut Cap 20a 20b 41 Note Ensure that all bolts and washers are in place an partially threaded in before comple tely tightening the bolt ...

Страница 15: ...se and the right pedal clockwise Step 5 a Fit the Armrest 31 to the Handlebar Post 9 secure in place with the Spring Washers 34 and Allen Bolts 35 which are pre attached to the Handlebar Post 9 and then pull the Pulse Sen sor Wire 46 out of the Handlebar Post 9 finally clip the Handlebar Clamp Cover 36 b Fix the Handlebar 32L R to the Swing Bar 24L R with Carria ge Bolt 37 Arc Washer 14 and Acorn ...

Страница 16: ...ter 38 onto the Bracket 45 And then connect the Wires 46 16 to the wi res of Meter 38 respectively Insert the Bracket onto the Handlebar Post 9 b Remove the battery cover from the back of the me ter 38 and insert two AA batteries See bottom of battery compartment for correct orientation ...

Страница 17: ...treated as household waste Instead it should be taken to the ap propriate collection point for the recycling of electrical and electronic equipment By ensuring this product is disposed of correctly you will help prevent potential negative consequences for the environment and human health which could otherwise be caused by inappropriate waste handling of this product For more detailled information ...

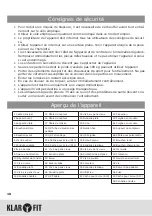
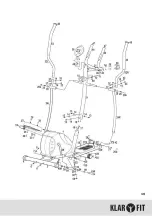
Страница 18: ...omestique L appareil n est pas destiné à un usage thérapeutique Les utilisateurs âgés de plus de 35 ans ou qui ont des problèmes de santé doivent con sulter un médecin avant de commencer l entraînement Aperçu de l appareil 1 Cadre principal 15 Câble du capteur 28 Vis à six pans creux 42 Capuchon 2 Support avant 16 Câble du capteur 29 Rondelle plate 43 Poignée en mousse 3 Support arrière 17 Câble d...

Страница 19: ...19 ...
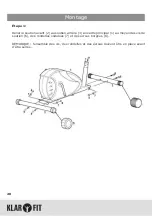
Страница 20: ...utien avant 2 au soutien arrière 3 au cadre principal 1 au moyen des vis de soutien 6 des rondelles ondulées 7 et des écrous borgnes 8 REMARQUE l ensemble des vis des rondelles et des écrous doivent être en place avant d être serrés ...

Страница 21: ...llonge de câble du capteur 15 Remarque mettre le régulateur de tension 10 sur le cran le plus bas b fixer la colonne de direction 9 au cadre principal 1 avec des vis à six pans creux 13 et des rondelles ondulées 14 REMARQUE l ensemble des vis des rondelles et des écrous doivent être en place avant d être serrés ...

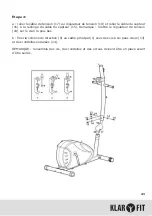
Страница 22: ...xe long de la colonne de direction 9 avec des vis à six pans creux 25 et des rondelles plates Puis fixer le tube de soutien des pédales 18L R à la manivelle 49 avec des écrous de verrouillage 19L R des rondelles élastiques 39 et des écrous 40L R Introduire enfin les caches pour écrous 20a 20b 41 REMARQUE l ensemble des vis des rondelles et des écrous doivent être en place avant d être serrés ...

Страница 23: ... mobiles 31 à la colonne de direction 9 avec les rondelles élastiques et les vis à six pans creux Faire passer le câble du pulsomètre 46 dans la colon ne de direction 9 Clipser enfin la protection de poignée 36 à la colonne de direction b fixer les poignées 32L R aux bras mobiles 24L R avec les vis de soutien 37 les rondelles on dulées 14 et les écrous borgnes 24L R Remarque les poignées en mousse...

Страница 24: ...45 et fixer le compteur 38 au support du compteur 45 Brancher les câbles 46 au câble du compteur 38 Puis fixer le support à la colonne de direction 9 b soulever le couvercle du compartiment des piles à l arrière du compteur 38 et introduire 2 piles AA Veil ler à respecter les polarités ...

Страница 25: ...ndique que le produit se trouve soumis à la directive européenne 2002 96 CE Renseignez vous sur les dispositions en vigueur dans votre région concernant la collecte séparée des appareils électriques et électroniques Respectez les et ne jetez pas les appareils usagés avec les ordures ménagères La mise au rebut correcte du produit usagé permet de préserver l environnement et la santé Le recyclage de...

Отзывы: