background image

11

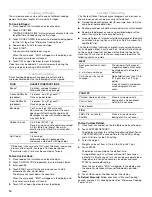
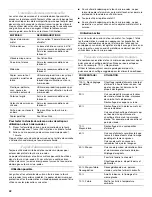
Sensor Cooking

A sensor in the microwave oven detects humidity released from 
the food as it heats, and adjusts the cook time accordingly.

Many sensor cycles require the covering of foods. Microwave-
safe containers or steamers with loose-fitting lids are 
recommended. The loose-fitting lid allows enough steam to 
escape to be detected by the sensor. When covering foods with 
plastic wrap, be sure to leave a large enough vent opening to 
allow the steam to escape.

NOTES:

The microwave oven should be plugged in for at least 
3 minutes.

The microwave oven cavity and the exterior of the cooking 
container should be dry.

The room temperature should not exceed 95°F (35°C).

If the door is opened during a sensor cycle, sensing will stop 
and the program will be canceled.

Sensor Cook

The sensor in the microwave oven detects humidity released 
from the food and automatically sets a cooking time based on the 
selected food category.

Use the following chart as a guide.

NOTE:

 When covering foods, make sure the vent opening is large 

enough for moisture to escape. This will allow the sensor to 
accurately determine cooking time.

To Use Sensor Cook:

1.

Place food on the turntable and close the door.

2.

Touch COOK until the desired food type is displayed.

The microwave oven will start automatically after a brief 
delay.

When the cycle ends, “END” will appear in the display, and 
the end-of-cycle tones will sound.

3.

Touch OFF or open the door to clear the display.

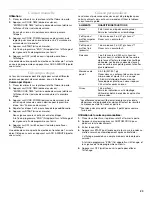
Sensor Popcorn

The sensor in the microwave oven determines the appropriate 
popping time of commercially packaged microwavable popcorn. 
This function is programmed to detect popping times for 3.5-oz 
(99 g), 3.0-oz (85 g) and 1.75-oz (50 g) bags.

NOTE:

 During Popcorn function, as with all microwave cooking 

functions, the microwave oven should be attended at all times. 
Listen for popping to slow to 1 pop every 1 or 2 seconds, then 
stop the cycle.

To avoid damage to the microwave oven, do not use regular 
paper bags or glassware.

Pop only 1 package of popcorn at a time.

Follow manufacturer’s instructions when using a microwave 
popcorn popper.

For best cooking results, do not try to pop unpopped kernels.

Use fresh bags of popcorn for optimal results.

Cooking results may vary by brand and fat content. For bag 
sizes not listed in this section, follow directions on the 
package.

To Use Sensor Popcorn:

1.

Place popcorn bag on the turntable and close the door.

2.

Touch POPCORN once for Regular (3.0-3.5 oz [85-99 g]), or 
twice for Snack (1.75 oz [50 g]).

The microwave oven will start automatically after a brief 
delay.

When the cycle ends, “END” will appear in the display, and 
the end-of-cycle tones will sound.

3.

Touch OFF or open the door to clear the display.

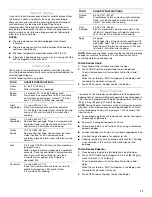
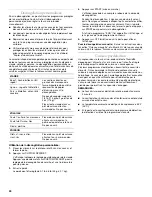
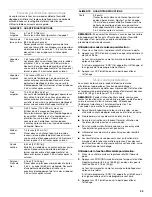
FOOD

QUANTITY/INSTRUCTIONS

Frozen 
Pizza

6-7 oz (170-198 mL)/
Follow directions on package.

Baked 
Potato

1-4 medium, 10-13 oz (283-369 g) each/
Pierce each one several times with a fork. Place 
on turntable around edges, at least 1" (2.5 cm) 
apart. Let stand 5 minutes after cooking.

Fresh 
Vegetables

1-4 cups (250 mL-1 L)/
Place in microwave-safe container and add 
2-4 tbs (30-60 mL) water. Cover with plastic wrap 
and vent. Stir and let stand 2-3 minutes after 
cooking.

Frozen 
Vegetables

1-4 cups (250 mL-1 L)/
Remove from package. Place in microwave-safe 
container. Cover with plastic wrap and vent. Stir 
and let stand 2-3 minutes after cooking.

Frozen 
Entrée

10-20 oz (283-567 g)/
Remove from package. Loosen cover on three 
sides. If entrée is not in microwave-safe 
container, place on plate, cover with plastic wrap 
and vent.

Rice

0.5-2 cups (125-500 mL) dry rice (Use medium or 
long grain rice.)/
Follow measurements on package for ingredient 
amounts. Place rice and liquid in microwave-safe 
dish. Cover with loose-fitting lid. Let stand 
5 minutes after cooking, or until liquid is 
absorbed. Stir.

Casserole

1-4 cups (250 mL-1 L)/
Place in microwave-safe container, cover with 
plastic wrap and vent. Stir and let stand 
2-3 minutes after cooking.

Ground 
Meat

8-32 oz (227-907 g)/
Crumble meat into a microwave-safe container. 
Cover with plastic wrap and vent. Stir and let 
stand 2-3 minutes after cooking.

Fish/
Seafood

4-16 oz (113-454 g)/
Place in microwave-safe dish and add 2-4 tbs 
(30-60 mL) liquid. Cover with plastic wrap and 
vent. Let stand 2-3 minutes after cooking.

Eggs

2-5 eggs/
Break eggs into a microwave-safe container with 
high sides. Add 1 tbs (15 mL) water per egg and 
beat. Cover with plastic wrap and vent. Stir and 
let stand 2-3 minutes after cooking.

FOOD

QUANTITY/INSTRUCTIONS

Содержание YKCMS1555S

Страница 1: ... 6777 or visit our website at www KitchenAid ca FOURÀMICRO ONDES Guided utilisationetd entretien Au Canada pour assistance installation ou service composez le 1 800 807 6777 ou visitez notre site web à www KitchenAid ca Table of Contents Table des matières 2 Model Modèle YKCMS1555S W10208004A ...

Страница 2: ...À MICRO ONDES 16 INSTRUCTIONS D INSTALLATION 18 Déballage 18 Exigences d emplacement 18 Spécifications électriques 18 PIÈCES ET CARACTÉRISTIQUES 19 Plateau rotatif 19 TABLEAU DE COMMANDE DU FOUR À MICRO ONDES 19 Affichage 19 Mise en marche 20 Ajouter une minute 20 Arrêt 20 Horloge 20 Signaux sonores 20 Minuterie 20 Verrouillage des commandes 20 Options 20 UTILISATION DU FOUR À MICRO ONDES 21 Carac...

Страница 3: ...y food It is not designed for industrial or laboratory use As with any appliance close supervision is necessary when used by children Do not operate the microwave oven if it has a damaged cord or plug if it is not working properly or if it has been damaged or dropped The microwave oven should be serviced only by qualified service personnel Call an authorized service company for examination repair ...

Страница 4: ...locations Do not immerse cord or plug in water Keep cord away from heated surfaces Do not let cord hang over edge of table or counter Do not mount over a sink Do not cover racks or any other part of the microwave oven with metal foil This will cause overheating of the microwave oven PRECAUTIONS TO AVOID POSSIBLE EXPOSURE TO EXCESSIVE MICROWAVE ENERGY a Do not attempt to operate this oven with the ...

Страница 5: ...e microwave oven off The microwave oven should work properly once it has cooled ElectricalRequirements Observe all governing codes and ordinances Required A 120 Volt 60 Hz AC only 15 or 20 amp electrical supply with a fuse or circuit breaker Recommended A time delay fuse or time delay circuit breaker A separate circuit serving only this microwave oven WARNING Excessive Weight Hazard Use two or mor...

Страница 6: ... the hub The rollers on the support should fit inside the turntable bottom ridge MICROWAVE OVEN CONTROL Display When power is first supplied to the microwave oven will appear in the display If the appears in the display at any other time a power failure has occurred Reset the clock if needed When the microwave oven is in use the display shows cook time remaining When the microwave oven is not in u...

Страница 7: ...ted Four tones End of cycle Five tones During defrost cycle as reminder to check turn rearrange or separate food Seven tones End of Timer countdown Timer The Timer can be set in minutes and seconds up to 99 minutes 99 seconds and counts down the set time NOTE The Timer does not start or stop the microwave oven Cook functions may be used while the Timer is counting down When the cook function is ac...

Страница 8: ... as meat and potatoes require a longer cook time than the same size of a light porous food such as cake CookingGuidelines Covering Covering food helps retain moisture shorten cook time and reduce spattering Use the lid supplied with cookware If a lid is not available wax paper paper towels or plastic wrap approved for microwave ovens may be used Plastic wrap should be turned back at one corner to ...

Страница 9: ...ER COOKING TIME will scroll across display Enter the length of time to cook If cooking with 100 power skip Step 3 3 Touch COOK POWER then set the desired cooking power See Microwave Cooking Power 4 Touch START When the cycle ends END will appear in the display and the end of cycle tones will sound 5 Touch OFF or open the door to clear the display Cook time may be added in 1 minute increments durin...

Страница 10: ...d Fish Custom Defrost should not be used for food that has been left outside the freezer for more than 20 minutes or for frozen ready made food Use the following chart as a guide To Use Custom Defrost 1 Place food uncovered on the turntable and close the door 2 Touch CUSTOM DEFROST The display will show the setting for defrosting Meat Touch CUSTOM DEFROST a second time for the Poultry setting and ...

Страница 11: ...ry to pop unpopped kernels Use fresh bags of popcorn for optimal results Cooking results may vary by brand and fat content For bag sizes not listed in this section follow directions on the package To Use Sensor Popcorn 1 Place popcorn bag on the turntable and close the door 2 Touch POPCORN once for Regular 3 0 3 5 oz 85 99 g or twice for Snack 1 75 oz 50 g The microwave oven will start automatical...

Страница 12: ... off and the microwave oven is cool Always follow label instructions on cleaning products Soap water and a soft cloth or sponge are suggested unless otherwise noted MICROWAVE OVEN CAVITY To avoid damage to the microwave oven cavity do not use soap filled scouring pads abrasive cleaners steel wool pads gritty washcloths or some recycled paper towels To avoid damage to stainless steel models rub in ...

Страница 13: ...f microwave oven still does not operate call for service See Assistance or Service section Is the door completely closed Firmly close door Is a packaging spacer on some models attached to the inside of the door Remove packaging spacer then firmly close door Is the electronic microwave oven control set correctly See Microwave Oven Control section On some models is the Control Lock set See Control L...

Страница 14: ...ery new KITCHENAID appliance To locate factory specified parts in your area call us or your nearest KitchenAid designated service center InCanada Call the KitchenAid Canada Customer eXperience Centre toll free 1 800 807 6777 Our consultants provide assistance with Features and specifications on our full line of appliances Use and maintenance procedures Accessory and repair parts sales Referrals to...

Страница 15: ...irs This major appliance is designed to be repaired in the home and only in home service is covered by this warranty 7 Repairs to parts or systems resulting from unauthorized modifications made to the appliance 8 Expenses for travel and transportation for product service if your major appliance is located in a remote area where service by an authorized KitchenAid servicer is not available 9 The re...

Страница 16: ... et les récipients fermés par exemple les bocaux en verre fermés peuvent exploser et on ne doit pas les faire chauffer dans le four à micro ondes Utiliser le four à micro ondes uniquement pour les applications auxquelles il est destiné telles qu elles sont décrites dans ce manuel Ne pas utiliser de vapeurs ou de produits chimiques corrosifs dans le four à micro ondes Ce type de four est spécifique...

Страница 17: ...ment sur le four à micro ondes lorsqu il est en service Ne pas couvrir ni obstruer toute ouverture sur le four à micro ondes Ne pas remiser ce four à micro ondes à l extérieur Ne pas utiliser le four à micro ondes à proximité d eau par exemple près d un évier de cuisine dans un sous sol humide ou près d une piscine ou à un emplacement similaire Ne pas immerger le cordon ou la fiche de branchement ...

Страница 18: ...s devrait fonctionner correctement une fois refroidi Spécificationsélectriques Observer les dispositions de tous les codes et règlements en vigueur Nécessaire Une alimentation électrique de 120 volts 60 Hz CA seulement 15 ou 20 ampères protégée par fusibles ou disjoncteur Recommandé Un fusible temporisé ou un disjoncteur temporisé Un circuit distinct exclusif à cet appareil AVERTISSEMENT Risque du...

Страница 19: ...nté du dessous du plateau rotatif TABLEAUDECOMMANDE DU FOUR À MICRO ONDES Affichage Lors de la mise sous tension initiale du four à micro ondes apparaît sur l afficheur Si s affiche à tout autre moment une panne de courant s est produite Régler de nouveau l horloge si nécessaire Lorsque le four à micro ondes est utilisé l affichage indique la durée de cuisson résiduelle Lorsque le four à micro ond...

Страница 20: ...endant le programme de décongélation pour vous rappeler de vérifier de tourner de réarranger ou de séparer les aliments Sept signaux sonores Fin du compte à rebours de la minuterie Minuterie La minuterie peut être réglée en minutes et secondes jusqu à 99 minutes et 99 secondes et procède à un compte à rebours de la durée réglée REMARQUE La minuterie ne met pas en marche et n arrête pas le four à m...

Страница 21: ... aliments de forme irrégulière Température de début Les aliments à température ambiante chaufferont plus vite que les aliments réfrigérés et les aliments réfrigérés chaufferont plus vite que les aliments congelés Composition et densité Les aliments à haute teneur en gras et en sucre atteindront une température plus élevée et chaufferont plus vite que les autres Les aliments lourds et denses tels q...

Страница 22: ...issancedecuissondesmicro ondes De nombreuses recettes de four à micro ondes précisent quelle puissance de chauffage doit être utilisée par pourcentage ou nom Par exemple 70 Moyen élevé Utiliser le tableau suivant comme guide général pour la puissance de chauffage suggérée pour les aliments spécifiques MATÉRIAU RECOMMANDATIONS Papier d aluminium métal Voir la section Papier d aluminium et métal Pla...

Страница 23: ... cours en appuyant sur ADD A MINUTE ajouter une minute Cuissonpersonnalisée Les durées et puissances de cuisson ont été préréglées pour certains aliments qui vont au micro ondes Utiliser le tableau suivant comme guide Les différences de quantité de matière grasse de viande d épaisseur et de procédé de salaison affectent les résultats La moyenne est de 16 tranches par livre Pour des pains plus peti...

Страница 24: ...our poursuivre la décongélation À la fin du programme END fin apparaît sur l affichage et les signaux de fin de programme sont émis 5 Appuyer sur OFF arrêt ou ouvrir la porte pour effacer l affichage Pour la décongelation manuelle Suivre les instructions dans la section Cuisson manuelle et utiliser 30 de la puissance de cuisson Voir le tableau Puissance de cuisson de micro ondes Cuissonpardétectio...

Страница 25: ...apparaît sur l afficheur et les signaux sonores de fin de programme sont émis 3 Appuyer sur OFF arrêt ou ouvrir la porte pour effacer l affichage ALIMENTS QUANTITÉ INSTRUCTIONS Pizza surgelée 6 7 oz 170 198 mL Suivre les instructions figurant sur la paquet Pomme de terre au four 1 à 4 moyennes 10 à 13 oz 283 à 369 g chacune Percer plusieurs fois chaque pomme de terre avec une fourchette Les dispos...

Страница 26: ... cuits et chauds sur le plateau rotatif et fermer la porte 2 Appuyer sur KEEP WARM KEEP WARM défile deux fois puis TOUCH START appuyer sur mise en marche défile 3 Appuyer sur START mise en marche KEEP WARM apparaît sur l afficheur pendant tout le programme À la fin du programme END fin apparaît sur l afficheur et les signaux de fin de programme sont émis 4 Appuyer sur OFF arrêt ou ouvrir la porte ...

Страница 27: ...s Couvercle orifice d introduction des micro ondes Pour éviter la formation d arcs et les dommages causés au four à micro ondes le couvercle orifice d introduction des micro ondes voir la section Pièces et caractéristiques doit être maintenu propre Essuyer avec un chiffon humide PORTE ET EXTÉRIEUR DU FOUR À MICRO ONDES La zone de contact de la porte et du cadre du four à micro ondes quand la porte...

Страница 28: ...ue le plateau rotatif et son support fonctionnent correctement Le plateau rotatif tourne dans les deux sens Ceci est normal et dépend de la rotation du moteur au début du programme L afficheur indique des messages L affichage indique t il L horloge n a pas été réglée Voir la section Affichage pour effacer l affichage Voir la section Horloge pour régler de nouveau l horloge L affichage indique t il...

Страница 29: ...antie des produits et fournir un service après la garantie partout au Canada Pour plus d assistance Si vous avez besoin de plus d assistance vous pouvez soumettre par écrit toute question ou préoccupation à KitchenAid Canada à l adresse suivante Centre pour l eXpérience de la clientèle KitchenAid Canada 1901 Minnesota Court Mississauga Ontario L5N 3A7 Veuillez inclure dans votre correspondance un ...

Страница 30: ...structions de l opérateur ou de l utilisateur fournies ne sont pas respectées 4 Les dommages imputables à accident modification usage impropre ou abusif incendie inondation actes de Dieu installation fautive ou installation non conforme aux codes d électricité ou de plomberie ou l utilisation de pièces consomptibles ou de produits nettoyants non approuvés par KitchenAid 5 Les défauts apparents not...

Страница 31: ... service sous garantie vous devez présenter un document prouvant la date d achat ou d installation Inscrivez les renseignements suivants au sujet de votre gros appareil ménager pour mieux vous aider à obtenir assistance ou service en cas de besoin Vous devrez connaître le numéro de modèle et le numéro de série au complet Vous trouverez ces renseignements sur la plaque signalétique située sur le pr...

Страница 32: ...vés Registered Trademark TM Trademark of KitchenAid U S A KitchenAid Canada licensee in Canada Marque déposée TM Marque de commerce de KitchenAid U S A Emploi sous licence par KitchenAid Canada au Canada MFL42163902 6 08 Printed in China Imprimé en Chine ...

Отзывы: