


E
n
g
lis
h
8
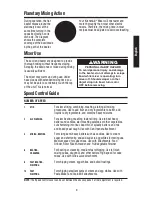
Flat Beater, for normal to heavy mixtures,
such as:
cakes
biscuits
creamed frostings
crumpets
candies
meat loaf
cookies
mashed potatoes
pie pastry
Dough Hook for mixing and kneading yeast
doughs, such as:
breads
coffee cakes
rolls
buns
Using Your KitchenAid
®
Attachments
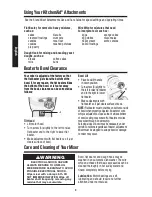
Beater to Bowl Clearance
Wire Whip for mixtures that need
to incorporate air, such as:
eggs
sponge cakes
egg whites
mayonnaise
heavy cream
some candies
boiled frostings
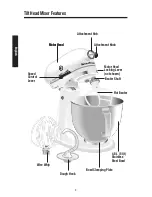
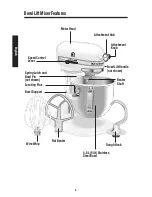
Tilt Head
• Lift motor head.
• Turn screw (A) slightly to the left to raise
flat beater and to the right to lower flat
beater.
• Make adjustment with flat beater, so it just
clears surface of bowl.
Your mixer is adjusted at the factory so that
the flat beater just clears the bottom of the
bowl. If, for any reason, the flat beater strikes
the bottom of the bowl, or is too far away
from the bowl, clearance can be corrected as
follows:
A
Bowl Lift
• Place bowl lift handle
in down position.
• Turn screw (B) slightly to
the left to raise flat beater
and to the right to lower
flat beater.
• Make adjustments with
flat beater, so it just clears surface of bowl.
NOTE:
Flat beater must not strike on bottom or side
of bowl when properly adjusted. If beater or wire
whip is adjusted too close so that it strikes bottom
of bowl, coating may wear off of beaters or wires
may wear through on wire whip.
Scraping sides of bowl may be necessary under
certain conditions regardless of beater adjustment.
Mixer must be stopped to scrape bowl or damage
to mixer may occur.
Bowl, flat beater, and dough hook may be
washed in an automatic dishwasher. The wire
whip and these other basic accessories can be
cleaned thoroughly in hot sudsy water and
rinsed completely before drying.
Lubrication:
Motor bearings are self-
lubricating and should require no further
attention under normal use.
ELECTRICAL SHOCK HAZARD
ALWAYS BE SURE TO UNPLUG
MIXER BEFORE CLEANING TO AVOID
POSSIBLE ELECTRICAL SHOCK.
Wipe mixer with a damp cloth. DO
NOT IMMERSE IN WATER. Wipe off
beater shaft frequently, removing any
residue that may accumulate.
w
WARNING
Care and Cleaning of Your Mixer
B
Your mixer is adjusted at the factory so that
the flat beater just clears the bottom of the
bowl. If, for any reason, the flat beater strikes
the bottom of the bowl, or is too far away
from the bowl, clearance can be corrected as
follows:
See the Stand Mixer Attachments Use and Care Guide for speed settings and operating times.


