background image

11

REFRIGERATOR CARE

Cleaning

Clean the refrigerator about once a month to prevent odors from 
building up. Wipe up spills immediately. 

To clean your refrigerator:

1. Unplug refrigerator or disconnect power. 

2. Remove all removable parts from inside, such as shelves, etc.

3. Hand wash, rinse, and dry removable parts and interior 

surfaces thoroughly. Use a clean sponge or soft cloth and a 
mild detergent in warm water.

Do not use abrasive or harsh cleaners such as window 
sprays, scouring cleansers, flammable fluids, cleaning 
waxes, concentrated detergents, bleaches or cleansers 
containing petroleum products on plastic parts, interior 
and door liners or gaskets. Do not use paper towels, 
scouring pads, or other harsh cleaning tools. These can 
scratch or damage materials. 

To help remove odors, you can wash interior walls with a 
mixture of warm water and baking soda (2 tbs to 1 qt 
[26 g to 0.95 L] of water).

4. Wash exterior with a clean sponge or soft cloth and a mild 

detergent in warm water. Do not use abrasive or harsh 
cleaners. Dry thoroughly with a soft cloth. 

To keep your stainless steel refrigerator looking like new 
and to remove minor scuffs or marks, it is suggested that 
you use the manufacturer’s approved Stainless Steel 
Cleaner & Polish. To order the cleaner, see the 
“Accessories” section.

IMPORTANT: This cleaner is for stainless steel parts only!

Do not allow the Stainless Steel Cleaner & Polish to come 
into contact with any plastic parts such as the trim pieces 
or door gaskets. If accidental contact does occur, clean 
plastic part with a sponge and mild detergent in warm 
water. Dry thoroughly with a soft cloth. 

5. Replace the removable parts. 

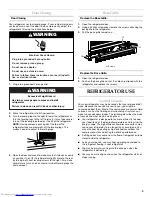
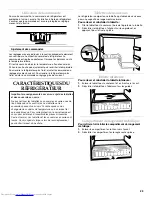
6. Clean the condenser coils regularly. They are located behind 

the base grille. Coils may need to be cleaned as often as 
every other month. This may help save energy.

Remove the base grille. See “Base Grille.”

Use a vacuum cleaner with an extended attachment to 
clean the condenser coils when they are dusty or dirty. 

Replace the base grille.

7. Plug in refrigerator or reconnect power.

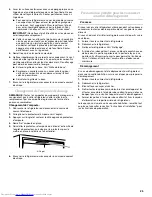
Changing the Light Bulb

NOTE: Not all appliance bulbs will fit your refrigerator. Be sure to 
replace the bulb with one of the same size, shape, and wattage.

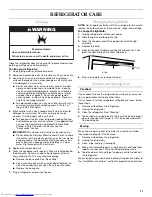
To change the light bulb:

1. Unplug refrigerator or disconnect power.

2. Slide the light shield toward the tab.

3. Press the tab down and lift the opposite end of the light 

shield up.

4. Replace the bulb.

5. Reinstall the light shield by inserting the tab end first. Then 

lower the light shield until it clicks into place.

6. Plug in refrigerator or reconnect power.

Vacation and Moving Care

Vacations

If you choose to leave the refrigerator on while you’re away, use 
up any perishables and freeze other items.

If you choose to turn the refrigerator off before you leave, follow 
these steps.

1. Remove all food from the refrigerator.

2. Unplug the refrigerator. 

3. Clean the refrigerator. See “Cleaning.”

4. Tape a rubber or wood block to the top of the door to prop it 

open far enough for air to get in. This stops odor and mold 
from building up.

Moving

When you are moving your refrigerator to a new home, follow 
these steps to prepare it for the move.

1. Remove all food from the refrigerator.

2. Unplug the refrigerator.

3. Clean, wipe, and dry it thoroughly.

4. Take out all removable parts, wrap them well, and tape them 

together so they don’t shift and rattle during the move.

5. Tape the doors shut and tape the power cord to the back of 

the refrigerator.

When you get to your new home, put everything back and refer to 
the “Installation Instructions” section for preparation instructions.

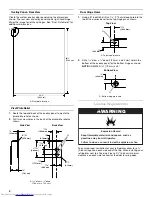
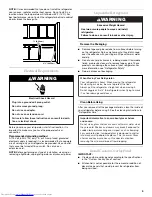
WARNING

Explosion Hazard

Use nonflammable cleaner.

Failure to do so can result in death, explosion, or fire.

A. Tab

A

Содержание Overlay Overlay Model Refrigerator

Страница 1: ... 800 461 5681 for installation and service call 1 800 807 6777 or visit our website at www kitchenaid com or www KitchenAid ca RÉFRIGÉRATEUR MODÈLEOVERLAY Guided utilisationetd entretien Au Canada pour assistance composez le 1 800 461 5681 pour installation ou service composez le 1 800 807 6777 ou visitez notre site web à www KitchenAid ca Table of Contents Table des matières 2 ...

Страница 2: ...s normaux 22 Utilisation de la commande 23 CARACTÉRISTIQUES DU RÉFRIGÉRATEUR 23 Tablette à deux niveaux 23 Tablette inférieure 23 Compartiment de rangement métallique 23 CARACTÉRISTIQUES DE LA PORTE 24 Porte cannettes 24 Balconnet de porte 24 ENTRETIEN DU RÉFRIGÉRATEUR 24 Nettoyage 24 Changement de l ampoule d éclairage 25 Précautions à prendre pour les vacances et avant un déménagement 25 DÉPANNA...

Страница 3: ...l determine the direction you want the door to swing Custom overlay panels are hinge specific A panel that is created for a right hinge door swing cannot be used for a left hinge door swing See Overlay Panel Rear View IMPORTANT SAFETY INSTRUCTIONS WARNING To reduce the risk of fire electric shock or injury when using your refrigerator follow these basic precautions SAVE THESE INSTRUCTIONS Plug int...

Страница 4: ... hole in the bottom of the overlay panel for the bottom hinge as shown NOTE CHAMFER 79 mm x 45 Bottom View LocationRequirements To ensure proper ventilation for your refrigerator allow for a 0 64 cm space on each side and at the top When installing your refrigerator next to a fixed wall leave 2 6 35 cm minimum clearance on each side to allow for the door to swing open A Pivot plate location Side V...

Страница 5: ...ter you remove all of the package materials clean the inside of your refrigerator before using it See the cleaning instructions in Refrigerator Care InstallCustomOverlayPanel IMPORTANT Create custom overlay panel according to the specifications in the Custom Overlay Panel section KitchenAid is not responsible for the removal or addition of decorative panels that would prevent the refrigerator from...

Страница 6: ...im piece NOTE Do not discard the two screws Set aside for use during Assemble the Door 2 Lift the sheet metal panel up and out of the door frame as shown 3 Set the sheet metal panel aside for later use See Attach the Overlay Panel to the Sheet metal Panel Attach the Pivot Plate 1 Tap the nylon inserts into the two holes drilled in the overlay panel 2 Using two 6 screws attach the pivot plate to th...

Страница 7: ...verlay panel to the sheet metal panel as shown 9 Remove the existing bottom pivot plate and discard Install the new bottom pivot plate NOTE When installing the bottom pivot plate be sure that the flush side is facing out and the three holes are toward the outside front of the door as shown Assemble the Door 1 Slide the overlay panel assembly into the door frame 2 Slide the cardboard spacer between...

Страница 8: ...roughly and apply petroleum jelly to the mating surfaces of the closers Install the door closer bottom and door closer top IMPORTANT Be sure to properly align the door closer bottom bosses with the holes in the bottom hinge Be sure to properly align the door closer top bosses with the holes in the hinge plate 6 Position the door frame onto the door closer assembly on the bottom hinge Using a Allen...

Страница 9: ...rews REFRIGERATOR USE NormalSounds Your new refrigerator may make sounds that your old one didn t make Because the sounds are new to you you might be concerned about them Most of the new sounds are normal Hard surfaces such as the flooring and surrounding structures can make the sounds seem louder The following describes the kinds of sounds and what may be making them Your refrigerator is designed...

Страница 10: ...1 Remove the shelf by lifting it up and pulling it forward 2 Replace the shelf by lowering it on the guides WireStorageBin To Remove and Replace Wire Storage Bin 1 Remove the bin by pulling it forward 2 Replace the bin by sliding it back into place DOOR FEATURES CanRack To Remove and Replace Can Rack 1 Remove the can rack by tilting it forward and pulling it out 2 Replace the rack by placing the r...

Страница 11: ...Coils may need to be cleaned as often as every other month This may help save energy Remove the base grille See Base Grille Use a vacuum cleaner with an extended attachment to clean the condenser coils when they are dusty or dirty Replace the base grille 7 Plug in refrigerator or reconnect power ChangingtheLightBulb NOTE Not all appliance bulbs will fit your refrigerator Be sure to replace the bul...

Страница 12: ...pletely later in this section Are the condenser coils dirty This prevents air transfer and makes the motor work harder Clean the condenser coils See Cleaning Temperature is too warm Is the door opened often Be aware that the refrigerator will warm when this occurs In order to keep the refrigerator cool try to get everything you need out of the refrigerator at once keep food organized so it is easy...

Страница 13: ...d provide after warranty service anywhere in the United States To locate the KitchenAid designated service company in your area you can also look in your telephone directory Yellow Pages For further assistance If you need further assistance you can write to KitchenAid with any questions or concerns at KitchenAid Brand Home Appliances Customer eXperience Center 553 Benson Road Benton Harbor MI 4902...

Страница 14: ... by KitchenAid or KitchenAid Canada 5 Any food loss due to product failure 6 Repairs to parts or systems resulting from unauthorized modifications made to the appliance 7 Replacement parts or repair labor costs for units operated outside the United States or Canada 8 In Canada travel or transportation expenses for customers who reside in remote areas KITCHENAID OR KITCHENAID CANADA SHALL NOT BE LI...

Страница 15: ...tous les messages de sécurité et de vous y conformer AVERTISSEMENT DANGER Voici le symbole d alerte de sécurité Ce symbole d alerte de sécurité vous signale les dangers potentiels de décès et de blessures graves à vous et à d autres Tous les messages de sécurité suivront le symbole d alerte de sécurité et le mot DANGER ou AVERTISSEMENT Ces mots signifient AVERTISSEMENT réfrigérateur prendre quelqu...

Страница 16: ...roite ne peut recevoir des charnières pour ouverture à gauche Voir Panneau décoratif Vue arrière Panneau décoratif Vue arrière Pour la réalisation du panneau décoratif utiliser les dimensions indiquées La vue arrière du panneau décoratif présente une charnière pour ouverture à droite Pour l ouverture à gauche l illustration serait symétrique Pour les autres dimensions voir Feuillure pour plaque de...

Страница 17: ...de 2 6 35 cm de chaque côté pour permettre à la porte de s ouvrir sans obstruction REMARQUE Il est recommandé de ne pas installer le réfrigérateur près d un four d un radiateur ou de toute autre source de chaleur Ne pas installer le réfrigérateur dans un endroit où la température baissera au dessous de 55 F 13 C Pour le meilleur rendement ne pas installer le réfrigérateur derrière une porte d armo...

Страница 18: ...abilité pour la dépose ou l addition de cadres décoratifs qui empêcheraient une intervention de réparation sur le réfrigérateur Dépose de la porte 1 Avec une clé Allen de ôter la vis de blocage de la charnière supérieure 2 Incliner la porte vers l avant et la soulever pour la séparer de la broche de charnière inférieure Retirer la porte du réfrigérateur Jeter les charnières supérieure et inférieur...

Страница 19: ...e nylon dans les deux trous percés sur le panneau décoratif 2 Utiliser deux vis n 6 pour fixer la plaque de pivot au sommet du panneau décoratif voir l illustration 3 Si nécessaire fixer la poignée option sur le panneau décoratif Installation du panneau décoratif sur le panneau métallique 1 Placer le panneau décoratif sur une surface propre et douce face vers le bas 2 Assujettir le panneau métalli...

Страница 20: ...er et jeter la plaque de pivot inférieure existante Installer la nouvelle plaque de pivot inférieure Lors de l installation de la plaque de pivot inférieure veiller à orienter la face lisse vers l extérieur et à orienter les trois trous vers l avant du panneau de porte voir l illustration Assemblage de la porte 1 Insérer le panneau décoratif dans le châssis de porte 2 Insérer la plaque d espacemen...

Страница 21: ...ne sur les surfaces de contact Installer les parties inférieure et supérieure du ferme porte IMPORTANT Veiller à aligner correctement les pitons du ferme porte inférieur avec les trous de la charnière inférieure Veiller à aligner correctement les pitons du ferme porte supérieur avec les trous de la plaque de charnière 6 Positionner le châssis de porte sur le ferme porte sur la cheville de charnièr...

Страница 22: ...le que le réfrigérateur neuf émette des sons que l appareil précédent ne produisait pas Comme ces sons sont nouveaux ils peuvent vous inquiéter La plupart de ces nouveaux sons sont normaux Les sons peuvent vous sembler plus forts avec des surfaces dures telles que le plancher et les structures adjacentes Les descriptions suivantes indiquent les genres de sons et leur cause possible Votre réfrigéra...

Страница 23: ...er la tablette 1 Ôter la tablette en la soulevant hors de l agrafe de la tablette 2 Réinstaller la tablette en l alignant sur les agrafes et en appuyant pour la fixer en place Tabletteinférieure Pour enlever et réinstaller la tablette inférieure 1 Enlever la tablette en la soulevant et en tirant vers l avant 2 Réinstaller la tablette en l abaissant sur les guides Compartimentderangementmétallique ...

Страница 24: ...ter la source de courant électrique 2 Retirer toutes les pièces amovibles de l intérieur telles que les tablettes etc 3 Laver à la main rincer et sécher les pièces amovibles et les surfaces internes à fond Utiliser une éponge propre ou un linge doux et un détergent doux dans de l eau tiède Ne pas utiliser de nettoyants abrasifs tels que les nettoyants à vitre en atomiseurs nettoyants à récurer liq...

Страница 25: ...poule 1 Débrancher le réfrigérateur ou déconnecter la source de courant électrique 2 Faire glisser le protecteur d ampoule vers l onglet 3 Appuyer sur l onglet et soulever le côté opposé du protecteur d ampoule 4 Remettre l ampoule en place 5 Réinstaller le protecteur d ampoule du côté de l extrémité de l onglet du protecteur puis abaisser le protecteur pour le mettre en place un déclic se fait en...

Страница 26: ...ement voir La porte ne ferme pas complètement plus loin dans cette section Les serpentins du condenseur sont ils sales Cette situation empêche le transfert de l air et fait travailler davantage le moteur Nettoyer les serpentins du condenseur Voir Nettoyage La température est trop élevée La porte est elle ouverte fréquemment Prévoir que le réfrigérateur deviendra tiède dans ce cas Pour garder le ré...

Страница 27: ...rnir un service après garantie partout aux États Unis Pour localiser la compagnie de service désignée par Kitchen Aid dans votre région vous pouvez également consulter les Pages jaunes Pour plus d assistance Si vous avez besoin de plus d assistance vous pouvez écrire à KitchenAid en soumettant toute question ou problème à KitchenAid Brand Home Appliances Customer Interaction Center 553 Benson Road...

Страница 28: ...attribuable à une malfonction du produit 6 Les réparations de pièces ou systèmes attribuables à des modifications non autorisées de l appareil ménager 7 Les pièces de rechange ou les frais de réparation des appareils utilisés à l extérieur du Canada ou des États Unis 8 Au Canada les frais de déplacement ou de transport pour les clients qui habitent dans des régions éloignées KITCHENAID ET KITCHENA...

Отзывы: