background image

14

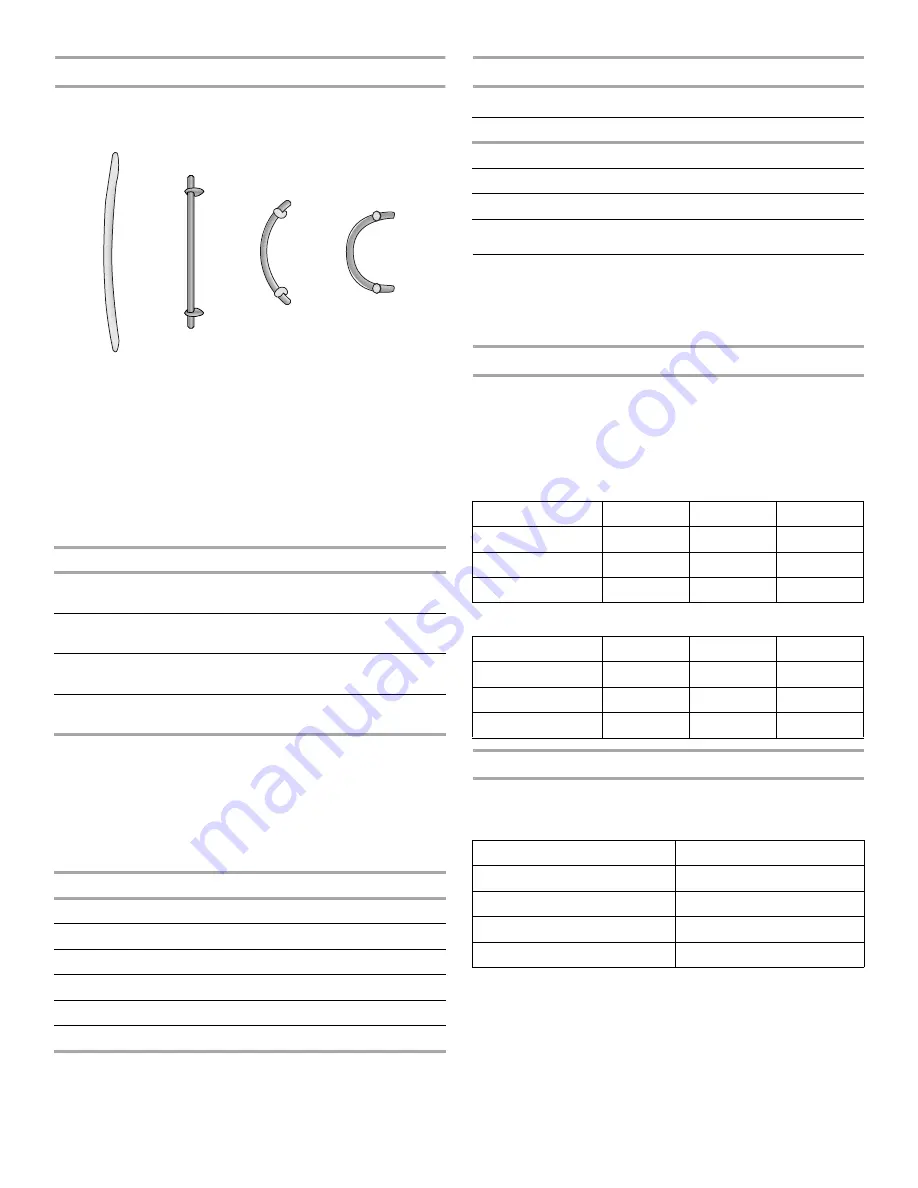
Overlay Series Door Handle Kits

The following handle styles are available. Contact your 
KitchenAid dealer or KitchenAid Parts and Accessories at 
1-800-442-9991. In Canada, call 1-800-807-6777.

Handles

These handles can be installed on side-by-side and bottom-
freezer refrigerators that require overlay panels.

*Available for non-dispensing models only.

Standoffs

(includes screws to support 

³

/

" applications)

These standoffs can be installed on side-by-side and bottom-
freezer refrigerators that require overlay panels. (2 standoffs must 
be ordered for each handle.) Handles and standoffs may be 
combined to meet your individual decorating needs.

Architect

®

 Series

Handles

Classic Series Factory Panels and Kits

All factory parts are available through your KitchenAid dealer or 
by calling KitchenAid Parts and Accessories at 1-800-442-9991
In Canada, call 1-800-807-6777.

Factory Door Panel Kits

Three kits containing colored acrylic or stainless steel door and 
top grille panels are available. Follow the kit instructions for 
installing the panels.

NOTE: Panel kits are not required for factory-installed stainless 
steel panel models.

Door Panel Part Numbers for Non-dispenser Models 

Door Panel Part Numbers for Dispenser Models 

Extended Door Handle Kits

Use extended door handles when additional finger clearance is 
needed between the door handles and custom panel. Follow the 
kit instructions for installing the door handles. 

A. Architect

®

 Series handle (4396103)

B. Flat end straight handle (4396776) with stainless 

steel clamshell standoffs (4396775)

C. Round end arc handle (4396779) with bronze bullet 

standoffs (4396778)

D. Round end semicircle (4396777) with stainless 

steel cylinder standoffs (4396782)

PART NO.

DESCRIPTION

4396776

Flat End Straight - 21" (53.3 cm) Length, 
Satin Stainless Steel

4396781

Flat End Straight - 45" (114.3 cm) Length, 
Satin Stainless Steel

4396777

Round End Semicircle, 
Satin Stainless Steel*

4396779

Round End Arc, 
Satin Stainless Steel*

PART NO.

DESCRIPTION

4396775

Clamshell, Satin Stainless Steel

4396780

Clamshell, Satin Bronze

4396774

Bullet, Satin Stainless Steel

4396778

Bullet, Satin Bronze

4396782

Cylinder, Satin Stainless Steel

4396773

Cylinder, Satin Bronze

A

B

C

D

PART NO.

COLOR

4396103

Stainless Steel

8171760

Biscuit

4396105

White

4396106

Black

Color

36

42

48

White

#2325136

#2325137

#2325138

Black

#2325139

#2325140

#2325141

Stainless Steel

#2325142

#2325143

#2325144

Color

36

42 48

White

#2325127

#2325128

#2325129

Black

#2325130

#2325131

#2325132

Stainless Steel

#2325133

#2325134

#2325135

Color

Part Number

White

#4387990

Black

#8171418

Stainless Steel

#4388062

Matte Aluminum

#4387989

Содержание KSSC36FT - Architect Series II 21.1 cu. Ft. Built

Страница 1: ...nclose the refrigerator IMPORTANT Observe all governing codes and ordinances It is recommended that you do not install the refrigerator near an oven radiator or other heat source Do not install in a location where the temperature will fall below 55 F 13 C Floor must support the refrigerator weight more than 600 lbs 272 kg door panels and contents of the refrigerator Ceiling height must allow for s...

Страница 2: ...extension cord IMPORTANT If this product is connected to a GFCI Ground Fault Circuit Interrupter protected outlet nuisance tripping of the power supply may occur resulting in loss of cooling Food quality and flavor may be affected If nuisance tripping has occurred and if the condition of the food appears poor dispose of it NOTE Before performing any type of installation cleaning or removing a ligh...

Страница 3: ...ate the water dispenser and ice maker If you have questions about your water pressure call a licensed qualified plumber Reverse Osmosis Water Supply IMPORTANT The pressure of the water supply coming out of a reverse osmosis system going to the water inlet valve of the refrigerator needs to be between 30 and 120 psi 207 and 827 kPa If a reverse osmosis water filtration system is connected to your c...

Страница 4: ... below rollers add 1 2 9 cm to the height dimensions Top View Front View Width dimensions were measured from trim edge to trim edge Height dimensions are shown with leveling legs extended 3 mm below the rollers When leveling legs are fully extended to 1 3 2 cm below rollers add 1 2 9 cm to the height dimensions Model Width A 36 42 48 35 88 9 cm 41 104 1 cm 47 119 4 cm 25 64 5 cm 23 59 7 cm 84 213 ...

Страница 5: ...y panels custom handles or extended handles on a Classic model To adjust the door swing see Adjust Doors 36 91 4 cm Models 42 106 7 cm Models 48 121 9 cm Models 130 130 90 90 110 110 44 112 7 cm 39 99 1 cm 14 36 5 cm 10 27 6 cm 35 90 2 cm 38 98 7 cm 130 130 90 90 110 110 47 121 6 cm 41 105 4 cm 16 42 9 cm 12 32 1 cm 37 94 6 cm 41 105 1 cm 130 130 90 90 110 110 51 130 5 cm 44 111 8 cm 19 48 9 cm 14...

Страница 6: ... degree NOTE For Overlay Series models rout the hinge side of the custom door panels to a radius that is equal to at least half the thickness of the panel if a 130 door swing is desired See Adjust Doors Spacer Panel 1 4 6 35 mm 3 4 1 9 cm 1 2 5 cm 1 2 1 3 cm 1 11 4 11 2 1 2 5 cm 1 3 2 cm 1 4 1 3 8 cm 1 2 1 2 Refrigerator Side Trim D o o r Hinge B a c k e r P a n e l O v e r l a y P a n e l Door Sw...

Страница 7: ... or custom handles are used Do not overlook baseboards 1 4 6 35 mm 3 4 1 9 cm 1 2 5 cm 1 2 1 3 cm 3 4 1 11 4 11 2 1 2 Refrigerator Side Trim Door Backer Panel Overlay Panel Hinge Door Swing 90 Actual Size Refrigerator to Cabinetry Clearance 1 9 cm 2 5 cm 3 8 cm 1 3 cm 3 2 cm Spacer Panel Cabinetry 1 2 3 4 1 1 3 cm 1 9 cm 2 5 cm 90 Door Stop Position ...

Страница 8: ...panels The spacer strips must be set in at least 1 2 54 cm from the top bottom and sides edges of the backer panel If you use spacer strips it is also recommended that you use two 2 5 08 cm strips horizontally centered for added support NOTE For the grille and the door panels to be flush the overlay door panel should be 6 35 mm thicker than the overlay grille panel Overlay Panel Spacer Panel Backe...

Страница 9: ...Numbers for Dispenser Models Extended Door Handle Kits Use extended door handles when additional finger clearance is needed between the door handles and custom panel Follow the kit instructions for installing the door handles A Architect Series handle 4396103 B Flat end straight handle 4396776 with stainless steel clamshell standoffs 4396775 C Round end arc handle 4396779 with bronze bullet stando...

Страница 10: ... 1 kg The refrigerator panel should not weigh more than 50 lbs 23 kg Door Panels for Dispenser Models The freezer panel should not weigh more than 40 lbs 18 1 kg The refrigerator panel should not weigh more than 50 lbs 23 kg NOTE Dispenser cut out is centered left to right Top Grille Panel Routing Requirements If the custom panels are thicker than 6 35 mm the top and bottom edges of the top panel ...

Страница 11: ...de Panels Custom side panels may be needed when not enough space is available to have cabinets on both sides of the refrigerator or when the refrigerator is placed at the end of a cabinet run You may choose an Inset Flush or Recessed Inset panel installation Refrigerator and Side Trim Dimensions The width and height of a side panel are determined by the type of installation you are planning NOTES ...

Страница 12: ...to hold the panel in the cabinet side trim OverlaySeriesCustomSidePanels Custom side panels may be needed when not enough space is available to have cabinets on both sides of the refrigerator or when the refrigerator is placed at the end of a cabinet run You may choose an Inset or Recessed Inset panel installation Refrigerator and Side Trim Dimensions The width and height of a side panel are deter...

Страница 13: ...ntil the refrigerator is in its final position 2 If necessary reduce the tipping radius See Tipping Radius for ceiling height requirements or Reduce Tipping Radius for step by step instructions If you do not need to reduce the tipping radius proceed to Move the Refrigerator into House ReduceTippingRadius ifrequired Before bringing the refrigerator into the home be sure there is adequate ceiling he...

Страница 14: ...refrigerator up so there is 6 35 mm maximum between the top of the refrigerator and the bottom of the anti tip board s Do not crush the compressor cover when raising the rear leveling legs To Install Anti tip Boards 1 Mark the stud locations on rear wall 80 to 90 203 cm to 229 cm above floor 2 Securely attach one or two 2 x 4 x 32 5 cm x 10 cm x 81 cm boards to wall studs behind refrigerator Use s...

Страница 15: ...y crush the copper tubing 7 Slip the compression sleeve and compression nut on the copper tubing as shown Insert the end of the tubing into the outlet end squarely as far as it will go Screw compression nut onto outlet end with adjustable wrench Do not overtighten the clamp or the sleeve This will crush the copper tubing IMPORTANT Before attaching the tubing to shutoff valve flush the main water s...

Отзывы: