background image

10

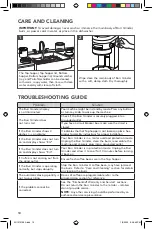
IMPORTANT: 

To avoid damage, never wash or immerse the main body of Burr Grinder, 

burrs, or power cord in water, or place in the dishwasher.

The Top hopper, Top hopper lid, Bottom 

hopper, Bottom hopper lid, Grounds catcher 

tray, and Portafilter holder can be cleaned 

with warm, soapy water, then rinse with clean 

water and dry with clean soft cloth.

1

Wipe clean the main body of Burr Grinder 

with a soft, damp cloth. Dry thoroughly.

2

CARE AND CLEANING

TROUBLESHOOTING GUIDE

Problem

Solution

The Burr Grinder display  

is not illuminated.

Your machine might be in stand by mode. Press any button 

or turn any knob to wake up the machine.

The Burr Grinder does  

not turn start.

Check if the Burr Grinder is securely plugged into a 

grounded outlet.
If you have a circuit breaker box, make sure the circuit is 

closed.

If the Burr Grinder shows 3 

dashes (---) on display.

It indicates the that Top hopper is not locked in place. See 

product assembly instructions for proper installation.

If the Burr Grinder does not turn 

on and display shows “Er2”.

Your Burr Grinder is in a motor overload protection mode. 

Unplug the Burr Grinder, clean the burrs, reassemble the 

machine and securely plug into a grounded outlet.

If the Burr Grinder does not turn 

on and display shows “Er3”.

Your Burr Grinder is in protection mode. Unplug the Burr 

Grinder and allow it to cool for 10 minutes before turning 

it back on.

If Coffee is not coming out from 

the grind outlet.

Ensure fresh coffee beans are in the Top hopper.

If the Burr Grinder is operating 

normally, but stops abruptly.

Stop the Burr Grinder. A coffee bean, may have jammed 

the burrs. Refer to “Care and Cleaning” section for details 

on cleaning the burrs.

The automatic dosing quantity is 

not to your liking.

Doses of coffee are programmable refer to the 

programming section for reference.

If the problem cannot be 

corrected.

See the “KitchenAid

®

 Warranty and Service” sections. 

Do not return the Burr Grinder to the retailer – retailers 

do not provide service.

NOTE:

 Any other servicing should be performed by an 

authorized service representative.

W11312158A.indb   10

W11312158A.indb   10

1/6/2020   5:56:40 PM

1/6/2020   5:56:40 PM

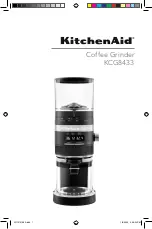
Содержание KCG8433

Страница 1: ...Coffee Grinder KCG8433 W11312158A indb 1 W11312158A indb 1 1 6 2020 5 56 34 PM 1 6 2020 5 56 34 PM ...

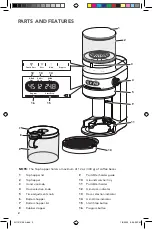
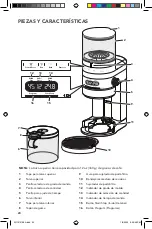
Страница 2: ...per lid 8 Rubber stopper 9 Portafilter holder guide 10 Grounds catcher tray 11 Portafilter holder 12 Grind size indicator 13 Dose selection indicator 14 Grind time indicator 15 Start Stop button 16 Program button Program Grind Time Start Stop Grind Size Cups Shots Perc Drip French Press Espresso 2 1 3 4 5 9 11 10 7 12 13 14 16 15 6 8 W11312158A indb 2 W11312158A indb 2 1 6 2020 5 56 35 PM 1 6 2020...

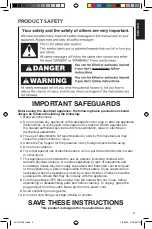
Страница 3: ...e Grinder in water or other liquid 7 This appliance is not intended for use by persons including children with reduced physical sensory or mental capabilities or lack of experience and knowledge unless they are closely supervised and instructed concerning use of the appliance by a person responsible for their safety Close supervision is necessary when any appliance is used by or near children Chil...

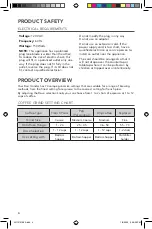
Страница 4: ... so that it will not drape over the countertop or tabletop where it can be pulled on by children or tripped over unintentionally PRODUCT OVERVIEW Your Burr Grinder has 70 unique grind size settings that are suitable for a range of brewing methods from the finest setting for espresso to the coarsest setting for french press By adjusting the Dose selection knob you can choose from 1 to 2 shots of es...

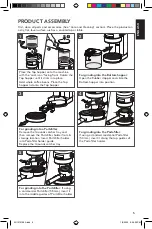
Страница 5: ...stopper and slide the Bottom hopper into position 2 For grinding into a Portafilter Remove the Grounds catcher tray and then remove the Portafilter holder from its storage location Insert Portafilter holder into Portafilter holder guide Replace the Grounds catcher tray 3 For grinding into the Portafilter If using a standard residential Portafilter 54 mm insert it along the top guides of the Portaf...

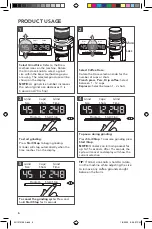
Страница 6: ...size knob to select a grind size within the brew method range you are using The selected grind size will be shown on the display NOTE As grind size number increases the actual grind size decreases 1 is Coarse and 70 is fine 1 Less More Grind Size Cups Shots Grind Time Program Start Stop Select Coffee Dose Rotate the Dose selection knob for the number of cups or shots French press Perc Drip coffee ...

Страница 7: ...ty This functionality allows you to save customized doses for each brew methods based on grinding time Grind Size Cups Shots Grind Time Program Start Stop To save dose setting Once you have identified a desire dose time press Program button to save the grind time you have selected Once a new grind time for a dose within a brew method is saved the Burr Grinder will automatically adjust the grind ti...

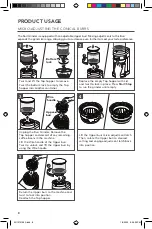
Страница 8: ...tart Stop to run the grinder until empty 2 1 2 Twist and lift the Top hopper to remove Twist the bottom lock to empty the Top hopper into another container 1 Bottom lock Lift the Upper burr micro adjustment latch Then rotate the Upper burr to desired setting and engage adjustment latch back into position 4 Unplug the Burr Grinder Remove the Top hopper and discard of any remaining coffee beans in t...

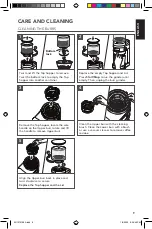
Страница 9: ...ANING CLEANING THE BURRS Remove the Top hopper locate the wire handle on the Upper burr rotate and lift the handle to remove Upper burr 3 1 2 Replace the empty Top hopper and Lid Press Start Stop to run the grinder until empty Then unplug the burr grinder 2 1 2 Twist and lift the Top hopper to remove Twist the bottom lock to empty the Top hopper into another container 1 Bottom lock W11312158A indb...

Страница 10: ...f the Burr Grinder does not turn on and display shows Er2 Your Burr Grinder is in a motor overload protection mode Unplug the Burr Grinder clean the burrs reassemble the machine and securely plug into a grounded outlet If the Burr Grinder does not turn on and display shows Er3 Your Burr Grinder is in protection mode Unplug the Burr Grinder and allow it to cool for 10 minutes before turning it back...

Страница 11: ...uthorized Service Center D Replacement parts or repair labor costs for Burr Grinder attachments operated outside the 50 United States District of Columbia Puerto Rico and Canada DISCLAIMER OF IMPLIED WARRANTIES LIMITATION OF REMEDIES IMPLIED WARRANTIES INCLUDING TO THE EXTENT APPLICABLE WARRANTIES OF MERCHANTABILITY OR FITNESS FOR A PARTICULAR PURPOSE ARE EXCLUDED TO THE EXTENT LEGALLY PERMISSIBLE...

Страница 12: ...nd that if your Burr Grinder should fail within the first year of ownership we will replace your Burr Grinder with an identical or comparable replacement Your replacement unit will also be covered by our one year limited warranty If your Burr Grinder should fail within the first year of ownership simply call our toll free Customer eXperience Center at 1 800 807 6777 Monday through Friday Please ha...

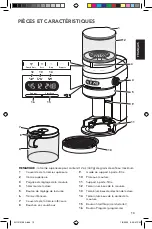
Страница 13: ...a trémie inférieure 8 Bouchon en caoutchouc 9 Guide du support à porte filtre 10 Plateau à mouture 11 Support à porte filtre 12 Témoin lumineux de la mouture 13 Témoin lumineux de sélection de la dose 14 Témoin lumineux de la durée de la mouture 15 Bouton Start Stop marche arrêt 16 Bouton Program programme Program Grind Time Start Stop Grind Size Cups Shots Perc Drip French Press Espresso 2 1 3 4 ...

Страница 14: ...risque de décharge électrique ne pas immerger le moulin à café dans l eau ou un autre liquide 7 Cet appareil ne convient pas à une utilisation par des personnes y compris des enfants à capacités physiques sensorielles ou mentales réduites ou possé dant un manque d expérience et de connaissances à moins qu elles ne soient placées sous supervision ou qu elles aient reçu des instructions concernant l...

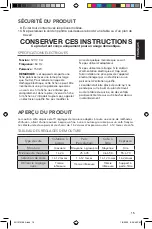
Страница 15: ... cuisine où des enfants pourraient tirer dessus ou trébucher dessus involontairement 9 Éviter tout contact avec les pièces mobiles 10 Ne pas laisser le cordon pendre par dessus le bord d une table ou d un plan de travail CONSERVER CES INSTRUCTIONS Ce produit est conçu uniquement pour un usage domestique APERÇU DU PRODUIT Le moulin à café dispose de 70 réglages de mouture adaptés à toute une série ...

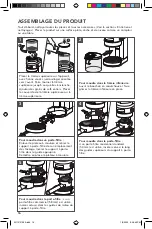
Страница 16: ...ieu du support à porte filtre 5 ASSEMBLAGE DU PRODUIT Tout d abord nettoyer toutes les pièces et tous les accessoires Voir la section Entretien et nettoyage Placer le produit sur une surface plate sèche et de niveau comme un comptoir ou une table 1 2 1 2 Placer la trémie supérieure sur l appareil avec l icône Lock verrouillage orientée vers l avant Faire tourner la trémie supérieure jusqu à ce qu ...

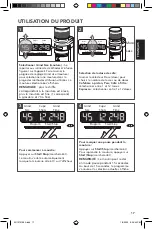
Страница 17: ...ts Grind Time Program Start Stop Sélectionner Grind Size mouture Se reporter aux icônes des méthodes d infusion figurant sur l appareil Faire tourner la poignée de réglage Grind size mouture pour sélectionner une mouture dans la plage des méthodes d infusion utilisées La mouture sélectionnée s affichera REMARQUE plus le chiffre correspondant à la mouture est élevé plus la mouture est fine 1 corres...

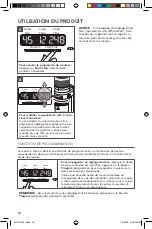
Страница 18: ...r sur le bouton Program programmer pour sauvegarder la valeur de la durée de mouture sélectionnée Lorsqu une nouvelle durée de mouture de dose est sauvegardée dans une des méthodes d infusion le moulin à café ajuste automatiquement vers le haut ou vers le bas la durée de mouture de toutes les autres doses dans la méthode d infusion en conséquence REMARQUE pour restaurer tous les réglages d usine d...

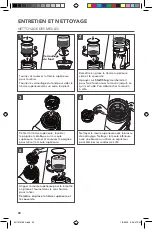
Страница 19: ...lacer la trémie supérieure vide avec le couvercle et tourner pour la verrouiller en position Appuyer sur Start Stop marche arrêt pour faire fonctionner le moulin jusqu à ce qu il soit vide 2 1 2 Tourner et soulever la trémie supérieure pour la retirer Tourner le verrouillage du fond pour vider la trémie supérieure dans un autre récipient 1 Verrouil lage du fond Débrancher le moulin à café Retirer ...

Страница 20: ...trémie supérieure localiser la poignée métallique sur la meule supérieure tourner et soulever la poignée pour retirer la meule supérieure 3 1 2 Remettre en place la trémie supérieure vide et le couvercle Appuyer sur Start Stop marche arrêt pour faire fonctionner le moulin jusqu à ce qu il soit vide Puis débrancher le moulin à café 2 1 2 Tourner et soulever la trémie supérieure pour la retirer Tour...

Страница 21: ... moulin à café ne s allume pas et que le message Er2 s affiche Le moulin à café est en mode de protection contre les surcharges Débrancher le moulin à café nettoyer les meules remonter l appareil et le brancher sur une prise reliée à la terre Si le moulin à café ne s allume pas et que le message Er3 s affiche Le moulin à café est en mode de protection Débrancher le moulin à café et le laisser refr...

Страница 22: ... coût des pièces de rechange ou de la main d œuvre pour les accessoires du moulin à café lorsqu il est utilisé à l extérieur des 50 États des États Unis du district fédéral de Columbia de Porto Rico et du Canada CLAUSE D EXONÉRATION DE RESPONSABILITÉ AU TITRE DES GARANTIES IMPLICITES LIMITATION DES RECOURS LES GARANTIES IMPLICITES Y COMPRIS DANS LA MESURE APPLICABLE LES GARANTIES DE QUALITÉ MARCHA...

Страница 23: ...café cesse de fonctionner au cours de la première année suivant son acquisition nous remplacerons le moulin à café par un appareil de rechange identique ou comparable L appareil de remplacement sera également couvert par notre garantie limitée d un an Si le moulin à café cesse de fonctionner durant la première année suivant son acquisition il suffit d appeler notre Centre eXpérience clientèle au 1...

Страница 24: ...ferior 8 Tapón de goma 9 Guía para sujetador de portafiltro 10 Bandeja recolectora de residuos 11 Sujetador de portafiltro 12 Indicador de grado de molido 13 Indicador de selección de cantidad 14 Indicador de tiempo de molido 15 Botón Start Stop Inicio Detener 16 Botón Program Programar Program Grind Time Start Stop Grind Size Cups Shots Perc Drip French Press Espresso 2 1 3 4 5 9 11 10 7 12 13 14...

Страница 25: ...rga eléctrica o lesiones 4 Revise si hay objetos extraños en la tolva superior antes de usarla 5 No lo use al aire libre 6 Para protegerse contra el riesgo de descarga eléctrica no sumerja el molino de café en agua ni en ningún otro líquido 7 Este electrodoméstico no ha sido diseñado para ser usado por personas incluidos niños con capacidad física sensorial o mental reducida o con falta de experie...

Страница 26: ...leen el aparato como juguete 14 No toque las superficies calientes La superficie del elemento de calefacción está sujeta a calor residual después de su uso Utilice las agarraderas asas o perillas botones 15 Para proteger en contra el riesgo de descargas eléctricas no sumerja el cordón la clavija enchufe ó el aparato en agua u otro líquido 16 No utilice el aparato para otro uso que el intencionado ...

Страница 27: ...ador de portafiltro REQUISITOS ELÉCTRICOS Tensión 120 VCA Frecuencia 60 Hz Potencia 150 vatios NOTA Este electrodoméstico tiene un enchufe polarizado una hoja es más ancha que la otra Para reducir el riesgo de choque eléctrico este enchufe encajará en un tomacorriente polarizado solamente de una manera Si el enchufe no encaja por completo en el tomacorriente dé vuelta el enchufe Si aún así no enca...

Страница 28: ... tolva inferior Abra el tapón de goma y deslice la tolva inferior hasta su posición 2 Cómo moler en un portafiltro Retire la bandeja recolectora de residuos y luego retire el sujetador del portafiltro Inserte el sujetador del portafiltro en la guía Vuelva a colocar la bandeja recolectora de residuos 3 Cómo moler en el portafiltro Si usa un portafiltro doméstico estándar 54 mm insértelo a lo largo ...

Страница 29: ...eleccionar Grind Size grado de molido Consulte los íconos de método de elaboración en la máquina Gire la perilla Grind size grado de molido para seleccionar el grado de molido dentro del rango del método de elaboración que esté usando El grado de molido seleccionado se mostrará en la pantalla NOTA Cuanto mayor sea el valor para el grado de molido más fino será el resultado 1 es igual a grueso y 70...

Страница 30: ...o de dosificación deseado presione el botón Program Programar para guardar el tiempo de molido que seleccionó Una vez que se guarda un nuevo tiempo de molido para una dosificación de un método de elaboración el molino de café aumentará o reducirá de manera automática el tiempo de molido correspondiente para todas las dosificaciones dentro del método de preparación NOTA Para restaurar las todas las...

Страница 31: ...rdo con sus preferencias USO DEL PRODUCTO 1 2 Vuelva a colocar la tolva superior vacía con tapa y retuerza para que se trabe en su lugar Presione Start Stop Inicio Detener para que el molino funcione hasta que quede vacío 2 1 2 Retuerza y levante la tolva superior para retirarla Retuerza el seguro inferior para vaciar el con tenido de la tolva superior en otro recipiente 1 Seguro inferior Desconec...

Страница 32: ...a tolva superior coloque el asa de alambre en la rebaba superior gire y levante el asa para retirar la rebaba superior 3 1 2 Retuerza y levante la tolva superior para retirarla Retuerza el seguro inferior para vaciar el contenido de la tolva superior en otro recipiente 1 1 2 Vuelva a colocar la tolva superior vacía y la tapa Presione Start Stop Inicio Detener para que el molino funcione hasta que ...

Страница 33: ...e El molino de café no se prende y la leyenda Er2 figura en pantalla Su molino de café se encuentra en modo de protección por sobrecarga del motor Desenchúfelo limpie las rebabas vuelva a ensamblar la máquina y enchúfelo correctamente en un tomacorriente con conexión a tierra El molino de café no se prende y la leyenda Er3 figura en pantalla Su molino de café se encuentra en un modo de protección ...

Страница 34: ...nipulación para llevar el molino de café a un centro de servicio técnico autorizado D Piezas de repuesto o costos de mano de obra para los molinos de café operados fuera de los 50 estados de Estados Unidos el Distrito de Columbia Puerto Rico y Canadá EXCLUSIÓN DE GARANTÍAS IMPLÍCITAS LIMITACIÓN DE RECURSOS LAS GARANTÍAS IMPLÍCITAS INCLUIDAS EN LA MEDIDA QUE CORRESPONDA LAS GARANTÍAS DE COMERCIABIL...

Страница 35: ...fé presentara alguna falla durante el primer año de compra reemplazaremos su molino de café con uno idéntico o un reemplazo comparable La unidad de reemplazo estará también cubierta por nuestra garantía limitada de un año Si su molino de café presenta alguna falla durante el primer año de compra simplemente llame a nuestro Centro para la eXperiencia del cliente al 1 800 807 6777 de lunes a viernes...

Страница 36: ...ucto garantizado siempre que éste deba ser intervenido debido a inconvenientes o fallas de funcionamiento del mismo o de sus componentes y cuando la falla se presente en condiciones normales de uso Esta Garantía no comprende A Daños ocasionados por la instalación incorrecta inapropiada o ilegal del producto o por la instalación y o corrección de una instalación deficiente efectuada por terceros no...

Страница 37: ... ceder la misma junto al producto garantizado durante el término de su vigencia en este caso el Garante sólo reconocerá al nuevo Beneficiario de ella el tiempo de vigencia pendiente siempre y cuando el usuario muestre el comprobante de compra para validar la vigencia de la garantía Las condiciones de validez de la garantía están sujetas a que el producto garantizado Sea utilizado en condiciones no...

Страница 38: ...quirió el producto presentando su producto con esta póliza llenada con los datos solicitados en la sección Individualización del producto garantizado y debidamente sellada por el distribuidor que la vendió El cons umidor podrá solicitar que se haga efectiva la garantía que ampara esta póliza al fabricante del producto en los domicilios y o teléfonos siguientes La presente Garantía no constituye y ...

Страница 39: ...minicana Lo invitamos a revisar los datos del Garante en el sello colocado por el Distribuidor Si tiene alguna consulta respecto de los Distribuidores oficiales o sus datos contáctenos a través de los medios señalados a continuación Línea de atención 1 809 200 9990 Horario de atención lunes a viernes de 8 00 am a 5 00 pm E mail contactorepublicadominicana whirlpool com Consulte también nuestros si...

Страница 40: ... USA 1 800 541 6390 KitchenAid com CANADA 1 800 807 6777 KitchenAid ca MEXICO KitchenAid com mx LATIN AMERICA KitchenAid Latam com 2020 KitchenAid All rights reserved Used under license in Canada Tous droits réservés Utilisé sous licence au Canada Todos los derechos reservados Usada en Canadá bajo licencia 01 20 W11312158A indb 40 W11312158A indb 40 1 6 2020 5 56 57 PM 1 6 2020 5 56 57 PM ...

Отзывы: