background image

4

Location Requirements

IMPORTANT:

Observe all governing codes and ordinances. 

It is recommended that you do not install the refrigerator near 
an oven, radiator, or other heat source. 

Do not install in a location where the temperature will fall 
below 55°F (13°C).

Floor must support the refrigerator weight, more than 600 lbs 
(272 kg), door panels and contents of the refrigerator. 

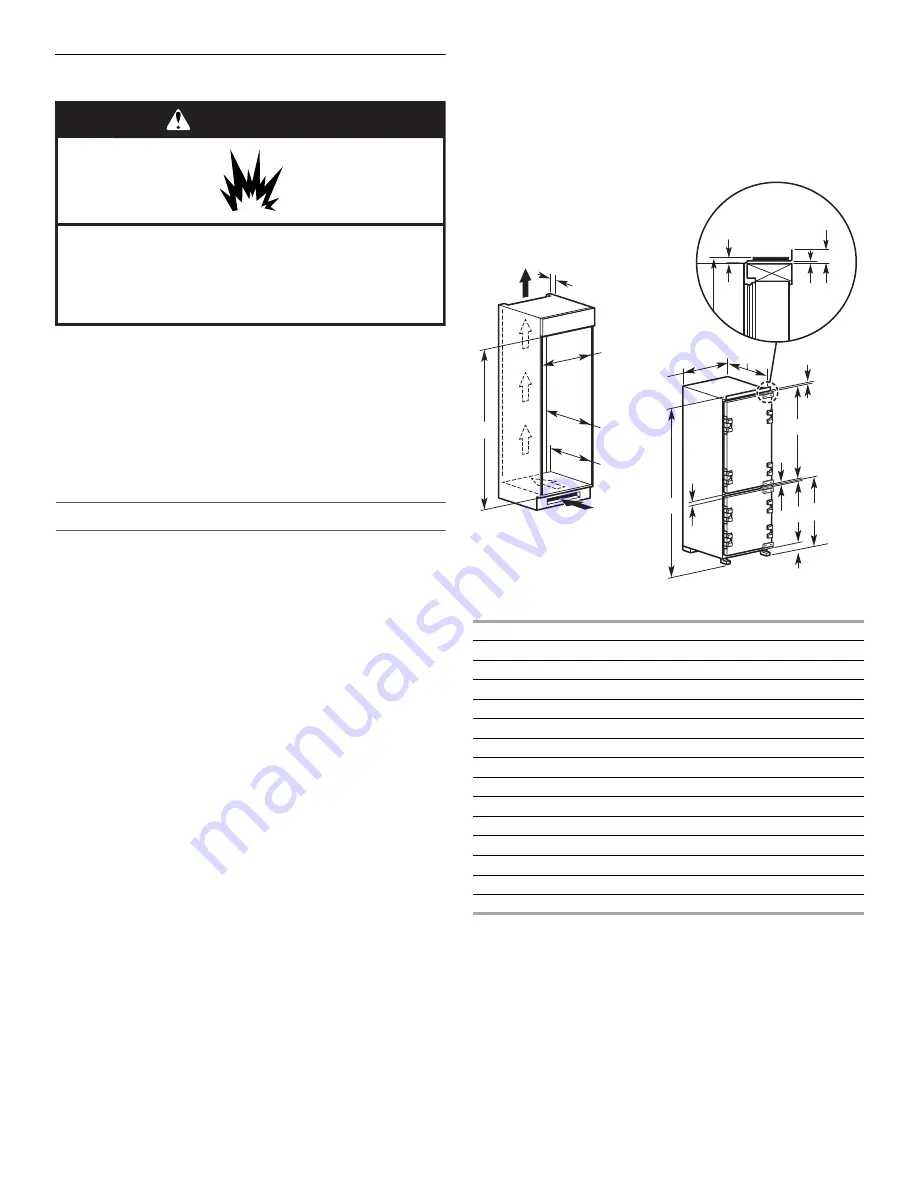
Opening Dimensions

This refrigerator is designed to be installed inside a frame that fits 
between kitchen cabinets. The inside of the frame should be a 
minimum of 69

¹⁵⁄₁₆

" (177.6 cm) high, 22

¹⁄₁₆

" (56.0 cm) wide, and 

21

⁷⁄₈

" (55.5 cm) deep (front-to-back).

For proper ventilation, you must allow adequate unobstructed 
space behind the refrigerator and below and above the frame. 
Air enters below the refrigerator and exits above it. 

Allow a clearance minimum of 2" (50 mm) at the top of the 
frame.

The minimum depth of the base of the frame is 20

1

2

(520 mm) (front to back).

The base can be as desired, but height should match height 
of toe kick of surrounding cabinets. A vent with an opening 
of at least 31 sq in. (200 sq. cm) is required for proper 
ventilation.

If the space between the top of the frame and the ceiling 
is open air, allow a minimum of 7

⁷⁄₈

" (20.0 cm) above the 

refrigerator.

If the space between the top of the frame and the ceiling is 
enclosed as part of the surrounding cabinetry, a vent with an 
opening of at least 31 sq. in. (200 sq. cm) is required. The 
bottom of the vent must be a minimum of 7

⁷⁄₈

" (20.0 cm) 

above the refrigerator.

NOTE:

 Vent covers are not supplied with the unit.

Dimension Table

WARNING

Explosion Hazard

Keep flammable materials and vapors, such as 
gasoline, away from refrigerator.

Failure to do so can result in death, explosion, or fire.

A

70" (1776 mm)

B

22" (560 mm)

C

minimum 21

⁷⁄₈

" (555 mm)

D

minimum 20

7

/

₁₆

" (520 mm)

E

minimum 2" min. (50 mm)

F

69" (1770 mm)

G

21¼" (540 mm)

H

21½" (545 mm)

I

2

3

/

" (60 mm)

J

¹⁄₁₆

" (2 mm)

K

42" (1057 mm)

L

3

/

₁₆

" (10 mm)

M

28" (703 mm)

N

26¼" (668 mm) 

O

1

1

⁄₈

" (30 mm)

1

/

16

"

(2 mm)

3

/

8

"

(9 mm)

1

/

8

"

(4 mm)

A

D

C

B

E

G

H

F

I

J

K

L

N M

O

F

Содержание KBBX104EPA

Страница 1: ...E INSTRUCTIONS INSTALLATION REQUIRES 2 OR MORE PEOPLE RÉFRIGÉRATEUR ENCASTRÉ AVEC CONGÉLATEUR EN DESSOUS Guide d installation IMPORTANT LIRE ET CONSERVER CES INSTRUCTIONS L INSTALLATION NÉCESSITE L INTERVENTION DE 2 PERSONNES OU PLUS Table of Contents Table des matières 2 W10745310B ...

Страница 2: ...r Panels 6 Reverse the Doors 8 Complete Installation 8 TABLE DES MATIÈRES SÉCURITÉ DU RÉFRIGÉRATEUR 9 EXIGENCES D INSTALLATION 9 Outillage et pièces 9 Exigences d emplacement 10 Spécifications électriques 11 INSTRUCTIONS D INSTALLATION 11 Déballage du réfrigérateur 11 Brancher le réfrigérateur 12 Faire entrer le réfrigérateur dans l encadrement 12 Installation des panneaux de porte 12 Inversion du...

Страница 3: ...jury and tell you what can happen if the instructions are not followed Your safety and the safety of others are very important We have provided many important safety messages in this manual and on your appliance Always read and obey all safety messages This is the safety alert symbol This symbol alerts you to potential hazards that can kill or hurt you and others All safety messages will follow th...

Страница 4: ...frame is 201 2 520 mm front to back The base can be as desired but height should match height of toe kick of surrounding cabinets A vent with an opening of at least 31 sq in 200 sq cm is required for proper ventilation If the space between the top of the frame and the ceiling is open air allow a minimum of 7 20 0 cm above the refrigerator If the space between the top of the frame and the ceiling i...

Страница 5: ...g disconnect power at the circuit breaker box When you are finished reconnect power at the circuit breaker box Then reset the control to the desired setting INSTALLATION INSTRUCTIONS Unpack the Refrigerator IMPORTANT Keep the cardboard shipping piece or plywood under the refrigerator until it is installed in the operating location 1 Save all literature that is provided inside the refrigerator and ...

Страница 6: ...ts each door Max Weight 26 5 lbs 12 Kg Minimum Panels Dimensions Refrigerator Door Panel 421 1071 5 mm x 23 590 mm x 20 mm Freezer Door Panel 275 701 5 mm x 23 590 mm x 20 mm 1 Mount the panel alignment tool onto the refrigerator door Align the smaller piece with the screws on the bottom of the door and slide it to the left step 1 and 2 in picture above Assemble the panel alignment tool by inserti...

Страница 7: ...into direct contact with any of the surrounding cabinets or cabinet doors Such contact could prevent the refrigerator and or freezer door s from closing properly The top slotted headless screw A in the picture adjusts the spacing between the door and the door panel Use a flat blade screwdriver to make adjustments Turn the screw clockwise to increase the space between the door and door panel and co...

Страница 8: ...osite side of the refrigerator door 3 Use the four screws to install the top hinge on the opposite bottom side of the refrigerator door Repeat for the bottom hinge 4 Insert the hole plugs where the hinge screws were prior to the door reversal 5 Repeat the process to reverse the freezer door Complete Installation 1 Remove all boxes parts packages and packing materials from the interior of the refri...

Страница 9: ...de décès et de blessures graves à vous et à d autres Tous les messages de sécurité suivront le symbole d alerte de sécurité et le mot DANGER ou AVERTISSEMENT Ces mots signifient AVERTISSEMENT Risque possible de décès ou de blessure grave si Risque possible de décès ou de blessure grave si vous ne suivez pas les instructions Tous les messages de sécurité vous diront quel est le danger potentiel et ...

Страница 10: ...imale de la base de l encadrement est de 20 2 520 mm avant et arrière La base peut être conçue comme l on désire mais doit correspondre à la hauteur des plinthes d armoire environnantes Un évent avec une ouverture d au moins 31 po2 200 cm2 est requis pour une aération adéquate Si l espace entre le haut de l encadrement et le plafond est de l air ouvert prévoir un minimum de 7 20 0 cm au dessus du ...

Страница 11: ...chement intempestif se produit et si les aliments semblent de piètre qualité jeter le tout REMARQUE Avant d effectuer tout type d installation ou de nettoyage couper l alimentation au boîtier de disjoncteurs Lorsque terminé rétablir le courant au boîtier de disjoncteurs Puis mettre de nouveau le réglage au réglage désiré INSTRUCTIONS D INSTALLATION Déballage du réfrigérateur IMPORTANT Garder la pi...

Страница 12: ...panneaux Panneau de porte du réfrigérateur 42 1 1071 5 mm x 23 590 mm x 20 mm Panneau de porte du congélateur 27 701 5 mm x 23 590 mm x 20 mm 1 Monter l outil d alignement de panneau sur la porte du réfrigérateur Aligner la pièce plus petite au moyen des vis sur le bas de la porte et la glisser vers la gauche étapes 1 et 2 de l illustration ci dessus Assembler l outil d alignement du panneau en in...

Страница 13: ...es panneaux de porte n entrent pas en contact direct avec les armoires ou portes d armoire environnantes Ce contact pourrait empêcher la ou les portes du réfrigérateur et ou du congélateur de se fermer correctement La vis sans tête à fente supérieure A de l illustration ajuste l espacement entre la porte et le panneau de porte À l aide d un tournevis à lame plate effectuer les ajustements Tourner ...

Страница 14: ...taller la charnière supérieure sur le côté opposé au bas de la porte du réfrigérateur au moyen des quatre vis Répéter l opération pour la charnière inférieure 4 Insérer les bouchons d obturation où les vis de la charnière se trouvaient avant l inversion de la porte 5 Répéter l opération pour inverser la porte du congélateur Achever l installation 1 Retirer toutes les boîtes tous les paquets de piè...

Страница 15: ...15 NOTES ...

Страница 16: ...W107445310B 2015 KitchenAid All rights reserved Used under license in Canada Tous droits réservés Utilisé sous licence au Canada 05 15 Printed in Italy Imprimé en Italie ...

Отзывы: