background image

Содержание IGL730C

Страница 1: ... Exigences d emplacement 27 Specifications electriques 29 Specifications de I alimentation en gaz 29 INSTRUCTIONS D INSTALLATION 31 Deballage de la cuisiniere 31 Installation de la bride antibasculement 31 Reglage des pieds de nivellement 32 Reglage de I aplomb de la cuisiniere 33 Raccordement au gaz 33 Verifier que la bride antibasculement est bien installee et engagee 35 Systeme d allumage elect...

Страница 2: ...damage personal injury or death Do not store or use gasoline or other flammable vapors and liquids in the vicinity of this or any other appliance WHAT TO DO IF YOU SMELL GAS Do not try to light any appliance Do not touch any electrical switch Do not use any phone in your building Immediately call your gas supplier from a neighbor s phone Follow the gas supplier s instructions If you cannot reach y...

Страница 3: ...d be killed Install anti tip bracket to floor or wall per installation instructions Slide range back so rear range foot is engaged in the slot of the anti tip bracket Re engage anti tip bracket if range is moved Do not operate range without anti tip bracket installed and engaged Failure to follow these instructions can result in death or serious burns to children and adults To verify the anti tip ...

Страница 4: ...49 High 6 15 2 cm Stainless Steel Order Part Number W10655450 IMPORTANT Observe all governing codes and ordinances Do not obstruct flow of combustion and ventilation air It is the installer s responsibility to comply with installation clearances specified on the model serial rating plate The model serial rating plate is located behind the oven door on the top right hand side of the oven frame The ...

Страница 5: ... the range is adequate as long as it conforms to the standards listed above Product Dimensions This manual covers several models Your model may appear different from the models depicted Dimensions given are maximum dimensions across all models Model KSGB900 A D A 1_ 3 0 cm height from cooktop to top of vent B 29 z_ 75 9 cm C Model serial number plate located behind the oven door on the top right h...

Страница 6: ... and grounded outlet H 13 _ 33 3 cm I 71 _ 19 5 cm J 4 1_ 12 2 cm K 3 1 _ 9 4 cm or measurement of N whichever is greater L 12 30 5 cm M Cabinet door or hinges should not extend into the cutout N Remaining counter depth should not exceed 2_ 5 7 cm I I K A 18 45 7 cm upper side cabinet to countertop B 13 33 cm max upper cabinet depth C 30 76 2 cm min opening width D For minimum clearance to top of ...

Страница 7: ... normal operating nature of electronic gas ranges The tech sheet and wiring diagram are located on the back of the range in a plastic bag NOTE The metal chassis of the range must be grounded in order for the control panel to work If the metal chassis of the range is not grounded no keypads will operate Check with a qualified electrician if you are in doubt as to whether the metal chassis of the ra...

Страница 8: ...e are for elevations up to 2 000 ft 609 6 m For elevations above 2 000 ft 609 6 m ratings are reduced at a rate of 4 for each 1 000 ft 304 8 m above sea level not applicable for Canada Gas Supply Pressure Testing Gas supply pressure for testing regulator must be at least 1 water column pressure above the manifold pressure shown on the model serial rating plate Line pressure testing above 1 2psi ga...

Страница 9: ...d mark centerline of the cutout space The mounting can be installed on either the left side or right side of the cutout Position mounting bracket against the wall in the cutout so that the V notch of the bracket is 12W 31 8 cm from centerline as shown 4 Drill two V8 3 mm holes that correspond to the bracket holes of the determined mounting method See the following illustrations Floor Mounting Rear...

Страница 10: ... the anti tip bracket will slide under the range and onto the rear leveling leg prior to anti tip bracket installation NOTE If a Trim Kit will be used the top of the cooktop should be higher than the counter See the Installation Instructions included with the Trim Kit for the correct height 1 Place level on the oven bottom as indicated in one of the two figures below depending on the size of the l...

Страница 11: ...d H Adapter Complete Connection 1 Check that the gas pressure regulator shutoff valve is in the on position 2 A Gas pressure regulator shutoff valve shown in the on position Open the manual shutoff valve in the gas supply line The valve is open when the handle is parallel to the gas pipe A Closed valve B Open valve 3 Test all connections by brushing on an approved noncorrosive leak detection solut...

Страница 12: ...tions can result in death fire or electrical shock 7 Plug into a grounded 3 prong outlet On Ranges Equipped with a Premium Storage Drawer 1 Slide range into final location making sure rear leveling leg slides into anti tip bracket 2 Remove the premium storage drawer See the Remove Replace Drawer section 3 Use a flashlight to look underneath the bottom of the range 4 Visually check that the rear ra...

Страница 13: ...ged into a grounded 3 prong outlet Check that the circuit breaker has not tripped or the household fuse has not blown Check that the gas shutoff valves are set to the open position Check that burner caps are properly positioned on burner bases Repeat start up If a burner does not light at this point turn the control knobs to the off position and contact your dealer or authorized service company fo...

Страница 14: ...her side The drawer is no longer attached to the drawer glides Using both hands pick up the drawer to complete the removal To Replace 1 Align the forward drawer notches with the notches in the drawer glides on both sides Place the rear alignment tabs into the drawer glides on both sides A Drawer alignment tab B Drawer glide notch 2 Push the drawer in all the way 3 Gently open and close the drawer ...

Страница 15: ...oven See the User Guide for specific instructions on range operation NOTE Odors and smoke are normal when the oven is used the first few times If range does not operate check the following Household fuse is intact and tight or circuit breaker has not tripped Gas pressure regulator shutoff valve is in the open position Range is plugged into a grounded 3 prong outlet Electrical supply is connected 9...

Страница 16: ...lide range back so rear range foot is engaged in the slot of the anti tip bracket Re engage anti tip bracket if range is moved Do not operate range without anti tip bracket installed and engaged Failure to follow these instructions can result in death or serious burns to children and adults 1 Turn the manual shutoff valve to the closed position B A_ J _ C A Torange B Manualshutoff valve closed pos...

Страница 17: ...driver down onto the gas orifice spud and remove by turning it counterclockwise and lifting out Set gas orifice spud aside A D 4 A Igniter electrode B Orifice spud C Orifice spud holder D Screws Remove the orifice spuds shipped in the literature package in the oven Gas orifice spuds are stamped with a number marked with 1 color dot and have a groove in the hex area Replace the Natural gas orifice ...

Страница 18: ...ont of the oven bottom panel toward the front frame and lower the rear of the oven bottom panel into the oven 11 Reattach the oven bottom panel with 2 screws and 2 washers To Convert Oven Broil Burner Natural Gas to LP Gas 1 Remove the 1 screw from the broil burner 2 Remove the flame spreader 3 Remove the broil burner from the broil burner orifice hood NOTE The broil burner will hang in the back o...

Страница 19: ...me 1 0 64 cm to 1 2 1 3 cm long The outer cone is not as distinct as the inner cone LP gas flames have a slightly yellow tip 4 Refer to Complete Installation in the Installation Instructions section of this manual to complete this procedure I IMPORTANT Make sure to save the orifices that have I I just been replaced in the conversion I Tip Over Hazard A child or adult can tip the range and be kille...

Страница 20: ...o that the solid end faces out and the marking 4 NG is facing the direction shown in the above drawing 6 Replace plastic cover over gas pressure regulator cap To Convert Surface Burners LP Gas to Natural Gas 1 Remove burner cap 2 Remove the burner base C A _ D A Igniter electrode B Burner cap C Gas tube opening D Burner base A Stamped number Refer to the following chart for the correct Natural gas...

Страница 21: ...pud 8 Position the back of the bake burner over the oven orifice and align the holes for the screws 9 Reattach the bake burner with 2 screws 10 Position the front of the oven bottom panel toward the front frame and lower the rear of the oven bottom panel into the oven 11 Reattach the oven bottom panel with 2 screws and 2 washers To Convert Oven Broil Burner LP Gas to Natural Gas 1 Remove 1 screw f...

Страница 22: ...on for properly connecting the range to the gas supply 2 Refer to the Electronic Ignition System section for proper burner ignition and operation 3 Refer to the Adjust Flame Height section for burner flame adjustments IMPORTANT You may have to adjust the low setting for each cooktop burner Checking for proper cooktop bake and broil burner flame is very important Natural gas flames do not have yell...

Страница 23: ...emove the premium storage drawer warming drawer or baking drawer see the Remove Replace Drawer section Locate gas pressure regulator at rear of the drawer compartment NOTE On models with a warming drawer or baking drawer an access cover must be removed to access the gas pressure regulator A A Gas pressure regulator IMPORTANT Do not remove the gas pressure regulator 4 A Screws B Oven bottom c Press...

Страница 24: ...character No yellow tips blowing or lifting of flame should be present If flame needs to be adjusted 1 Press the off pad Let the oven cool 2 Loosen the lock screw on the air shutter located at the rear of the broil burner 3 Adjust the air shutter as needed 4 Tighten lock screw 5 A Lock screw B Air shutter Close the oven door Press BROIL then press the start pad Look through the oven window to chec...

Страница 25: ...treposer ni utiliser de I essence ou d autres vapeurs ou liquides inflammables proximite de cet appareil ou de tout autre appareil electromenager QUE FAIRE DANS LE CAS D UNE ODEUR DE GAZ Ne pas tenter d allumer un appareil Ne pas toucher a un commutateur electrique Ne pas utiliser le telephone se trouvant sur les lieux Appeler immediatement le fournisseur de gaz a partir du telephone d un voisin S...

Страница 26: ... de sorte que le pied de la cuisiniere se trouve sous la bride antibasculement Voir les instructions d installation pour plus de d_tails EXIGENCESD INSTALLATION Rassembler les outils et pieces necessaires avant d entreprendre I installation Lire et observer les instructions fournies avec chacun des outils de la liste ci dessous Outils n_cessaires Metre ruban Tournevis Phillips Tournevis a lame pla...

Страница 27: ...a determiner si le rev_tement de sol peut resister a une temperature d au moins 200 F 93 C Dans le cas de I installation de la cuisiniere sur une moquette placer sous la cuisiniere un tapis isolant ou une plaque de contreplaqu_ de _ 0 64 cm IMPORTANT Afin d eviter d endommager les placards consulter I installateur ou le fabricant des placards pour determiner si les materiaux utilises peuvent subir...

Страница 28: ...igide dans cette zone gris e H 13 _ 33 3 cm I 71 _ 19 5 cm J 4 1_ 12 2 cm K 3 r _ 9 4 cm ou mesure de IV la plus grande dimension tant retenue L 12 30 5 cm M La porte du placard ou ses charnieres ne dolt pas d passer I in t rieur de I ouverture N La profondeur restante du plan de travail ne dolt pas d passer 2_ 5 7 cm A 18 45 7 cm entre le placard lateral sup rieur et le plan de travail B 13 33 cm...

Страница 29: ...st recommande de ne pas brancher une cuisiniere gaz ou tout autre gros appareil electromenager allumage electrique par etincelle dans une prise murale disjoncteur differentiel car ce dernier peut se declencher Iors de I utilisation normale de I allumeur La performance de cette cuisiniere ne change pas si elle est branchee un circuit protege par disjoncteur differentiel Toutefois le declenchement i...

Страница 30: ...inet d arret necessaire La canalisation d alimentation doit comporter un robinet d arret manuel Le robinet d arret manuel doit etre separe de I ouverture de la cuisiniere mais doit se trouver dans la meme piece par exemple dans un placard adjacent La canalisation doit se trouver en un endroit facilement accessible pour les manceuvres d ouverture fermeture Ne pas entraver I acces au robinet d arret...

Страница 31: ... plancher A 2 personnes au moins redresser la cuisiniere et la placer sur le carton ou le panneau de fibres dur Risque de basculement Un enfant ou une personne adulte peut faire basculer la cuisiniere ce qui peut causer un d_ces Fixer la bride antibasculement au plancher ou au mur conform_ment aux instructions d installation Faire glisser de nouveau la cuisiniere de fa_on a ce que le pied arriere ...

Страница 32: ...ntibasculement au plancher ou au mur conform_ment aux instructions d installation Faire glisser de nouveau la cuisiniere de fa on a ce que le pied arriere de la cuisiniere se trouve dans la fente de la bride antibasculement R_engager la bride antibasculement si la cuisiniere a _t_ d_plac_e Ne pas faire fonctionner la cuisiniere si la bride antibasculement n est pas install_e et engag_e Le non resp...

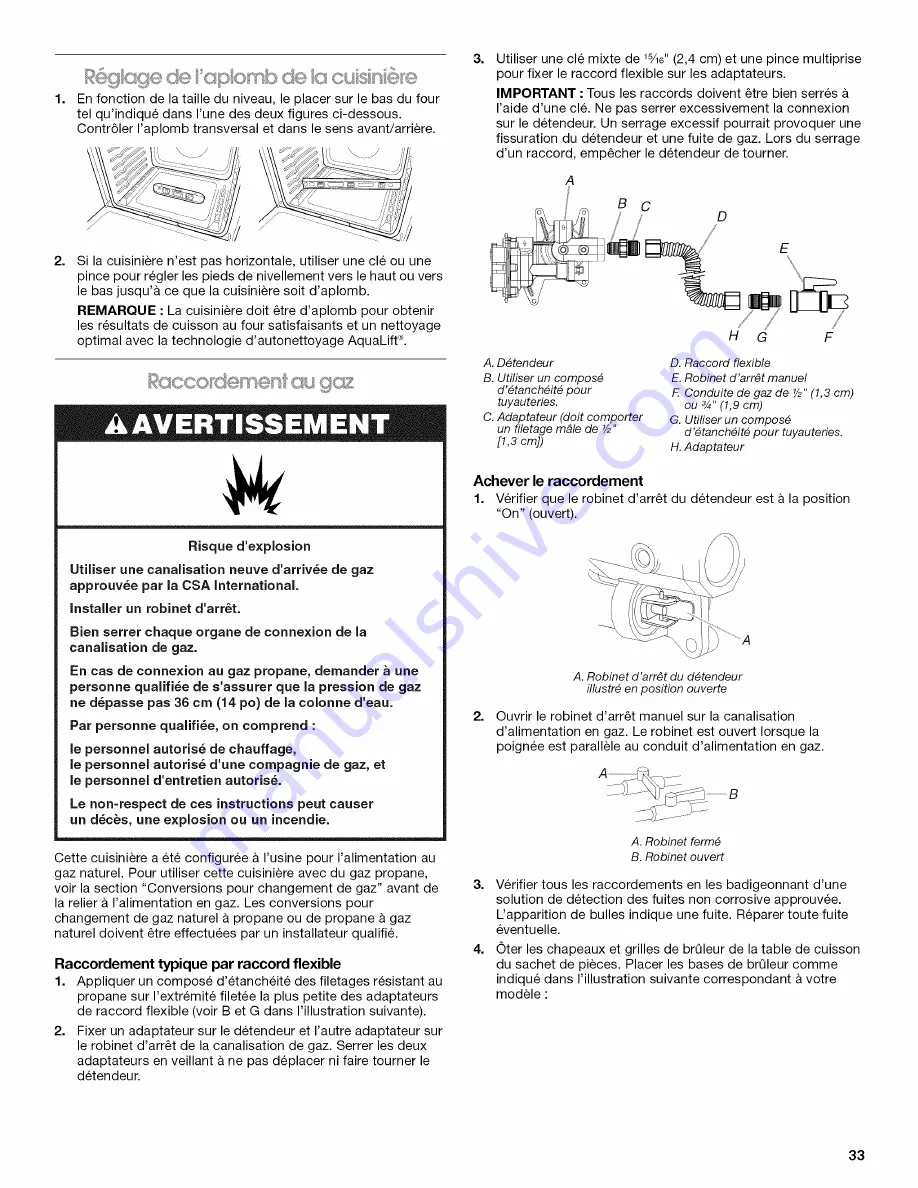
Страница 33: ...des filetages resistant au propane sur I extremite filetee la plus petite des adaptateurs de raccord flexible voir Bet G dans I illustration suivante 2 Fixer un adaptateur sur le detendeur et I autre adaptateur sur le robinet d arr_t de la canalisation de gaz Serrer les deux adaptateurs en veillant ne pas deplacer ni faire tourner le detendeur 3 Utiliser une cle mixte de _ e 2 4 cm et une pince mu...

Страница 34: ... E D A Chapeau de brOleur D Electrode d allumage B Tube d arriv e de gaz E Support du gicleur C Base du brOleur Placer les chapeaux de brQleur sur les bases de brQleur correspondantes IMPORTANT Les dessous des chapeaux petit et moyen sont differents Ne pas placer un chapeau de la taille incorrecte sur la base du brQleur Petit chapeau Grand Tres grand chapeau chapeau Chapeau moyen Un chapeau de brQ...

Страница 35: ...iere de la cuisiniere se souleve de plus de 1 2 1 3 cm du plancher sans opposer de resistance cesser d incliner la cuisiniere et la reposer doucement sur le plancher Le pied de la cuisiniere n est pas engage dans la bride antibasculement IMPORTANT Si I on entend un claquement ou un bruit d eclatement Iorsqu on souleve la cuisiniere cela signifie peut _tre que la cuisiniere n est pas bien engagee d...

Страница 36: ... la terre Verifier si le disjoncteur s est declenche ou si un fusible est grille Verifier que les robinets d arr_t de gaz sont en position ouverte Verifier que les chapeaux de brQleur sont correctement places sur la base des brQleurs Repeter le processus de mise en marche Si un brQleur ne s allume pas ce stade tourner les boutons de commande sur la position Off arr_t et contacter le revendeur ou u...

Страница 37: ...e c6t Le tiroir n est plus fixe aux glissieres de tiroir Avec les deux mains saisir le tiroir pour le retirer completement R_installation 1 Aligner les encoches de I avant du tiroir avec les encoches des glissieres laterales a I interieur du tiroir de chaque c6te Placer les onglets d alignement arriere dans les glissieres de tiroir de chaque c6te A Onglet d afignement du tiroir B Encoche de gfissi...

Страница 38: ...ernant I utilisation de la cuisiniere consulter le Guide d utilisation et d entretien ou les instructions d utilisation Si la cuisini_re ne fonctionne pas contrSler ce qui suit Les fusibles du domicile sont intacts et serres le disjoncteur n est pas declench Le robinet d arr_t du detendeur est en position ouverte La cuisiniere est branchee directement sur une prise de courant 3 alveoles reliee a l...

Страница 39: ...Le non respect de ces instructions peut causer un d_c_s une explosion ou un incendie Risque de basculement Un enfant ou une personne adulte peut faire basculer la cuisiniere ce qui peut causer un d_ces Fixer la bride antibasculement au plancher ou au mur conform_ment aux instructions d installation Faire glisser de nouveau la cuisiniere de fa on a ce que le pied arriere de la cuisiniere se trouve ...

Страница 40: ...es br_leurs de surface de gaz naturel gaz propane 1 Oter le chapeau de brQleur 2 Oter la base du brQleur 3 4 A Electrode d allumage B Chapeau du brOleur C Ouverture du tube de gaz D Base du brOleur Appliquer du ruban adhesif de masquage I extremit6 d un tourne ecrou de 7 mm 2 pour retenir le gicleur du brQleur dans le tourne ecrou durant I extraction Placer le tourne ecrou sur le gicleur tourner d...

Страница 41: ...6mite d un tourne ecrou de 3 8 1 cm pour retenir le gicleur du brQleur dans le tourne ecrou durant I extraction Placer le tourne ecrou sur le gicleur de gaz naturel du brQleur de cuisson au four tourner dans le sens antihoraire pour devisser et extraire le gicleur Le gicleur porte la mention 47 7 Remplacer le gicleur 47 par un gicleur 56 Installer le gicleur pour gaz propane du brQleur de cuisson ...

Страница 42: ...que 3 Pour regler la flamme des brQleurs se reporter la section Reglage de la taille des flammes IMPORTANT II peut _tre necessaire de modifier le reglage des flammes la position du debit thermique minimum pour chaque brQleur de la table de cuisson II est tr_s important de verifier I etablissement de flammes correctes sur la table de cuisson Le petit c6ne interne doit comporter une flamme bleue tr_...

Страница 43: ...ersion des br61eurs de surface du gaz propane au gaz naturel 1 Oter le chapeau de brQleur 2 Oter la base du brQleur S 3 4 A Electrode d allumage B Chapeau du brOleur C Ouverture du tube de gaz D Base du brOleur Appliquer du ruban adhesif de masquage I extremite d un tourne ecrou de 7 mm 9 32 pour retenir le gicleur du brQleur dans le tourne ecrou durant I extraction Placer le tourne ecrou sur le g...

Страница 44: ... au four de I orifice du four et mettre le brQleur de cuisson au four de c6t Ne pas deconnecter le ill A A BrOleur de cuisson au four B Vis A Orifice du four 6 Appliquer du ruban adhesif de masquage I extremit6 d un tourne ecrou de 3 8 1 cm pour retenir le gicleur du brQleur dans le tourne ecrou durant I extraction Placer le tourne ecrou sur le gicleur de gaz propane du brQleur de cuisson au four ...

Страница 45: ...ose et repose du tiroir 10 Reinstaller la porte du four Voir la section Porte du four 11 Reinstaller les grilles du four Achever I installation gaz propane gaz naturel 1 Pour le raccordement correct de la cuisiniere a I alimentation en gaz se reporter a la section Raccordement au gaz 2 Pour allumer et utiliser correctement les brQleurs voir la section Systeme d allumage electronique 3 Pour regler ...

Страница 46: ...on High elev6e et observer les flammes pour chaque reglage ContrSle du fonctionnement du br_leur de cuisson au four Consulter le Guide d utilisation pour le bon fonctionnement des commandes du four R6glage de la taille des flammes sur le br_leur du four le cas _ch_ant 1 Retirer le tiroir de remisage de qualite superieure le tiroir rechaud ou le tiroir de cuisson voir la section Depose et repose du...

Страница 47: ...age ou de separation entre les flammes et le brQleur S il est n_cessaire de r_gler la taille des flammes 1 Appuyer sur la touche Off arr_t Laisser le four refroidir 2 Desserrer la vis de blocage de la virole de reglage de I admission d air I arriere du brQleur du gril 3 Regler I admission d air selon le besoin 4 Resserrer la vis de blocage 5 6 A Vis de blocage B Virole de r glage de I admission d ...

Страница 48: ...W10665256A 2014 All rights reserved Used under license in Canada Tous droits reserves Utilise sous licence au Canada 2 14 Printed in U S A Imprime aux E U ...

Отзывы: