background image

English

6

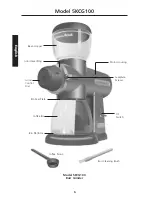
Model 5KCG100

Model 5KCG100

Burr Grinder

Bean Hopper

Bin Platform

Coffee Bin 

Motor Housing

Bin Seal Plate

Grind 
Control 
Dial

Grind Level Ring

O/I
Switch

Faceplate
Screws

Coffee Scoop

Burr Cleaning Brush

Содержание 5KCG100

Страница 1: ...OLINO DE CAFÉ ARTISAN GUÍA PARA CONSEGUIR RESULTADOS PROFESIONALES ARTISAN BURR GRINDER GUIDE FÖR BÄSTA RESULTAT ARTISAN KAFFEKVERN OPPNÅ BEST MULIG RESULTATER ARTISAN BURR GRINDER OPAS PARHAISIIN TULOKSIIN ARTISAN BURR GRINDER VEJLEDNING FOR EKSPERT RESULTATER MOÍNHO DE CAFÉ ARTISAN GUIA PARA RESULTADOS PROFISSIONAIS ARTISAN BURR GRINDER NOTKUNARLEIIÐBEININGAR ARTISAN BURR GRINDER Ο ΗΓΙΕΣ ΧΡΗΣΗΣ ...

Страница 2: ...9 Adjusting the Cutting Burrs 10 Adjusting to Provide Coarser Grinds 10 Adjusting for Maximum Grind Fineness 11 Burr Grinder Tips 12 How the Grind Affects Flavor 13 Care and Cleaning 14 Cleaning the Motor Housing and Hoppers 14 Cleaning the Cutting Burrs 14 Adjusting the Cutting Burrs for Wear 16 Replacing the Cutting Burrs 17 Troubleshooting Problems 18 Household KitchenAid Burr Grinder Warranty ...

Страница 3: ... you and others All safety messages will follow the safety alert symbol and either the word DANGER or WARNING These words mean You can be killed or seriously injured if you don t immediately follow instructions You can be killed or seriously injured if you don t follow instructions All safety messages will tell you what the potential hazard is tell you how to reduce the chance of injury and tell y...

Страница 4: ...ence of foreign objects before using 10 Do not use appliance for other than intended household use 11 The appliance is not intended for use by young children or infirm persons without supervision SAVE THESE INSTRUCTIONS This appliance is marked according to the European directive 2002 96 EC on Waste Electrical and Electronic Equipment WEEE By ensuring this product is disposed of correctly you will...

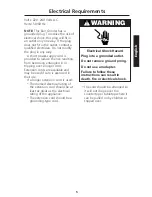
Страница 5: ...nger cord Extension cords are available and may be used if care is exercised in their use If a longer extension cord is used The marked electrical rating of the extension cord should be at least as great as the electrical rating of the appliance The extension cord should be a grounding type cord The cord should be arranged so it will not drape over the countertop or tabletop where it can be pulled...

Страница 6: ...sh 6 Model 5KCG100 Model 5KCG100 Burr Grinder Bean Hopper Bin Platform Coffee Bin Motor Housing Bin Seal Plate Grind Control Dial Grind Level Ring O I Switch Faceplate Screws Coffee Scoop Burr Cleaning Brush ...

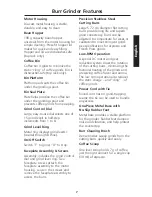
Страница 7: ...ate assembly to the motor housing Loosen the screws and remove the faceplate assembly to access the burrs Precision Stainless Steel Cutting Burrs Large 5 72 cm diameter flat cutting burrs provide long life and superb grind consistency Burrs can be adjusted to compensate for wear or calibrated to meet stringent grind size specifications for espresso and French Press grinds Low RPM Operation A speci...

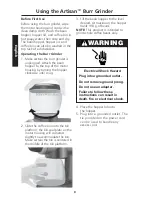
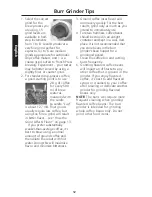
Страница 8: ...l snug 2 Slide the coffee bin onto the bin platform the bin seal plate on the motor housing will compress slightly to accommodate the bin Make certain the bin is centered in the middle of the bin platform 3 Fill the bean hopper to the level desired At maximum the hopper holds 198 g of beans NOTE This product is intended to grind whole coffee beans only 4 Place the hopper lid onto the hopper 5 Plug...

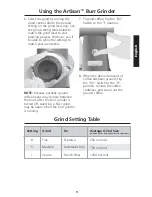
Страница 9: ...r the burr grinder is turned off selecting a finer grind may be easier when the burr grinder is running 7 To grind coffee flip the O I Switch to the I position 8 When the desired amount of coffee has been ground flip the O I Switch to the O position remove the coffee container and scoop out the ground coffee Using the Artisan Burr Grinder Setting 8 5 1 Grind Fine Medium Coarse For Espresso Automat...

Страница 10: ... to provide coarser grinds grind sizes will increase throughout the grinding range and the finest level may become too coarse for espresso To re calibrate the grinder for maximum fineness see page 11 1 Turn the grind control dial to level 1 2 Using a 4 mm wrench remove the screw located in the front of the grind control dial by turning it counter clockwise Once the screw is free remove the grind c...

Страница 11: ...d be visible once the grind control dial is removed 4 Turn on the unit by flipping the O I Switch to the I position 5 Rotate the grind control gear clockwise 1 click or detent at a time until you hear the burrs touching one another when they touch the burrs will make a distinct rubbing or grating sound 6 When the burrs are touching turn the grind control gear counter clockwise 1 click or detent Th...

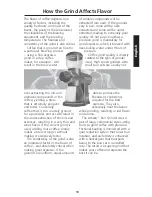
Страница 12: ... using a normal amount of ground coffee and then dilute the result with hot water Doing this will maximize flavor and minimize bitterness 3 Ground coffee loses flavor and aroma very quickly For the best results grind only as much as you intend to immediately use 4 To retain freshness coffee beans should be stored in an airtight container and kept in a cool dark place It is not recommended that you...

Страница 13: ...f coffee and absolutely critical when making great espresso If the grounds are uniform equal amounts of soluble compounds will be extracted from each If the grounds vary in size some will be over extracted and some will be under extracted leading to extremely poor quality It s not surprising that a precision grind is mandatory for good espresso which is brewed with near boiling water under 9 bars ...

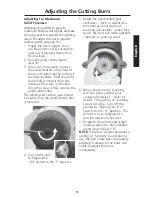
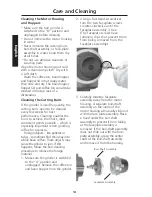
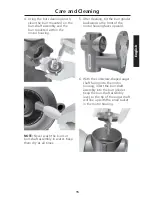
Страница 14: ...esso Foreign objects like pebbles or twigs sometimes find their way into whole bean coffee These objects may cause the grinder to jam If this happens follow the burr cleaning procedure to remove the foreign material 1 Make sure the grinder is switched to the O position and unplugged Remove the coffee bin and bean hopper from the grinder 2 Using a flat head screwdriver turn the two faceplate screws...

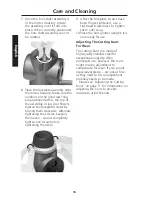
Страница 15: ...n water Keep them dry at all times 5 After cleaning tilt the burr grinder backward so the front of the motor housing faces upward 6 With the corkscrew shaped auger shaft facing into the motor housing insert the burr shaft assembly into the burr grinder Keep the burr shaft assembly level so the tip of the auger shaft will line up with the small socket in the motor housing Care and Cleaning ...

Страница 16: ...ghten one screw before tightening the other 9 After the faceplate screws have been finger tightened use a flat head screwdriver to tighten them until snug 10 Place the burr grinder upright It is now ready for use Adjusting The Cutting Burrs For Wear The cutting burrs are made of high quality stainless steel for exceptional longevity After prolonged use however the burrs might require adjustment to...

Страница 17: ...er remove the burr from the burr shaft assembly by turning the two burr mounting screws counter clockwise until free 3 Remove the burr from the motor housing by turning the two burr mounting screws counter clockwise until free 4 Attach the replacement burrs to the burr shaft assembly and motor housing using the burr mounting screws Make certain the cutting surfaces of the burrs face outward and th...

Страница 18: ...utting burrs require cleaning or are worn See Cleaning the Cutting Burrs on page 14 or Replacing the Cutting Burrs on page 17 for more information If the grinder is operating normally but stops abruptly Immediately turn off the burr grinder A foreign object such as a pebble or twig may have jammed the cutting burrs See Cleaning the Cutting Burrs on page 14 for more information If the grind is too ...

Страница 19: ...rope Australia and New Zealand Two Year Full Warranty from date of purchase Other One Year Full Warranty from date of purchase KitchenAid Will Pay For Replacement parts and repair labor costs to correct defects in materials or workmanship Service must be provided by an Authorized KitchenAid Service Center KitchenAid Will Not Pay For A Repairs when Burr Grinder is used for operations other than nor...

Страница 20: ...S A Trademark of KitchenAid U S A 2005 All rights reserved Specifications subject to change without notice 4761dZw605 20 Customer Service In U K Ireland Tollfree number 00800 38104026 Address KitchenAid Europa Inc PO BOX 19 B 2018 ANTWERP 11 BELGIUM www KitchenAid com ...

Отзывы: