background image

4

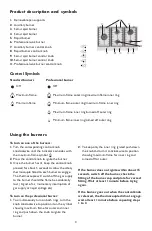
To turn on one of the burners:
1.

Turn the corresponding control knob
anticlockwise until the indicator coincides with
the maximum flame symbol

.

2.

Press the control knob to ignite the burner.

3.

Once the burner has lit, keep the control knob
pressed for about 5 seconds to allow the safety
thermocouple fitted to each burner to engage.
The thermocouple will switch off the gas supply
to the burner should the flame be accidentally
lost ( A gust of air, momentary interruption of
gas supply or liquid spillage etc).

To turn on the professional burner:
1.

To simultaneously turn on both rings, turn the
knob anticlockwise to position it on the symbol
showing maximum flame for outer and inner
ring and push down the knob to ignite the
burner.

2.

To keep only the inner ring ignited push down
the knob and turn it anticlockwise to position
showing maximum flame for inner ring and
turned off for outer.

If the burner does not ignite within about 15
seconds, switch off the burner, check the
fitting of the burner cap and plate for correct
fitting. Wait at least 1 minute before trying
again.

If the burner goes out when the control knob
is released, the thermocouple did not engage.
wait al least 1 minute before repeating steps
1 to 3.

Using the burners

1.

Removable pan supports

2.

Auxiliary burner

3.

Semi-rapid burner

4.

Semi-rapid burner

5.

Rapid burner

6.

Professional wok burner

7.

Auxiliary burner control knob

8.

Rapid burner control knob

9.

Semi-rapid burner control knob

10.

Semi-rapid burner control knob

11.

Professional wok burner control knob

Product description and symbols

q

w

r

t

e

y

u

i

o

a

s

Control Symbols

Standard burners

Professional burner

Off

Off

Maximum flame

Maximum flame outer ring/maximum flame inner ring

Minimum flame

Minimum flame outer ring/maximum flame inner ring

Maximum flame inner ring/turned off outer ring

Minimum flame inner ring/turned off outer ring

Содержание 2C-1R-2SR -1AUX

Страница 1: ...Instructions for use GB LU ...

Страница 2: ......

Страница 3: ... Declaration of conformity 8 Installation 9 Gas connection 9 Electrical connection 10 Installation 10 Adaption to a different type of gas supply 11 Replacing the injectors 11 Injectors replacement in the wok burner 12 Regulating the minimum flow level of the gas taps 12 Care and maintenance 13 Care and maintenance of the gas burners 13 Troubleshooting guide 14 After Sales Service 14 These instruct...

Страница 4: ...g maximum flame for inner ring and turned off for outer If the burner does not ignite within about 15 seconds switch off the burner check the fitting of the burner cap and plate for correct fitting Wait at least 1 minute before trying again If the burner goes out when the control knob is released the thermocouple did not engage wait al least 1 minute before repeating steps 1 to 3 Using the burners...

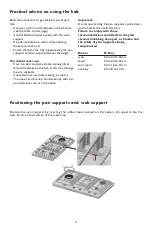
Страница 5: ...tal netting or others The use of two burners simultaneously with just one container such as a fish kettle Important Do not rest or drag the pan supports upside down on the hob as this could scratch it Failure to comply with these recommendations could lead to the glass ceramic hob being damaged or broken and the safety of your appliance being compromised Burner Ø Pans wok from 24 to 30 cm rapid fr...

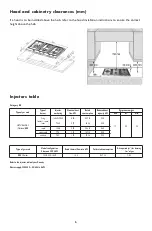
Страница 6: ...r Injector marketing Nominal heat flow kW Rated consumption Reduced heat capacity kW Gas pressure mbar min rat max NATURAL GAS Methane G20 2 ring outer inner Inner 165H1 70H1 70H1 5 80 0 90 552 l h 86 l h 2 20 0 30 17 20 25 rapid 125A 3 00 286 l h 0 60 semi rapid 97A 1 75 167 l h 0 35 auxiliary 78C 1 00 95 l h 0 30 Type of gas used Model configuration 5 burners 2C 5 8kW Rated thermal flow rate kW ...

Страница 7: ...ncorrect placement of the pans supports can scratch the hob To avoid this always ensure that the rubber feet on the bottom of the pan supports are the only part of the pan supports that touch the hob and do not drag the pan supports accross the hob surface On the glass surface do not use Cast iron grills terracotta pots or pans Heat convectors e g metal netting Using two burners to cook 1 pan In t...

Страница 8: ...of as household waste Please dispose of this appliance at an Electrical Electronic Equipment Collection point as in accordance with local environmental regulations for waste disposal For details of your local Collection Point please contact your Local Authority Safeguarding the environment EC Declaration of conformity This appliance has been designed constructed and marketed in compliance with saf...

Страница 9: ...minent and accessable on the walls of the room being ventilated and extracting towards the outside created in such a way that the openings both inside and out cannot be obstructed even in error Protected by plastic grill metallic netting etc that should not reduce the 100cm2 cross section Located in such a position so as not to interfere with the extraction of the products of combustion Installati...

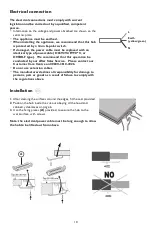
Страница 10: ...e conducted by our After Sales Service Please contact our Customer Care Centre on 00800 3810 4026 Do not use extension cables The manufacturer declines all responsibility for damage to persons pets or goods as a result of failure to comply with the regulations above Electrical connection L Earth yellow green N 1 After cleaning the surfaces around the edges fit the seal provided 2 Position the hob ...

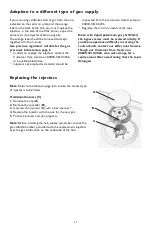
Страница 11: ...injectors in the case of the Wok burner adjust the primary air see Injector table on page 6 The orange label should be removed and kept together with the manual Use pressure regulators suitable for the gas pressures indicated on page 6 In order to replace the injectors contact the Customer Care Centre on 00800 3810 4026 or a qualified electrician Injectors not supplied as standard should be reques...

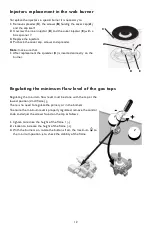
Страница 12: ...ctors replacement in the wok burner Regulating the minimum flow level must be done with the tap at the lowest position small flame There is no need to regulate the primary air in the burners To ensure the minimum level is properly regulated remove the control knob and adjust the screws found on the tap as follows 1 tighten to reduce the height of the flame 1 2 slacken to increase the height of the...

Страница 13: ...and or a neutral detergent Care and maintenance The pan supports and burners can be removed to make cleaning easier 1 Hand wash carefully in hot water with a mild detergent making sure that all the ingrained dirt is removed and the openings on the burner are not blocked The internal burner cap D on page 12 is made of brass and is subject to a natural burnishing when it heats up Clean it each time ...

Страница 14: ...e burner 3 the pan supports are correctly positioned with all the rubber feet in place If despite all these checks and after tuning the hon off and on again you are still experiancing problems please contact our Customer Care Centre on 00800 3810 4026 Troubleshooting guide Before contacting our Customer Care Centre please check to see if the problem can be fixed by refering to the troubleshooting ...

Страница 15: ......

Страница 16: ...400010852250 Printed in Italy n 03 15 Whirlpool Europe S r l Socio Unico Viale G Borghi 27 21025 Comerio VA Phone 0332 759111 Fax 0332 759268 www whirlpool eu ...

Отзывы: