background image

2) Fill-In 

Fill-In

 only works in rhythm mode. 

When a rhythm is playing, press 

Insert 

to insert a short interlude into the 

rhythm.  

4. Chord control 

1) Single finger 

Single

 only works in Rhythm Mode and General Mode. 

In Rhythm Playback mode, select the Single key to specify the chord for the 
corresponding chord accompaniment by pressing any single key in the range 
of C3 ~ F4 #. In this case, the key pressed will specify the keynote of the 
accompaniment chord. The nearest black key to the left can be pressed to 
change the chord gender to minor. 

2) Multi-finger 

Finger

 only works in Rhythm Mode and General Mode. 

In Rhythm Playback mode, select the Finger key to use three keys in the 
range C3 ~ F4 # which define a whole chord to specify the chord for the 
corresponding chord accompaniment. Unless you specify a three-part chord, 
only the drum rhythm will sound. 

5. Recording 

1) Melody recording 

Press the 

switch to enter recording mode. Press any button to start 

recording.  

The maximum recording is 92 notes. During recording, press the button 

to 

play back the recorded data. 

Pressing again 

will erase the memory and return to the recording 

mode. 

2) OOP 

Press to 

switch to enter OOP recording mode. 

Here you can create your own drum rhythm. The default OOP playback speed 
is 120 BPM. 
In OOP mode, the piano keys automatically respond as a keyboard drum. 

The maximum recording is 32 notes. During recording, press the button 

to 

play back the recorded data. The recorded rhythm data is now played back 
repeatedly. 

Pressing again 

will erase the memory and return to the recording 

mode. 


Содержание Funkey RP-61M

Страница 1: ...RP 61M Rollpiano mit MIDI Out Bedienungsanleitung User manual Version 09 2020 ...

Страница 2: ... WARNUNG sind die Gefahren gekennzeichnet die ohne Vorsichtsmaßnahmen zu schweren Verletzungen führen können Mit dem Signalwort HINWEIS sind allgemeine Vorsichtsmaßnahmen gekennzeichnet die im Umgang mit dem Produkt beachtet werden sollen Bilder und Bildschirmdarstellungen in dieser Bedienungsanleitung können vom Erscheinungsbild des tatsächlichen Produkts geringfügig abweichen solange dies keine ...

Страница 3: ...n Ihren Händler Bevor Sie das Produkt reinigen sollten Sie es ausschalten und vom Strom trennen Stellen Sie das Produkt stets auf eine ebene stabile Oberfläche ab um einen sicheren Stand zu gewährleisten Benutzen Sie das Produkt nicht in feuchter oder nasser Umgebung Stellen Sie keine Gefäße die mit Flüssigkeiten gefüllt sind wie z B Vasen Gläser oder Flaschen auf das Produkt Legen Sie keine klein...

Страница 4: ...meiden Direktes Sonnenlicht extreme Temperatur oder Luftfeuchtigkeit übermäßig staubiger oder schmutziger Ort starke Vibrationen oder Stöße starken Magnetfeldern Reinigung Reinigen Sie das Produkt nur mit einem weichen trockenen Tuch Verwenden Sie keine Farbverdünner Lösungsmittel Reinigungsflüssigkeiten oder chemisch imprägnierte Wischtücher Handhabung Üben Sie keine übermäßige Kraft auf Bedienel...

Страница 5: ...it 6 2 Allgemeine Bedienung 7 1 Master Lautstärkeregler 7 2 Tempo Kontrolle 7 3 Tonauswahl 7 4 Rhythmusauswahl 7 5 Demo Songs 7 3 Spielen mit Rhythmusbegleitung 7 1 Start Stopp 7 2 Fill In 8 4 Akkordsteuerung 8 1 Single Finger 8 2 Multi Finger 8 5 Aufnahme 8 1 Melodie Aufnahme 8 2 OOP 8 6 Effekte 9 7 Lehrmodus 9 8 Software 9 9 Tone Liste 10 10 Rhythmus Liste 12 11 Demo Liste 14 12 Hinweise zur ric...

Страница 6: ...5 Start Stopp Taste 19 Sustain Sustain Taste 6 Demo Demo Taste 20 Vibrato Vibrato Taste 7 Insert Fill In Taste 21 Lautstärkeregler 8 Single Single Taste 22 Lautstärkeregler 9 OKON OKON Taste 23 Hauptschaltertaste 10 Finger Fingered Taste 24 DC 5V Anschlussbuchse 12 LED Anzeige 25 Audio Schnittstelle 13 Tempo Steuertaste 26 Kopfhöreranschluss 14 Tempo Steuertaste 27 MIDI Output Interface ...

Страница 7: ... des Songs bzw Rhythmus kann jedoch nach dem Songstart Rhythmusstart mittels der Tasten und verändert werden Wenn Sie während der Wiedergabe von Songs Rhythmus gleichzeitig und drücken kehrt dieser zu seinem ursprünglichen Tempo zurück 3 Tonauswahl Drücken Sie zuerst um in den Tonauswahlmodus zu gelangen drücken Sie dann um Ton 0 127 auszuwählen 4 Rhythmusauswahl Drücken Sie zuerst und dann um Rhy...

Страница 8: ...kord für die entsprechende Akkordbegleitung anzugeben Solange Sie keinen dreistimmigen Akkord angeben erklingt lediglich der Drum Rhythmus 5 Aufnahme 1 Melodie Aufnahme Durch Drücken von wechseln Sie zum Aufnahmemodus Drücken Sie eine beliebige Taste um die Aufnahme zu starten Die maximale Aufnahme ist 92 Noten Drücken Sie während der Aufnahme die Taste um die aufgenommenen Daten wiederzugeben Dur...

Страница 9: ... diesem Modus können die Songs auch mittels der und Tasten durchgeblättert werden Nun werden die Töne der Melodie im Display angezeigt Das Instrument spielt jedoch auch bei falscher Toneingabe den richtigen Ton 8 Software Das Rollpiano kann mittels der Midi Schnittstelle mit jedem Midifähigen Programm auf Ihrem Rechner verbunden werden Eine kostenfreie Software für Windows zum Test Ihres Rollpiano...

Страница 10: ...10 9 Tone Liste ...

Страница 11: ...11 ...

Страница 12: ...12 10 Rhythmus Liste ...

Страница 13: ...13 ...

Страница 14: ...14 11 Demo Liste ...

Страница 15: ...t ausschließlich auf einer ebenen harten Fläche da sonst die normale Funktion beeinträchtigt und das Instrument beschädigt werden kann Rollen Sie das Piano nicht zu fest um die Tastatur nicht zu beschädigen Ziehen Sie nicht an der Klaviatur und vermeiden Sie diese zu verdrehen Achten Sie darauf daß die Klaviatur nicht in Wellen liegt Dies beeinträchtigt die Funktion und kann die Lebensdauer verkür...

Страница 16: ...inungsbild sind vorbehalten Alle Angaben entsprechen dem Stand bei Drucklegung Für die Richtigkeit und Vollständigkeit der enthaltenen Beschreibungen Abbildungen und Angaben übernimmt Musikhaus Kirstein GmbH keinerlei Gewähr Abgebildete Farben und Spezifikationen können geringfügig vom Produkt abweichen Musikhaus Kirstein GmbH Produkte sind nur über autorisierte Händler erhältlich Distributoren un...

Страница 17: ...RP 61M Rollpiano mit MIDI Out RP 61M Rollpiano mit MIDI Out User Manual Version 09 2020 ...

Страница 18: ...NG signal word identifies hazards that without precautions could result in serious injury The signal word NOTE indicates general precautions that should be observed when handling the product Images and screen images in this manual may differ slightly from the actual product s appearance as long as it does not adversely affect the technical characteristics and safety of the product All personal phr...

Страница 19: ... centre or your dealer Before cleaning the product you should turn it off and disconnect it from the power supply Always place the product on a flat stable surface to ensure a secure stand Do not use the product in a damp or wet environment Do not place containers filled with liquids such as vases glasses or bottles on the product Do not place small objects on top of it that could slide in such as...

Страница 20: ...mation discoloration or major damage Direct sunlight extreme temperature or humidity excessively dusty or dirty place strong vibrations or shocks strong magnetic fields Cleaning Clean the product only with a soft dry cloth Do not use paint thinner solvents cleaning fluids or chemically impregnated wipes Handling Do not exert excessive force on operating elements such as switches knobs buttons and ...

Страница 21: ... General operation 7 1 Master volume control 7 2 Tempo control 7 3 Sound selection 7 4 Rhythm selection 7 5 Demo songs 7 3 Playing with rhythm accompaniment 7 1 Start Stop 7 2 Fill In 8 4 Chord control 8 1 Single finger 8 2 Multi finger 8 5 Recording 8 1 Melody recording 8 2 OOP 8 6 Effects 9 7 Teaching mode 9 8 Software 9 9 Tone List 10 10 Rhythm list 12 11 Demo list 14 12 Instructions for correc...

Страница 22: ... 5 Start Stop button 19 Sustain Sustain button 6 Demo Demo button 20 Vibrato Vibrato button 7 Insert Fill in button 21 Volume control 8 Single Single button 22 Volume control 9 OKON OKON button 23 Main switch button 10 Finger Fingered button 24 DC 5V connection socket 12 LED display 25 Audio interface 13 Tempo control key 26 Headphone jack 14 Tempo control key 27 MIDI output interface ...

Страница 23: ...o However the tempo of the song or rhythm can be changed after the song starts rhythm starts by using the and keys If you press and simultaneously during song rhythm playback it will return to its original tempo 3 Sound selection Press first to enter the sound selection mode then press to select sound 0 127 4 Rhythm selection Press first and then to select rhythm 0 127 You start the rhythm with 5 ...

Страница 24: ...ange C3 F4 which define a whole chord to specify the chord for the corresponding chord accompaniment Unless you specify a three part chord only the drum rhythm will sound 5 Recording 1 Melody recording Press the switch to enter recording mode Press any button to start recording The maximum recording is 92 notes During recording press the button to play back the recorded data Pressing again will er...

Страница 25: ...this mode songs can also be scrolled through using the and keys Now the tones of the melody are shown in the display However the instrument will play the correct tone even if the wrong tone is entered 8 Software The roll piano can be connected to any Midi capable program on your computer via the Midi interface A free software for Windows to test your roll piano is available at https www kirstein d...

Страница 26: ...10 9 Tone List ...

Страница 27: ...11 ...

Страница 28: ...12 10 Rhythm list ...

Страница 29: ...13 ...

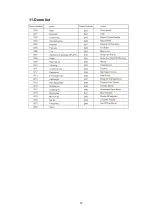
Страница 30: ...14 11 Demo list ...

Страница 31: ...ong time Use the instrument only on a flat hard surface or normal operation may be impaired and the instrument damaged Do not roll the piano too hard to avoid damaging the keyboard Do not pull on the keyboard and avoid twisting it Make sure that the keyboard does not lie in waves This impairs the function and can shorten the service life 13 Easy troubleshooting If the instrument sounds strange doe...

Страница 32: ...rance are reserved All information corresponds to the status at the time of printing Musikhaus Kirstein GmbH assumes no liability for the correctness and completeness of the descriptions illustrations and information contained therein Shown colors and specifications may differ slightly from the product Musikhaus Kirstein GmbH Products are only available through authorized dealers Distributors and ...

Отзывы: