background image

          MID user manual 


                                                                                                        User Manual     

13 


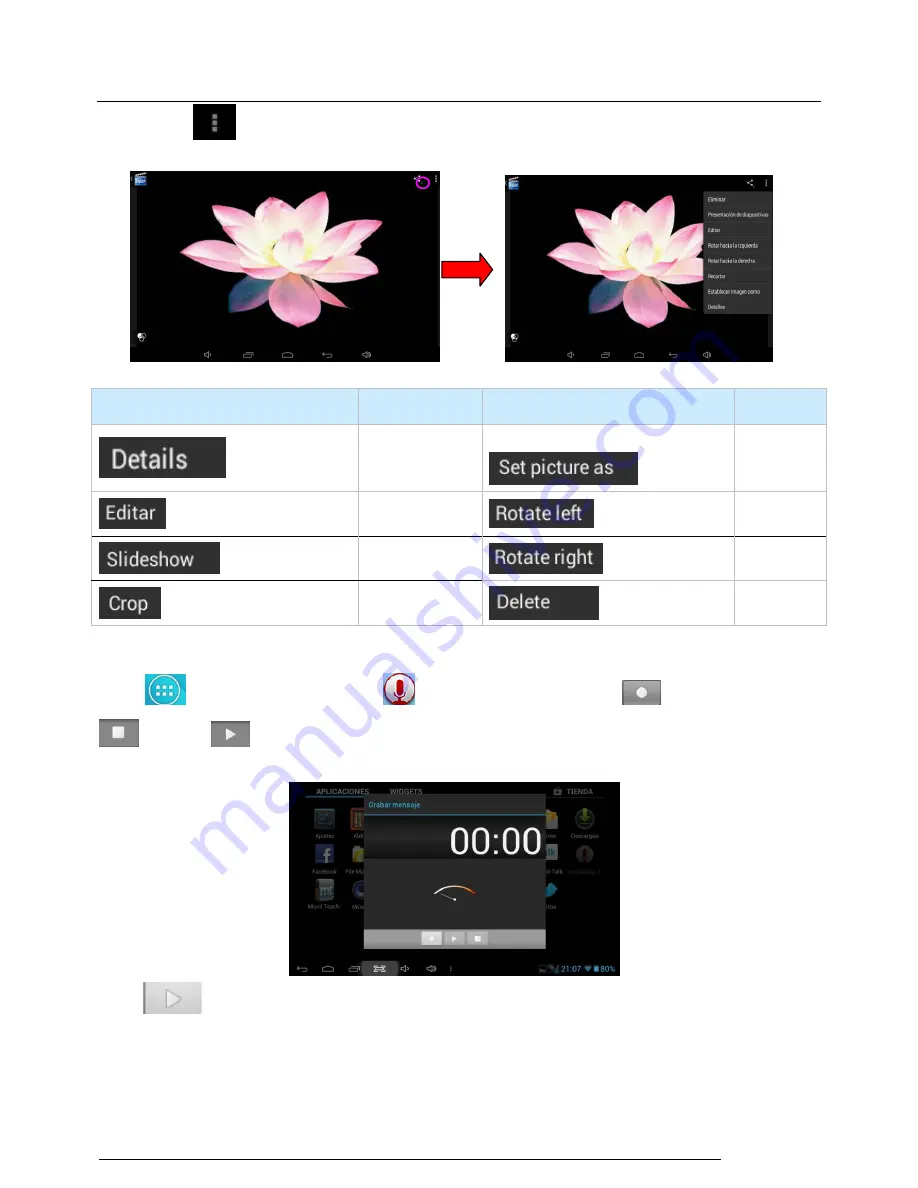
Tap

to slide show, browse images, set the image as wallpaper, edit, rotate, crop or resize 

your image. 


Icon 

Function 

Icon 

Function 


Image 


set image 

as 

wallpaper 


edit 


Rotate left 


Slide show 


Rotate 

right 


Crop and resize 


  Delete   


5.1.4 Recording 

Taping

to the main interface

click 

to the recording interface

tap

to start recording, 

to pause

  To play. When recording finish, you’ll be asked if you want “Discard” or “Save” 

the recording. 


Press 

    to play the record   

5.1.5

 File Manager


Содержание KW-PC1008L

Страница 1: ...MID user manual User Manual 1 User Manual for KW PC1008L ...

Страница 2: ... Icons 5 Operation Details 5 1 1 Music Player 5 1 2 Video Player 5 1 3 Picture Player 5 1 4 Sound Recorder 5 1 5 File Manager 5 1 6 Web Browser 5 1 7 Calculator 5 1 8 Clock 5 1 9 Camera 5 2 0 External Storage 5 2 1 APK installs uninstall 5 2 2 External mouse keyboard 5 2 3 HDMI Output optional function 6 Device setting 6 1 1 WIFI 6 1 2 Bluetooth optional function 6 1 3 External 3G USB Dongle 6 1 4...

Страница 3: ...ave a better understanding of the operations Before operating this player please carefully read all data we provide about the player so that you will have a better understanding of the product and its operations The Company will not be responsible for any loss of personal data and damage caused by incorrect operation of the Software Hardware artificial damages replacement of batteries or any other...

Страница 4: ...wer cable strain and bending or squeezing of the power cable by heavy objects must be avoided to prevent the possibility of overheating or fire 8 In order to eliminate the risk of electric shock do not touch the cable power plug with wet hands 9 Some movies music and pictures are under the protection of copyright unauthorized usage is deemed as an infringement to the laws of copyright 10 Please do...

Страница 5: ...ipped the play for Windows Media Player 10 Windows Media Player 11 or above version 3 Ready to use 3 1packing list Accessories Quantity Device 1 Leather Case Optional 1 Keyboard Mouse Optional 1 TF Micro SD Card Optional 1 Adaptor 1 Earphone optional 1 USB Cable 1 3G USB Dongle Optional 1 RJ45 USB Dongle Optional 1 Paper User Manual 1 CD ROM Firmware 1 Warranty Card optional 1 HOST cable 1 3 2 Dev...

Страница 6: ...card 10 1 inch 1024 600 TFT capacitive display 5 point Support H 264 1080P 30fps 720P 60fps video coding 3840X1080 30fps 3D video decoding Support JPG JPEG BMP GIF PNG JFIF etc picture format max resolution support 8000 8000 Integrated HIFI 100DB audio Coder Decoder support MP1 MP2 MP3 WMA WAV OGG OGA APE FLAC AAC M4A 3GPP etc audio formats Support TXT LRC PDF Html Htm EPUB etc file formats suppor...

Страница 7: ... 5mW R 5mW 32Ohm MP3 Bit rate 8Kbps 392 Kbps WMA WMV Bit rate 5Kbps 192 Kbps Frequency response 20Hz 20KHz SN ratio 90dB Distortion 0 05 Video Function Play format AVI MPG MKV RM RMVB MP4 MOV VOB DAT FLV TS 3GP WEBM VP8 etc Max Resolution 1920 1088 Ratio 4 3 16 9 full screen optional Photo Browse Support JPG JPEG BMP GIF PNG JFIF max resolution 8000 8000 E book Function Format TXT LRC PDF Html Htm...

Страница 8: ...When the Tablet PC is in use please press and hold the POWER key for 3 seconds the screen will display the power off interface choose the power off option to confirm your selection and the system will shut down automatically Note when system halted or device under blank screen please restart the device after device automatic power off by pressing reset key or long pressing power key for 6 second N...

Страница 9: ...ion battery you can charge the battery even when there is still power left in the battery without it affecting the lifespan of the battery 3 In order to keep the battery in good condition Make sure you charge it at least once every two weeks if the Tablet PC hasn t been used for a long time 4 3 Operation of the Function Icons Icon Function Icon Function Back to main menu Notifications Power Status...

Страница 10: ... The playlist shown as below picture In the playlist paddle up or down on the screen for page turning Double press your favored songs to enter playing interface and start to pay audio files When in playing click to enter into play list drag the playback progress bar to adjust video playback progress Music Player Icons Description Music Player Icons Description Icons description Icons description A...

Страница 11: ...ort MKV AVI RM RMVB MP4 MOV VOB DAT FLV 3GP etc The system will automatically load any video files from the TF card to the playlist after the video player has been launched Drag the playback progress bar to adjust video playback progress During video playing you can tap to control volume to change chapter to play and pause the video to return for more such as subtitle selection audio track Video S...

Страница 12: ...o picture browsing as below shown Picture Player Icons Description Icon Function Icon Function Delete the picture Edit the picture More functions In picture playing icon will hide automatically tap or touch the display to see them The Tablet PC supports the BMP JPG JPEG PNG and GIF formats The system will automatically load the image files from the TF card to the photo browsing list after the phot...

Страница 13: ...on Function Image set image as wallpaper edit Rotate left Slide show Rotate right Crop and resize Delete 5 1 4 Recording Taping to the main interface click to the recording interface tap to start recording to pause To play When recording finish you ll be asked if you want Discard or Save the recording Press to play the record 5 1 5 File Manager ...

Страница 14: ...Copy Delete Move Rename etc See picture below When copy or move a file folder find the target folder and long press choose paste into folder 5 1 6 IE Web Browser Under WIFI connected see chapter6 1 1 Wi Fi tap icon enter to the Web Browser interface tap the address bar of the browser and input the website and enter Note The IE Explorer uses the popular third party IE Explorer software please follo...

Страница 15: ...k out the content to the device with standard language and then the device will recognize your voice and automatically search what you have said 5 1 8 Calculator Tap icon to open the calculator 5 1 9 Clock Click icon to the interface of clock Tap set up accordingly as shown below Before setting make sure the top right button is opening then taps and open to set up the time bell ...

Страница 16: ...ose the date to set such as Monday to Friday in 7 o clock and then alarm will Repeat at 7 o clock from Monday to Friday The time and date are set as you need Once you set ok the Front color of the set time will be turn in white and other will be gray 5 2 0 Camera Operation In the applications menu or on the desktop tap the icon to enter into the camera function interface as below Icons Description...

Страница 17: ...es in card or it will cause data mistake or lost problem d Avoid high temperature and wet environment when using the card e Avoid liquid and corrosive materials 5 2 2 APK software installs and uninstall This tablet PC can directly install the software in File manager but first should copy the APK software into the tablet pc s flash or TF card and then go to main menu click for installation see as ...

Страница 18: ...MID user manual User Manual 18 picture Click the install APK file see as shown picture Click next to install the file see as below picture ...

Страница 19: ...the applications menu or on the desktop tap to enter into the setting interface see as below picture Then click APK Icon which you want to uninstall in the right side uninstall OK See as below picture Once you have uninstalled successfully the APK icon will disappear in the main menu 5 2 3 External Keyboard Mouse Connect the USB mouse to the Tablet PC by USB OTG cable ...

Страница 20: ...e suggest you can use the default USB keyboard Once you connected the keyboard you will see in the left side of the tablet PC 5 2 4 Connect to HD TV Connect the tablet pc to HD TV with HDMI cable then HD picture will show on TH TV 6 System setting 6 1 1 WIFI settings In the applications menu or on the desktop tap to enter into the setting interface and then tap ...

Страница 21: ... click the Wi Fi network name For example click Test II it will pop up a connection window where you can input the correct security code and then tap connect The system will connect to the network automatically and once connected will show a Status of Connected You can see the network connection status by pressing the network name see the figure below There will be a WIFI icon in the bottom right ...

Страница 22: ...Press Choose portable WIFI now the tablet pc output as a wireless router and can be found in other WIFI devices Click WIFI hotspot setting page and you can change the network SSID and password as you like see as below picture 6 1 2 Bluetooth Settings optional function Press icon on the desktop press icon in menu ...

Страница 23: ...luetooth devices and let other Bluetooth devices check it Then press search Bluetooth devices nearby can be searched B connection set PIN and connect other blue tooth devices If the PIN is correct Bluetooth devices will be connected automatically when input the correct PIN Press icon and below picture will appears ...

Страница 24: ...ll be showed in the bottom right corner of the screen when Tablet PC connects the 3G successfully 6 1 4 External RJ45 USB Dongle function Automatically get the IP address no need to make settings Connected RJ45USB Dongle to the tablet PC by USB HOST cable the icon appears in the right lower corner when it is connect well then the network is available 6 1 5 Sound setting Tap the icon to enter the s...

Страница 25: ...setting interface tap Ring notice to enter into Ring setting interface Once you have set successfully please click and then finish setting System indicator sound setting touch indicator sound tap the touch screen Lock indicator sound lock and unlock the screen broadcast voice These two functions are optional press to enter mute state if you do not want those functions 6 1 6 Display setting Click i...

Страница 26: ...duce the brightness of the system by dragging the click ok and return to main menu B Wallpaper setting Tap setting Apps display wallpaper and then you can choose the wallpaper as you like such as live wallpaper gallery custom wallpaper system video wallpaper as shown in picture ...

Страница 27: ...se any live wallpaper as you like see as below picture Click in the bottom middle and then set successfully It is the same setting method between live wallpaper and static wallpaper If you want to change the wallpaper you can long press the blank position of the desktop and you will ...

Страница 28: ... time which you need and click ok E Interactive screen saver Enter into the Interactive screen saver interface click the sliding block icon in the right side to set the picture which in the tablet pc as screen saver And click return to start this function in the top right corner Once it enters this function the picture will play in slide form Note The picture of Interactive screen saver can be JPE...

Страница 29: ...ct the coordinates which can be supported as some car racing game with a G Sensor H Screen adaptation The screen revolution 6 1 7 Storage Click in the setting application interface it will show all the storages status It can check the flash storage SD storage available storage and so on ...

Страница 30: ...MID user manual User Manual 30 6 1 8 Battery status Tap the icon to check the battery using status 6 1 9 Apps Tab the icon to enter the Application setting interface as below ...

Страница 31: ...l User Manual 31 Tab the icon of the apps you can choose to Uninstall Move Force stop or Clear data of the selected application Running service settings Tap the RUNNING to check and control the running apps as below ...

Страница 32: ...d Location Google search as below Tap the icon to enter the security settings interface as below A screen Lock 1 None 2 Slide 3 Face Unlock 4 Pattern 5 PIN 6 Password a None After setting with None the device can be used directly without unlocking when it is turned on b Slide After booting the desktop has a lock icon ...

Страница 33: ...e Unlock After enter into Face Unlock then select the Cancel or Set it up click Set it up Continue to appear the Face Recognition interface as below Ensure a clear image does not show visible red box below the image area about five seconds before you set successfully as below ...

Страница 34: ...low Align the camera and when set image displayed in the image area Will automatically unlock if the image is not displayed within three seconds then the screen will appear just set alternate way to unlock d Pattern Draw the unlock pattern with a minimum of 4 points tap Continue to compete the setting as below Click Continue to appear draw pattern again to confirm just draw the recorded pattern ag...

Страница 35: ... input PIN password with 4 characters Continue input PIN password again OK compete the setting as below Tap OK to compete the setting The screen has been locked Remember this password When the Tablet PC is turned on after standby will prompt you to set a password Input the recorded PIN password to unlock ...

Страница 36: ...the language and input method settings interface to choose the language as you need as below Language settings The Tablet PC supports multi languages You can select an operation interface of corresponding language according to your needs Tap the corresponding language options ...

Страница 37: ...et the corresponding input method Tap the icon to enter the settings interface Tap settings Language input Android keyboard settings input language Voice search settings Tap the icon to enter the voice search settings to select different languages Tap the icon to enter the Text to speech ...

Страница 38: ...MID user manual User Manual 38 output 6 2 2 Backup reset Default factory recovery Tab the icon to enter the settings interface as below ...

Страница 39: ...PC or you will lose all the data 6 2 3 Add Account Add an Exchange account 6 2 4 Date time settings Tap the icon to enter the date and time setting interface click the box behind the Automatic click date time to modify the system date and time by manual as below Set Date tap up and down button to select Day Month and Year or click the right numbers ...

Страница 40: ...me tap to enter the time setting as below Tap up and down button to set time then tap to finish the setting Select time zone Cancel the automatically determined time zone Tap to enter the setting select the time zone you want to set Switching time format Switch time format If you use the 24 hour format Unpick the box behind the ...

Страница 41: ...41 Date format Tap to enter date format Total three formats for your option as below 1 Month Date Year 2 Date Month Year 3 Year Month Date 6 2 5 Accessibility Can set the Auto rotate screen large test etc as below Touch hold delay ...

Страница 42: ...o use the factory default developer options setting or some changes may affect the functions of the Tablet PC Tab the icon to enter the developer options setting interface as below 6 2 7 about Tablet Check System updates Status Legal information and software version as below ...

Страница 43: ...icon on the desktop to enter the editing mode and you can remove the icon and set its location When you drag the icon to the it turns into the delete function release the icon to delete it as below 7 upgrade Install phonenixsuit tool Notes Do not run Phoenix Suit together with other firmware tools such as Live Suit etc Do not run Phoenix Suit together with software such as Peapod or 91 Mobile Phon...

Страница 44: ...it Click The main interface of Phonenixsuit is shown below 7 1 1 USB Device Installation New driver installation When the software is installed for the first time you will be prompted to install a driver as shown below Following steps can be followed ...

Страница 45: ...5 7 2 Phonenixsuit Operations 7 2 1 Phonenixsuit Interface The Client Area on the top has four function buttons and you can access each function by clicking on corresponding button Phonenixsuit stays in Home interface after running ...

Страница 46: ...the window to the system task Bar and click on to exit the Phonenixsuit 7 3 Firmware After the device is connected firmware can be loaded to it You can click on to Enter the firmware flash interface as shown below Click on to select the target firmware file as shown below After select the firmware click on to load firmware into the Device as shown below ...

Страница 47: ...he power key Press and hold any key except the power key connect the device to PC and press and release the power key for five to ten times and then release all keys you will find that the device automatically enters the upgrade mode If it doesn t work repeat Step a to c again 7 4 APK The Phonenixsuit supports APK backup restore installation device reboot and recovery Click on to enter the APK int...

Страница 48: ...fter the backup finishes you can see following interface The original APK will be stored at My Documents Phonenixsuit Backup 2 Restore Click on to reload the backup APK into the device You can also Click on Cancel to exit the restore ...

Страница 49: ...anual 49 After the restore finishes you can see following interface 3 Installation Click on and select the Apks you want to install multiple Apks can be selected once as shown below The installation interface is shown below ...

Страница 50: ...t it by click on 5 Recovery the device can enter Recovery mode by clicking on If the device doesn t support Recovery mode it will directly go to Android mode after restart 8 Mobil Teachers 8 1 Device setting Click the Setting icon to enter in the setting panel Locate and choose Language and keyboard and select Voice Search Select Language ...

Страница 51: ...MID user manual User Manual 51 Select English Under Dialect choose select English US Select Keyboard and Language and select Output of Voice Text on the right ...

Страница 52: ... of the chapters of course There are two methods of navigation between chapters You can move forwards and back from one chapter to another as shown in the following image Indicator of current chapter Contact and Information Indicator of current card Global Punctuation of Chapter Dynamic icon of progress and punctuation Reference and pronunciation Chapter Index Title of Chapter Compou nds chapters ...

Страница 53: ...al 53 Drag the tabs to navigate between chapters Drag lessons panels for details of that lesson In compounds chapters touch tabs to access that section Progress Icon is automatical ly updated to show lesson s progress or score ...

Страница 54: ...word See the definition of the word Practice writing Listen to the pronunciation Practice your pronunciation of the word Touch the panels to access the main menu of the lessons in this chapter Menu to access these different chapters General Instructions for this set of lessons Pull down menu with interactive English Spanis h Dictionary Press this button to practice your pronunciation of the word t...

Страница 55: ...hed lesson to review topics or improve your score The lessons have several different types of activities all complete With instructions and guidance In all the lessons you can find the Same functionality and continuity of concepts of user s interface Your current pronunciatio n in the lesson Menu to access these different chapters General Instructions for this set of lessons Pull down menu with in...

Страница 56: ...dent on usage High volume WIFI and the frequent use may cause the battery to be drained at a higher rate From usage point of view the battery consumption is relatively with big screen but also by increasing the volume opens the speaker frequent operation and other factors the actual use of the time there will be some differences 9 3 No sound via earphone Please check if the volume setting is 0 Ple...

Страница 57: ...MID user manual User Manual 57 ...

Отзывы: