ADJUSTMENTS & OPERATIONS
Adjusting Table Height
WARNING!
Do not position table below sanding belt! Keep an overlap of at least
1/16” between table and sanding belt to avoid material and/or fingers getting
caught! Failure to comply may cause serious injury!
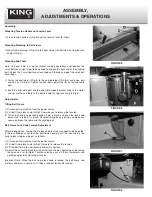
1) Loosen two lock knobs (A-Fig.12).
2) Raise or lower the work table to desired level.
3) Retighten two lock knobs.
Operation
WARNING!
Removing the belt covers expose more of the sanding belt! Replace
the belt covers immediately after completing any sanding that requires its
removal! Failure to comply may cause serious injury!
Horizontal Sanding
1) With the belt frame locked in the horizontal position, the adjustable fence (A-
Fig.13) may be used. The fence can be secured in place by screwing two lock
knobs (B-Fig.13) into the guide blocks found in the miter slot (C-Fig.13).
2) The backstop (D-Fig.13) can also be used, place the backstop pin in the
positioning hole and secure it in place with the workstop lock knob (E-Fig.1).
Vertical Sanding
1) With the belt frame locked in the vertical position, the backstop (A-Fig.13)
and/or the miter gauge (B-Fig.14) may be used.
2) To set a miter gauge angle, loosen the lock handle (C-Fig.14), pivot the miter
gauge body to the desired angle and retighten the lock handle. If you need to
do precise 90° work use a square between the table and belt frame. Adjust for
square.
3) The fence (A-Fig.13) can also be positioned for tapered sanding operations by
setting the fence on an angle. Adjust the table so the fence is at a good height.
Contour Sanding
The use of the end table (A-Fig.15) is optional according to the particular
function of the sanding operation. It is ideal for sanding curves.
1) Always rest your workpiece on the end table for support.
2) Reposition the end table height for maximum belt use by loosening the end
table lock knob which fastens the end table post.
3) When the end table is not being used, remove the end table and post and store
them inside the enclosed cabinet. The end belt cover should always be in
place if the end table is not being used.
Connecting a Dust Collection System
To control the limit of airborne dust, it is highly recommended to connect a dust
collection system to your edge sander. The belt cover on the right side has a 4”
dust chute incorporated into it. Adapt a 4” hose from the edge sander to a dust
collector for best results.
FIGURE 12
FIGURE 13
FIGURE 14
FIGURE 15


