background image

MAINTENANCE / TROUBLESHOOTING

LUBRICATION

All of the ball bearings are packed with grease at the factory. They require no further lubrication. Periodically lubricate the splines
(Grooves) in the spindle and the rack (Teeth of the quill).

WARNING!

For your own safety, turn the switch “OFF” and remove the plug from the power source before maintaining or lubricating

your drill press.

Frequently blow out any dust that may accumulate inside the motor. After operation, remove chips or dirt on the machine and apply a
coat of furniture-type paste wax to the table and the column, this will help keep the surfaces clean and free of rust.

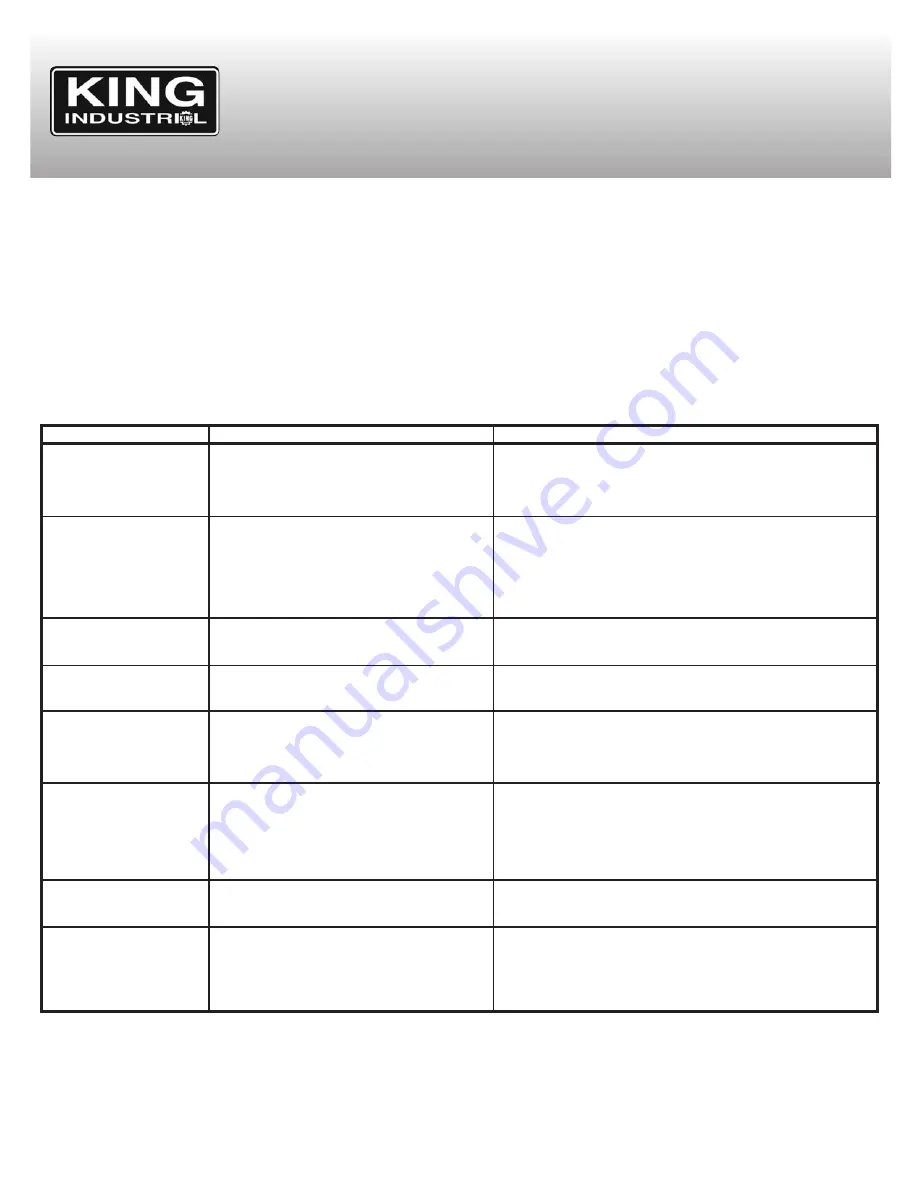
PROBLEM

Noisy operation.

Drill bit burns.

Wood splinters on
underside of workpiece.

Workpiece torn loose
from hand.

Drill bit binds in work-
piece.

Excessive drill bit 
wobbling.

Quill returns too fast or
too slow.

Chuck will not stay
attached to the spindle.
It falls off when trying
to install it.

PROBABLE CAUSE

1. Incorrect belt tension.
2. Dry spindle.
3. Loose spindle pulley.
4. Loose motor pulley.

1. Incorrect speed.
2. Chips not coming out of hole.
3. Dull drill bit.
4. Feeding too slow.
5. Not lubricated.

1. No “Back-up material” under the 

workpiece.

1. Not supported or clamped properly.

1. Workpiece is pinching the drill bit or

there is an excessive feeding pressure.

2. Improper belt tension.

1. Bent drill bit.
2. Worn spindle bearings.
3. Drill bit is not properly installed in the

chuck.

4. Chuck not properly installed.

1. Spring has improper tension.

1. Dirt, grease or oil on the tapered inside

surface of the chuck or on the spindle
tapered surface.

SOLUTION

1. Adjust the tension.
2. Lubricate the spindle.
3. Tighten the retaining nut on the pulley as needed.
4. Tighten the set screws which hold the pulleys in place.

1. Change the speed.
2. Retract the drill bit frequently to clear the chips.
3. Resharpen the drill bit.
4. Feeding too fast...allow the drill bit to cut.
5. Lubricate the drill bit with cutting or motor oil.

1. Support the workpiece or clamp it.

1. Support the workpiece or clamp it.

1. Support the workpiece or clamp it.
2. Adjust the tension of the belt.

1. Use a straight drill bit.
2. Replace the bearings.
3. Install drill bit properly.
4. Install chuck properly.

1. Adjust the spring tension.

1. Using a household detergent, clean the tapered 

surfaces of the chuck and the spindle to remove the
dirt, grease and oil.

PARTS DIAGRAM & PARTS LISTS

Refer to the Parts section of the King Canada web site for the most updated parts diagram and parts list.

Содержание KC-122FC

Страница 1: ...or replace the product if any part or parts covered under this warranty which examination proves to be defective in workmanship or material during the warranty period FIGURE 1 MODEL KC 122FC LS Using...

Страница 2: ...0 0201221100 0201221110 0201221120 0201221130 0201221140 0201221150 0201221160 0201221170 0201221180 Steel mounting bracket Pan hd screw Tapping screw Limit switch Steel ball Compression spring Set sc...

Страница 3: ...INSTRUCTION MANUAL MODEL KC 122FC COPYRIGHT 2002 ALL RIGHTS RESERVED BY KING CANADA TOOLS INC 12 SPEED 22 DRILL PRESS...

Страница 4: ...standards KING CANADA warrants to the original retail consumer a 2 year limited warranty as of the date the product was purchased at retail and that each product is free from defects in materials War...

Страница 5: ...AIN TOOL WITH CARE Keep tools sharp and clean for best and safest performance Follow instructions for lubricating and changing accessories 15 DISCONNECT TOOLS Before servicing when changing accessorie...

Страница 6: ...NTENTS A Head assembly 1 B Table 1 C Column and table support 1 D Base 1 E Box of loose parts 1 F Bag of loose parts 1 G Instruction manual 1 TOOLS NEEDED 1 Combination square 1 8 Ajustable wrench 1 M...

Страница 7: ...R THEY ARE NOT IN ACCORDANCE WITH LOCAL CODES AND ORDINANCES NEVER USE IN CANADA 220V OPERATION If 220V single phase operation is desired the following instructions must be followed 1 Disconnect the m...

Страница 8: ...nk Turn clockwise to elevate the table Support lock must be released before operating crank 6 Chuck key Used to tighten a drill into the chuck and also to loosen the chuck for drill removal 7 Chuck Ho...

Страница 9: ...t the table support and tighten set screw 8 Check column collar for proper adjustment The collar should not be angled on the column and it should be positioned so the rack will slide freely in the col...

Страница 10: ...d rattles or other noises motor frame must not touch lower belt guard Speed adjustment 1 Release belt tension lock handles located on each side of the drill press by turning them counterclockwise 2 Lo...

Страница 11: ...ckwise and open jaws in chuck completely 5 Turn the feed handles counterclockwise and force the chuck against the table until the chuck is secure Fig 16 REMOVING CHUCK AND ARBOR 1 With the switch off...

Страница 12: ...cessary a square or other precision measuring tool should be used to position the table 1 To use the bevel scale do the following a Loosen the table bevel lock nuts See step 3 above for reference b Mo...

Страница 13: ...ckup material wood plywood on the table underneath the workpiece This will prevent splintering or making a heavy burr on the underside of the workpiece as the drill bit breaks through To keep the back...

Страница 14: ...or motor oil to prevent burning of the drill tip ADJUSTING THE QUILL RETURN SPRING NOTE The return spring tension is set at the factory and should not require further adjustment 1 Keep the chuck at i...

Страница 15: ...Back up material under the workpiece 1 Not supported or clamped properly 1 Workpiece is pinching the drill bit or there is an excessive feeding pressure 2 Improper belt tension 1 Bent drill bit 2 Worn...

Отзывы: