


2
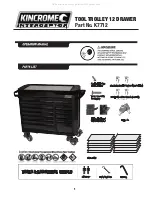
TOOL TROLLEY 12 DRAWER
Part No. K7712
Step 1: Assembly Preparation
Remove all contents from box. Reference the parts list to
make sure you have all the parts.
Place a cover on the floor to prevent any damage to surface of the Trolley.
Castors are prefitted on large trolleys.
Step 2: Attaching Castors
Using two people, tip the trolley so it is laying drawer side up.
Align holes in locking and non-locking Castors with matching
holes in the bottom tray as shown in figure 2. Attach using
16 x 17mm Hex bolts, lock washers and flat washers from
Castor bolt kit and tighten.
Ensure that both locking Castors are on same end of the Trolley.
We recommend mounting locking Castors at the front of the Trolley.
Step 3: Attaching the Side Handles
Align the mounting holes of the handle brackets with the holes
on the side of the Trolley. Attach using the Hex Bolts
Ensure drawers are fully
closed prior to closing lid
and locking the chest
Automatic Drawer Retention
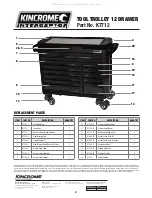
TOOL TROLLEY 7 DRAWER
Part No. K7747GT
1
Castors (2)
Castors (2)
Castors
Gas Struts (2)
17mm Spanner
5mm Hex Key
7 x Liners
Non-Locking Castors (2)
Locking Castors (2)
Handle (1)
Power Handle (1)
Castors
8 x Hex Bolts for
Push Handle
17mm Bolts
(16) for Castors
TOOLS/ASSISTANCE NEEDED
DRAFTING
STANDARD
AS100
UNLESS OTHERWISE
SPECIFIED, DIMENSIONS
ARE IN MILLIMETERS
TITLE:
DWG NAME:
A3
chris power 1
SHEET: 1 OF 1
DRWN BY: Dylan Luxa
1_HandleAssy_POWERBOARD
1:6
SCALE:
DO NOT SCALE DRAWING
DATE: 5/09/2014
COPYRIGHT © 2014. ALL WORK PROPERTY OF KINCROME.
DRAFTING
STANDARD
AS100
UNLESS OTHERWISE
SPECIFIED, DIMENSIONS
ARE IN MILLIMETERS
TITLE:
DWG NAME:
A3
chris power 1
SHEET: 1 OF 1
DRWN BY: Dylan Luxa
1_HandleAssy_POWERBOARD
1:6
SCALE:
DO NOT SCALE DRAWING
DATE: 5/09/2014
COPYRIGHT © 2014. ALL WORK PROPERTY OF KINCROME.
All manuals and user guides at all-guides.com