


Access
Airflow
function by means of key. With
Velocity
function, you can access to following
sub-functions Hold, Area, Configuration, Parameters, Average, Alarms et Recording.
Hold - Min./Max.
Press 1x in order to select
HOLD
function : measurement holding on display.
Press 2x in order to select
Min-Max
function : display of minimum and maximum values.
Press 3x : back to the continuous measurement.
9
AIR VELOCITY menu
This function allows to calculate an average value that the device measured in an interval chosen time.
Timer
is displayed. Select
Start
with access key for launching measurement.
If you click on
average icon
, max. and min. values, standard deviation, average of each channel and time chosen will be displayed.
This function allows to calculate the average value of various points, calculated themselves on a duration beforehand defined.
You must enter duration : click on the
Period
icon. Select
minutes
or
seconds
with arrow buttons
and
.
Scroll digits with
and
. Confirm with
OK
. The numbers of points is displayed. Press
Ok
for launching measurement.
If you click on
average
icon, max. and min. values, standard deviation, average of each channel and numbers of measuring points will be
displayed.
You can view each measuring points if you click on
Visu.
•
Automatic average
•
Automatic point/point average
Moyenne
Average
This function allows to calculate the average value of various points that you can select.
Numbers of selected points
and
parameter
for which calculation is carried out, are displayed
For adding a new measuring point to this calculation, press
OK
to confirm.
If you click on
average icon
, max. and min. values, standard deviation, average of each parameter and numbers of measuring points will be
displayed. If you want to see all values, select
Visu.
and scroll
with
and
.
•
Point / point average
AIR VELOCITY display
Rec.
Probe
Config
Airflow
Params
Avg.
Alarms
Hold
IV – Menus
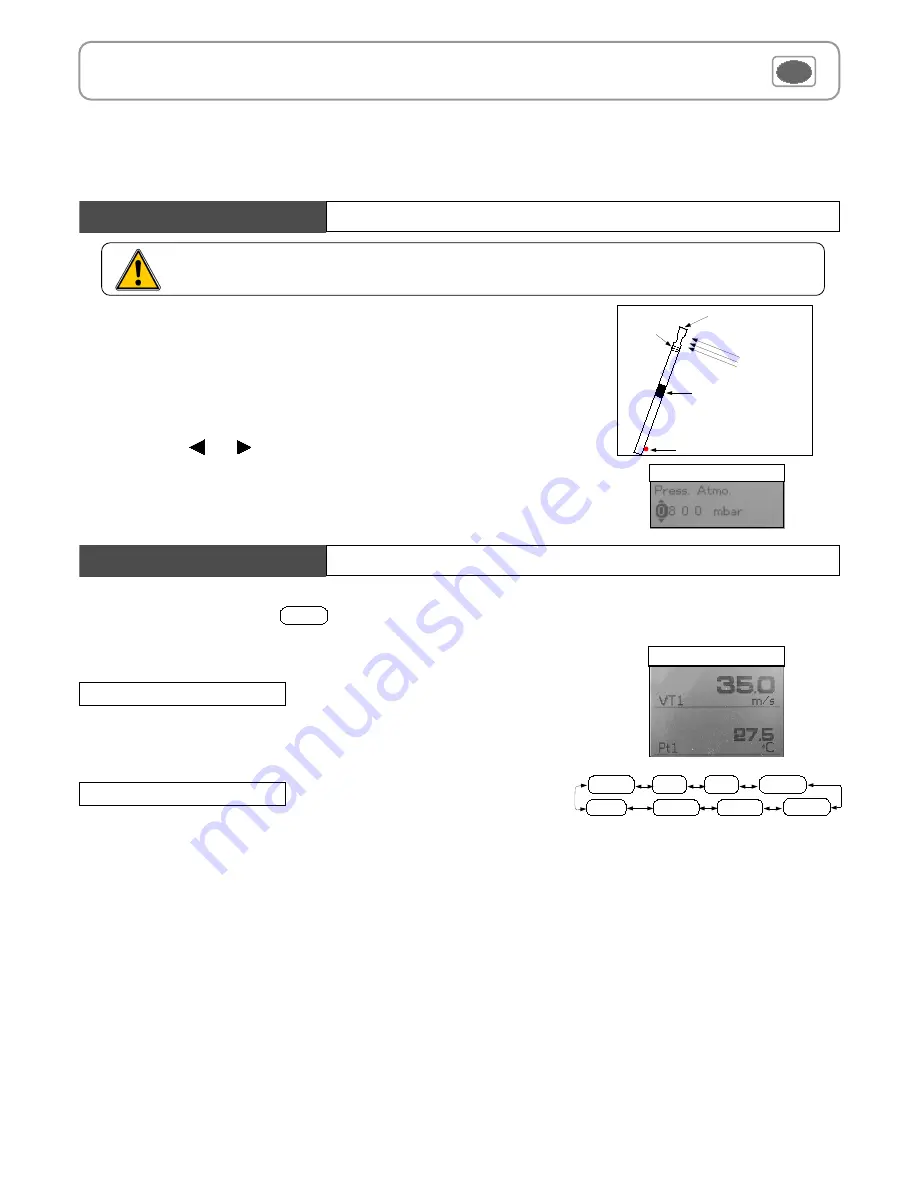
Using a hotwire
1. Connect the hotwire probe to VT 200. Probe menu appears.
2. Slide down protection tube (1).
3.The probe must be perpendicular to airflow : the red point at the bottom of the probe must
face airflow.
4. Press
OK
to enter in the
Measurement
menu, the air velocity and temperature values are
displayed.
5. With arrow keys and go to «
Config
» and press
OK
.
6. Go to «
Air pressure
» then press
OK
.
7. Enter air pressure.
8. Press«
Valid.
» then «
Esc
» to go back to measurement mode.
To select the unit
press
OK
or
.
Select
mm
or
in
with arrow buttons
and
. Confirm with
OK
.
•
Units
Air flow direction
Red point
Protection tube (1)
Sensing element (air velocity)
Sensing element
(temperature)
Veloci.
COMPENSATION display
In order to offset the air pressure, before making a measurement with a hot wire probe, enter in the instrument the air
pressure of the day or of the conditions in which the hotwire is located. The adjustement range is from
800 to 1200 hPa
.
Содержание VT 200
Страница 1: ...Anemometer VT 200 Supplied with Calibration certificate ...
Страница 2: ......
Страница 14: ......
Страница 15: ......