4/
5/
6/
7/
8/
9/
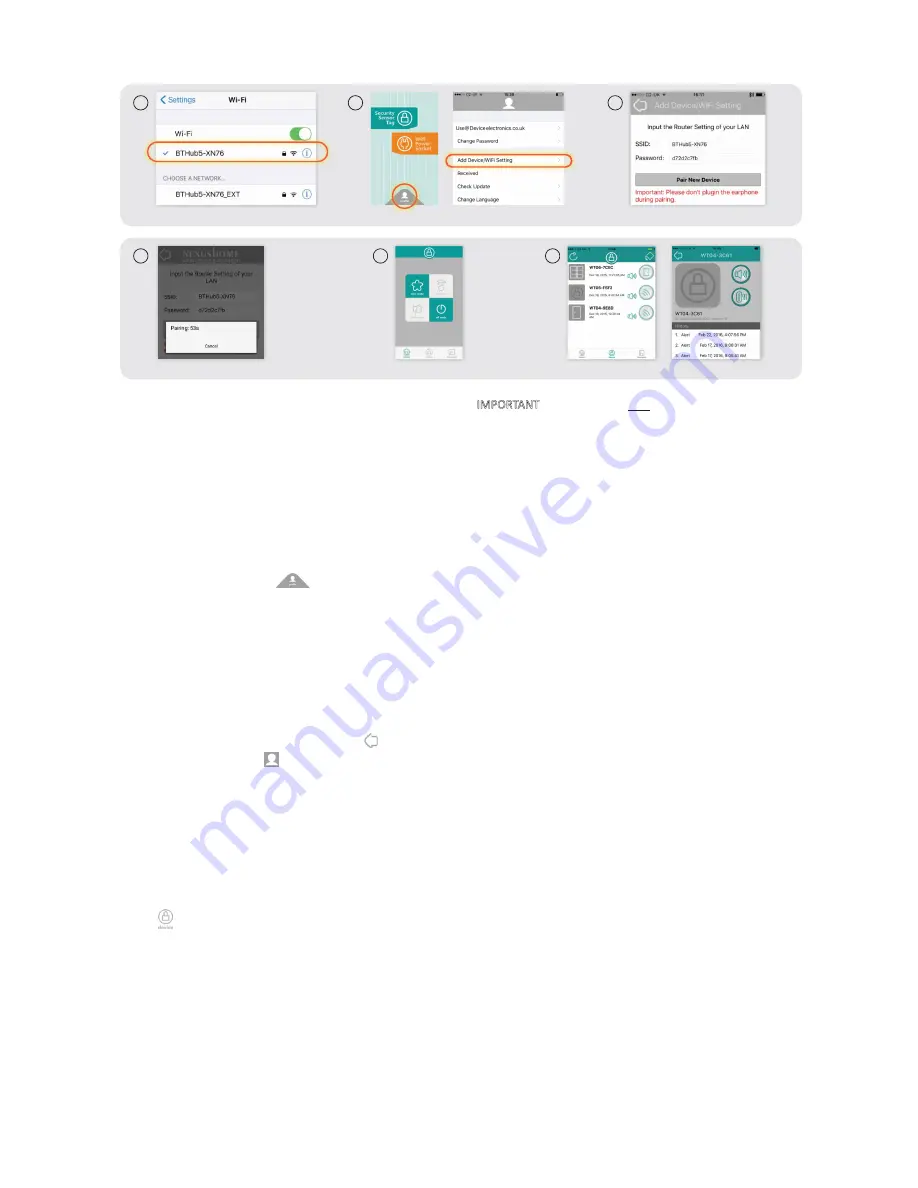
Now, exit the APP and open SETTINGS on your smart phone. VERY IMPORTANT. The Sensor will only communicate Alarm signals
to the WIFI router that you are about to “pair” it to. If the Sensor is or goes out of range of that specific router, then it will not
work. This also means that if you have WIFI Extenders/Repeaters in your WIFI network and you wish to install/use the Sensor in
the vicinity of that Extender, rather than the main Router, you will need to pair the Sensor to that Extender and NOT to the Router.
Each Router or Extender has its own unique reference name (or SSID) and this is what you are now going to pair to:
Re-Open the APP and click PROFILE at the bottom of the opening HOME page. This will take you to the APP’s SETTINGS
Page. Click “ADD DEVICE/WI-FI SETTING”
You will see the same SSID of the Router/Extender that you selected in your phone’s WIFI Settings. Enter the password of that
Router or Extender and press PAIR NEW DEVICE.
The Sensor will now start pairing to the Router or Extender and you will see the wheel whirling. It can take up to 60 seconds for a
“pairing successful” message to appear. If you see the message “time out, try again”, move the smartphone, still with the Sensor
attached, closer to the Router or Extender and repeat the process. Once paring is successful, you can now unplug the cable and
close the battery door. Mount the Panic Knob into a permanent location using the double sided tape provided.
Exit the PAIRING Page in the APP by clicking at the top of the screen (iOS only, for Android users press Backwards on your
Smartphone). Then, click at the top of the APP’s SETTING PAGE to return you to the APP’s Home Screen. Now press SECURITY
SENSOR TAG. This will take you to the Alert Mode Screen. This allows you to choose the Sound you will hear on your phone
when an Alarm notification is received from both this Sensor and all other Nexus devices you may have paired to your Router.
Click at the bottom of the screen. This will take you to the DEVICE page. Here you will see all the Sensors, including any other
type of Nexus sensors that have been paired to the APP.
With SETTINGS open on your smart phone open, check what is showing in “WIFI”. If you just have a main Router, it should be
showing the SSID of this Router. However, if you have a network with one or more extenders, it may also be showing the SSID
of an overlapping Extender as in the picture to the right. In this case, check whether you are closest to the main Router or to
an Extender and select the closest/strongest SSID (i.e. the Router reference name).
Alert Mode
Safe Mode
Silent Mode
Off Mode
Move the magnet away from the reed switch to test the Sensor. You will see the blue LED flash once followed, a few seconds
later by a further two quick flashes, to indicate anotification Alert has been sent to the APP. Depending on the Alert Mode
you have chosen, this will be audible or silent. You will see the notification appear and the Device will start to
flash with the Alert’s time and date stamped alongside. Press the “Refresh” Button at the top left hand side of the page to
cancel the flashing. If you now press the Device Icon, you will be taken to its HISTORY PAGE which will list the last 30
notifications
= Short Siren Tone + incoming Notification Alert Sound
= No Siren, just an incoming Notification Alert Sound
= No Siren, no Alert Sound, just the Notification
= No Siren, no Alert Sound and no Notification
(although all alerts from the Sensor will still be listed the DEVICE’s HISTORY page)
4
5
6
connect WiFi
click “Add Device/WiFi Setting”
enter the name of WiFi and password
7
8
9
pairing
4 different mode
device list and history
WT07-A31D Device Alert
02-03-2016 13:58:59


