Keysight Ixia IxOS XGS2 Series Скачать руководство пользователя страница 1

IxOS

XGS2 Chassis Platform

Getting Started Guide

Release 8.51 EA

Содержание Ixia IxOS XGS2 Series

Страница 1: ...IxOS XGS2 Chassis Platform Getting Started Guide Release 8 51 EA...

Страница 2: ...standard commercial license which is embodied in its End User License Agreement EULA a copy of which can be found at http www keysight com find sweula or https support ixiacom com support services wa...

Страница 3: ...This page intentionally left blank iii...

Страница 4: ...2599 support ixiacom com APAC Support 91 80 4939 6410 support asiapac ixiacom com EMEA Support 40 21 301 5699 support emea ixiacom com Greater China Region 400 898 0598 support china ixiacom com Indi...

Страница 5: ...This page intentionally left blank v...

Страница 6: ...5 Chapter 2 XGS2 Chassis Physical Setup 8 Unpack and Connect the Unit 9 Rack Mounting and Ventilation Warning 13 Installing the XGS2 on a Flat Surface 14 Record Product Information 15 Chapter 3 XGS2...

Страница 7: ...Windows Remote Desktop Connection 32 Start an SSH Session 33 Start a Serial Session 34 Reboot the System 35 Shut Down the System 35 Chapter 7 Troubleshooting 37 LED Indicators 38 IP Addressing Issues...

Страница 8: ...tion explains the notational and typographical conventions used in this documentation and provides a list of related documentation Section contents Note icons and messages 2 Typographical conventions...

Страница 9: ...ames such as dialog boxes buttons menu selections and so forth l Command line interface commands and options l The name of a field option or parameter when used as part of an instruction For example S...

Страница 10: ...xt Words that represent Boolean notation are written in all uppercase text For example 1010 OR 1100 Keystrokes Simultaneous keystrokes are shown by joining the key names with a plus sign For example C...

Страница 11: ...This page intentionally left blank 4...

Страница 12: ...rview This section provides an overview of the XGS2 chassis platform the physical units and the indicators and controls on them In this section XGS2 Processor Modules 2 Front Panel 4 Indicators and Co...

Страница 13: ...etwork but not BPS The XGS2 Processor Modules are a modular field replaceable system controller units running Linux and Windows 7 operating systems for management and control of load modules user mana...

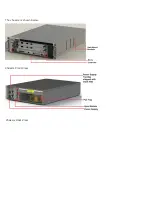
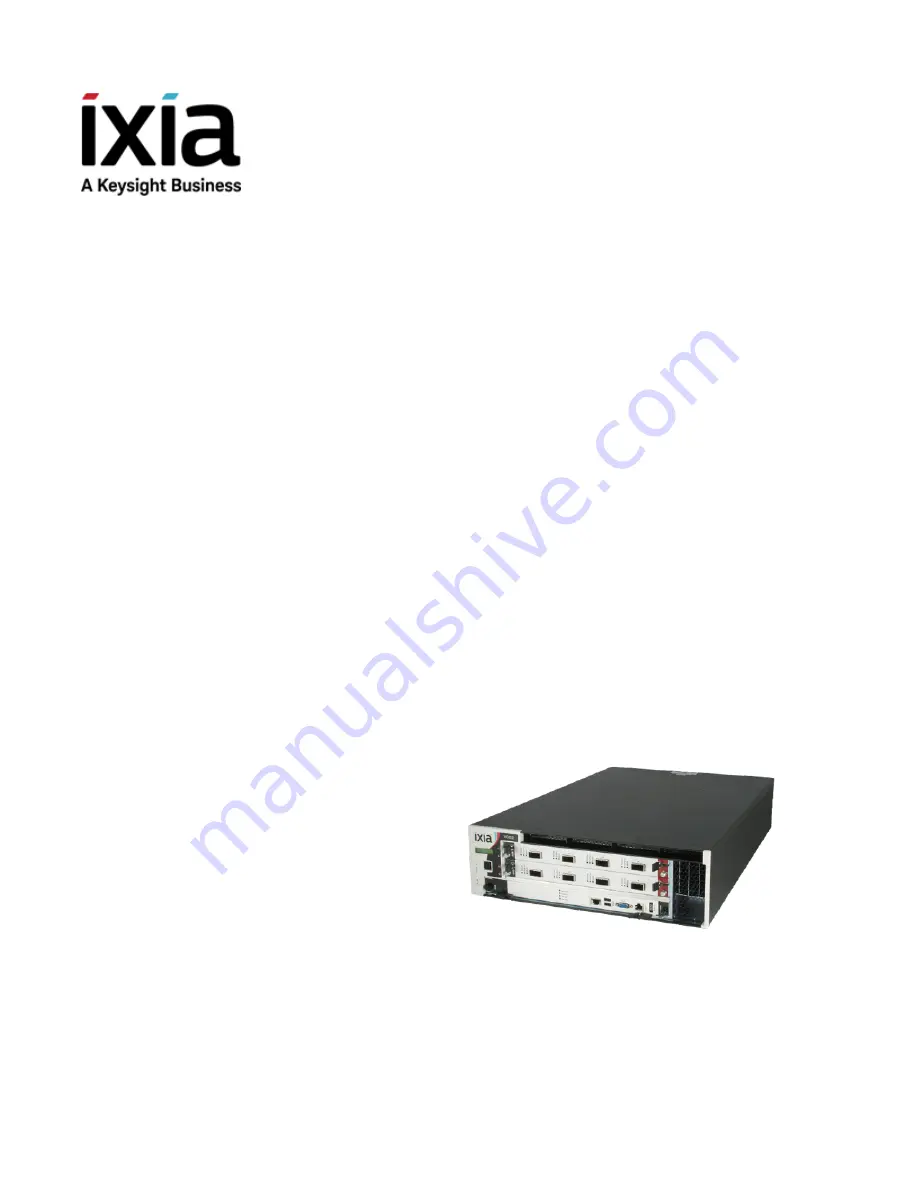
Страница 14: ...The chassis is shown below Chassis Front View Chassis Rear View...

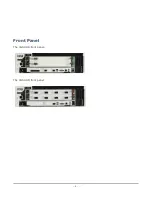
Страница 15: ...Front Panel The XGS2 HS front panel The XGS2 SD front panel 4...

Страница 16: ...nds Force Power Shutdown immediate Serial port Provides attachment to the serial port of a workstation using the provided RJ45 to DB232 cable USB ports Provides attachment of USB devices LAN port An R...

Страница 17: ...8 Voltage Fluctuations Flicker Immunity IEC EN 61000 4 2 2008 Electrostatic Discharge Immunity IEC EN 61000 4 3 2006 Radiated Immunity IEC EN 61000 4 4 2004 A1 2010 Transient Burst Immunity IEC EN 610...

Страница 18: ...densing Input Power INPUT 1 ALIMENTATION 1 100 240VAC 50 60Hz 8A INPUT 2 ALIMENTATION 2 100 240VAC 50 60Hz 8A INPUT 3 ALIMENTATION 3 100 240VAC 50 60Hz 8A Note Inputs 1 and 2 are required for normal o...

Страница 19: ...describes the tasks needed to physically set up the XGS2 HS and XGS2 SD units for operation In this section Unpack and Connect the Unit 9 Rack Mounting and Ventilation Warning 13 Installing the XGS2...

Страница 20: ...onnecting the unit record the following information from the label on the back of the unit l Host Name for example XGS2 HS l Part number for example 940 0012 You can record these in the form on Record...

Страница 21: ...sections describe the procedure 1 Insert the controller module in the lower slot in front of the chassis Ensure that the module is fully seated Ensure that the thumbscrews are screwed in properly 2 Ta...

Страница 22: ...is fully inserted tighten its two screws 4 Insert a power supply in one of the power supply slots 5 Push the power supply until you hear a click and it is fully seated in its slot Chapter 2 XGS2 Chas...

Страница 23: ...pply Note If you have purchased the optional redundant power supply you may have to repeat this step after removing the empty slot cover 7 The fully assembled chassis s rear view looks like this Chapt...

Страница 24: ...ched at an offset from the chassis front 9 Use the provided power cords to connect the chassis to the electrical power source Rack Mounting and Ventilation Warning The XGS2 chassis are shipped with br...

Страница 25: ...bient Therefore consideration should be given to installing the equipment in an environment compatible with the maximum ambient temperature Tma pecified by the manufacturers B Reduced Air Flow Install...

Страница 26: ...oduct Key are printed on the label on the back of the unit l The IP addresses are either assigned by the network s DHCP server or statically assigned by a system administrator l Flix OS and BreakingPo...

Страница 27: ...Configuration This section describes the tasks needed to configure the XGS2 HS chassis In this section Connecting the XGS2 HS Processor module 17 Initial Configuration of XGS2 HS 18 System Administrat...

Страница 28: ...the XGS2 HS Processor module To connect the module you need to do the following 1 Connect the RJ45 management port 4 as the designated management port to your lab management switch 2 Connect the VGA...

Страница 29: ...nternal virtual network l 10 0 x x 16 default internal port address This can be changed from IxExplorer Chassis Properties Virtual Machines and IP Address requirements for XGS2 HS chassis The XGS2 HS...

Страница 30: ...n system configuration menu for configuring various system level parameters use the following system credentials l username admin l password admin 3 Once the system credentials are correctly inserted...

Страница 31: ...ed type the following credentials l username ixia l password ixia b To login to the IxOS Windows machine use the following username and password also shown in the bottom right corner of the login scre...

Страница 32: ...ine and the System Admin Screen by using the following hotkeys CTRL ALT F2 System Admin Screen CTRL ALT F7 Windows IxOS Machine Remote system access 1 To remotely administer the IxOS Windows machine t...

Страница 33: ...CHAPTER 4 XGS2 SD Configuration This section describes the tasks needed to configure the XGS2 SD chassis In this section Connecting the XGS2 SD Processor module 23 Initial Configuration XGS2 SD 24...

Страница 34: ...or module To connect the module you need to do the following 1 Insert and remove the Processor Module 2 Connect the RJ45 management port 4 as the designated management port to your lab management swit...

Страница 35: ...nce you log on to the chassis change the IP address Note 10 0 x x 16 is the default internal port address This can be changed from IxExplorer Chassis Properties Change IP Address To change the IP addr...

Страница 36: ...rties Select Internet Protocol Version 4 TCP IPv4 5 Click Properties and then click the Use the following IP address option 6 Enter the IP address subnet mask and default gateway Chapter 4 XGS2 SD Con...

Страница 37: ...Applications Support This section provides the details of the Ixia Test Applications supported by XGS2 chassis platform In this section Ixia Applications support for XGS2 HS 27 Ixia Applications supp...

Страница 38: ...ress should be used IxNetwork To start IxNetwork and assign ports from an XGS2 SD chassis 1 Log on to an application server or workstation that has the IxNetwork application installed 2 Start IxNetwor...

Страница 39: ...akingPoint session Note It is recommended that you periodically check the Ixia compatibility matrix https support ixiacom com support overview product support product compatibility matrix to determine...

Страница 40: ...xNetwork To start IxNetwork and assign ports from an XGS2 SD chassis 1 Log on to an application server or workstation that has the IxNetwork application installed 2 Start IxNetwork 3 Select XGS2 ports...

Страница 41: ...xia compatibility matrix https support ixiacom com support overview product support product compatibility matrix to determine the correct Ixia software application versions that are validated for inte...

Страница 42: ...es for reference some of the common tasks that system administrators will perform on the XGS2 system In this section Start a Windows Remote Desktop Connection 32 Start an SSH Session 33 Start a Serial...

Страница 43: ...OS virtual machine using the IP address that was returned by the ping command In the Windows Security window provide the following credentials l User name ixia l Password the last part of the host nam...

Страница 44: ...n an SSH session from your terminal emulation application specifying l The FlixOS IP address as the Host Name l Port 8022 For example Once you open the session the Administrative Console prompts you t...

Страница 45: ...model only To start a serial session 1 Open the serial connection from your terminal emulation application For example The Administrative Console prompts you to log in 2 Enter the following credentia...

Страница 46: ...l option 4 Press Enter to initiate the graceful restart XGS2 executes an orderly shut down of all processes then reboots the system The operation may take several minutes to complete Note The forced r...

Страница 47: ...alt system graceful option GS 4 Press Enter to initiate the graceful shutdown XGS2 executes an orderly shut down of all processes then powers down the system Note The forced shutdown option should be...

Страница 48: ...your XGS2 unit and troubleshooting issues that may arise If you need assistance contact Ixia Technical Support using the contact information provided in Contact Us on page iv In this section LED Indic...

Страница 49: ...owered In Use Amber The Active LED is illuminated when you have taken ownership of the load module If you run traffic from IxExplorer without taking port ownership the In Use light is not illuminated...

Страница 50: ...twork implements a DHCP service the XGS2 IP addresses will automatically be assigned by that service unless you choose to assign static IP addresses instead When assigning static IP addresses you must...

Страница 51: ...id this configure the XGS2 to use NTP or manage the time setting manually if NTP is not an available to you Refer to Set the System Time for instructions Troubleshooting Other Issues Following is a li...

Страница 52: ...This page intentionally left blank 41...

Страница 53: ...d to remove the cover and access any of the components inside the system CAUTION To reduce the risk of electrical shock a trained service technician must disconnect all power supply cables before serv...

Страница 54: ...nge l Do not stack equipment or place equipment so close together that it is subject to re circulated or preheated air When operating your equipment CAUTION Do not operate your equipment with the cove...

Страница 55: ...or air intakes l Do not push any objects into the air vents or openings of your equipment Doing so can cause fire or l electric shock by shorting out interior components CAUTION Only Ixia trained serv...

Страница 56: ...pment may contain optical communications transceivers which have built in laser devices To prevent any risk of exposure to laser radiation do not disassemble or open any optical transceiver assembly f...

Страница 57: ...les directives de s curit suivantes afin d assurer votre s curit personnelle et de prot ger votre quipement et votre environnement de travail contre les dommages potentiels S CURIT S curit g n rale A...

Страница 58: ...ouvercle retir l Utiliser ce produit uniquement avec des quipements approuv s certifi s Faire fonctionner ce produit uniquement avec des alimentations redondantes approuv es certifi es l Faire fonctio...

Страница 59: ...mit avec les directives indiqu es ci dessus l Ne pas entraver l arriv e d air dans l quipement en bloquant les fentes d a ration ou les entr es d air l Ne pas introduire d objets dans les fentes d a r...

Страница 60: ...uds lors du fonctionnement normal Faire preuve de prudence lors du retrait de modules additionnels apr s un fonctionnement continu Pour viter le risque potentiel de choc lectrique ne pas connecter ou...

Страница 61: ...la connexion d autres dispositifs cet quipement vous devez toujours assurer votre mise la terre et celle de l autre dispositif avant de le connecter cet quipement Vous pouvez aussi suivre les tapes s...

Страница 62: ...This page intentionally left blank J...

Страница 63: ...verview 18 IP addressing issues 39 ixia applications support for XGS2 HS 27 ixia applications support for XGS2 SD 29 L LED indicators 38 R reboot 35 Remote Desktop Connection starting 32 S serial conn...

Страница 64: ...Ixia a Keysight Business 26601 West Agoura Road Calabasas California 91302 Keysight Technologies 2018...

Отзывы: