


KD-HDMI2x1 & 4x1 Operating Instructions
Page 14
KD-HDMI2x1 & 4x1 Operating Instructions
Page 1
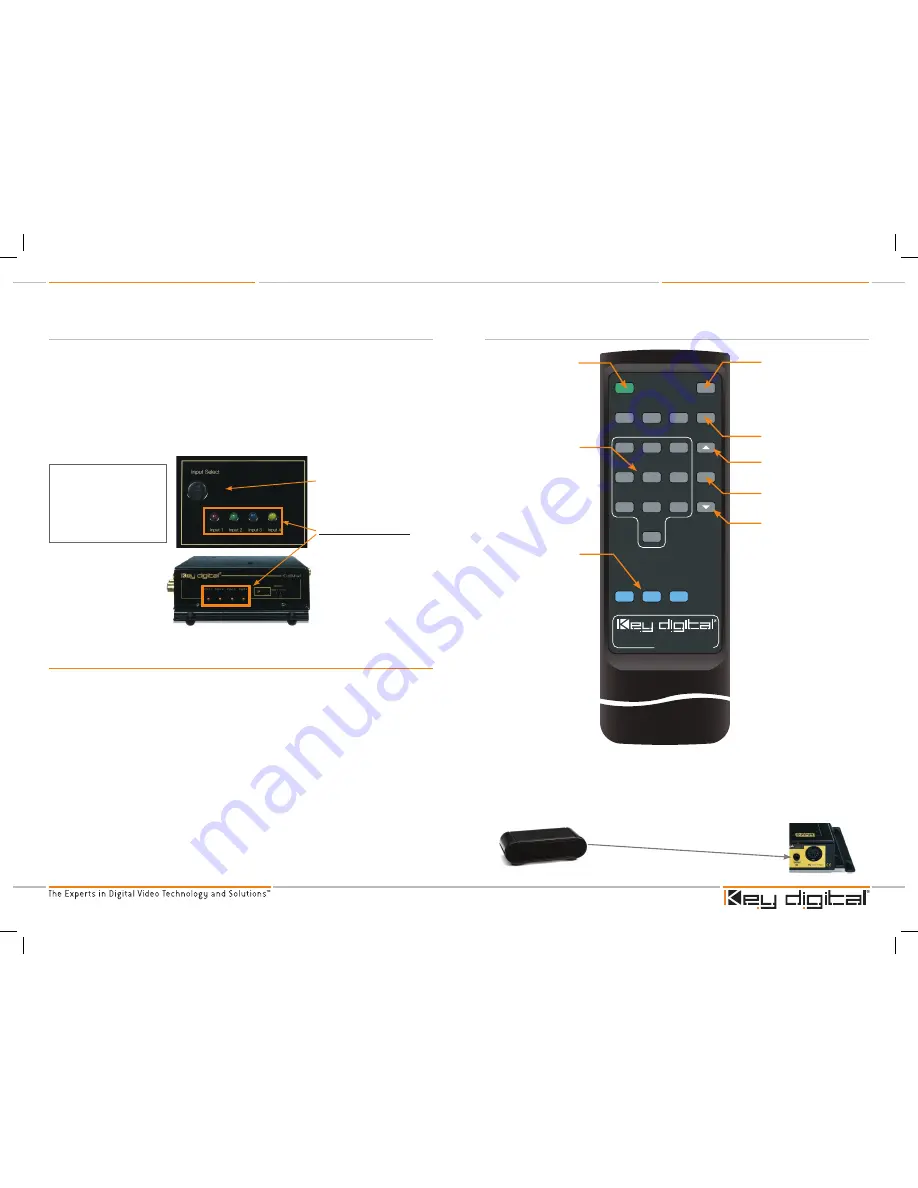
IR extender
You may also want to use an IR extender, such as available by Xantech:
A rear panel sensor is perfect for use with Xantech IR extender
A wired IR serial connector is also provided
you’ll need to either mount the IR extender on the side of the kd-hdmI unit, or connect the
serial connector cable.
›
›
IR Remote Control buttons
IR RemoTe ConTRol
All the functions of the KD-HDMI can be remotely accessed using the IR remote control supplied
with your unit. The status-monitoring LEDs on the KD-HDMI will light to indicate the selections you
make with the IR remote control, just like when you use the pushbutton switch.
The IR remote control unit is based on Infrared technology, so you need a clear line-of-sight from
the handheld control to the IR sensors located on the KD-HDMI. Always point the front of the
remote control directly at the IR sensors located on the KD-HDMI unit.
The IR remote control may not operate properly if there are objects placed between it and the IR
sensors located on your KD-HDMI switcher.
Be sure that you have installed the batteries in the handheld remote control unit. Periodically
replace batteries in the handheld unit, as the operational distance of the remote control is
affected by a weakened power source.
The handheld IR remote control allows you to quickly and conveniently perform the input selection.
The following figure of the IR remote control that is provided with your KD-HDMI unit indicates the
functions of each pushbutton and hence all of the functions you can remotely control.
›
›
›
2. Input Selection
Press the pushbutton to until you reach your desired input selection. Monitor your selection with
the LEDs.
a) Select the input source that you want to send to your display.
The
auto-sensing
will detect and switch to the active HDMI source input, automatically. If an active
source is present on Input 1 it is automatically switched to the output.
If an active input is not
present on Input 1 then the inputs are scanned sequentially and switch the output to the first active
input found.
b) The output audio follows input selection switching.
Using the “Input Select”
pushbutton, cycle through
selection of all input sources.
Monitor each selection with
the LEDs located on the top
and side of your unit.
InPuT SWITCh ConTRol
pushbutton
selects the input
Source that you want to send to
your displays and audio systems.
LEDs show your selection.
Top of the unit
www.keydigital.com
1
2
3
4
5
6
7
8
9
0
Power ON
OFF
Input 1
Input 2
Input 3
Input 4
R1
R2
R3
Auto
Select
www.keydigital.com
1
2
3
4
5
6
7
8
9
0
Power ON
OFF
Input 1
Input 2
Input 3
Input 4
R1
R2
R3
Auto
Select
on
Turns Unit On
auto Input Select
Input Select Scroll up
Input Select
off
Turns Unit Off
Input Select Scroll down
numeric keypad
Used in addressable
mode for specifying
unit’s address
R1, R2, R3
are Reserved
for future use
www.keydigital.com
1
2
3
4
5
6
7
8
9
0
Power ON
OFF
Input 1
Input 2
Input 3
Input 4
R1
R2
R3
Auto
Select
www.keydigital.com
1
2
3
4
5
6
7
8
9
0
Power ON
OFF
Input 1
Input 2
Input 3
Input 4
R1
R2
R3
Auto
Select
Wired IR Extender
KD-HDMI Unit
3.5mm male-to-male mono cable
KD-HDMI2x1_4x1_Manual.indd 14-15
12/12/06 5:14:58 PM


