Key Digital KD-4x8CS Champion Скачать руководство пользователя страница 6

4

Operation:

After performing the setup above, the unit is ready for operation. 
There are several options for controlling the unit. Commands can be issued via IR remote control, 
RS-232 or by using the front panel buttons. Note that the advanced commands are available only 
via the RS-232 protocol.
 

Settings

The KD-4x8CS, KD-6x6CS, KD-8x4CS & KD-8x8CS features a library of 12 internal EDID 
(Extended Display Identification Data) files, in addition to allowing any Input source to receive 
a copy of the EDID information of any selected Output connected via HDMI.  The default EDID 
setting is “04” – 1080p 2ch Digital Audio.  Changing to EDID settings may be necessary when 
connecting to or from an AV Receiver, or for passing 3D content derived from a Cable or Satellite 
source if the default EDID has problems.  
They can also speed up the switching process with cable or satellite sources.

The possible EDID settings can range from ‘01’ to ‘12’. (‘04’ is the default).

01

1080i, 2CH Audio

07

3D, 1080p 2CH Audio

02

1080i, DOLBY/DTS 5.1

08

3D, DOLBY/DTS 5.1

03

1080i, HD Audio

09

3D, HD Audio

04

1080p, 2CH Audio

10

1280x1024 DVI

05

1080p, DOLBY/DTS 5.1

11

1920x1080 DVI

06

1080p, HD Audio

12

1920x1200 DVI

When selecting an EDID from the library (settings 01-12), 
your source device will see the KD-4x8CS, KD-6x6CS, KD-
8x4CS & KD-8x8CS EDID choice instead of the display’s 
EDID, overriding the display’s own EDID information.  
If your display is not capable of accepting the video 
resolution or audio type selected, you may not see a picture 
or hear sound. In this case please choose another more 
compatible EDID, or use the default EDID.
EDID settings can only be changed through the RS-232 
command protocol. See the RS-232 command section 
below for a list of EDID commands available.
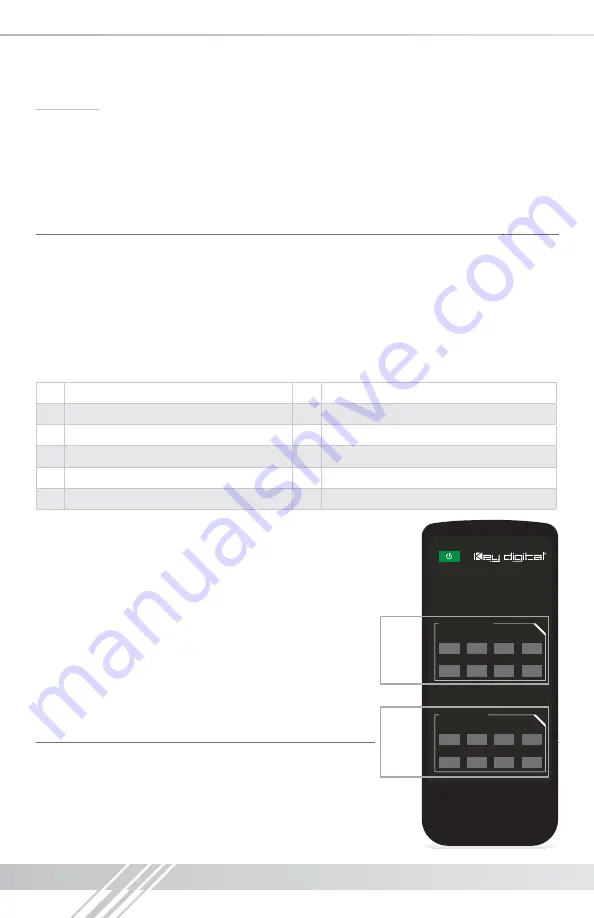
Remote Control

You may switch inputs on the KD-4x8CS, KD-6x6CS,  
KD-8x4CS & KD-8x8CS by using the supplied IR Remote 
control. There are 2 groups of controls, one group for outputs 
and one group for inputs. To execute a switching command, 
first select the output you wish to switch 

(1)

, then select the 

desired input 

(2)

.

Models for this Remote

Front

Back

Front

Back

Remote Buttons:
PMS Cool Gray 11U

PVC Inlay:
PMS Black

Silkscreen:
White

Body:
Black 

Power Button:
PT 355 U

Sasha 11.13.2012 – Remote SKU: 

KDRM8XNCS

KD4X8CS

KD8X4CS

KD6X6CS
KD8X8CS

KDRM8XNCS

Part Number:

Power

www.keydigital.com

1

2

3

4

Input Select

1

2

3

4

5

6

7

8

5

6

7

8

Output Select

KDRM8XNCS

Part Number:

Power

www.keydigital.com

1

2

3

4

Input Select

1

2

3

4

5

6

7

8

5

6

7

8

Output Select

Output 

Select

1

Input 

Select

2

Содержание KD-4x8CS Champion

Страница 1: ...HDMI Matrix Switchers The Experts in Digital Video Technology and Solutions KD 4x8CS KD 6x6CS KD 4x8CS KD 6x6CS KD 8x4CS KD 8x8CS KD 8x4CS KD 8x8CS Setup Guide...

Страница 2: ...ions Buttons and LEDs 2 Application Example 3 Quick Setup Guide 3 Settings 4 Remote Control 4 RS 232 Commands 5 Specifications 7 Important Product Warnings Safety Instructions 8 How to Contact Key Dig...

Страница 3: ...e 3D Ready Full support for 12 bit Deep Color and HDCP Supports lossless compressed digital audio Dolby TrueHD Dolby Digital Plus and DTS HD Master Audio Key Benefits Key Digital s Buffered Matrix Tec...

Страница 4: ...Optical IR Sensor Operation Mode Switch and Power connections are located on the right side of the back panel The Operation Mode switch is used to update the unit s firmware which is done using the DB...

Страница 5: ...in with the KD 4x8CS KD 6x6CS KD 8x4CS KD 8x8CS and all input output devices turned off and power cables removed 2 Connect HDMI sources to the appropriate input ports on the KD 4x8CS KD 6x6CS KD 8x4CS...

Страница 6: ...HD Audio 09 3D HD Audio 04 1080p 2CH Audio 10 1280x1024 DVI 05 1080p DOLBY DTS 5 1 11 1920x1080 DVI 06 1080p HD Audio 12 1920x1200 DVI When selecting an EDID from the library settings 01 12 your sour...

Страница 7: ...uired Pin 5 Ground Pin 3 Receive Pin 2 Transmit RS 232 cable pin out NOTE All commands are case insensitive Spaces are shown for clarity commands should not have any spaces Every command below require...

Страница 8: ...ite the EDID information from the built in default EDID library using default EDID 1 to Input 2 issue the command SPCEDID02D01 The possible EDID settings can range from 01 to 12 04 is the default 01 1...

Страница 9: ...dure Open the KD Flash2 software on your Windows computer 1 Ensure the Rotary Switch Position menu within the KD Flash2 software is selecting Position 2 2 Set the Operation Mode dial on the rear of yo...

Страница 10: ...nk Single Link EDID Control EDID information is assigned to the inputs from the internal EDID library or from a display s internal EDID data Lossless Compressed Digital Audio Supports lossless compres...

Страница 11: ...his device near water 4 Clean only with dry cloth 5 Install in accordance with the manufacturer s instructions 6 Do not install near any heat sources such as radiators heat registers stoves or other a...

Страница 12: ...Digital products please contact us at Phone 914 667 9700 E mail tech keydigital com Repairs and Warranty Service Should your product require warranty service or repair please obtain a Key Digital Ret...

Страница 13: ...Warranty Information All Key Digital products are built to high manufacturing standards and should provide years of trouble free operation They are backed by a limited three year parts and labor warra...

Страница 14: ...12 Installation Notes...

Страница 15: ...13...

Страница 16: ...ications where high quality video imaging is important Key Digital is at the forefront of the video industry for Home Theater Retailers Custom Installers System Integrators Broadcasters Manufacturers...

Отзывы: