


2
3
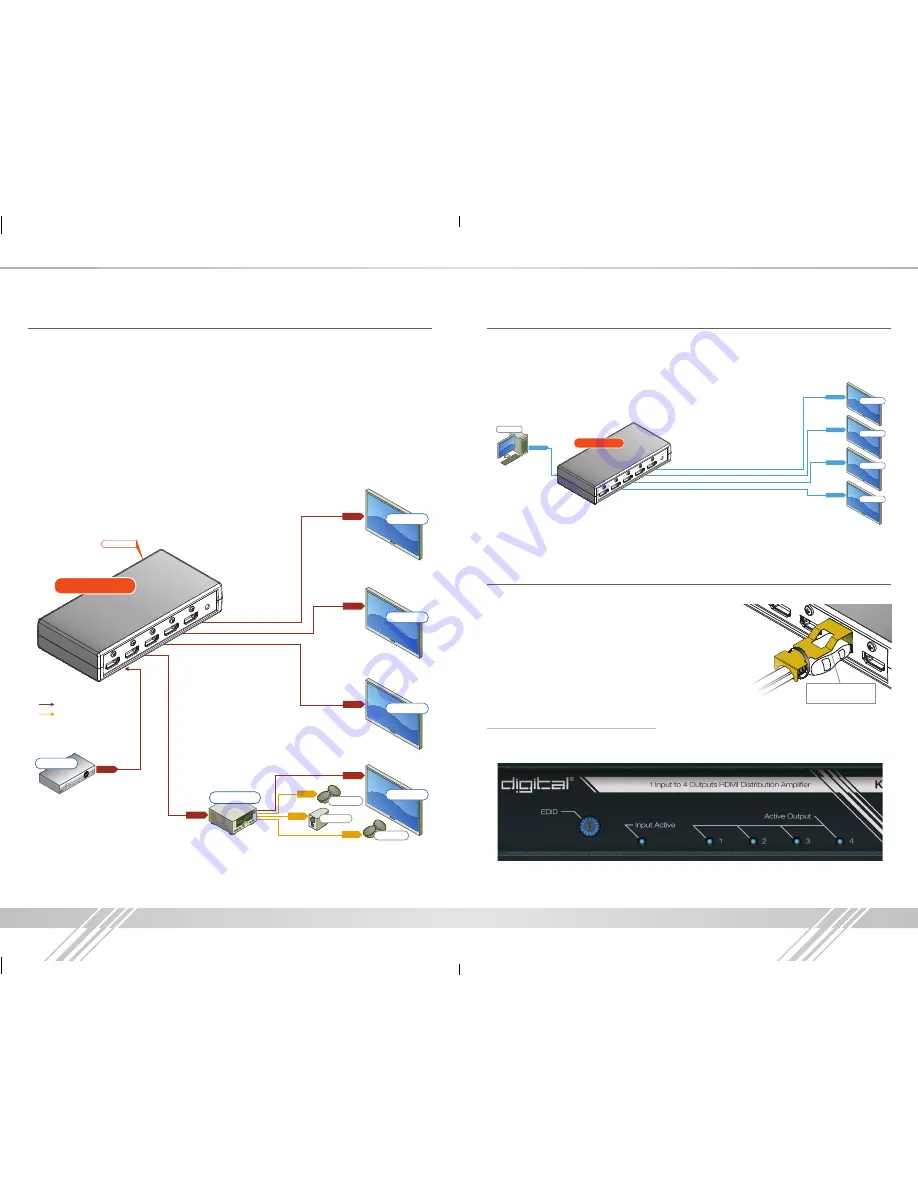
DVI Applications for KD-1X2CS, KD-1X3CS, KD-1X4CS
KD-1X2CS, KD-1X3CS, KD-1X4CS Distribution Amplifiers can also be used with DVI sources
and displays. For these applications, use dual-link DVI to HDMI adapters. Note that while HDMI
supports both video and audio over an HDMI cable, DVI supports only video.
Audio
Audio
Audio
Audio
Audio
Audio
HDMI
Audio
HDMI
Audio
HDMI
HDMI
HDMI
HDMI
HDMI
HDMI
HDMI
HDMI
HDMI
HDMI
HDMI
HDMI
KD-1X4CS
KD-1X4CS
KD-1X4CS
EDID Control
EDID Control
Speakers
Speakers
Sub-Woofer
Cable Box
Display 4
Display 3
Display 2
Display 1
Audio Rcvr.
Speakers
Speakers
Sub-Woofer
Cable Box
Display 4
Display 3
Display 2
Display 1
Audio Rcvr.
Display 4
Display 3
Display 2
Display 1
*To connect DVI, use appropriate HDMI to DVI adapters
DVI Video
DVI Video
DVI Video
DVI Video
DVI Video
Desktop PC
Note: No signal conversion is done on the KD-1X2CS, KD-1X3CS, KD-1X4CS.
If input signal is HDMI output signal will be HDMI. If input signal is DVI output signal will be DVI.
Installation and Operation
Before permanently securing the unit for final installation of cabling behind walls or ceilings, test for
proper operation of the unit and the cables in your system.
It is recommended that you leave enough ventilation space to
provide sufficient airflow and cooling, especially if you are
going to leave the unit powered at all times.
An optional HDMI cable clip (included) enables a method for
securing HDMI cables the KD-1X2CS, KD-1X3CS, KD-1X4CS
units and helps defeat intermittent or complete signal loss due
to poor connection.
Active Input / Output LED Indicators
›
The front LED indicators indicate that a valid HDMI / DVI connection is made between
the KD-1X2CS, KD-1X3CS, KD-1X4CS unit and each Input / Output.
Optional HDMI Cable
clip (included)
Quick Setup Guide
›
Step 1:
Find a safe and convenient location to mount or place your KD-1X2CS, KD-1X3CS,
KD-1X4CS unit
›
Step 2:
Begin with the KD-1X2CS, KD-1X3CS, KD-1X4CS unit and all input/output devices
turned off with power cables removed
›
Step 3:
Connect your HDMI or DVI source to the input port of your KD-1X2CS, KD-1X3CS,
KD-1X4CS unit
›
Step 4:
Connect your HDMI or DVI displays to the output port of your KD-1X2CS, KD-1X3CS,
KD-1X4CS unit
›
Step 6:
Connect power to the KD-1X2CS, KD-1X3CS, KD-1X4CS unit
›
Step 7:
Power on input/output devices
Audio
Audio
Audio
Audio
Audio
Audio
HDMI
Audio
HDMI
Audio
HDMI
HDMI
HDMI
HDMI
HDMI
HDMI
HDMI
HDMI
HDMI
HDMI
HDMI
HDMI
KD-1X4CS
KD-1X4CS
KD-1X4CS
EDID Control
EDID Control
Speakers
Speakers
Sub-Woofer
Cable Box
Display 4
Display 3
Display 2
Display 1
Audio Rcvr.
Speakers
Speakers
Sub-Woofer
Cable Box
Display 4
Display 3
Display 2
Display 1
Audio Rcvr.
Display 4
Display 3
Display 2
Display 1
*To connect DVI, use appropriate HDMI to DVI adapters
DVI Video
DVI Video
DVI Video
DVI Video
DVI Video
Desktop PC
KD-1x2_1x3_1x4CS_Manual.indd 2-3
6/26/13 4:16 PM


