page 2
Kewaunee C-Leg Table — Assembly Instructions 05/20
page 3
Kewaunee C-Leg Table — Assembly Instructions 05/20
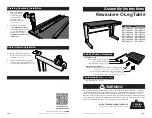
Right Hand
Leg Assembly
Stabilizing Rail
(attached to Work Top)
Left Hand
Leg Assembly
Modesty Panel
Front Apron Rail
(attached to Work Top)
Rear Apron Rail
(attached to Work Top)
Cabinet Hanging Rail
(attached to Work Top)
2a.
Insert
Leg
Studs
into
holes on ends of the
Front
& Rear Apron Rails
and
Support Rail
.
2b.
Thread
Flanged Locking
Nuts
onto
Studs
and
tighten using 7/16" Wrench
or Socket.
2c.
Slide slots in
Modesty
Panel
over loosened
Rear
Flanged Bolts
. Make sure
Modesty Panel
is fully
seated by pulling up on
the Panel and tighten
Cap
Screws
.
(Make sure both Front &
Rear Flanged Cap Screws
are securely tightened.)
2d.
Snap
Access Cap
into
hole in
Leg Assembly
.
Make sure cap is fully
seated.
Modesty Panel
Rear
Apron Rail
Rear Flanged
Cap Screws
Flanged
Locking Nut
Stabilizing
Rail
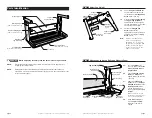
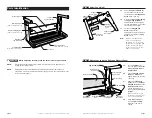
Parts Identification
Step 1
Adjust Leg Height
!
WARNING:
Before beginning assembly, read the entire instuction proceedure.
NOTE:
If installing shelf assembly on top of table, follow instructions on page 4 before
beginning assembly of table.
NOTE:
Although the height of the table may be adjusted after the the table has been
assembled, it is easier to adjust the height of the legs before they are attached to the
rails and modesty panel.
Step 2
Attach Legs to Apron Rails and Modesty Panel
Lower Leg
Assembly
Upper Leg
Assembly
Flanged
Cap Screws
(front)
Flanged
Cap Screws
(rear)
Tapped
Leg Bars
1a.
Lay both
Leg Assemblies
flat
on their sides and remove the
(4) 5/16”-18 x 5/8”
Flanged Cap
Screws
from each leg.
1b.
Slide the
Lower Leg Assembly
and
Upper Leg Assembly
apart until the overall height of
the Leg Assembly is 1" less than
the required table height.
1c.
Thread the
Flanged Cap
Screws
back into the
appropriate holes in the Tapped
Leg Bars, leaving the rear
Cap
Screws
loose.
Note:
Leg Bars are tapped on 2”
centers. Leg heights are
adjustable in 1” increments
by inserting the Flanged Cap
Screws in either the upper
or lower hole pattern in the
Upper Leg Assembly.
Work Top
Leg Studs
Front Flanged
Cap Screws
Access Cap
Front
Apron Rail
Leg Assembly


