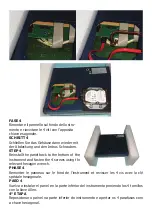
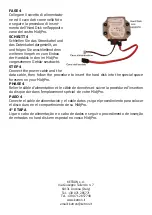
KETRON MIDjPRO Скачать руководство пользователя страница 4

FASE 4

Rimontare il pannello sul fondo dello stru-

mento e riavvitare le 4 viti con l’apposita 

chiave esagonale.

SCHRITT 4

Schließen Sie das Gehäuse dann wieder mit 

der Abdeckung und den Imbus Schrauben.

STEP 4

Reinstall the panel back to the bottom of the 

instrument and fasten the 4 screws using the

relevant hexagon wrench.

PHASE 4

Remonter le panneau sur le fond de l’instrument et revisser les 4 vis avec la clé 

spéciale hexagonale.  

PASO 4

Vuelva a instalar el panel en la parte inferior del instrumento poniendo los 4 tornillos 

con la llave Allen.

4° ETAPA

Reposicionar o painel na parte inferior do instrumento e apertar os 4 parafusos com 

a chave hexagonal. 

Содержание MIDjPRO

Страница 1: ...INSTALLAZIONE HARD DISK INSTALLAIONS HARD DISK INSTALLATION HARD DISK INSTALLATION DISQUE DUR INSTALACI N DISCO DURO INSTALA O HARD DISK...

Страница 2: ...Instrument um und l sen Sie die 4 Imbus Schrauben des Abdeckpanels STEP 1 Turn the instrument upside down holding it on the package supports then unscrew the 4 screws using the hexagon wrench PHASE 1...

Страница 3: ...l utilizando os 4 parafusos e as 4 anilhas como na imagem FASE 3 Collegare il cavo di alimentazione ed il cavo dati facendo attenzione alla polarit dei connettori come in figura SCHRITT 3 Schlie en Si...

Страница 4: ...back to the bottom of the instrument and fasten the 4 screws using the relevant hexagon wrench PHASE 4 Remonter le panneau sur le fond de l instrument et revisser les 4 vis avec la cl sp ciale hexagon...

Страница 5: ...etallhalterung auf der 4 Gummipuffer angebracht sind The kit includes in addition to the power and data cables a metal support on which 4 small rubber dampers are fixed Le Kit est compos du c ble d al...

Страница 6: ...correspond ncia com os quatro furos como na imagem FASE 2 Appoggiare il supporto in metallo sopra l Hard Disk assicurandoci che i 4 spes sori rimangano in corrispondenza dei fori filettati di fissaggi...

Страница 7: ...screws and make sure that the dampers are inserted on the screw between the metal support and the hard disk PHASE 3 Visser les 4 vis de fixation en v rifiant que les rondelles soient ins r es dans la...

Страница 8: ...insert the hard disk into the special space foreseen on your MidjPro PHASE 4 Relier le c ble d alimentation et le c ble de donn es et suivre la proc dure d insertion du disque dur dans l emplacement...

Отзывы: