background image


YKH-01-BA-e-1910


9


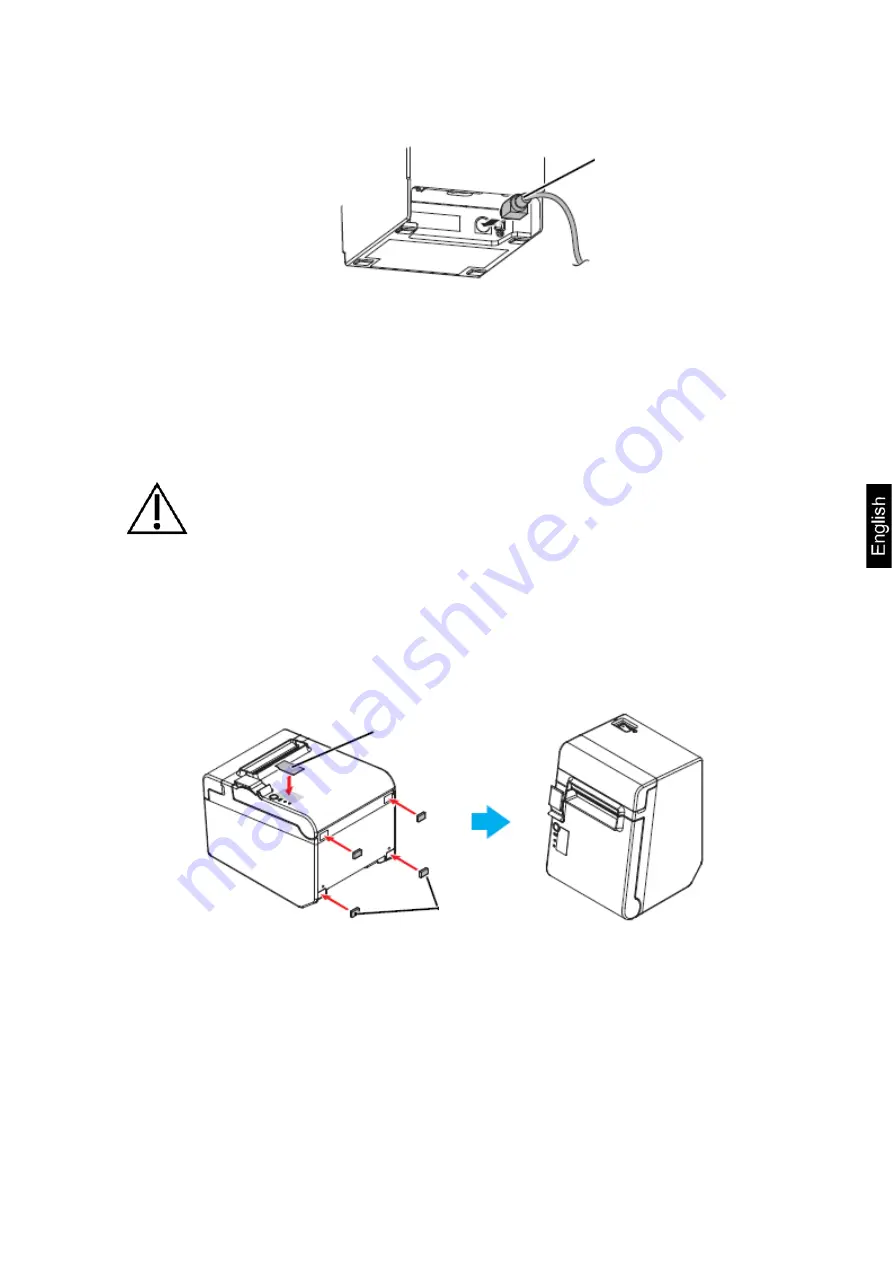
4.  Plug the power cord of the power supply and connect it to the mains. 


5  Printer installation 

The printer can be installed horizontally (with the paper output on the top) or vertically 
(with the paper output on the front). Using the accessories supplied with the device, it 
is possible also to hang it on the wall. 


CAUTION


Take measures to prevent printer movement as a result of vibrations 
when cutting the paper and using the drawer. 


5.1  Vertical printer installation 

When you install the printer vertically, remember to place the control panel for vertical 
installation on the paper roll cover and to fix four rubber feet in the rectangular re-
cesses of the printer enclosure, as shown in the figure below. 


Power cord 

Control panel for 
vertical installation 


Rubber feet 

Содержание TYKH-01-A

Страница 1: ...Sohn GmbH Ziegelei 1 D 72336 Balingen E mail info kern sohn com Phone 49 0 7433 9933 0 Fax 49 0 7433 9933 149 www kern sohn com User Manual Thermal Printer KERN YKH 01 Version 1 0 2019 08 GB YKH 01 e...

Страница 2: ...afety instructions Warning plates 6 4 2 Warranty 7 4 3 Power supply 7 4 4 Cable connection 8 5 Printer installation 9 5 1 Vertical printer installation 9 5 2 Hanging the printer on the wall 10 5 3 Ins...

Страница 3: ...ax outer diameter 83 mm Core Core diameter inner 12 mm outer 18 mm Power supply input voltage 100 240 V Balance input voltage 24 VDC 1 5 A Operating temperature 5 45 C Air humidity max 10 90 relative...

Страница 4: ...th software not documented 7 Disconnector switch cover 8 Rubber feet for vertical installation 9 Watertight disconnector switch cover 10 Control panel for vertical installation 11 Wall bracket 12 Pape...

Страница 5: ...dicator Is lit after an error has occurred in the device Paper LED Paper indicator Informs the paper has been used up If the LED flashes the device is in the stand by mode Feed button Movement button...

Страница 6: ...tandard power socket directly Socket overloading can cause fire Be careful when handling the cord Using for purposes other than the designed ones can cause fire or electric shock Do not use a damaged...

Страница 7: ...set correctly or the electrical system is not as required 4 3 Power supply WARNING The device can be connected to the power grid only when the voltage specified on the device sticker and the local vol...

Страница 8: ...eliv ered with the device For the USB interface switch the printer on and then install the print er driver Do not try to stretch or strain the cord to connect it The power cord must not be strained wh...

Страница 9: ...ossible also to hang it on the wall CAUTION Take measures to prevent printer movement as a result of vibrations when cutting the paper and using the drawer 5 1 Vertical printer installation When you i...

Страница 10: ...rd 5 2 Hanging the printer on the wall After you connect power to the printer it is in the operating mode enabling to receive and print data It is also possible to switch the printer to the stand by m...

Страница 11: ...nk length in the wall is 10 mm or more and the length outside the wall is 3 to 4 mm 2 Remove 2 screws shown in the figure below from the printer 3 Attach the wall bracket to the printer and fix it wit...

Страница 12: ...opening lever 2 Remove the used up paper roll core if it is present in the printer and insert a new one The paper movement direction is shown in the figure below 3 Pull out a piece of paper and close...

Страница 13: ...r form the following steps CAUTION After the paper width is changed from 80 mm to 58 mm it is not possible to change it to 80 mm again 1 Open the paper roll cover 2 Align the three ribs of the paper g...

Страница 14: ...in the disconnector switch cover You can use a sharp object to remove the cover The scope of delivery comprises also a watertight disconnector switch cover To use it install it as shown in the figure...

Страница 15: ...cord Error free operation can be ensured solely with the included interface cable and the appropriate interface cable by KERN Communication parameters e g transmission speed bits and parity of the bal...

Страница 16: ...number of times corresponding to the relevant option Step 2 Then press and hold the Feed button 2 To trigger the Customize Value Settings instruction press the Feed button three times and then press a...

Страница 17: ...st will be printed 4 To select the Baud Rate instruction press the Feed button once and then press and hold it The Baud Rate setting list will be printed 5 To change the transmission speed to 9 600 bp...

Страница 18: ...is no printing Check if the paper roll cover is closed If open close it The paper indicator is on check the correct installation and the paper roll stock The error indicator is flashing but there is...

Страница 19: ...1 Switch the printer off 2 To remove the cover grip the recesses on both sides of the paper cutter cover with your fingers and move it a bit towards the arrow shown in the figure below 3 Turn the whe...

Страница 20: ...The thermal head of the printer can be very hot after printing Do not touch the thermal head and leave it to cool down before cleaning To avoid damaging the thermal head do not touch it with your fing...

Отзывы: