background image

12

STROBE LIST:
The serial interface card is also equiped with a
strobe line.  When the strobe line is triggered, a
chosen set of data will be transmitted to be dis-
played or printed.  The selections for the display
list are entered in the program mode.  Enter "1"
to add selections to the list and enter "0" to de-
lete selections from the list.  The seven available
items for the strobe display list are: (1) Preset A,
(2) Preset B, (3) K-Factor A, (4) K-Factor B, (5)
Rate of A, (6) Rate of B, (7) Rate of C.    When
setting the strobe list the unit will print :
ENTER STROBE LIST:
DO NOT DISPLAY-0   DISPLAY-1
The unit will  prompt you:
PRESET A<DISPLAY>?
PRESET B<DISPLAY>?
K-FACTOR A<DISPLAY>?
K-FACTOR B<DISPLAY>?
RATE A<DISPLAY>?
RATE B<DISPLAY>?
RATE C<DISPLAY>?
If the above choices are entered, when the strobe
line is triggered (3-30V positive pulse) the unit
will transmit:
DEVICE# 1:
PA XXXXX
PB XXXXX
KA XXXXX
KB XXXXX
DA XXXXXX
DB XXXXXX
DC XXXXXX
(SEE COMMANDS BELOW FOR DESCRIP-
TION OF COMMAND CODES).
Each time the strobe line gets triggered the unit
will transmit this data unless the program mode
is entered and the strobe list altered.

After these four items have been entered they
will remain unaltered unless the program mode
is entered again and the values changed.  The
unit is now set and must be addressed by it's
device number to come on line again.

SERIAL INPUT COMMANDS:
To get a unit on line you must address it by it's
device number.  This is done by typing DXX(S),
XX= device number.  The unit comes on line
and echos back DEVICE# XX.  Insure that "DE-
VICE# XX:" is received before requests are sent.
The unit is now ready to receive a command or
string of commands seperated by a space.  A
carriage return (enter) will enter the commands
and processing of requests begins.  The carriage
return (Hex Code "D") puts the unit "off line"
after data is processed.

COMMANDS:
EP...........Unit will enter program mode.
DA..........Unit will display (transmit) Rate A.
DB..........Unit will display (transmit) RateB.
DC..........Unit will display (transmit) RateC.
KA..........Unit will display K-factor A.
†*KA(S)XXXXX....Unit will load K-factor A

with entered number.

KB..........Unit will display K-factor B
†*KB(S)XXXXX....Unit will load K-factor B

with entered number.

PA...........Unit will display Preset A.
†PA(S)XXXXX....Unit will load Preset A with

entered number.

PB...........Unit will display Preset B
†PB(S)XXXXX....Unit will load Preset B with

entered number.

RR..........Relays will drop out if they are in hys-
teresis.
RN..........This resets (updates) normalization.

*THE UNIT WILL RECOGNIZE A DECI-
MAL IF ONE IS PLACED IN ANY OF
THESE DATA VALUES.

†THE UNIT WILL ONLY RECOGNIZE
THE LAST FIVE DIGITS ENTERED.

Содержание PROTROL

Страница 1: ...PROTROL INSTALLATION OPERATING INSTRUCTIONS 99320 9 24 97 KESSLER ELLIS PRODUCTS 10 Industrial Way East Eatontown NJ 07724 800 631 2165 732 649 7100 Fax 732 649 7099 http www kep com ...

Страница 2: ...WIRING CONNECTIONS 3 DEFINITIONS 4 FRONT PANEL OPERATIONS 6 PROGRAMMING FLOW CHART 6 PROGRAMMING 7 SETTING THE PRESETS PANEL LOCK 9 CALCULATING THE K FACTORS 10 INTERFACE CARD RS 232 422 OPERATION 11 RS 232 RS422 WIRING 14 TROUBLESHOOTING GUIDE 15 WARRANTY TABLE OF CONTENTS ...

Страница 3: ...ax P P signals 10 KΩ imp 5 kHz max NOTE The Mag input has filtering as fol lows 30mV trigger level up to 300Hz 0 25 V trigger level at 5KHz Set Points Two 5 digit control set points are provided The outputs have a programmable hysteresis alarm range from 0 to 9999 Programming Set points decimal points Scaling from 0001 to 99999 input type normalization factor hys teresis alarm range and security p...

Страница 4: ... board will be exposed The unit must be removed from the case to access jumpers C F all other jumbers can be accessed by removing the plastic extender J4 J5 J6 J3 J1 J2 CR1 R3 C8 R7 R5 R4 U1 CR2 REV 20229 CR6 CR3 U3 P1 R10 R6 C6 C7 CR4 CR5 C4 R2 R1 C3 C5 U2 U4 U6 U5 R8 R9 C1 C2 C9 B C CLOSE O OPEN 4 30V INPUT Millivolt INPUT Input A J1 O J2 C J3 O J1 C J2 O J3 C InputB J4 O J5 C J6 O J4 C J5 O J6 ...

Страница 5: ...nput line noise The noise is carried on the input and DC ground lines Make sure the input wires are not run into the unit in a bundle with power input lines We recommend using shielded cable Connect the shield to DC ground of the unit and earth at one point in the circuit preferably at the DC ground terminal of the unit 3 Output lines The unit has Two relay outputs When these outputs are used to r...

Страница 6: ...nputs A B A B This sets the C display to show the ratio of the A B inputs HI CPS HIGH COUNTS PER SECOND This sets the A B inputs for a high count speed input 0 to 10 KHz LO CPS LOW COUNTS PER SECOND This sets the A B inputs for a low count speed input 0 to 40 Hz NOR NORMALIZATION FACTOR This is an averaging factor 00 to 99 Higher settings provide more normalizing averaging for a more stable displa...

Страница 7: ...w 90 10 below preset A B RATE B RELAY ASSIGNED TO B RATE This assigns the B relay to the rate of B display B When the rate of the B input equals or exceeds Preset B relay B will activate B NET B RELAY ASSIGNED TO NET This assigns the B relay to the net value of the A B inputs display C When the net value display C equals or exceeds Preset B relay B will activate HYS HYSTERESIS This sets the hyster...

Страница 8: ...nd C dispays Press to cycle through PRO GRAM choices Press to step through set up choices in program mode PROGRAMMING FLOWCHART START HERE FACTOR RATE DP LOC LOC LC ALL LC PG CODE RUN MODE RELAY RUN MODE RUN MODE DP F A DP F B A B A B B A B LO CPS HI CPS NOR DLY A RATE A NET HYS A B RATE B NET HYS B RUN MODE ENTER PRGM ENTER ENTER ENTER ENTER ENTER ENTER ENTER PRGM PRGM PRGM ENTER ENTER ENTER ENTE...

Страница 9: ...Press the PRGM key to step through choices Press ENTER to enter dis played choice Press the PRGM key to step through choices Press ENTER to enter dis played choice Key in the desired normalizing aver aging factor 00 to 99 Higher set tings provide more normalizing aver aging for a more stable display Keyinthedesireddelay window value 02 to 24 Press ENTER to enter displayed value DISPLAY FACTOR DP F...

Страница 10: ... the security lock code To change press the keys under the digits to be canged and press ENTER to enter dis played value RECORD THIS NUMBER FOR FUTURE USE Press the PRGM key to step through choices Press ENTER to enter dis played choice Key in desired hysteresis value and press ENTER Press the PRGM key to step through choices Press ENTER to enter dis played choice Key in desired hysteresis value a...

Страница 11: ...ed Key in the lock code see programming step 3 by pressing the keys under the digits to be changed Each time a key is pressed the digit will increment one Press the ENTER key to enter the dis played code After the code is entered the unit will display LOC unit is locked or UN LOC unit is un locked This message will be displayed for approximately 3 sec onds before the unit returns to the run mode P...

Страница 12: ...ion of the paper roll equals 3 meters of paper Base K factor 1 pulse 3333 3 meters STEP 2 Calculate the rate K factor The rate K factor is the actual number to be programmed into the unit Caculate the rate K factor using Rate K factor Base K factor Time conversion factor TIME CONVERSION FACTORS Desired rate reading Factor Rate Per Second 1 Rate Per Minute 60 Rate Per Hour 3600 EXAMPLE 1 Using the ...

Страница 13: ...mpt you DEVICE XX If XX is the desired device number press return enter If not enter the desired number after the question mark and press return enter BAUD RATE The baud rate is the speed at which data is trans mitted expressed in bits per second Baud rates of 300 600 1200 2400 4800 or 9600 are avail able When in the baud rate section of the menu the unit will list BAUD RATES 1 300 2 600 3 1200 4 ...

Страница 14: ...nless the program mode is entered again and the values changed The unit is now set and must be addressed by it s device number to come on line again SERIAL INPUT COMMANDS To get a unit on line you must address it by it s device number This is done by typing DXX S XX device number The unit comes on line and echos back DEVICE XX Insure that DE VICE XX is received before requests are sent The unit is...

Страница 15: ... and transmitted to the unit in a string as long as there is a space between the commands If an error is made a correction can be made by back spacing and retyping correct data before the return enter is sent Once a return enter is sent the unit begins processing the data and will transmit the requested data on a non priority basis over the data transmit line A keypad entry or incoming data will h...

Страница 16: ...nd pin 5 Ground PRINTER HOOKUP When connecting the unit to a printer you must first program the desired baud rate parity and strobe list with a computer After the unit is programmed it can be connected to the printer Connect the transmit line s of the unit to the receive line s of the printer and be sure that both devices have common grounds When the strobe line is triggered the unit will transmit...

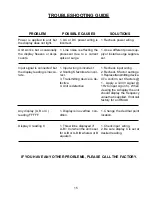
Страница 17: ... device is de fective 4 Unit is defective 1 Display is in overflow con dition 1 This will be displayed if A B 0 or when the unit is set for A B or A B B where A or B equals 0 1 Recheck power wiring 1 Use a different power sup ply or install a surge suppres sor 1 Recheck input wiring 2 Recheck K factor settings 3 Replacetransmittingdevice 4 To confirm set K factors 1 Apply a 3 30V signal 1Hz to inp...

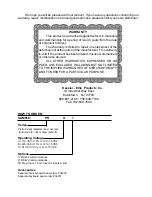
Страница 18: ...acement of the defective unit at the option of the manufacturer This warranty is void if the product has been altered misused dismantled or otherwise abused ALL OTHER WARRANTIES EXPRESSED OR IM PLIED ARE EXCLUDED INCLUDING BUT NOT LIMITED TO THE IMPLIED WARRANTIES OF MERCHANTABILITY AND FITNESS FOR A PARTICULAR PURPOSE Series Protrol dual ratemeter and net rate A B ratio A B or draw A B B Operatin...

Отзывы: