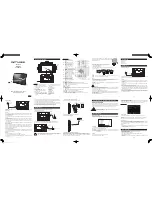
background image

i

nStAlling


the

 A

ntennA

i

nStAlling


the

 B

elt

 c

lip

Do not use glue which is designed to prevent screw loosening when 

installing the belt clip, as it may cause damage to the transceiver.  

Acrylic ester, which is contained in these glues, may crack the 

transceiver’s back panel.

Screw the antenna into the connector

on the top of the transceiver by 

holding the antenna at its base and 

turning it clockwise until secure.

Note:  The antenna is neither a handle,  

a key ring retainer, nor a speaker/ 

microphone attachment point.  Using the 

antenna in these ways may damage the 

antenna and degrade your transceiver's 

performance.

If necessary, attach the belt clip using 

the two supplied 3 x 8 mm screws.

Note:  If the belt clip is not installed, its 

mounting location may get hot during 

continuous transmission or when left 

sitting in a hot environment.

Содержание TK-2200L

Страница 1: ...INSTRUCTION MANUAL B62 1978 00 K K2 K3 09 08 07 06 05 04 03 02 01 00 VHF FM TRANSCEIVER TK 2200L UHF FM TRANSCEIVER TK 3200L ...

Страница 2: ...FM Transceiver TK 3200L K 2 channel UHF FM Transceiver TK 2200L K2 8 channel VHF FM Transceiver TK 3200L K2 8 channel UHF FM Transceiver TK 3200L K3 15 channel UHF FM Transceiver Features 2 channels K 8 channels K2 or 15 channels K3 with 27 VHF operating frequencies TK 2200L or 56 UHF operating frequencies TK 3200L and 122 tone code settings for each channel allowing you to ignore unwanted calls B...

Страница 3: ...U S A Only The RBRC Recycle seal found on KENWOOD lithium ion Li ion battery packs indicates KENWOOD s voluntary participation in an industry program to collect and recycle Li ion batteries after their operating life has expired The RBRC program is an alternative to disposing Li ion batteries with your regular refuse or in municipal waste streams which is illegal in some areas For information on L...

Страница 4: ...les and instructions MAIL Forms can be ordered by telephone and will be sent to you by first class mail Call the FCC Forms Hotline at 1 800 418 FORM 1 800 418 3676 INTERNET Form 601 and instructions can be downloaded from the FCC Forms website at http www fcc gov formpage html Before filling out your Form 601 application Technical Data section you must decide on which frequencies you will operate ...

Страница 5: ... not installed and used in accordance with the instructions may cause harmful interference to radio communications However there is no guarantee that the interference will not occur in a particular installation If this equipment does cause harmful interference to radio or television reception which can be determined by turning the equipment off and on the user is encouraged to try to correct the i...

Страница 6: ... not specified by KENWOOD If the die cast chassis or other transceiver part is damaged do not touch the damaged parts If a headset or headphone is connected to the transceiver reduce the transceiver volume Pay attention to the volume level when turning the squelch off Do not place the microphone cable around your neck while near machinery that may catch the cable Do not place the transceiver on un...

Страница 7: ...na terminal or if any metallic parts are exposed from the antenna covering Transmitting at such a time may result in a high frequency burn If an abnormal odor or smoke is detected coming from the transceiver switch the transceiver power off immediately remove the battery pack from the transceiver and contact your KENWOOD dealer Use of the transceiver while you are driving may be against traffic la...

Страница 8: ...set 12 GETTING STARTED 13 VOICE OPERATED TRANSMISSION VOX 14 VOX Gain 14 VOX Operation 16 KEY FUNCTIONS 17 Side 1 Key 17 Side 2 Key 17 BACKGROUND OPERATIONS 19 Time out Timer TOT 19 Low Battery Warning 19 Quiet Talk QT Digital Quiet Talk DQT 20 CHANNEL SETUP MODE 21 Channel Operating Frequencies 23 Quiet Talk QT Digital Quiet Talk DQT Settings 26 Channel Confiramation Mode 30 KEY ASSIGNMENT MODE 3...

Страница 9: ... claim with the carrier immediately Supplied Accessories Item Part Number Quantity Antenna TK 2200L T90 1036 XX 1 TK 3200L T90 1039 XX 1 Rapid battery charger KSC 35 W08 0988 XX 1 AC adapter W08 0989 XX 1 Li ion battery pack KNB 45L W09 1033 XX 1 Speaker microphone jack cap B09 0680 XX 1 Speaker microphone locking bracket J19 5472 XX 1 Belt clip KBH 10 J29 0713 XX 1 Screw set N99 2046 XX 1 Warrant...

Страница 10: ... Belt clip KBH 10 Speaker microphone jack cap Screw set Speaker microphone locking bracket Li ion battery pack KNB 45L Rapid battery charger KSC 35 AC adapter Antenna TK 2200L Antenna TK 3200L ...

Страница 11: ...en speak into the microphone to transmit Side 1 key For key function refer to page 17 Side 2 key For key function refer to page 17 Speaker microphone jacks Battery pack KNB 45L Channel selector Rotate to change the operating channel For the S position on TK 3200L K3 model refer to page 13 Power switch Volume control Turn clockwise to switch the power ON and counterclockwise to switch the power OFF...

Страница 12: ...r dispose of the battery by fire Never attempt to remove the casing from the battery pack Information concerning the Li ion battery pack The battery pack includes flammable objects such as organic solvent Mishandling may cause the battery to rupture producing flames or extreme heat deteriorate or cause other forms of damage to the battery Please observe the following prohibitive matters Do not dis...

Страница 13: ...maged the battery may charge at extreme current or voltage and an abnormal chemical reaction may occur The battery may generate heat or smoke rupture or burst into flame Use only the specified charger and observe charging requirements If the battery is charged in unspecified conditions under high temperature over the regulated value excessive high voltage or current over regulated value or with a ...

Страница 14: ...y connect with a charger or operating equipment do not force it check the polarity of the battery If the battery pack is reverse connected to the charger it will be reverse charged and an abnormal chemical reaction may occur The battery may generate heat or smoke rupture or burst into flame Do not touch a ruptured and leaking battery If the electrolyte liquid from the battery gets into your eyes w...

Страница 15: ...n use Store the battery pack in a cool and dry location When storing the battery pack for a long period 1 Remove the battery pack from the equipment 2 Discharge the battery pack if possible 3 Store the battery pack in a cool below 25 C 77 F and dry location Characteristics of the Li ion Battery Pack As the battery pack is charged and discharged repeatedly the battery capacity decreases Even if the...

Страница 16: ...with a battery pack before inserting the transceiver into the charger 3 2 1 Plug the AC adapter cable into the jack located on the rear of the charger Plug the AC adapter into an AC outlet Slide a battery pack or a transceiver equipped with a battery pack into the charging slot of the charger Make sure the metal contacts of the battery pack mate securely with the charger terminals The charger LED ...

Страница 17: ...de this range may not fully charge the battery The battery pack life is over when its operating time decreases even though it is fully and correctly charged Replace the battery pack 4 When charging is completed the indicator lights green Remove the battery pack or the transceiver from the charging slot of the charger It takes approximately 3 hours to charge the battery pack When the charger will n...

Страница 18: ...e battery pack with the back of the transceiver then press the battery pack and transceiver firmly together until the release latch on the base of the transceiver locks To remove the battery pack lift the safety catch on the base of the transceiver then press the release latch underneath the safety catch While pressing the release latch pull the battery pack away from the transceiver ...

Страница 19: ...he top of the transceiver by holding the antenna at its base and turning it clockwise until secure Note The antenna is neither a handle a key ring retainer nor a speaker microphone attachment point Using the antenna in these ways may damage the antenna and degrade your transceiver s performance If necessary attach the belt clip using the two supplied 3 x 8 mm screws Note If the belt clip is not in...

Страница 20: ...To keep the transceiver water resistant you must cover the speaker microphone jacks with the supplied cover 2 1 2 Attach the locking bracket using the supplied 3 x 6 mm screw Note The transceiver is not fully water resistant while using the speaker microphone Insert the speaker microphone or headset plugs into the speaker microphone jacks Note Always switch OFF the transceiver power when installin...

Страница 21: ... in your normal voice while holding the microphone approximately 1 5 inches 3 to 4 cm from your lips Channel Selector Scan Position TK 3200L K3 model only Scan is useful for monitoring signals on the transceiver channels When scanning the transceiver checks for a signal on each channel and only stops if a signal is present For further details on how scan operates refer to Scan on page 35 1 S 1 5 1...

Страница 22: ...it causes the transceiver to transmit Due to the automatic switching between transmission and reception we recommend you set the VOX Gain level such that it will not activate transmission when in an area with excessive ambient noise VOX Gain To activate VOX and set the VOX Gain level 2 1 1 With the transceiver power OFF connect the headset to the transceiver page 12 The VOX function does not activ...

Страница 23: ...n to normal operation if no action is performed for 5 seconds 3 5 4 1 Press the Side 1 key to increase the VOX Gain level and the Side 2 key to decrease the level The VOX Gain can be adjusted from level 1 to level 10 and OFF The transceiver announces the VOX Gain level as you adjust it If OFF is selected the transceiver announces Off Press the PTT switch within 5 seconds to save the setting otherw...

Страница 24: ...ill flash red in this state 2 1 3 4 Set up a VOX Gain level from 1 to 10 page 14 To transmit simply speak into the headset microphone You do not need to press the PTT switch the transceiver automatically detects your voice and begins transmitting To stop transmitting stop speaking Transmission will continue momentarily after you stop speaking so ensure your transmission will not be cut off To exit...

Страница 25: ...ransceiver power ON When the LED lights orange release the Side 2 key A confirmation tone will sound Side 2 Key TK 2200L TK 3200L K K2 Models The default function of the Side 2 key is Scan Temporary Delete You can scan the channels of the transceiver to search for a signal When the transceiver verifies a signal on a channel it proceeds to check whether or not its QT DQT setting which is set up on ...

Страница 26: ...nnel from the scanning sequence by pressing and holding the Side 2 key for 3 seconds You cannot remove a channel if there will be less than 2 channels available for scanning remaining To add the removed channels back into the Scan list simply exit Scan mode or switch the transceiver power OFF and then ON again TK 3200L K3 Model The default function of the Side 2 key is Calling Alert Calling alert ...

Страница 27: ... battery power consumption If you continuously transmit for 60 seconds default the transceiver will stop transmitting and an alert tone will sound To stop the tone release the PTT switch You can press the PTT switch again to resume transmitting Low Battery Warning Low Battery Warning alerts you when the battery needs to be recharged or replaced While operating the transceiver if the battery power ...

Страница 28: ...re using If a call containing a different tone or code is made on the same channel you are using squelch will not open and you will not hear the call Likewise when you transmit on a channel set up with QT or DQT the receiving station must have a matching tone or code in order to hear your call Although it may seem like you have your own private channel while using QT or DQT other parties can still...

Страница 29: ... Channel Number Table Number Frequency MHz Table Number Frequency MHz TK 2200L K 2 Channel Model TK 3200L K 2 Channel Model 1 3 154 5700 2 464 5500 2 4 154 6000 8 467 9250 TK 2200L K2 8 Channel Model TK 3200L K2 8 Channel Model 1 3 154 5700 2 464 5500 2 4 154 6000 8 467 9250 3 5 151 7000 9 461 0375 4 6 151 7600 10 461 0625 5 7 151 8200 11 461 0875 6 8 151 8800 12 461 1125 7 9 151 9400 13 461 1375 ...

Страница 30: ...ing frequencies 151 8200 MHz 151 8800 MHz and 151 9400 MHz the transmit power is fixed at 1 W Channel Number Table Number Frequency MHz TK 3200L K3 15 Channel Model 1 2 464 5500 2 8 467 9250 3 9 461 0375 4 10 461 0625 5 11 461 0875 6 12 461 1125 7 13 461 1375 8 14 461 1625 9 1 464 5000 10 3 467 7625 11 4 467 8125 12 5 467 8500 13 6 467 8750 14 7 467 9000 15 15 461 1875 ...

Страница 31: ... Side 2 key will toggle between QT DQT and Channel setup Press the Side 1 key to increment the Table number or the Side 2 key to decrement the number to select the new channel frequency Press and hold the Side 1 or Side 2 key to increment decrement the number by 5 at a time Table numbers and their corresponding operating frequencies are provided in the table on page 24 A voice announcement will in...

Страница 32: ...lly return to normal operation if no action is performed for 5 seconds TK 2200L Table Number Operating Frequency MHz TK 2200L Table Number Operating Frequency MHz 0 OFF 14 151 7450 1 151 6250 15 151 7750 2 151 9550 16 151 8650 3 154 5700 17 151 8950 4 154 6000 18 151 9250 5 151 7000 19 152 7000 6 151 7600 20 154 4900 7 151 8200 21 154 5150 8 151 8800 22 154 5275 9 151 9400 23 154 5400 10 151 5125 ...

Страница 33: ...875 9 461 0375 37 466 1125 10 461 0625 38 466 1375 11 461 0875 39 466 1625 12 461 1125 40 466 1875 13 461 1375 41 466 2125 14 461 1625 42 466 2375 15 461 1875 43 466 2625 16 461 2125 44 466 2875 17 461 2375 45 466 3125 18 461 2625 46 466 3375 19 461 2875 47 466 3625 20 461 3125 48 467 7875 21 461 3375 49 467 8375 22 461 3625 50 467 8625 23 462 7625 51 467 8875 24 462 7875 52 467 9125 25 462 8125 5...

Страница 34: ...he transceiver announces Self Press the Side 1 key or Side 2 key to select QT or DQT setup The transceiver announces QT or DQT depending on your selection Press and release the PTT switch then rotate the Channel selector to your desired channel Upon releasing the PTT switch the transceiver announces QT One or DQT One depending on your selection Release the PTT switch and Side 1 key The transceiver...

Страница 35: ...crement the Tone number or the Side 2 key to decrement the number to select the new tone or code Tone numbers and their corresponding tones codes are provided in the table on pages 28 and29 Press and hold the Side 1or Side 2 key to increment decrement the QT or DQT number by 5 at a time A voice announcement will inform you of the currently selected QT or DQT number Note The transceiver will automa...

Страница 36: ... 118 8 Hz 31 192 8 Hz 4 77 0 Hz 18 123 0 Hz 32 203 5 Hz 5 79 7 Hz 19 127 3 Hz 33 210 7 Hz 6 82 5 Hz 20 131 8 Hz 34 218 1 Hz 7 85 4 Hz 21 136 5 Hz 35 225 7 Hz 8 88 5 Hz 22 141 3 Hz 36 233 6 Hz 9 91 5 Hz 23 146 2 Hz 37 241 8 Hz 10 94 8 Hz 24 151 4 Hz 38 250 3 Hz 11 97 4 Hz 25 156 7 Hz 39 69 3 Hz 12 100 0 Hz 26 162 2 Hz off OFF 13 103 5 Hz 27 167 9 Hz 14 107 2 Hz 28 173 8 Hz ...

Страница 37: ...46N 10 D065N 38 D263N 66 D565N 11 D071N 39 D265N 67 D606N 12 D072N 40 D271N 68 D612N 13 D073N 41 D306N 69 D624N 14 D074N 42 D311N 70 D627N 15 D114N 43 D315N 71 D631N 16 D115N 44 D331N 72 D632N 17 D116N 45 D343N 73 D654N 18 D125N 46 D346N 74 D662N 19 D131N 47 D351N 75 D664N 20 D132N 48 D364N 76 D703N 21 D134N 49 D365N 77 D712N 22 D143N 50 D371N 78 D723N 23 D152N 51 D411N 79 D731N 24 D155N 52 D412N ...

Страница 38: ...eiver announces Channel Confirm Rotate the Channel selector to your desired channel within 5 seconds otherwise the operation will cancel The transceiver announces the channel Table number and Tone number of the selected channel Release the PTT switch The transceiver announces the channel Table number and Tone number of the current channel Note The transceiver will automatically return to normal op...

Страница 39: ...s Table Number Function Name 0 None no function 1 Calling Alert Side 2 key default TK 3200L K3 2 Key Lock 3 Super Lock Side 1 key default 4 Monitor 5 Monitor Momentary 6 Scan 7 Scan Temporary Delete Side 2 key default TK 2200L TK 3200 K K2 8 Scrambler 9 Squelch Off 10 Squelch Off Momentary 13 Temporary Delete Note The TK 3200L K3 model transceiver cannot be programmed with the Scan and Scan Tempor...

Страница 40: ...crement the Table number or the Side 2 key to decrement the number to select the new key function Table numbers and their corresponding functions are provided in the table above A voice announcement will inform you of the currently selected Table number Continue to press and hold the key to be reprogrammed either the Side 1 key or the Side 2 key while releasing the remaining key The transceiver wi...

Страница 41: ...e operation will cancel A beep will sound and the transceiver will announce the new Table number Turn the transceiver power OFF and then ON again to activate the new settings Note The transceiver will automatically return to normal operation if no action is performed for 5 seconds ...

Страница 42: ...n Key Lock is active Calling Alert Key Lock Monitor Monitor Momentary PTT Squelch Off Squelch Off Momentary and Volume When the transceiver power is turned OFF and then ON again the Key Lock function will be cancelled Super Lock Press and hold the key programmed as Super Lock for 4 seconds to lock the transceiver keys The following keys functions can still be used when Super Lock is active Calling...

Страница 43: ...ring signals on the transceiver channels When scanning the transceiver checks for a signal on each channel and only stops if a signal is present If the QT DQT matches the transceiver stops at the channel and opens the squelch so you can listen to the call If the QT DQT does not match the call is ignored and scanning continues Note You can only use Scan if there are at least 2 channels available on...

Страница 44: ...unctions page 20 allows you to ignore unwanted calls Scrambler allows you to hold a conversation in complete privacy When activated any other party listening in on your channel will be unable to understand your conversation The transceiver scrambles your voice so that anybody listening to your conversation will not be able to understand what you are saying In order for members of your own group to...

Страница 45: ... their default functions To reset the transceiver 2 1 1 With the transceiver power OFF press and hold the PTT switch the Side 1 key and the Side 2 key while turning the transceiver power ON Continue to hold the keys for 2 seconds until the LED lights orange Release the keys The keys must be released within 1 second after the LED lights orange otherwise All Reset Mode will cancel The transceiver an...

Страница 46: ...38 OPTIONAL ACCESSORIES KMC 17 Speaker microphone KMC 21 Speaker microphone KHS 1 Headset KHS 22 Headset KWR 1 Water resistant bag PTT SENS VOX PTT ...

Страница 47: ...ith a new one Cannot talk to or hear other members in your group Make sure you are using the same frequency and QT DQT settings as the other members in your group Other group members may be using the Scrambler function Turn on your transceiver s Scrambler Other group members may be too away Make sure you are within range of the other transceivers Other voices besides group members are present on t...

Отзывы: