background image

INSTRUCTION MANUAL

© B62-2365-00 (K, E, M)

09 08 07 06 05 04 03 02 01 00

TH-K40A

TH-K40E

430 MHz FM TRANSCEIVER

NOTIFICATION

This equipment complies with the essential requirements of 
Directive 1999/5/EC.
The use of the warning symbol 

 means the equipment is subject 

to restrictions of use in certain countries.
This equipment requires a licence and is intended for use in the 
countries as below.

AT

BE

DK

FI

FR

DE

GR

IS

IE

IT

LI

LU

NL

NO

PT

ES

SE

CH

GB

CY

CZ

EE

HU

LV

LT

MT

PL

SK

SI

BG

RO

ISO3166

144 MHz FM TRANSCEIVER

TH-K20A

TH-K20E

Содержание TH-K40A

Страница 1: ...requirements of Directive 1999 5 EC The use of the warning symbol means the equipment is subject to restrictions of use in certain countries This equipment requires a licence and is intended for use in the countries as below AT BE DK FI FR DE GR IS IE IT LI LU NL NO PT ES SE CH GB CY CZ EE HU LV LT MT PL SK SI BG RO ISO3166 144 MHz FM TRANSCEIVER TH K20A TH K20E ...

Страница 2: ... adopted separate waste collection systems Products and batteries with the symbol crossed out wheeled bin cannot be disposed as household waste Old electrical and electronic equipment and batteries should be recycled at a facility capable of handling these items and their waste byproducts Contact your local authority for details in locating a recycle facility nearest to you Proper recycling and wa...

Страница 3: ...e determined by turning the equipment off and on the user is encouraged to try to correct the interference by one or more of the following measures Reorient or relocate the receiving antenna Increase the separation between the equipment and receiver Connect the equipment to an outlet on a circuit different from that to which the receiver is connected Consult the dealer for technical assistance ATT...

Страница 4: ...mmable gas dust particles metallic powders grain powders etc While taking on fuel or while parked at gasoline service stations Near explosives or blasting sites In aircraft Any use of the transceiver must follow the instructions and regulations provided by the airline crew Where restrictions or warnings are posted regarding the use of radio devices including but not limited to medical facilities N...

Страница 5: ...rcuited excessive current will flow and the battery may generate heat or smoke rupture or burst into flame It will also cause metal objects to heat up Do not incinerate or apply heat to the battery If the insulator is melted the gas release vent or safety function is damaged or the electrolyte is ignited the battery may generate heat or smoke rupture or burst into flame Do not leave the battery ne...

Страница 6: ...nect with a charger or operating equipment do not force it check the polarity of the battery If the battery pack is reverse connected to the charger it will be reverse charged and an abnormal chemical reaction may occur The battery may generate heat or smoke rupture or burst into flame Do not touch a ruptured and leaking battery If the electrolyte liquid from the battery gets into your eyes wash y...

Страница 7: ...N OUTPUT POWER 12 BACKLIGHT 13 MONITOR 13 LOCK FUNCTION 14 MENU SETUP 15 WHAT IS A MENU 15 MENU ACCESS 15 MENU FUNCTION LIST 16 MEMORY CHANNELS 18 SIMPLEX REPEATER OR ODD SPLIT MEMORY CHANNEL 18 STORING SIMPLEX AND STANDARD REPEATER FREQUENCIES 19 STORING ODD SPLIT REPEATER FREQUENCIES 20 RECALLING A MEMORY CHANNEL 20 NAMING A MEMORY CHANNEL 21 MEMORY DISPLAY TYPE 22 CLEARING A MEMORY CHANNEL 22 C...

Страница 8: ... AUXILIARY FUNCTIONS 43 PROGRAMMABLE VFO 43 FREQUENCY STEP SIZE 44 TONE ALERT 44 POWER ON MESSAGE 45 BEEP FUNCTION 46 LOCK TYPE 46 BATTERY SAVER 47 APO AUTO POWER OFF 48 NARROW BAND FM OPERATION 48 BEAT SHIFT 49 VOX VOICE OPERATED TRANSMIT 49 TIME OUT TIMER 51 BUSY CHANNEL LOCKOUT 51 TX INHIBIT 52 MICROPHONE SENSITIVITY 52 PROGRAMMABLE FUNCTION KEYS 52 MICROPHONE KEY LOCK 53 BATTERY TYPE 53 WEATHE...

Страница 9: ...ter KSC 35S 1 1 1 Belt clip KBH 18 1 1 1 Warranty card 1 1 Instruction manual English 1 1 1 French 1 1 Spanish 1 1 Italian 1 German 1 Dutch 1 Turkish 1 Chinese 1 INSTALLING THE ANTENNA Hold the supplied antenna by its base then screw it into the connector on the top panel of the transceiver until secure Note The antenna is neither a handle a key ring retainer nor a speaker microphone attachment po...

Страница 10: ...secure 2 To remove the battery pack push the lock lever up then pull the battery pack away from the transceiver Lock lever Lock lever INSTALLING THE BELT CLIP If desired you can install the supplied belt clip to the transceiver 1 Remove the battery pack as described above 2 To install the belt clip align the guides of the belt clip with the grooves on the rear of the battery pack then slide the be...

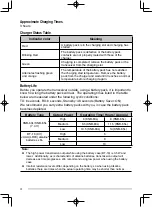
Страница 11: ...ver while charging its battery pack will interfere with correct charging If the operating time of a battery pack decreases although the battery pack is fully and correctly charged the battery pack life is over Replace the battery pack The ambient temperature should be from 41 F 5 C to 104 F 40 C while charging is in progress The charging times provided are obtained when a battery pack discharged t...

Страница 12: ...y pack will last The operating times listed in the table below are measured under the following cyclic conditions TX 6 seconds RX 6 seconds Stand by 48 seconds Battery Saver ON We recommend you carry extra battery packs with you in case the battery pack becomes depleted Battery Type Output Power Operating Time Hours Approx KNB 63L KNB 65L 7 4 V High 6 KNB 63L 8 KNB 65L Medium 8 5 KNB 63L 11 5 KNB ...

Страница 13: ...t CAUTION Do not fix the Charger near an airbag nor in places where it will be a hindrance while driving CONNECTING TO THE PC Use the optional PG 4Y PC interface cable to connect the transceiver to a PC Plug the Speaker Microphone connector to the SP MIC jack and the DB 9 connector to one of the COM serial ports on your PC PG 4Y To PC To download the MCP 5A software go to http www kenwood com i pr...

Страница 14: ...ile transmitting and green while receiving a signal ENC Control Rotate to select an operating frequency Memory channel Menu number and setting value or to change the scan direction etc PTT Push to talk switch Press and hold then speak into the microphone to transmit MONI Press and hold to unmute the speaker in order to monitor signals Release MONI to return to normal operation page 13 PANEL Speake...

Страница 15: ... frequency in the Memory channel 19 KEY 1s To start Memory scan 28 CALL D KEY To select the Call channel 23 F KEY To store the current operating frequency to the Call channel KEY 1s To start CALL scan 28 MENU 1 KEY To enter Menu mode 15 TONE 2 KEY To select the Signaling Tone CTCSS DCS or Cross tone function 32 36 37 39 LOW 3 KEY To select an Output power 12 SQL 4 KEY To enter Squelch Level Adjust...

Страница 16: ... Also attach an optional PG 4Y PC interface cable to this jack to connect the transceiver to a PC page 5 DISPLAY Indicator Description Appears while using Medium output power Appears while using Low output power Appears when the Cross Tone function is ON Appears when the Tone function is ON Appears when the CTCSS function is ON Appears when the DCS function is ON Appears when Weather Alert is ON B...

Страница 17: ... when the Memory channel Lockout function is ON for the selected Memory channel Appears when the selected Memory channel is registered while in Memory Input mode Appears while in Narrow FM mode Appears while in Function mode Performs as an S meter when receiving a signal and displays the battery power remaining while Low power transmitting Appears when the Tone Alert function is ON Appears when Pr...

Страница 18: ...urpose of Squelch is to mute the speaker when no signals are present With the squelch level correctly set you will hear sound only while actually receiving signals The higher the selected squelch level the stronger the signals must be to receive The appropriate squelch level depends on the ambient RF noise conditions 1 Press SQL The squelch level appears on the display 2 Rotate the ENC control to ...

Страница 19: ...ng Mode and return to normal VFO Mode 4 Continue adjusting the frequency as necessary using the ENC control TRANSMITTING RECEIVING 1 To transmit hold the transceiver approximately 5 cm 2 inches from your mouth then press and hold PTT and speak into the microphone in your normal tone of voice The TX RX LED lights red 2 When you finish speaking release PTT The TX RX LED lights green while receiving ...

Страница 20: ...ing the kHz digits as they are press VFO in place of ENT Note If the entered frequency does not match the current frequency step size the frequency is automatically rounded down to the next available frequency When the desired frequency cannot be entered exactly confirm the frequency step size If you rotate the ENC control while entering the frequency the transceiver clears the entry SELECTING AN ...

Страница 21: ...ing LAMP Press any key including PTT other than LAMP while the display and keys are lit to restart the 5 second timer Continuing to press LAMP after having pressed it will illuminate the display and keys for as long as you hold the key Press F LAMP to keep the light ON continuously The light remains ON until you press F LAMP again MONITOR When you are receiving while the squelch function is ON wea...

Страница 22: ...F 1s to turn the Lock function ON The icon appears when the Lock function is ON The following keys cannot be locked F PTT LAMP MONI SQL PWR VOL control and microphone PF key 2 Press F 1s to unlock the keys Note You cannot perform the Transceiver Reset while the Lock function is ON You can select the lock type from Menu No 3 ...

Страница 23: ...various timings settings and programming functions on this transceiver to meet your needs without using many controls and switches MENU ACCESS 1 Press MENU A brief explanation of the Menu and the Menu No appear on the display 2 Rotate the ENC control to select your desired Menu No 3 Press F OK to configure the parameter of the currently selected Menu No 4 Rotate the ENC control to select your desi...

Страница 24: ...pe 43 7 OFFSET Repeater Offset Frequency 0 000 29 950 MHz 31 8 ARO Automatic Repeater Offset OFF ON 34 9 N FM Narrow FM OFF ON OFF 48 10 B SHIFT Beat shift OFF ON OFF 49 11 M NAME Memory name Up to 6 characters 21 12 M DISP Memory display type NAME FREQ NAME 22 13 L OUT Memory channel lockout OFF ON OFF 29 14 RESUME Scan resume method TO CO SEEK TO 30 15 PR SCAN Priority scan OFF ON OFF 28 16 VOX ...

Страница 25: ... key MR 26 PF 3 Microphone PF 3 key CALL 27 MIC LK Microphone key Lock OFF ON OFF 53 28 DTMF MR DTMF memory Automatic dialer 0 F ch Up to 16 digits 0 ch 40 29 DT SPD DTMF TX speed 50 100 150 ms 100 ms 41 30 DT HOLD DTMF TX hold OFF ON OFF 42 31 DT PAUS DTMF pause time 100 250 500 750 1000 1500 2000 ms 500 ms 32 DT LOCK DTMF key Lock OFF ON OFF 33 1750 HD 1750 Hz TX hold OFF ON OFF 35 34 BATT Batte...

Страница 26: ...perations you have in mind Simplex Repeater channels allow Simplex frequency operation Repeater operation with a standard offset if an offset direction is stored Odd split channels allow Repeater operation with a non standard offset The data listed below can be stored in each Memory channel Parameter Simplex Repeater Odd split Receive Transmit frequency Yes No Receive Transmit frequency step size ...

Страница 27: ...t the following data Offset direction Tone function if necessary CTCSS DCS function if necessary If storing a simplex frequency you may select other related data CTCSS or DCS settings etc 4 Press F MR A memory channel number appears and blinks When the channel has stored data the icon appears Memory channel numbers L0 U0 L2 U2 and Pr Priority Channel are reserved for other functions 5 Rotate the E...

Страница 28: ...d in the memory channel Note When you recall an odd split memory channel and appear on the display To confirm the transmit frequency press REV Reverse function RECALLING A MEMORY CHANNEL USING THE ENC CONTROL 1 Press MR to enter Memory Recall Mode The memory channel last used is recalled 2 Rotate the ENC control to select your desired memory channel You cannot recall an empty memory channel To res...

Страница 29: ...requency Names can be call signs repeater names cities names of people etc 1 Press MR then rotate the ENC control to select your desired memory channel 2 Enter Menu mode and access Menu No 11 M NAME then press F A blinking cursor appears 3 Rotate the ENC control to select a desired alphanumeric character You can enter the following alphanumeric characters 0 9 A Z hyphen slash and a space 4 Press M...

Страница 30: ...e the setting 3 Press MENU or PTT to exit Menu mode Note Even when set to NAME the frequency will appear on the display while pressing MONI CLEARING A MEMORY CHANNEL To clear the data from an individual memory channel 1 Recall the memory channel you want to clear 2 Turn the transceiver OFF 3 Press MR Power ON A confirmation message appears 4 Press MR to clear the channel data The contents of the m...

Страница 31: ...turn to the previous frequency press CALL again REPROGRAMMING THE CALL CHANNEL 1 Select your desired frequency and related data Tone CTCSS DCS or offset direction etc When you program the Call Channel as an odd split channel select a receiving frequency first 2 Press F CALL The selected frequency and related data are stored in the Call Channel To also store a separate transmit frequency continue w...

Страница 32: ...NEL TRANSFER You can also copy channel information from one memory channel to another This function is useful when storing frequencies and associated data that you temporarily change in Memory Recall mode 1 Press MR then turn the ENC control to recall a desired memory channel 2 Press F MR 3 Select the memory channel where you would like the data copied using the ENC control 4 Press MR to copy the ...

Страница 33: ...mory name data the Memory name is displayed in place of the CH characters You cannot enter Channel Display mode while Key Lock is ON While in the Channel Display mode only the following keys can be operated KEY PTT MONI F MR CALL LOW SQL LAMP ENT F KEY MONI LAMP KEY 1s F MR CALL While transmitting MONI A F B VFO C MR D CALL 0 1 2 3 4 5 6 7 8 9 ...

Страница 34: ... MONI to pause scan in order to monitor the scanning frequency Release MONI to resume scanning Pressing MENU causes scan to stop If you press any key other than the following keys during scan the transceiver exits scan excluding Priority Scan MONI LAMP F SQL F 1s or F LAMP BAND SCAN The transceiver scans the entire band of the frequency you selected For example if you are operating and receiving a...

Страница 35: ...en rotate the ENC control to select a channel from U0 U2 corresponding to the channel selected in step 2 For example if you selected L0 in step 3 select U0 for the end frequency 6 Press MR to store the end frequency in the memory channel USING PROGRAM SCAN 1 Press VFO then rotate the ENC control to select a frequency within the frequency range of memory channel L0 U0 L2 U2 2 Press VFO 1s to start ...

Страница 36: ...r memory channel are monitored 4 To stop Call Scan press any key other than MONI LAMP F SQL F 1s or F LAMP Note The transceiver stops scanning when it detects a signal You can perform Call Scan even if the recalled memory channel has been locked out PRIORITY SCAN You may sometimes want to check your favorite frequency activities while monitoring other frequencies In this case use the Priority Scan...

Страница 37: ...l Priority Scan stops You can also press any key other than MONI F SQL Squelch level adjustment F 1s Key lock and PTT to exit Priority Scan while is blinking MEMORY CHANNEL LOCKOUT You can lock out memory channels that you prefer not to monitor during Memory Scan 1 Press MR to enter Memory Recall Mode 2 Rotate the ENC control to select the memory channel to be locked out 3 Enter Menu mode and acce...

Страница 38: ...hen continues to scan even if the signal is still present CO Carrier Operated mode The transceiver remains on a busy frequency or Memory channel until the signal drops out There is a 2 second delay between signal drop out and scan resumption SEEK Seek mode The transceiver remains on a busy frequency or Memory channel even after the signal drops out and does not automatically resume scanning 1 Ente...

Страница 39: ...LECTING AN OFFSET DIRECTION SHIFT The offset direction allows your transmitting frequency to be higher or lower than the receiving frequency Press SHIFT to select an offset direction Each time you press SHIFT the offset direction changes as follows Simplex operation no offset Simplex operation no offset If you are using a TH K40E E type model the offset direction changes as follows Simplex operati...

Страница 40: ...omatic Repeater Offset TONE FUNCTION ACTIVATING THE TONE FUNCTION To turn the Tone function on 1 Press TONE to turn the Tone function On Each time you press TONE the selection changes as follows Tone CTCSS DCS Cross Tone Off no display The icon appears on the display when the tone function is On 2 Press T SEL The current Tone frequency appears on the display and blinks 3 Rotate the ENC control to ...

Страница 41: ...al repeater 1 Press TONE to switch the Tone function On Each time you press TONE the selection changes as follows Tone CTCSS DCS Cross Tone Off no display The icon appears on the display when the tone function is On 2 Press T SEL 1s to run the Tone Frequency ID scan Scan starts and T SCAN appears on the display While the transceiver is receiving a signal during Tone Frequency Scan the signal is em...

Страница 42: ...higher No offset 146 000 146 395 MHz offset 146 400 146 595 MHz No offset 146 600 146 995 MHz offset 147 000 147 395 MHz offset 147 400 147 595 MHz No offset 147 600 147 995 MHz offset 148 000 MHz and higher No offset Note Even when setting the TH K20A TH K40A M type and TH K40E E type model to ON the ARO function will not operate REVERSE FUNCTION After setting a separate receive and transmit freq...

Страница 43: ...e E type model simply pressing PF causes it to transmit a 1750 Hz tone It is also possible to program 1750 on the front panel as a PF key for transmitting a 1750 Hz tone Note The transceiver continuously transmits a 1750 Hz tone until you release the PF key 1750 Some repeaters in Europe must receive continuous signals for a certain period of time following a 1750 Hz tone This transceiver is also c...

Страница 44: ... 3 173 8 210 7 250 3 79 7 97 4 118 8 146 2 179 9 218 1 254 1 Note CTCSS does not cause your conversation to be private It only relieves you from listening to unwanted conversations USING CTCSS 1 Press TONE 2 times to turn the CTCSS function ON Each time you press TONE the selection changes as follows Tone CTCSS DCS Cross Tone Off no display The icon appears when the CTCSS function is ON 2 Press T ...

Страница 45: ...rogram the identified frequency press any key other than MONI LAMP or T SEL DCS Digital Coded Squelch DCS is another application which allows you to ignore not hear unwanted calls It functions the same way as CTCSS The only differences are the encode decode method and the number of selectable codes For DCS you can select from 104 different codes Available DCS Codes DCS Code 023 025 026 031 032 036...

Страница 46: ...speak into the microphone DCS CODE SCAN This function scans through all DCS codes to identify the incoming DCS code on a received signal You may find it useful when you cannot recall the DCS code that the other persons in your group are using 1 Press TONE 3 times to activate the DCS function Each time you press TONE the selection changes as follows Tone CTCSS DCS Cross Tone Off no display The icon...

Страница 47: ...nges as follows Tone CTCSS DCS Cross Tone Off no display The icon appears when the Cross Tone function is ON 2 Press T SEL The Cross Tone setting appears on the display 3 Rotate the ENC control to select your desired Cross Tone setting Setting TX RX Icon TX Icon RX DCS DCS off T DCS Tone DCS DCS CT DCS CTCSS T CT Tone CTCSS To exit the Cross Tone selection press PTT 4 Press any key other than MONI...

Страница 48: ... the speaker Frequency Hz 1209 1366 1477 1633 697 1 2 3 A 770 4 5 6 B 852 7 8 9 C 941 0 D When DTMF TX Hold is ON you do not need to continuously press PTT to remain in Transmit Mode However Transmit Mode is retained for only 2 seconds after pressing a key so if the next key is not pressed within this time limit the transceiver stops transmitting AUTOMATIC DIALER If you use the 16 dedicated memory...

Страница 49: ...ransmit the selected DTMF tones The code stored in the channel scrolls across the display accompanied by DTMF tones from the speaker After transmitting the frequency display is restored If you do not need to confirm the memory channel contents press STEP 0 PF 9 F A CALL D LAMP E and ENT F instead of turning the ENC control in step 2 to select a channel number The stored DTMF code will be immediate...

Страница 50: ...ls The default setting is 500 milliseconds 1 Enter Menu mode and access Menu No 31 DT PAUS then press F 2 Rotate the ENC control to select 100 250 500 750 1000 1500 2000 ms then press F to store the setting 3 Press MENU or PTT to exit Menu mode DTMF LOCK If you have a transceiver with the optional speaker microphone installed and are carrying it in the holder or bag you sometimes may want to disab...

Страница 51: ...e and access Menu No 6 P VFO then press F The current programmable frequency range for the band appears The lower limit frequency blinks 3 Rotate the ENC control to select the lower limit frequency in MHz 4 Press F to store the lower limit frequency The upper limit frequency blinks 5 Rotate the ENC control to select the upper limit frequency in MHz 6 Press F to store the upper limit frequency 7 Pr...

Страница 52: ...on the frequency you are monitoring In addition it shows the number of hours and minutes elapsed after signals have been received If you use Tone Alert with CTCSS or DCS it sounds only when a received CTCSS tone or DCS code matches the tone or code you selected Turning this function ON is convenient for when you are not sitting in front of the transceiver as confirmation of the receipt is possible...

Страница 53: ... is turned ON 1 Enter Menu mode and access Menu No 1 P ON MSG then press F A blinking cursor appears 2 Rotate the ENC control to select a character You can enter the following alphanumeric characters 0 9 A Z hyphen slash and a space 3 Press MR The cursor will move to the next digit You can move the cursor to the left or right by pressing VFO or MR Press CALL to delete the character at the current ...

Страница 54: ...beep output level is linked to the volume control position LOCK TYPE You can select your desired Lock type KEY locks the operational keys FRQ locks the frequencies so that you do not accidentally change them and KEY FRQ locks both the keys and the frequencies Manual DTMF and Autodial can still be performed while either lock is active 1 Enter Menu mode and access Menu No 3 LOCK then press F 2 Rotat...

Страница 55: ...or the battery saver 1 Enter Menu mode and access Menu No 4 SAVE then press F 2 Rotate the ENC control to select OFF 0 2 0 4 0 6 0 8 1 0 2 0 3 0 4 0 5 0 seconds then press F to store the setting 3 Press MENU or PTT to exit Menu mode Note The longer the shut off period the more you can save on battery consumption However there is a greater chance of missing a signal When the CTCSS DCS code matches ...

Страница 56: ...PO does not function while the transceiver is scanning When Tone Alert is ON APO does not turn the power OFF The APO timer starts counting down the time when no keys are pressed and no controls are adjusted The APO warning beep sounds and APO appears 1 minute before the transceiver turns OFF NARROW BAND FM OPERATION The transceiver operates in normal FM deviation 5 kHz mode for both transmitting a...

Страница 57: ...nsmit mode when the VOX circuitry senses that you have begun speaking into the microphone When you operate the VOX function you must use an optional Headset the internal speaker and microphone are too close to each other to be used for the VOX function To turn the VOX function ON 1 Enter Menu mode and access Menu No 16 VOX then press F 2 Rotate the ENC control to select the desired VOX gain level ...

Страница 58: ... Menu 1 Enter Menu mode and access Menu No 16 VOX then press F 2 Rotate the ENC control to select the desired VOX gain level from 1 least sensitive to 9 most sensitive then press F to store the setting 3 Press MENU or PTT to exit Menu mode VOX ON BUSY You can configure the transceiver to force VOX to transmit even if the transceiver is receiving a signal 1 Enter Menu mode and access Menu No 17 VOX...

Страница 59: ...sceiver stops the transmitting a warning beep sounds This function is necessary to protect the transceiver from thermal damage and can therefore not be turned OFF 1 Enter Menu mode and access Menu No 19 TOT then press F 2 Rotate the ENC control to select the desired time from 0 5 1 0 1 5 2 0 2 5 3 0 3 5 4 0 4 5 5 0 10 0 default minutes then press F to store the setting 3 Press MENU or PTT to exit ...

Страница 60: ...te the ENC control to select the desired Sensitivity level then press F to store the setting 3 Press MENU or PTT to exit Menu mode PROGRAMMABLE FUNCTION KEYS TRANSCEIVER PF KEY This is the PF Programmable Function key on the transceiver front panel You can assign your desired function to this key 1 Enter Menu mode and access Menu No 23 PF KEY then press F 2 Rotate the ENC control to select your de...

Страница 61: ...AMP 3 Press MENU or PTT to exit Menu mode MICROPHONE KEY LOCK The Microphone Key Lock function will lock the microphone PF keys 1 Enter Menu mode and access Menu No 27 MIC LK then press F 2 Rotate the ENC control to select ON then press F to store the setting 3 Press MENU or PTT to exit Menu mode BATTERY TYPE Set the battery type to match the type of batteries you are using in the transceiver If t...

Страница 62: ... cannot change to the Weather channel 1 Press the key programmed with the WX function 2 Rotate the ENC control to select your desired channel MR Name CH No Freq MHz Location MR Name CH No Freq MHz Location WX 1 A1 162 550 NOAA Canada WX 6 A6 162 500 NOAA WX 2 A2 162 400 NOAA Canada WX 7 A7 162 525 NOAA WX 3 A3 162 475 NOAA Canada WX 8 A8 161 650 Canada WX 4 A4 162 425 NOAA WX 9 A9 161 775 Canada W...

Страница 63: ...ification before shipment Attempting service or alignment without factory authorization can void the product warranty SERVICE When returning this product for repair send the complete product packed in its original box and packing material to the authorized KENWOOD dealer from whom you purchased it or any authorized KENWOOD service center Include a full description of the problem s experienced Incl...

Страница 64: ...teries Most keys and the Selector do not function Transceiver Lock function is ON the icon is visible Press F 1s to turn OFF Transceiver Lock The transceiver is in Channel Display Mode Press PTT MR Power ON to exit Channel Display Mode The Tone Alert function is ON Turn OFF the Tone Alert function You cannot recall any memory channel You have stored no data in any of the memory channels Store the ...

Страница 65: ...rier Operated for Menu No 14 RESUME OPERATION NOTICES The transceiver has been designed and engineered to avoid possible hardware glitches However you may notice the following symptoms when you operate the transceiver These symptoms are not malfunctions Receiving Signals In Cities When you receive signals in cities the receiver s entire antenna indicator may light up without receiving any strong s...

Страница 66: ...n the transceiver power OFF 2 Press F Power ON All indicators are lit 3 Release F 4 Rotate the ENC control and select your desired reset type PA RST Partial Reset or FL RST Full Reset 5 Press F SURE appears 6 Press F again to reset the transceiver Note When the lock function is on you cannot reset the transceiver using Key operation MENU OPERATION 1 Enter Menu mode and access Menu No 99 RESET then...

Страница 67: ...25 3 mm 2 13 x 4 4 x 1 00 in Weight with KNB 63L Approx 210 g 7 4 oz Transmitter TH K20A E TH K40A E RF output power with KNB 63L KNB 65L High 5 5 W 5 W Medium 2 W Low 1 W Modulation Reactance Maximum frequency deviation Within 5 kHz Spurious emission Less than 60 dB Modulation distortion Less than 5 300 Hz 3 kHz Microphone impedance 2 kΩ Receiver TH K20A E TH K40A E Circuit type Double super hete...

Страница 68: ......

Отзывы: