background image

9

English   |

Bluetooth

Continued on the next page...

Register your smartphone to the 

unit

You can use your Bluetooth smartphone when 

paired to this unit.

Turn on the Bluetooth function on your 
smartphone/cell-phone.

Search the unit (“KW-M150BT”) from your 
smartphone/cell-phone.

If a PIN code is required, enter the PIN code 
(“0000”).
• 

 appears when the Bluetooth smartphone is 

connected.


Ñ

Disconnecting the device

•  Turn off the Bluetooth function from your 

smartphone/cell-phone.

•  Turn off the ignition switch.

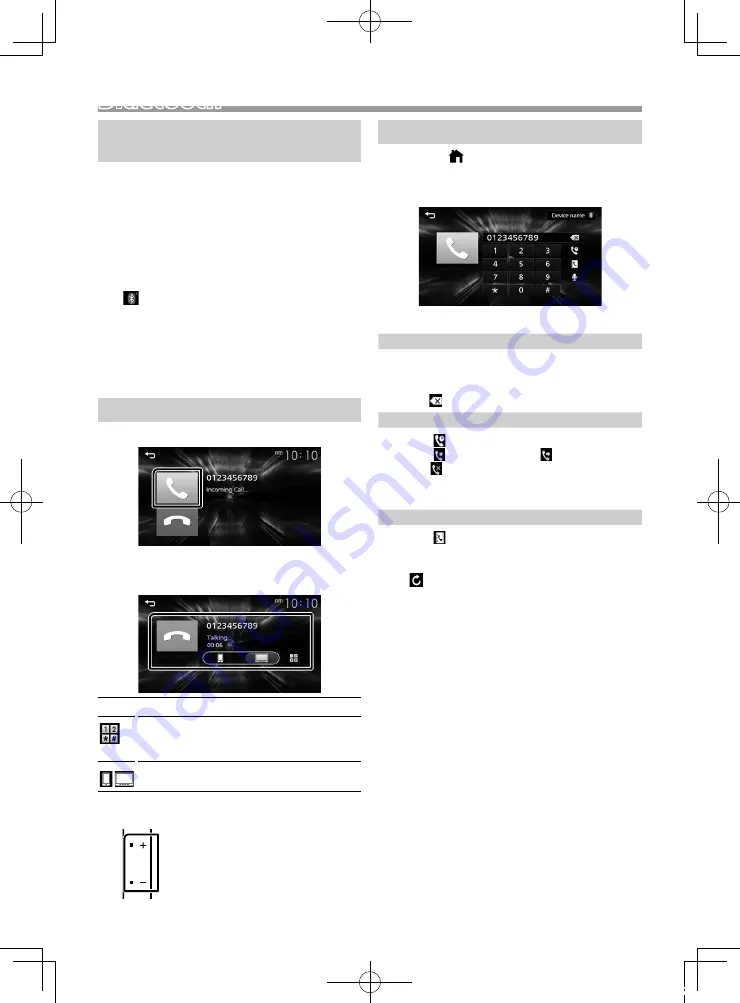
Receive a phone call

Touch [

Û

].

•  [

Ý

] : Reject an incoming call.


Ñ

Operations during a call

[

Ý

]

Ending a call
You can send tones by touching desired keys 
on the screen.
•  Touch [

6

] to close the window.


Switches the speaking voice output between 
smartphone/cell-phone and speaker.


Adjust the receiver volume

Press the <+> or <

> button.

Make a phone call

Press the <

> button.

Touch [Phone].

See the table below for each operation method.

Call by entering a phone number

1) Enter a phone number with number keys.
2) Touch [

Û

]. 

Make a call

•  Touch [   ] to delete the last entry.

Call using call records

1) Touch [   ].
2) Touch [   ] (Incoming Calls), [   ] (Outgoing 

Calls), [   ] (Missed Calls).

3) Select the phone number from the list.

Make a call

Call using the phonebook

1) Touch [   ].
2) Select the name from the list.

Make a call

•  [   ] :  Updates the phonebook. Touch this 

button after you have made a change 
to the phonebook of your smartphone/
cell-phone.

Bluetooth

!B5K-0672-10b_K_EnFrEs.indb   9

2019/07/04   9:20

Содержание KW-M150BT

Страница 1: ...e garniture P 29 Posición de la indicación del nombre del modelo Consulte Retirada del marco P 45 For detailed operations and information refer to the INSTRUCTION MANUAL on the following website Pour plus d informations et de détails sur les opérations reportez vous au MODE D EMPLOI sur le site Internet suivant Para obtener información y detalles sobre las operaciones consulte el MANUAL DE INSTRUC...

Страница 2: ...optional accessories check with your JVC dealer to make sure that they work with your model and in your area The Radio Data System or Radio Broadcast Data System feature won t work where the service is not supported by any broadcasting station Ñ Ñ Protecting the monitor To protect the monitor from damage do not operate the monitor using a ballpoint pen or similar tool with the sharp tip Ñ Ñ Cleani...

Страница 3: ...parking when you shift the gear to the reverse R position Default is ON Guidelines SETUP If you select ON for Parking Guidelines you can adjust the parking guidelines System Reset Touch System Reset and then touch YES to set all the settings to the initial default settings Bluetooth Displays the Bluetooth Settings screen Screen Dimmer Select the dimmer mode High Default Mid Low Demo Select the dem...

Страница 4: ... properly the unit returns to factory settings when this button is pressed Common operations Ñ Ñ Turning on the power 1 Press the button Ñ Ñ Turning off the power 1 Press and hold the button HOME screen 1 Press the button HOME screen appears 2 5 3 6 4 7 1 1 Clock display 2 Switches to the Tuner broadcast P 5 3 USB Plays files on a USB device P 6 iPod Plays an iPod iPhone P 7 When iPod iPhone is co...

Страница 5: ...tion in memory 1 Tune in to a station you want to preset 2 Touch and hold 1 6 in which you want to store the station Ñ Ñ Recalling the preset station 1 Touch 1 6 Tuner Setup 1 Touch 2 Set each item as follows Auto Store Automatically searches and stores the 6 stations with the strongest signals for the selected band Auto Store appears Area N America Default For North Central South America AM FM in...

Страница 6: ...ck mode Selects Repeat playback mode U H Plays or pauses E F Searches the previous next content Touch and hold to fast forward or fast backward 1 Searches file P 6 Ñ Ñ For Video playback 1 When the operation buttons are not displayed on the screen touch the display 6 7 6 You can adjust image quality in video screen INITIALIZE To clear the adjustment 7 U H Plays or pauses E F Searches the previous ...

Страница 7: ...connecting the iPod the music that has been played by the iPod is played first Cap the USB terminal whenever not using Playback operations Ñ Ñ Control the music you are listening to on the source control screen 1 4 3 2 1 Artwork Shown if the track contains artwork 2 Displays the information of the current file 3 Playing time File number Play time bar For confirmation of current playing position 4 ...

Страница 8: ...rce Ñ Ñ For Video playback 1 When the operation buttons are not displayed on the screen touch the display 1 Rear view camera To use a rear view camera the REVERSE lead connection is required For connecting a rear view camera P 14 Ñ Ñ Displaying the picture from the rear view camera The rear view screen is displayed when you shift the gear to the reverse R position To erase the caution message touc...

Страница 9: ...nd tones by touching desired keys on the screen Touch 6 to close the window Switches the speaking voice output between smartphone cell phone and speaker Adjust the receiver volume Press the or button Make a phone call 1 Press the button 2 Touch Phone 3 See the table below for each operation method Call by entering a phone number 1 Enter a phone number with number keys 2 Touch Û Make a call Touch t...

Страница 10: ...nt in a list 1 Touch 1 2 Touch desired item When you touch a category its contents are displayed 3 Touch desired item from the content list Playback starts Touch 6 to moves to the upper hierarchy NOTE The source control screen appears when you touch 6 at the top hierarchy You can adjust various settings such as audio balance or subwoofer level 1 Press the EQ button 2 See the below for each operati...

Страница 11: ...stant voltage supply such as with battery wires the battery may be drained If the console has a lid make sure to install the unit so that the front panel will not hit the lid when closing and opening If the fuse blows first make sure the wires aren t touching to cause a short circuit then replace the old fuse with one with the same rating Insulate unconnected wires with vinyl tape or other similar...

Страница 12: ...A on the wiring harness and connect it to the external power connector on your vehicle 6 Connect the wiring harness connector to the unit 7 Install the unit in your car 8 Reconnect the terminal of the battery 9 Press the reset button Installing the unit Ñ Ñ Non Japanese cars Bend the tabs of the mounting sleeve with a screwdriver or similar utensil and attach it in place NOTE Make sure that the un...

Страница 13: ...ary Ñ Ñ Removing the trim plate 1 Use the extraction key accessory 3 to lever out the four tabs two on the left part two on the right part 3 2 Pull the trim plate forward Ñ Ñ Removing the unit 1 Remove the trim plate by referring to step 1 in Removing the trim plate 2 Insert the extraction key accessory 2 deeply into the slot as shown The protrusion at the tip of the extraction key must face towar...

Страница 14: ...one To steering remote To use the steering wheel remote control feature you need an exclusive remote adapter not supplied matched to your car Connect to vehicle s reverse lamp harness when using the optional rear view camera Light Blue Yellow Steering remote control wire Bright Green Red Purple Red Gray Red Fuse 15A Subwoofer Preout Cap Cap FM AM antenna input FM AM antenna Connector A Connector B...

Страница 15: ... Accessory 5 Blue Power control Antenna control wire Connect either to the power control terminal when using the optional power amplifier or to the power terminal for the booster amplifier of the film type or short pole type antenna Max 150mA 12V White Black Gray Black Green Black Purple Black Speaker impedance 4 8 Ω Purple Green Gray White To front left speaker To front right speaker To rear left...

Страница 16: ... need to purchase a commercially available USB device Cap the USB terminal whenever not using Ñ Ñ Playable Audio files Audio format Extension MP3 mp3 WMA wma AAC LC m4a aac Linear PCM WAVE wav FLAC flac Vorbis ogg This unit can show ID3 Tag Version 1 0 1 1 2 2 2 3 2 4 for MP3 NOTE WMA and AAC of which is covered with DRM cannot be played Although the audio files are complied with the standards lis...

Страница 17: ...st of conditions and the following disclaimer Redistributions in binary form must reproduce the above copyright notice this list of conditions and the following disclaimer in the documentation and or other materials provided with the distribution Neither the name of the Xiph org Foundation nor the names of its contributors may be used to endorse or promote products derived from this software witho...

Страница 18: ...z des accessoires en option vérifiez auprès de votre revendeur JVC qu ils fonctionneront avec votre modèle et dans votre région Les fonctions Radio Data System ou Radio Broadcast Data System sont inopérantes dans les zones où le service n est pris en charge par aucune station de radiodiffusion Ñ Ñ Protection du moniteur Ne touchez pas le moniteur avec un stylo à bille ou tout autre outil pointu Ce...

Страница 19: ...orsque vous changez le rapport dans la position marche arrière AR Le choix par défaut est ON Guidelines SETUP Si vous sélectionnez ON pour Parking Guidelines il est possible d ajuster les instructions de parking System Reset Touchez System Reset puis touchez YES pour ramener tous les réglages aux réglages initiaux par défaut Bluetooth Affiche l écran des réglages Bluetooth Screen Dimmer Sélectionn...

Страница 20: ...ppuyer sur ce bouton pour que l appareil retrouve les réglages d usine Opérations courantes Ñ Ñ Allumer le courant 1 Appuyez sur le bouton Ñ Ñ Éteindre le courant 1 Appuyez et maintenez enfoncé le bouton Écran d ACCUEIL 1 Appuyez sur le bouton L écran d ACCUEIL apparaît 2 5 3 6 4 7 1 1 Affichage de l horloge 2 Passe à la diffusion du tuner p 21 3 USB Lit les fichiers d un périphérique USB p 22 iPo...

Страница 21: ...chercher une station que vous voulez présélectionner 2 Toucher et maintenir 1 6 dans lequel vous voulez mémoriser la station Ñ Ñ Rappel de la station prédéfinie 1 Toucher 1 6 Configuration du syntoniseur 1 Touchez 2 Réglez chaque option comme suit Auto Store Recherche et enregistre automatiquement les 6 stations avec les signaux les plus puissants pour la bande sélectionnée Auto Store Mémoriser Au...

Страница 22: ...ou met en pause E F Recherche le contenu précédent suivant Touchez et maintenez enfoncé pour effectuer une avance ou un retour rapide 1 Recherche le fichier p 22 Ñ Ñ Pour la lecture de vidéo 1 Lorsque les touches de fonctionnement ne sont pas affichées à l écran toucher l écran 6 7 6 Vous pouvez régler la qualité d image dans l écran vidéo INITIALIZE Pour effacer le réglage 7 U H Lance la lecture ...

Страница 23: ...Pod est jouée en premier Fermer le port USB quand il n est pas utilisé Options de lecture Ñ Ñ L écran de commande de la source vous permet de gérer la musique que vous écoutez 1 4 3 2 1 Illustration Affiché si la piste contient un visuel 2 Affiche les informations concernant le fichier en cours 3 Temps de lecture numéro de fichier Barre du temps de lecture Pour confirmer la position actuelle de le...

Страница 24: ...la lecture de vidéo 1 Lorsque les touches de fonctionnement ne sont pas affichées à l écran toucher l écran 1 Caméra de recul Pour utiliser la caméra de recul le câble de connexion INVERSE est requis Pour connecter une caméra de recul p 30 Ñ Ñ Affiche l image de la caméra de recul L écran de vue arrière est affiché lorsque vous changez de vitesse pour la position de marche arrière R Pour enlever l...

Страница 25: ... la fenêtre Bascule l émission de la voix entre le smartphone téléphone portable et le haut parleur Régler le volume de réception Appuyez sur le bouton ou Passer un appel 1 Appuyez sur le bouton 2 Appuyez sur Phone 3 Veuillez consulter le tableau ci dessous pour chaque méthode de fonctionnement Appel par entrée d un numéro de téléphone 1 Utilisez les touches numériques pour entrer un numéro de tél...

Страница 26: ...ns la liste 1 Touchez 1 2 Touchez l élément de votre choix Le contenu d une catégorie est affiché lorsque vous touchez celle ci 3 Touchez l élément de votre choix dans la liste des contenus La lecture commence Toucher 6 pour aller au niveau hiérarchique supérieur REMARQUE Touchez 6 pour faire apparaître l écran de contrôle source en haut de page Vous pouvez régler différents paramètres comme la ba...

Страница 27: ...sion constante comme les câbles de la batterie il se peut que la batterie se décharge Si la console est dotée d un couvercle veillez à installer l appareil de sorte que la façade ne heurte pas le couvercle quand elle s ouvre ou se ferme Si le fusible saute vérifiez d abord que les câbles ne se touchent pas afin d éviter tout court circuit puis remplacez l ancien fusible par un nouveau fusible de m...

Страница 28: ...d alimentation externe de votre véhicule 6 Branchez le connecteur du faisceau de fils sur l appareil 7 Installez l appareil dans votre véhicule 8 Reconnectez la borne de la batterie 9 Appuyez sur le bouton réinitialiser Installation de l appareil Ñ Ñ Voitures non japonaises Courbez les languettes de la douille de montage à l aide d un tournevis ou d un outil similaire puis fixez la en place REMARQ...

Страница 29: ...n accessoire 3 pour sortir les quatre languettes deux sur la partie gauche deux sur la partie droite en effectuant un mouvement de levier 3 2 Tirer la plaque de garniture vers l avant Ñ Ñ Retrait de l appareil 1 Retirez la plaque de garniture en vous référant à l étape 1 dans Retrait de la plaque de garniture 2 Insérez la clé d extraction accessoire 2 profondément dans l emplacement comme illustré...

Страница 30: ...tion de télécommande au volant vous avez besoin d un adaptateur de télécommande spécial non fourni qui correspond à votre véhicule Connexion au faisceau du feu de marche arrière du véhicule lors de l utilisation de la vue arrière de la caméra Bleu ciel Jaune Câble de la télécommande au volant Vert vif rouge Violet rouge Gris rouge Fusible 15 A Préamplification du caisson de basses Capuchon Capucho...

Страница 31: ...ontrôle de l antenne À brancher à la borne de commande motorisée avec l amplificateur de puissance en option ou à la borne d alimentation de l amplificateur de puissance d une antenne de type film ou courte Max 150 mA 12 V Blanc Noir Gris Noir Vert Noir Violet Noir Impédance de haut parleur 4 8 Ω Violet Vert Gris Blanc Au haut parleur avant gauche Vers haut parleur avant droit Vers haut parleur ar...

Страница 32: ...SB n est fourni avec cet appareil Vous devez acheter un périphérique USB disponible dans le commerce Fermer le port USB quand il n est pas utilisé Ñ Ñ Fichiers audio lisibles Format audio Extension MP3 mp3 WMA wma AAC LC m4a aac PCM linéaire ONDE wav FLAC flac Vorbis ogg Cette unité peut montrer ID3 Tag Version 1 0 1 1 2 2 2 3 2 4 pour MP3 REMARQUE Les formats WMA et AAC protégés par GDN ne peuven...

Страница 33: ...copyright notice this list of conditions and the following disclaimer Redistributions in binary form must reproduce the above copyright notice this list of conditions and the following disclaimer in the documentation and or other materials provided with the distribution Neither the name of the Xiph org Foundation nor the names of its contributors may be used to endorse or promote products derived ...

Страница 34: ...es para el uso de esta unidad Cuando compre accesorios opcionales pregunte a su distribuidor JVC si dichos accesorios son compatibles con su modelo y en su región La función Radio Data System o Radio Broadcast Data System no funcionará en lugares donde no existan emisoras compatibles con este servicio Ñ Ñ Cómo proteger el monitor Para proteger el monitor de posibles daños no lo utilice con un bolí...

Страница 35: ...ento más sencillo al engranar la marcha en la posición de marcha atrás R La opción predeterminada es ON Guidelines SETUP Si selecciona ON para Parking Guidelines podrá ajustar las pautas de aparcamiento System Reset Toque System Reset y después toque YES para establecer todos los ajustes en los ajustes iniciales predeterminados Bluetooth Muestra la pantalla Configuración de Bluetooth Screen Dimmer...

Страница 36: ... la configuración de fábrica al pulsar este botón Funciones habituales Ñ Ñ Encendido 1 Pulse el botón Ñ Ñ Apagado 1 Pulse y mantenga pulsado el botón Pantalla HOME inicio 1 Pulse el botón Aparece la pantalla INICIO 2 5 3 6 4 7 1 1 Pantalla del reloj 2 Cambia a la emisión del programa del sintonizador P 37 3 USB Reproduce archivos en un dispositivo USB P 38 iPod Reproduce un iPod iPhone P 39 Cuando...

Страница 37: ...ice una emisora que desea preestablecer 2 Mantenga pulsado 1 6 en el que desee guardar la emisora Ñ Ñ Volver a una emisora prefijada 1 Toque 1 6 Configuración de sintonizador 1 Toque 2 Ajuste cada elemento del modo siguiente Auto Store Busca y guarda automáticamente las 6 emisoras con las señales más fuertes de la banda seleccionada Aparece Auto Store guardar automáticamente Area N America predete...

Страница 38: ... de reproducción Repetir U H Inicia la reproducción o hace una pausa E F Busca el contenido anterior siguiente Mantenga pulsado para avanzar o retroceder rápidamente 1 Busca el archivo P 38 Ñ Ñ Para la reproducción de video 1 Si los botones de operación no se visualizan en la pantalla toque la pantalla 6 7 6 Puede ajustar la calidad de imagen en la pantalla de vídeo INITIALIZE Para eliminar el aju...

Страница 39: ... música reproducida por el iPod Tape la terminal de USB cuando no se esté utilizando Operaciones de reproducción Ñ Ñ Controle la música que está escuchando en la pantalla de control de fuente 1 4 3 2 1 Material gráfico se muestra si la pista contiene material gráfico 2 Muestra la información del archivo actual 3 Tiempo de reproducción Número de archivo Barra de tiempo de reproducción Para confirma...

Страница 40: ...eo 1 Si los botones de operación no se visualizan en la pantalla toque la pantalla 1 Cámara de visión trasera Para usar una cámara de visión trasera se requiere la conexión del cable de MARCHA ATRÁS Para conectar una cámara de visión trasera P 46 Ñ Ñ Visualización de la imagen desde la cámara de visión trasera Se muestra la pantalla de visión trasera cuando cambia la palanca de cambios a la posici...

Страница 41: ...tocando las teclas correspondientes de la pantalla Toque 6 para cerrar la ventana Cambia la salida de voz entre el teléfono inteligente móvil y el altavoz Ajustar el volumen del receptor Pulse el botón o Realice una llamada telefónica 1 Pulse el botón 2 Toque Phone 3 Consulte la tabla de abajo para cada método de funcionamiento Llamar introduciendo un número telefónico 1 Introduzca un número de te...

Страница 42: ... en una lista 1 Toque 1 2 Toque el elemento deseado Cuando toca una categoría se muestran sus contenidos 3 Toque para seleccionar el elemento en la lista de contenidos La reproducción se inicia Toque 6 para desplazarse a la jerarquía superior NOTA Aparece la pantalla de control de la fuente cuando toca 6 en la parte superior de la jerarquía Puede configurar diversos ajustes como el balance del aud...

Страница 43: ...alimentación con un suministro de voltaje constante como con los cables de la batería la batería puede agotarse Si la consola tiene una tapa asegúrese de instalar la unidad de forma que el panel frontal no golpee la tapa al abrirse o cerrarse Si se funden los fusibles asegúrese primero de que los cables no están en contacto pues pueden ocasionar un cortocircuito luego reemplace el fusible dañado p...

Страница 44: ...éctelo al conector de alimentación externa de su vehículo 6 Conecte el mazo de cables a la unidad 7 Instale la unidad en el automóvil 8 Conecte nuevamente el terminal de la batería 9 Pulse el botón Restablecer Instalación de la unidad Ñ Ñ Coches no japoneses Doble las lengüetas del manguito de montaje con un destornillador o similar y fíjelo NOTA Asegúrese de que la unidad esté firmemente instalad...

Страница 45: ...la tecla de extracción accesorio 3 para extraer las cuatro pestañas dos en la parte izquierda dos en la parte derecha 3 2 Tire de la placa hacia adelante Ñ Ñ Desmontaje de la unidad 1 Retire el marco según las indicaciones del paso 1 de Retirada del marco 2 Introduzca la llave de extracción accesorio 2 profundamente en la ranura tal y como se muestra El saliente en la punta de la tecla de extracci...

Страница 46: ...a distancia en el volante es necesario un adaptador remoto exclusivo no suministrado apropiado para su vehículo Conecte el mazo de la luz de marcha atrás del vehículo cuando utilice una cámara de visión trasera opcional Azul claro Amarillo cable del mando a distancia de la dirección Verde brillante rojo Púrpura Rojo Gris Rojo Fusible 15A Salida previa del subwoofer Tapa Tapa Entrada de antena FM A...

Страница 47: ...ena Realice la conexión al terminal de control de alimentación si utiliza el amplificador de potencia opcional o al terminal de alimentación para el amplificador de refuerzo de la antena de tipo película o de mástil corto Máx 150 mA 12 V Blanco Negro Gris negro Verde negro Morado negro Impedancia del altavoz 4 8 Ω Morado Verde Gris Blanco Al altavoz delantero izquierdo Al altavoz delantero derecho...

Страница 48: ...n un dispositivo USB Tiene que comprar un dispositivo USB disponible comercialmente Tape la terminal de USB cuando no se esté utilizando Ñ Ñ Archivos de audio reproducibles Formato de audio Extensión MP3 mp3 WMA wma AAC LC m4a aac PCM lineal WAVE wav FLAC flac Vorbis ogg Esta unidad puede mostrar etiquetas ID3 Versión 1 0 1 1 2 2 2 3 2 4 para MP3 NOTA Los formatos WMA y AAC que están cubiertos con...

Страница 49: ...t retain the above copyright notice this list of conditions and the following disclaimer Redistributions in binary form must reproduce the above copyright notice this list of conditions and the following disclaimer in the documentation and or other materials provided with the distribution Neither the name of the Xiph org Foundation nor the names of its contributors may be used to endorse or promot...

Страница 50: ...r Canada Ñ Ñ IC Industry Canada Notice This device complies with Industry Canada licence exempt RSS standard s Operation is subject to the following two conditions 1 This device may not cause interference and 2 this device must accept any interference including interference that may cause undesired operation of the device CAUTION This equipment complies with FCC IC radiation exposure limits set fo...

Страница 51: ...íses que hayan adoptado sistemas independientes de recogida de residuos Los productos con el símbolo de un contenedor con ruedas tachado no podrán ser desechados como residuos domésticos Los equipos eléctricos y electrónicos al final de la vida útil deberán ser reciclados en instalaciones que puedan dar el tratamiento adecuado a estos productos y a sus subproductos residuales correspondientes Póng...

Страница 52: ... B5K 0672 10b_K_EnFrEs indb 52 2019 07 04 9 20 ...

Отзывы: