


— 6 —
English
Operations
INTEGRATED QUAD
1 BIT D/A
CONVERTER
KDC-D300
CD PLAYER
DIGITAL OPTIMUM
SERVO CONTROL
11BAND11BAND
SPECTRUM ANALYZER
60
120
250
380
500
750
1k
2k
4k
8k
16k
DPAC
DISP
MENU
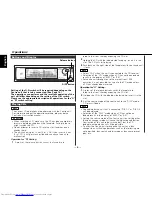
Buttons and Display
The various CD operations are performed with the Centre unit.
For information about the operation method, please see the
Centre unit instruction manual.
• When inserting a CD, make sure the CD has been completely
drawn in before pushing back the faceplate. Failing to do so
might scratch the CD.
• Do not attempt to insert a CD into the slot if another one is
already there.
• The unit can only play 12 cm (5 in). CDs. If you insert a 8 cm
(3 in). CD, it will get stuck inside and can cause the unit to
malfunction.
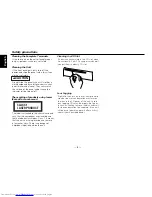
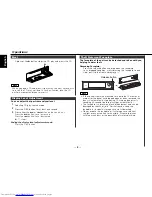
Operation for "N" Setting:
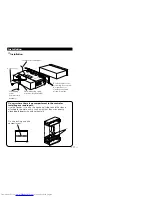
A press of the release button causes the faceplate to
1
2
CAUTION
NOTE
Playing CDs
Setting of the O-N switch will be required depending on the
Centre unit that is to be connected. (See Page 10.)
The operations you perform and the resultant operation of the
unit will differ depending on the setting of the O-N switch.
Please see the appropriate description of operations for the "O"
or "N" switch setting.
Release button
DISP button
drop to the front, thereby exposing the CD slot.
Holding the CD with the labeled side facing up, insert it in the
slot. The CD will start playing.
Push back on the right side of the faceplate with your hand until
it locks.
• Select "CD2" when this unit is connected to tha CD receiver.
• Selection of the "CD" mode when a CD has not been loaded
results in the display of "EJECT" or "E-01".
• For centre units brought on to the market from 1999
onwards, it is not possible to switch to the CD mode unless
a CD has already been inserted.
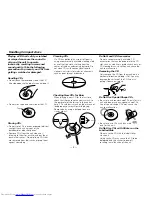
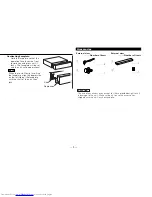
Operation for "O" Setting:
A press of the release button causes the faceplate to
drop to the front, thereby exposing the CD slot.
Holding the CD with the labeled side facing up, insert it in the
slot.
Set the source mode of the centre unit to the "DISC" mode.
CD play will begin.
• Depending on the unit that is connected, "DISC-1" or "DISC-2"
will be displayed.
• Selection of the "DISC" mode when a CD has not been
loaded results in the display of "EJECT" or "E-01".
• Setting the source mode of the Centre unit to a setting other
than disc changer mode will cause the indicators and button
illumination of this unit to be switched off, but the CD
loading/eject operation will still be possible.
• To allow the Centre unit to recognize this unit as a disc
changer, disc switching operations such as the following are
not permitted: disc search and disc repeat, disc name preset
play, etc.
NOTE
3
2
1
NOTE
3
2