background image

10


|


English

Accessories/ Installation Procedure

Accessories

1

..........1

2

..........2

3

..........4

4

..........4

5

..........2

6

..........1


Installation Procedure

1.  To prevent short circuits, remove the key from 

the ignition and disconnect the 

-

 terminal of 

the battery.

2.  Install the FM/AM antenna and connect the 

antenna wire to the HD Radio tuner.

3.  Connect the HD Radio tuner and the control unit 

using the provided connection wire.

4.  Make the proper input and output wire 

connections for each unit.

5.  Install the unit in your car.
6. Reconnect the 

-

 terminal of the battery.

7.  Press the reset button on the control unit.

•  Do not connect the control wire while the control unit is 

turned ON.

•  Be sure to press the reset button on the control unit after 

installation.

•   If your car is not prepared for this special connection-

system, consult your Kenwood dealer.

•   Make sure that all wire connections are securely made by 

inserting jacks until they lock completely.

•   Do not let unconnected wires or terminals touch metal 

on the car or anything else conducting electricity. To 
prevent short circuits, also do not remove the caps on 
the ends of the unconnected wires or the terminals.

•  Insulate unconnected wires with vinyl tape or other 

similar material.

•   Take care so that the antenna wire and other connection 

wires are not caught by mobile parts. Otherwise wire 
disconnection or other trouble may result.

•   Do not apply too much force on the antenna wire, other 

connection wires and connectors by bending a wire, 
etc. Otherwise wire disconnection or other trouble may 
result.

•   After the unit is installed, check whether the brake lamps, 

indicators, wipers, etc. on the car are working properly.

!KTC-HR100TR.indb   10

!KTC-HR100TR.indb   10

05.4.15   11:33:24 AM

05.4.15   11:33:24 AM

Содержание HD Radio TUNER

Страница 1: ...s will help you obtain the best performance from your new HD Radio tuner For your records Record the serial number found on the back of the unit in the spaces designated on the warranty card and in the space provided below Refer to the model and serial numbers whenever you call upon your Kenwood dealer for information or service on the product Model KTC HR100TR KTC HR100MC Serial number KTC HR100T...

Страница 2: ...eset Memory Preset Tuning Auto Memory Entry Switching Display Text Scroll In HD Radio source Accessories Installation Procedure 10 Connecting Wires to Terminals 11 Mounting the HD Radio tuner unit 13 Troubleshooting Guide 14 Specifications 15 KTC HR100TR indb 2 KTC HR100TR indb 2 05 4 15 11 33 20 AM 05 4 15 11 33 20 AM ...
Страница 3: ...nction will be no longer possible Also note that the SYNC and TI items in the menu will be displayed but will not function 2 The HD Radio cannot be selected as a dual zone source 3 This model has the Multi key system 4 Some of the functions are set up by Menu for this model 5 Refer to this manual for the operation See the manual of the control unit for the operation method 2WARNING To prevent inju...

Страница 4: ...dry soft cloth such as a silicon cloth If the faceplate is stained badly wipe the stain off with a cloth moistened with neutral cleaner then wipe neutral detergent off Applying spray cleaner directly to the unit may affect its mechanical parts Wiping the faceplate with a hard cloth or using a volatile liquid such as thinner or alcohol may scratch the surface or erases characters About CD players d...

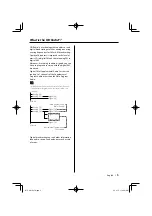
Страница 5: ...to 7 channels of the Supplemental Program Audio other than the Main Program Audio Main Program Audio hereafter called Main channel Supplemental Program Audio hereafter called Sub channel Analog AM Digital AM Analog AM Digital AM HD AM band HD FM band Analog FM Digital FM Analog FM Digital FM 1ch Analog FM Digital FM 2ch Digital FM 8ch Digital FM Main Program Audio Main channel Supplemental Program...

Страница 6: ...frequency When Tune up button is pressed it will switch to the next frequency if is it switched before receiving the Digital broadcasting When Tune down button is pressed it will be received from Analog broadcasting if the Digital broadcasting has never been received When Tuning Mode is set to Manual the frequency will be switched while pressing 4 or buttons Tuning Mode Sets the tuning mode Press ...

Страница 7: ... the frequency to put in the memory Press the 4 or button 3 Multi key model only 3 of Model list Select the preset function before Refer to Station Preset Memory of the tuner function See the control unit instruction manual for its operations 4 Put the frequency and channel in the memory Press the desired 1 6 button for at least 2 seconds The preset number display blinks 1 time On each band 1 stat...

Страница 8: ... be set up The channel information cannot be displayed in the Frequency display Displayed information except Frequency are shown only when you receive text in digital broadcast If text cannot be displayed frequency will be shown Though some models have two lines in the display you cannot display the same information in both the Upper Part and the Lower Part Operations Auto Memory Entry Putting a s...

Страница 9: ...HF3 bands AM button Select the HD AM band 4 buttons Tune up or down program 0 9 buttons Press buttons 1 6 to recall preset stations In the control unit with P S indicator the indicator will be turned ON or OFF as described below 1 M S P S indicator is OFF both of P and S indicators are OFF 2 M S P S indicator is ON both of P and S indicators are ON 3 M S P S indicator blinks both of P and S indica...

Страница 10: ...ial connection system consult your Kenwood dealer Make sure that all wire connections are securely made by inserting jacks until they lock completely Do not let unconnected wires or terminals touch metal on the car or anything else conducting electricity To prevent short circuits also do not remove the caps on the ends of the unconnected wires or the terminals Insulate unconnected wires with vinyl...

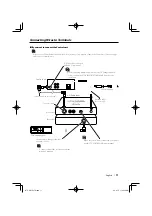
Страница 11: ... side Rear side Connection wire Accessory1 When you use Controller unit optional accessory refer to If you want to connect the Controller of the next page and connect Controller unit When the control unit is connected you cannot use this TO CONTROLLER input terminal Antenna cable Accessory6 When connecting multiple units such as the CD Changer and KCA S210A connect the KTC HR100TR KTC HR100MC dire...

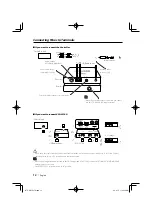
Страница 12: ...TO CHANGER 1 TO H U TO SWITCH AUX OFF ON SWITCH PROTOCOL O N IN AUX N Please keep the total extension of the control cable from the control unit to the disc changer to 13 m or less Control cable lengths in excess of 13 m will cease to function properly When connecting multiple units such as the CD Changer and KCA S210A connect the KTC HR100TR KTC HR100MC directly to the control unit Set the PROTOC...

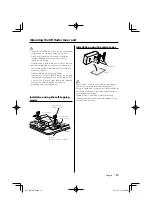
Страница 13: ... objects on top of it When installing to the car the unit should be securely fastened at a location that will not interfere with driving When making a hole in the chassis check that the gas tank break pipe wire harness or other part is not located on the other side and be careful not to cause scratches When attaching the mounting fittings Accessory2 to the HD Radio tuner unit use only the supplied...

Страница 14: ... between stereo and monaural too often Receiving condition is bad or unstable Stereo is chosen when receiving condition is good and it switches to monaural when the condition becomes bad The source mode was changed or the power switch was turned on The monaural signals are received several seconds after power on or after FM tuning of HD Radio HD Radio tuner is connected to KCA S210A or other units...

Страница 15: ... to Noise ratio STEREO 70 dB Analog AM tuner section Frequency range 10 kHz space 530 kHz 1700 kHz Usable sensitivity S N 20dB 28 dBµ 25 µV Digital AM tuner section Frequency range 10 kHz space 530 kHz 1700 kHz Frequency response 3 dB 40 Hz 15 kHz Signal to Noise ratio STEREO 70 dB General Operating voltage 14 4 V 11 16 V allowable Current consumption 500 mA Operating Environment 20 C 70 C Install...

Страница 16: ... présélections Accord pré réglé Entrée en mémoire automatique Mode de commutation de l affichage Défilement du texte En source HD Radio Accessoires Procédure d installation 24 Connexion des câbles sur les prises 25 Montage de l unité HD Radio 27 Guide de depannage 28 Spécifications 29 KTC HR100TR indb 16 KTC HR100TR indb 16 05 4 15 11 33 28 AM 05 4 15 11 33 28 AM ...

Страница 17: ...consulter le manuel d utilisation de l appareil pour le fonctionnement du menu 1 La fonction RDS ne sera plus possible Noter également que les éléments SYNC et TI du menu seront affichés mais ne fonctionneront pas 2 La fonction HD Radio ne peut pas être sélectionnée comme source double zone 3 Ce modèle dispose du système multi touches 4 Certaines des fonctions sont configurées par le Menu pour ce ...

Страница 18: ...e avec un chiffon sec et doux comme ceux au silicone Si le panneau avant est très taché essuyez le avec un chiffon imbibé d un produit de nettoyage neutre et ensuite essuyez toute trace de ce produit La pulvérisation directe de produit de nettoyage sur l appareil risque d affecter les pièces mécaniques L utilisation d un chiffon rugueux ou d un liquide volatile tel que solvant ou alcool pour essuy...

Страница 19: ...lémentaires peut envoyer jusqu à 7 canaux de programmes audio supplémentaires en plus du programme audio principal Programme audio principal appelé ci après Canal principal Programme audio supplémentaire appelé ci après Canal auxiliaire AM analogique AM numérique AM analogique AM numérique Bande AM HD Bande FM HD FM analogique FM numérique FM analogique FM 1can numérique FM analogique FM 2can numé...

Страница 20: ...lection de la fréquence Lorsqu on appuie sur la touche de syntonisation vers le haut elle commutera sur la prochaine fréquence si elle est commutée avant de recevoir l émission numérique Mode d accord Choisissez le mode d accord Appuyez sur la touche AUTO Chaque fois que l on appuie sur la touche le mode d accord change de la manière suivante Modèles de menu n 4 dans la liste des modèles 1 Affiche...

Страница 21: ...n mémoire Appuyez sur la touche 4 ou 3 Modèle multi touche uniquement n 3 dans la liste des modèles Sélectionnez la fonction présélectionnée auparavant Veuillez consulter Mémoire de station pré réglée dans la fonction tuner Veuillez consulter le manuel d utilisation de l appareil pour son fonctionnement 4 Mettez la fréquence et le canal en mémoire Appuyez sur la touche souhaitée 1 6 pendant au moi...

Страница 22: ...es informations affichées sont indiquées uniquement lorsque le texte est reçu en émission numérique Si le texte ne peut pas être affiché la fréquence sera indiquée Bien que certains modèles présentent deux lignes d affichage il est impossible d afficher la même information à la fois dans la partie supérieure et dans la partie inférieure Opérations Entrée en mémoire automatique Mettre automatiqueme...

Страница 23: ...ner la bande HD AM Touches 4 Programme de syntonisation vers le haut ou vers le bas Touches 0 9 Appuyez sur les touches 1 6 pour rappeler des stations pré réglées Sur l unité de commande avec indicateur P S l indicateur sera activé ou désactivé comme indiqué ci dessous 1 L indicateur M S P S est désactivé les deux indicateurs P et S sont désactivés 2 L indicateur M S P S est activé les deux indica...

Страница 24: ...ue toutes les connexions de câble sont faites correctement en insérant les fiches jusqu à ce qu elles soient verrouillées Ne laissez pas des câbles non connectés ou des prises toucher les parties métalliques de la voiture ou autres conducteurs électriques Pour éviter les courts circuits ne retirez pas non plus les capuchons à l extrémité des câbles non connectés ou des prises Isolez les câbles non...

Страница 25: ...t Arrière Câble de connexion Accessoire1 Lorsque vous utilisez l unité de commande accessoire en option reportez vous à la section Si vous souhaitez connecter l unité de commande sur la page suivante et connectez l unité de commande Lorsque l unité de commande est connectée vous ne pouvez pas utiliser cette borne d entrée TO CONTROLLER Câble d antenne Accessoire6 Lors de la connexion de plusieurs ...

Страница 26: ...GER 2 TO CHANGER 1 TO H U TO SWITCH AUX OFF ON SWITCH PROTOCOL O N IN AUX N Veiller à ce que l extension totale du câble de commande allant de l unité de commandes au changeur de disque soit inférieure à 13 m Les câbles de commande de plus de 13 m ne fonctionneront pas correctement Lors de la connexion de plusieurs unités comme le changeur de CD et le KCA S210A connectez le KTC HR100TR KTC HR100MC...

Страница 27: ...le boîtier doit être soigneusement attaché à un endroit où il ne gênera pas la conduite Lorsque vous faites des trous dans le châssis assurez vous que le réservoir d essence la tuyauterie de frein le dispositif d attache des câbles ni aucune autre pièce ne se trouvent de l autre côté du châssis et faites bien attention de ne pas faire d égratignures Lorsque vous attachez les dispositifs de fixatio...

Страница 28: ...réo et monaural Les conditions de réception sont mauvaises ou instables Le mode stéréo est choisi lorsque les conditions de réception sont bonnes Le mode bascule ensuite sur monaural lorsque les conditions de réception se dégradent Le mode source a été changé ou bien l interrupteur d alimentation a été activé Les signaux monauraux sont reçus plusieurs secondes après la mise sous tension ou après l...

Страница 29: ...t Stéréo 70 dB Section tuner AM analogique Plage de fréquence espacement de 10 kHz 530 kHz 1700 kHz Sensibilité utilisable S N 20dB 28 dBµ 25 µV Section tuner AM numérique Plage de fréquence espacement de 10 kHz 530 kHz 1700 kHz Réponse en fréquence 3 dB 40 Hz 15 kHz Taux de Signal Bruit Stéréo 70 dB Général Tension de fonctionnement 14 4 V 11 16 V admissible Courant absorbé 500 mA Milieu de fonct...

Страница 30: ...ntonización preajustada Entrada de Memoria Automática Cambio de Visualización Despliegue de Texto En fuente HD Radio Accesorios Procedimiento de instalación 38 Conexión de cables a los terminals 39 Montaje de la unidad HD Radio 41 Guia Sobre Localización De Averias 42 Especificaciones 43 KTC HR100TR indb 30 KTC HR100TR indb 30 05 4 15 11 33 35 AM 05 4 15 11 33 35 AM ...

Страница 31: ...ncionamiento 2ADVERTENCIA Para evitar el riesgo de lesiones y o fuego observe las siguientes precauciones Para evitar cortocircuitos nunca coloque ni deje objetos metálicos por ejemplo monedas o herramientas metálicas dentro de la unidad 2PRECAUCIÓN Para evitar daños en la unidad tome las siguientes precauciones No instale la unidad en un sitio expuesto a la luz directa del sol o excesivamente húm...

Страница 32: ...mo un paño de silicona Si la placa frontal está muy sucia límpiela con un paño humedecido en jabón neutro y luego aclárelo Si se aplica algún spray para limpiar directamente a la unidad puede que afecte a sus partes mecánicas Si se limpia la placa frontal con un paño duro o utilizando líquido volátil tal como disolvente o alcohol puede que se raye la superficie o que se borren algunos caracteres A...

Страница 33: ...ementario diferentes del audio del programa principal Audio del programa principal de aquí en adelante denominado canal principal Audio del programa suplementario de aquí en adelante denominado canal secundario AM analógico AM digital AM analógico AM digital Banda AM de HD Banda FM de HD FM analógico FM digital FM analógico FM digital de 1 canal FM analógico FM digital de 2 canal FM digital de 8 c...

Страница 34: ...es digitales Cuando se pulsa el botón de sintonización en forma ascendente este conmutará a la frecuencia siguiente Modo de Sintonización Elija el modo de sintonización Pulse el botón AUTO Cada vez que se pulse el botón el modo de Sintonización cambiará como se indica a continuación Modelos de menús 4 de la lista de modelos 1 Visualice el modo de menú con la unidad de control y seleccione una opci...

Страница 35: ...ia Pulse el botón 4 o 3 Sólo el modelo de múltiples teclas 3 de la lista de modelos Seleccione antes la función de preajuste Sintonización preajustada Recuperación de la frecuencia y del canal de la memoria 1 Seleccione la banda Pulse el botón FM o AM 2 Sólo el modelo de múltiples teclas 3 de la lista de modelos Seleccione antes la función de preajuste Remítase a Memoria de presintonización de emi...

Страница 36: ...a o título de la canción La información de canal no se puede visualizar en la pantalla de frecuencia La información visualizada excepto Frequency se muestra sólo durante la recepción de texto en modo de radiodifusión digital Si el texto no puede visualizarse se visualiza la frecuencia en su lugar Aun cuando algunos modelos tienen dos líneas en la pantalla no es posible visualizar la misma informac...

Страница 37: ...M Seleccione una banda de HD AM Botones 4 Sintonización de programas en forma ascendente o descendente Botones 0 9 Pulses los botones 1 6 para recuperar las emisoras predefinidas En la unidad de control con indicador P S el indicador se encenderá o apagará como se describe a continuación 1 El indicador M S P S está apagado los indicadores P y S están apagados 2 El indicador M S P S está encendido ...

Страница 38: ...ese de efectuar correctamente las conexiones de los cables insertando los jacks hasta que queden firmemente bloqueados No permita que los cables o terminales no conectados entren en contacto con las partes metálicas del automóvil o con cualquier otra parte conductora de electricidad Para evitar cortocircuitos no retire las tapas de los extremos de los cables o terminales no conectados Enrolle los ...

Страница 39: ...o trasero Cable de conexión Accesorio1 Cuando utilice la unidad del controlador accesorio opcional consulte Si desea conectar el controlador de la página siguiente y conecte la unidad del controlador Cuando se conecta la unidad del controlador no se puede utilizar este terminal de entrada TO CONTROLLER Cable de la antena Accesorio6 Cuando realice la conexión de múltiples unidades como por ejemplo ...

Страница 40: ...ANGER 2 TO CHANGER 1 TO H U TO SWITCH AUX OFF ON SWITCH PROTOCOL O N IN AUX N Mantenga la extensión total del cable de control desde la unidad de control hasta el cambiador de discos en 13 m o menos Un cable de control que sobrepase los 13 metros dejará de funcionar adecuademente Cuando realice la conexión de múltiples unidades como por ejemplo el cambiador de CD y el KCA S210A conecte el KTC HR10...

Страница 41: ...ventilado y no coloque objetos encima del mismo Durante la instalación en el vehiculo la unidad debe quedar firmemente sujeta en un sitio que no interfiera con la conducción Al realizar un orificio en el chásis compruebe que el depósito de gasolina el tubo de los frenos el mazo de cables u otras piezas no se encuentran del otro lado ademas de tener cuidado de no dejar arañazos Al colocar los acces...

Страница 42: ...masiada frecuencia Las condiciones de recepción son malas o inestables Se selecciona estéreo cuando las condiciones de recepción son buenas y cambia a monoauricular cuando las condiciones de recepción se vuelven malas o inestables El modo de fuente fue modificado o se activó el interruptor de alimentación Las señales monoaurales se reciben varios segundos después de haberse realizado el encendido ...

Страница 43: ...ón señal a ruido MONO 70 dB Sección del sintonizador AM analógico Gama de frecuencias intervalo 10 kHz 530 kHz 1700 kHz Sensibilidad útil Relación señal ruido 20dB 28 dBµ 25 µV Sección del sintonizador AM digital Gama de frecuencias intervalo 10 kHz 530 kHz 1700 kHz Respuesta de frecuencia 3 dB 40 Hz 15 kHz Relación señal a ruido MONO 70 dB General Tensión de funcionamiento 14 4 V 11 16 V admisibl...

Страница 44: ... KTC HR100TR indb 44 KTC HR100TR indb 44 05 4 15 11 33 42 AM 05 4 15 11 33 42 AM ...

Отзывы: