background image

G-EQ300  (En/K)

1 6

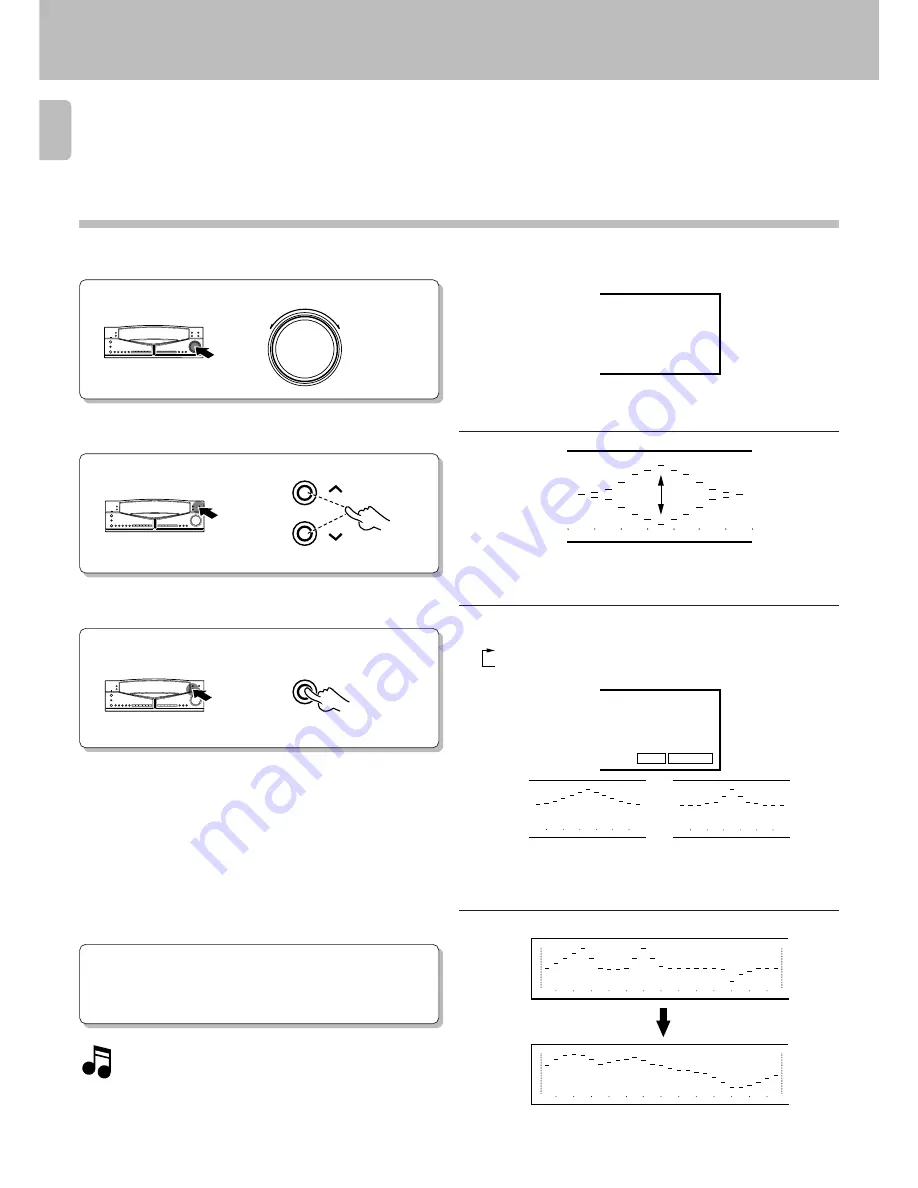
Select the center frequency.

6

Adjust the level.

Select the inclination of the curve.

7

5

When adjustment of center frequencies F2 and/
or F3 is required:

8

9 8 H Z

400

625

1k

250

63

98

160

Pressing the 

FLAT

 key allows to start adjustment from the flat level

position.

NARROW

WIDE

One the two
shall light up.

WIDE

NARROW

400

625

1k

250

63

98

160

400

625

1k

250

63

98

160

2.5k

3.9k

6.3k

10k

16 k

400

625

1k

1.5k

250

40

63

98

160

2.5k

3.9k

6.3k

10k

16 k

400

625

1k

1.5k

250

40

63

98

160

One adjusted, the curve remains the same until next time it is pressed.

For finer adjustment, perform the graphic mode operation described
in the following page.

&

Creation of desired equalizer patterns

Repeat steps 

4

 to 

7

 above for each center frequency.

Each press switches the display as follows.

WIDE

:

Curve with a gentle slope.

NARROW:

Curve with a sharp slope.

When two curves F1 and F2 or three curves F1, F2 and F3 are set,
the curve combining them will be displayed in a few seconds.

FREQUENCY JOG

EQ.LEVEL

WIDE/NARROW

Содержание G-EQ300

Страница 1: ...GRAPHIC EQUALIZER KENWOOD CORPORATION G EQ300 B60 3538 08 KO K P Y C M X T 97 12 11 10 9 8 7 6 5 4 3 2 1 96 12 11 10 9 8 7 5 INSTRUCTION MANUAL MC ...

Страница 2: ...placement use only a 13 Amp ASTA approved BS1362 fuse 2 The fuse cover must be refitted when replacing the fuse in the moulded plug 3 Do not cut off the mains plug from this equipment If the plug fitted is not suitable for the power points in your home or the cable is too short to reach a power point then obtain an appro priate safety approved extension lead or adapter or consult your dealer If no...

Страница 3: ...ecording patterns for playback on car stereo or from 30 types of recording patterns for playback on headphone stereo is also available Select the optimum equalizer pattern according to the music genre and purpose of use of the pattern Accessories Demonstration method 11 Operation of graphic equalizer 12 Operation of MANUAL feature 12 Operation of REFERENCE feature 13 Equalizer pattern list 14 Crea...

Страница 4: ... safety and operating instructions should be retained for future reference 1 Power sources The appliance should be connected to a power supply only of the type described in the instruction manual or as marked on the appliance If you are not sure of the type of power supply to your home consult your appliance dealer or local power company For appliances intended to operate from battery power or oth...

Страница 5: ...ation of antenna discharge unit connection to grounding electrodes and requirements for the grounding electrode See Figure 18 Power lines An outside antenna system should not be located in the vicinity of overhead power lines or other electric light or power circuits or where it can fall into such power lines orcircuits Wheninstallinganoutsideantennasystem extreme care should be taken to keep from...

Страница 6: ...correctly This is not a malfunction however the unit should be dried To do this turn the ON STANDBY switch ON and leave the unit as it is for several hours Be especially careful in the following conditions When the unit is brought from a cold place to a warm place and there is a large temperature difference When a heater starts operating When the unit is brought from an air conditioned place to a ...

Страница 7: ...d music genres and their equal izer patterns Frequency keys F1 F2 F3 Each key can store a desired center frequency FREQUENCY JOG knob Rotate the control knob to adjust the frequency band range 90 EQ LEVEL UP DOWN keys Press the UP or DOWN key to increase or decrease the equal izer level EQ EFFECT key Press to turn the equalizer mode ON and OFF TAPE key Use when playing back or recording a tape DIS...

Страница 8: ... referring to In case of difficulty Connect to the TAPE 2 MONITOR jacks Set the TAPE 2 MONITOR switch to the monitoring position Australia Other countries Audio cords Audio cords System control cord To wall AC outlet This unit AV CONTROL CENTER Use the numbers 9 0 on the rear panel of this unit when connecting it to an AV CONTROL CENTER or RECEIVER Connections are easily completed by using Audio c...

Страница 9: ...lugs are in serted all the way in to the system control terminals 4 When a cassette deck is connected to the graphic equalizer do not connect the sys tem control cord to the cassette deck About the system control operations Available operations when SERIES 21 components are connected through system control cords Notes Notes About the system control connections POWER AMPLIFIER GRAPHIC EQUALIZER CAS...

Страница 10: ...ion of the graphic equalizer curves starts 2 5k 3 9k 6 3k 10k 16 k 400 625 1k 1 5k 250 40 63 98 160 Peak hold level Spectrum analyzer display mode Displays the frequency distribution of the source being played to allow under standing at a glance The peak value of the varying level of each frequency range is held and displayed for about 0 5 second Each press switches the display modes as follows 1 ...

Страница 11: ...tration method Demonstration of equalizer curves can be displayed to help the user understand the features of the equalizer better Each press switches the display modes as follows 1 Graphic equalizer display mode 2 Spectrum analyzer display mode 3 DEMO Demonstration mode To stop demonstration DISPLAY Keys and control used in the operations described on this page DISPLAY ...

Страница 12: ...factory preset for this mode too In this mode it is also possible to preset assign equalizer patterns created by the user in place of the factory presets Set to MANUAL Select by pressing one of preset keys 1 to 5 Each press switches the display as follows 1 MANUAL 2 REFERENCE FLAT key Pressing the FLAT key makes the displayed curve flat This occurs in any mode The pattern being displayed remains t...

Страница 13: ... indicator goes off REFERENCE EQ ON Lights up Operation of REFERENCE feature Five exemplary patterns have been preset at the factory Select by pressing one of preset keys 1 to 5 Each press switches the display as follows 1 MANUAL 2 REFERENCE REFERENCE Lights up Operation of graphic equalizer EQ EFFECT MANU REF 1 2 3 4 5 M EQ EFFECT Keys and control used in the operations described on this page ...

Страница 14: ...s sound effect without feeling of sharpness M2 Vocal For listening vocal sound with enhanced expansion M3 Percussion For listening percussion sound with expansion and powerfulness M4 Car For recording tape with suitable tone to be played on car stereo M5 Headphones For recording tape with suitable tone to be played on headphone stereo Preset equalizer pattern R1 to R5 REFERENCE R1 Mild For listeni...

Страница 15: ...n be selected between WIDE gentle slope and NARROW steep Continued on next page PARAMETRIC Lights up F1 Lights up EQ ON Lights up Operation in PARAMETRIC mode Each press switches the display as follows 1 GRAPHIC Mode for adjusting equalizer curves 2 PARAMETRIC Mode for creating a curve according to center frequencies Each press switches the display modes as follows 1 Graphic equalizer display mode...

Страница 16: ...400 625 1k 1 5k 250 40 63 98 160 2 5k 3 9k 6 3k 10k 16 k 400 625 1k 1 5k 250 40 63 98 160 One adjusted the curve remains the same until next time it is pressed For finer adjustment perform the graphic mode operation described in the following page Creation of desired equalizer patterns Repeat steps 4 to 7 above for each center frequency Each press switches the display as follows 1 WIDE Curve with ...

Страница 17: ... equalizer curve for each frequency band provided The curve created in the param eter mode can be fine adjusted in this mode Creation of desired equalizer patterns Operation in GRAPHIC mode GRAPHIC lights up GRAPHIC Repeat steps 4 and 5 above Each press switches the display modes as follows 1 Graphic equalizer display mode 2 Spectrum analyzer display mode 3 DEMO Demonstration mode Each press switc...

Страница 18: ...ory registered patterns M1 to M5 1 Display the equalizer pattern 2 Press and hold the preset key for more than 5 seconds Pattern is preset under the number of the numeric key pressed Up to five patterns can be preset in the same manner When a pattern has previously been preset under the numeric key pressed the newly preset pattern replaces the previous pattern MEMORY Lights up MEMORY MEMORY Creati...

Страница 19: ...s The repetitions resume when the PAUSE key is pressed again 4Select the desired tone pattern Until you actually select a tone pattern the five patterns available with the genre selected in step 3 are displayed in repeated cycles and the tones heard also change accordingly Five of the genre keys are also used as pattern No keys 1 2 3 4 5 EQ ON MANUAL GRAPHIC J A Z Z 5 After the tone pattern has be...

Страница 20: ...or use in recording of tapes to be played on headphone stereo players To cancel GENRE mode REVERSE key When a car stereo or headphone stereo is used the special curveforuseinrecordingiscombinedwiththedisplayedcurve For recording sound together with the equalizer effect applied to it see Tape recording of sound with equalizer effect Press the REVERSE key to reverse the equalizer curve 2 5k 3 9k 6 3...

Страница 21: ...ich has been recorded together with the equalizer effect set the EQ EFFECT key to OFF To stop tape playback TAPE EQ ON 2 5k 3 9k 6 3k 10k 16 k 400 625 1k 1 5k 250 40 63 98 160 EQ ON Lights up Lights up Applying equalizer effect to tape playback Make preparation for playback For the preparation for playback refer to the instruction manuals of the cassette tape deck See pages to Press the stop key o...

Страница 22: ...9k 6 3k 10k 16 k 400 625 1k 1 5k 250 40 63 98 160 EQ ON Lights up Turns off In addition to ordinary recording special equalizer recording patterns refer to page 14 can be used for effective playback on car stereo or headphone stereo Preparation Make preparation for recording For the preparation for recording refer to the instructionmanualsofthecassettetapedeck 5Start recording it onto tape To stop...

Страница 23: ...my move this control down Bass range 98 Hz 160 Hz Usually the listening room resonance frequency is in this range To eliminate bass resonance move this control down Mid bass range 250 Hz 400 Hz This range is the basis of music Whether the sound is rich or not depends on this range When the playback sound is not so good move this control up Mid range 625 Hz 1 kHz When this control is moved up or do...

Страница 24: ...eturns the micro processor to the condition when it left the factory What appears to be a malfunction may not always be serious If your unit should not perform as expected consult the table below to see if the problem can be corrected before seeking help from your dealer or service representative Symptom Remedy In case of difficulty The power cord is plugged incompletely The system control cord is...

Страница 25: ...voltage at 1 T H D 7 V Output Impedance Line 2 2 kΩ Specifications Notes Notes 1 KENWOOD follows a policy of continuous advancements in development For this reason specifications may be changed without notice 2 The full performance may not be exhibited in an extremely cold location under a water freezing temperature 3Caution Read this page carefully to ensure safe operation General 3 AC outlets Fo...

Страница 26: ...rence in a residential installation This equipment may cause harmful interference to radio communications if it is not installed and used in accordance with the instructions However there is no guarantee that interference will not occur in a particular installation If this equipment does cause harmful interference to radio or television reception which can be determined by turning the equipment of...

Страница 27: ...G EQ300 En K 2 7 MEMO ...

Страница 28: ...found on the back of the unit in the spaces designated on the warranty card and in the space provided below Refer to the model and serial numbers whenever you call upon your dealer for information or service on this product Model Serial Number ...

Отзывы: