background image

16

16

17

Return to the Top page

DVD, VCD

Return to the Top page

DVD, VCD

DVD/VCD Basic Operation

Most functions can be controlled from the source control screen and playback screen.

NOTE

•  Set the remote controller mode switch to DVD mode before starting operation, see 

Switching the operation 

mode (P.101)

.

•  The screen shot below is for DVD. It may be different from the one for VCD.

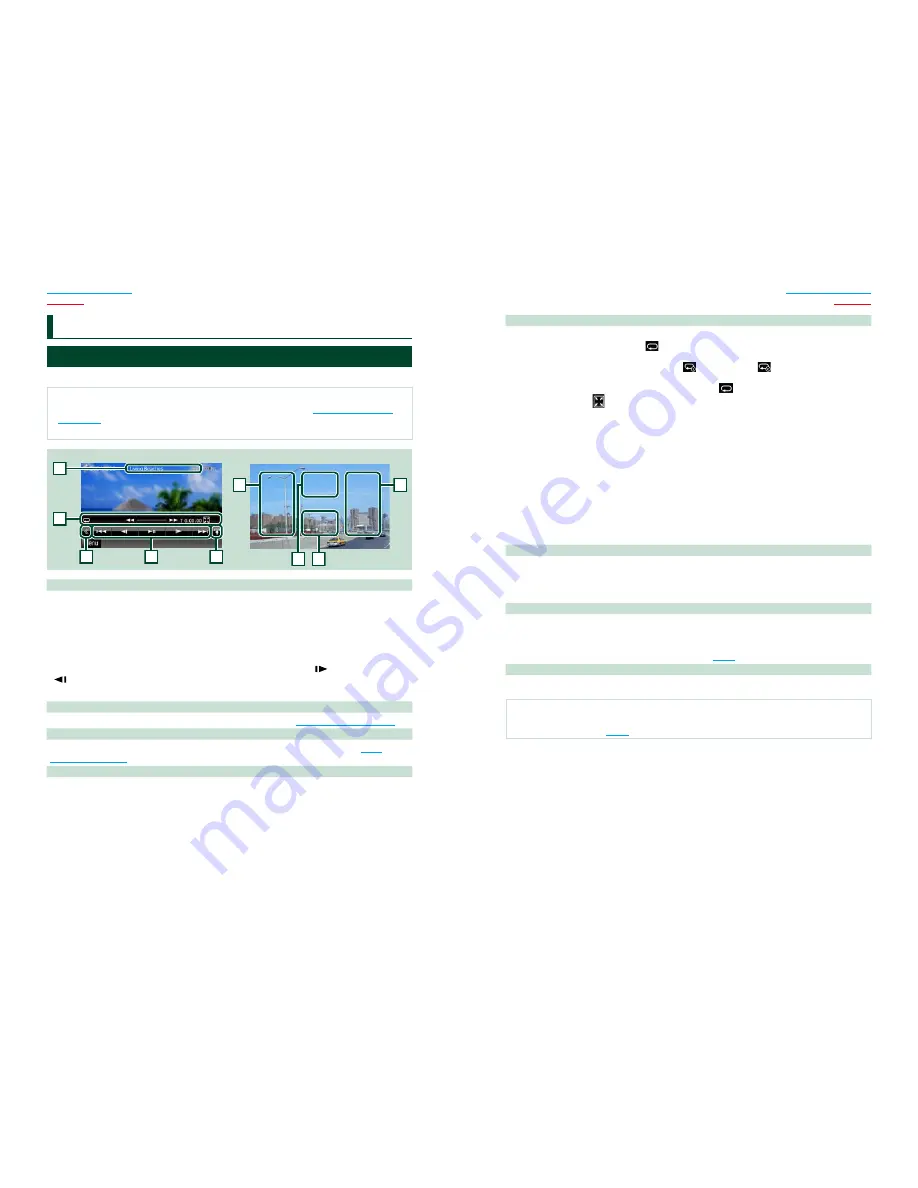
2

3

4

1

5

Video screen

Control screen

6

6

7

8

1  Information display

Displays the following information.
• 

Title #, Chap #

: DVD title and chapter number display

• 

Track #/Scene #

: VCD track or scene number display 

*Scene # is displayed only when PBC is on.

• 

3

¡

¢

7

etc.

: Current play mode display 

The meanings of each icon are as follows; 

3

 (play), 

¡

 (fast forward), 

1

 (fast backward), 

¢

 (search up), 

4

 (search down), 

7

 (stop), 

7

R (resume stop), 

8

 (pause), 

 (slow playback), 

 (slow reverse playback).

Touch this area to display the disc lable name.

2  Multi function key

Touch to switch the multi function menu. For details on the menu, see 

Multi function menu (P.18)

.

3  Multi function menu

Various functions can be performed by using keys in this area. For details on the keys, see 

Multi 

function menu (P.18)

.

4  Control switching key

Unavailable in DVD/VCD source.

D

VD/Video CD (VCD) Operation

5  Sub function menu

The following functions can be performed by using keys in this area.
• 

Repeats the current content

:   Touch  [ 

 ]. Each time you touch the key, repeat mode switches in the 

following sequence;  

DVD

: "title repeat" 

, "chapter repeat" 

, "function off" 

VCD

 (PBC On): Does not repeat 

VCD

 (PBC Off ): "track repeat" 

, "function off"

• 

Hides all keys

: Touch [ 

 ].

• 

Fast forward or fast backward

:   Touch  [

1

] or [

¡

]. Each time you touch the key, the speed 

changes; standard, 2 times, 3 times.

• 

Confirms play time

: See #:##:##.

DVD

:  You can switch the time display between title play time, chapter play 

time, and title remaining time. Each time you touch, the display switches 

between “T #:##:##” (title play time display), “C #:##:##” (chapter play time 

display), and “R #:##:##” (title remaining time display). 

As well as the time display, the bar indicating current location appears.

VCD (PBC off)

:  You can also confirm disc remaining time by touching time 

display. Each time you touch, the display switches between “P 

##:##” (play time display) and “R ##:##” (disc remaining time).

• 

Confirms the current location

:  See the bar in center (DVD only). The bar does not appear when the 

time display is remaining time display.

6  Searching area

Touch to search the next/previous content.
Scrolling from center of display to left or right performs fast backward or fast forward. Each time you 

touch each area, the speed changes; standard, 2 times, 3 times. To stop fast backward/forward, touch 

center of the display.

7  Menu display area

This area functions differently depending on the current status.
• 

During DVD playback

:  Displays the DVD menu. During the menu display, displays the highlight 

control screen.

• 

During VCD playback

: Displays the Zoom Control screen 

(P.20)

.

8  Key display area

Touch to display the last control screen.

NOTE

•  If you use a remote controller, you can jump directly to the desired image with entering the chapter number, 

scene number, play time, etc 

(P.101)

.

Содержание DNX9990HD

Страница 1: ...ion and operation procedures will help you obtain the best performance from your new GPS Navigation System For your records Record the serial number found on the back of the unit in the spaces designated on the warranty card and in the space provided below Refer to the model and serial numbers whenever you call upon your Kenwood dealer for information or service on the product Model DNX9990HD Seri...

Страница 2: ...s used to provide clear explanations of the operations For this reason they may be different from the actual panels In operation procedures bracket shape indicates the key or button you should control indicates the name of panel buttons name of touch keys EN2 I Contents Precautions AWARNING _________ Cleaning The Unit_______ How To Reset Your Unit _____ 3 4 4 Safety Precautions and Important Infor...

Страница 3: ...eather dew or condensation may form on the lens in the disc player of the unit Called lens fogging this condensation on the lens may not allow discs to play In such a situation remove the disc and wait for the condensation to evaporate If the unit still does not operate normally after a while consult your Kenwood dealer EN3 DNX9990HD Precautions on handling discs Do not touch the recording surface...

Страница 4: ...ig 1 Fig 2 Cleaning The Unit If the faceplate of this unit is stained wipe it with a dry soft cloth such as a silicon cloth If the faceplate is stained badly wipe the stain off with a cloth moistened with neutral cleaner then wipe it again with a clean soft dry cloth Applying spray cleaner directly to the unit may affect its mechanical parts Wiping the faceplate with a hard cloth or using a volati...

Страница 5: ...ure Using the navigation system at extreme temperatures can lead to malfunction or damage Also note that the unit can be damaged by strong vibration by metal objects or by water getting inside the unit ACAUTIONS Failure to avoid the following potentially hazardous situations may result in injury or property damage The navigation system is designed to provide you with route suggestions It does not ...

Страница 6: ...lect the language used for the control screen and setting items Default is American English ent After setting touch Enter Angle Adjust the position of the monitor Default is After setting touch 1 1 iPod AV lnterface Use Set the terminal which your iPod is connected to Default is iPod Set the screen and button illumination color You can select whether to perform color scan and adjust scanning color...

Страница 7: ...wedged under the pedals while driving Do not leave the battery near fire or under direct sunlight A fire explosion or excessive heat generation may result Do not recharge short break up or heat the battery or place it in an open fire Such actions may cause the battery to leak fluid If spilled fluid comes in contact with your eyes or on clothing immediately rinse with water and consult a physician ...

Страница 8: ...o Insert An SD Card 1 Press button for 1 second The panel fully opens 2 Hold the SD card as the diagram in the right and insert it into the slot until it clicks e To eject the card Push the card until it clicks and then remove your finger from the card The card pops up so that you can pull it out with your fingers EN8 0 J Labelled side ...

Страница 9: ...ra view display on off Displays the navigation screen Pressing for 1 second switches AV out sources Displays the Top Menu screen Instruction Manual P 11 Pressing for 1 second turns the power off When the power off turns the power on Displays the Hands Free screen Instruction Manual P 62 Pressing for 1 second displays the Screen Control screen Ejects the disc When the panel is opened pressing close...

Страница 10: ...nt of the menu are as follows Iii Displays the EXT SW Control screen II Displays the SETUP Menu screen Displays the Audio Control Menu screen R Displays the control screen of current source Icon feature differs depending on the source II Closes the menu JI Scrolls the displayed text c Touch keys with various functions are displayed here Displayed keys differ depending on the current audio source s...

Страница 11: ... Help Tools and then touch Help Where Am I r I My Data Routes I World Clock Calculator For more information about your navigation system download the latest version of the Owner s Manual from monuol kenwood com edition im352 3 Enter your destination and start the guidance e Finding points of interest 1 Touch Where To 2 Touch Points of Interest 3 Select a category and a subcategory 4 Select a desti...

Страница 12: ... arrows on the map and directions at the top of the map Ifyou depart from the original route your navigation system recalculates the route Views the NextTurn page or the junction view page when available 13 Views the Turn List page 0 Views the Where Am I page Zooms in and out I Returns to the Main Menu Displays a different data field Views the Trip Computer NOTE Touch and drag the map to view a di...

Страница 13: ...o avoid the incident The FM TMC subscription activates automatically after your navigation system acquires satellite signals while receiving traffic signals from the service provider Go to www garmin com fmtraffic for more information e Updating the software To update the navigation system software you must have a USB mass storage device and an internet connection 1 Go to www garmin com Kenwood 2 ...

Страница 14: ...c You can play audio files from music CD disc media USB storage device and iPod NOTE For details on playable file format media format iPod model etc refer to the Instruction Manual 1 Connect the media you want to play as shown below EN 14 ...

Страница 15: ...content 1 Plays all content in random order r NOTE For other operations refer to the Instruction Manual I If desired key is not displayed in the multi function bar touch the a to switch the menu __j 3 Search the track file you want to listen to e List search 1 Touch center of the screen The content list of the media being played is displayed Ifthe information ofthe current track only is displayed ...

Страница 16: ...edia Displays the disc menu 3 Displays the Source Searches the next previous content or Control screen file Scrolling from center of display to left or right performs fast backward or fast forward To stop fast backward forward touch center of the display 4 1 See DVD Disc Menu Operation P 19 in the Instruction Manual 2 See Zoom Control For DVD And VCD P 20 in the Instruction Manual 3 See Movie Cont...

Страница 17: ...lect the band HD Radio tuner only 3 Touch or to tune in the desired station e Auto memory HD Radio tuner only 1 Touch 101 Sub function menu appears 2 Touch AM or FM to select the band 3 Touch Hl 4 Touch AME 5 Touch or in the sub function menu Auto memory starts e Recalling the preset station 1 Touch P DNX9990HD You can also display the preset list by touching the frequency display in the center r ...

Страница 18: ... your cell phone from the displayed list in the Searched Device List screen Registering is completed 2 Connect your cell phone to the unit 1 Touch SET of Paired Device List in the Bluetooth SETUP screen 2 Touch the desired device from the list and touch TEL HFP The selected device is connected to the unit NOTE Touch Audio A2DP if you want to connect the device as an audio player Touch Pandora SPP ...

Страница 19: ...ch Redial to display the previously called number 2 Touch I J Call using the phonebook 1 ouch Phonebook 2l Select the name from the list 3 Select the number from the list 4 ouch I Call using the preset number 1 T ouch Preset to start calling the correspond ng phone number Call by voice You can make a voice call using the voice recognition function ofthe cell phone 1 Touch vo ce 2 Pronounce the nam...

Страница 20: ...ition key If you connect the ignition wire to a power source with a constant voltage supply such as with battery wires the battery may be drained EN20 If the console has a lid make sure to install the unit so that the faceplate will not hit the lid when closing and opening If the fuse blows first make sure the wires aren t touching to cause a short circuit then replace the old fuse with one with t...

Страница 21: ...nd output wire connections for each unit 3 Connect the speaker wires of the wiring harness 4 Connect the wiring harness wires in the following order ground battery ignition 5 Connect the wiring harness connector to the unit 6 Install the unit in your car 7 Reconnect the 8 terminal of the battery 8 Press the Reset button P 4 9 Perform the Initial Setup See First Step P 6 e Non Japanese cars Bend th...

Страница 22: ... out accessory to meet the shape of the opening of the center console 2 Attach accessory to the unit Cut out to meet the shape of the opening in the vehicle EN22 e Toyota Scion cars 1 Cut out accessory as illustrated Cutting line 2 Fold double sided adhesive accessory along the slit and attach it to accessory cut out against the center rib as illustrated Use 2 pieces of accessory for 1 accessory c...

Страница 23: ...s might not be possible with an inside installation The GPS antenna should be installed at a position that is spaced at least 12 inch 30 em from cellular phone or other transmitting antennas Signals from the GPS satellite may be interfered with by these types of communication Painting the GPS antenna with metallic paint may cause a drop in performance EN23 DNX9990HD Microphone unit 1 Check the ins...

Страница 24: ...top side in the same manner 2 When the lower level is removed remove the upper two locations EN24 Removing the unit 1 Remove the hard rubber frame by referring to step 1 in Removing the hard rubber frame 2 Insert the two removal tools accessory deeply into the slots on each side as shown 3 Lower the removal tool toward the bottom and pull out the unit halfway while pressing towards the inside NOTE...

Страница 25: ...or best safety be sure to connect the parking sensor Purple White Reverse sensor wire Connect to vehicle s reverse lamp harness when using the optional rear view camera EN25 DNX9990HD Fuse Cooling fan lSA Speaker impedance 4 8 0 8 To front left speaker C __ru_J 8 To front right speaker 1 __fU_j Green Black 8 To rear left speaker __fU_j Green Purple Black J OJTo rear right speaker ...

Страница 26: ...ings or during conversation To use the Mute feature you need to hook up this wire to your telephone by using a commercial telephone accessory Depending on what antenna you are using connect either to the control terminal of the motor antenna or to the power terminal for the booster amplifier of the film type antenna Max 300mA 12V When using the optional power amplifier connect Light Blue Yellow St...

Страница 27: ...ht Output White Audio Left Output Subwoofer Preout Red Audio Right Output White Audio Left Output SIRIUS XM Satellite Radio tuner White AVoutput AV IN1 input Front view camera input Rear view camera input White Use an RCA cable as shown in above diagram Accessory EN27 USB device commercially available DNX9990HD USB terminal O Sm USB maximum power supply current DC 5 V 1 A To CMOS 310 CMOS 300 Opti...

Страница 28: ...Japan and other countries This item incorporates copy protection technology that is protected by U S patents and other intellectual property rights of Rovi Corporation Reverse engineering and disassembly are prohibited Manufactured under license from Dolby Laboratories Dolby and the double D symbol are trademarks of Dolby Laboratories Manufactured under license under U S Patent Nos 5 956 674 5 974...

Страница 29: ...e or all of the services may become unavailable Some Pandora functionality cannot be operated from this unit For issues using the Pandora application please contact Pandora at pandora support pandora com EN29 DNX9990HD Requirements Aha Requirements for listening to Aha are as follows Download the Aha application from the iTunes App Store or Android Marketplace In the application on your device log...

Страница 30: ...ns Transmitter Module FCC ID RKXFC6000S Contains Transmitter Module IC 5119A FC6000S 86 1c Industry Canada Notice Operation is subject to the following two conditions 1 This device may not cause interference and 2 this device must accept any interference including interference that may cause undesired operation of the device The term IC before the certification registration number only signifies t...

Страница 31: ...eds et chevilles Conformement aIa reglementation d lndustrie Canada le present emetteur radio peut fonctionner avec une antenne d un type et d un gain maximal ou inferieur approuve pour l emetteur par lndustrie Canada Dans le but de reduire les risques de brouillage radioelectrique a intention des autres utilisateurs il faut choisir le type d antenne et son gain de sorte que Ia puissance isotrope ...

Страница 32: ...This HD Radio receiver enables HD2 HD3 Digital Sound iTunes Taggin Artist Experienc oyD I DOLBY db v 1 0 E 0 TM DIGITAL I 2 0 Channel KENWOOD ...

Страница 33: ...is instruction manual Familiarity with installation and operation procedures will help you obtain the best performance from your new GPS Navigation System For your records Record the serial number found on the back of the unit in the spaces designated on the warranty card and in the space provided below Refer to the model and serial numbers whenever you call upon your Kenwood dealer for informatio...

Страница 34: ...___ 65 Using Hands Free Unit________________ 66 Bluetooth Setup_____________________ 69 Hands Free Control__________________ 70 Camera Control 76 Switching the View Mode_____________ 76 Switching the View Camera____________ 76 Setting Up 78 Monitor Screen Setup________________ 78 System Setup_______________________ 79 Display Setup_______________________ 82 Navigation Setup____________________ 85 ...

Страница 35: ...pe accessories Clean from the center of the disc and move outward When removing discs from this unit pull them out horizontally If the disc center hole or outside rim has burrs use the disc only after removing the burrs with a ballpoint pen etc Discs that are not round cannot be used 8 cm 3 inch discs cannot be used Discs with coloring on the recording surface or discs that are dirty cannot be use...

Страница 36: ...enuation of the volume on off Pressing for 1 second stores the tag data of the current music from HD Radio broadcast or SIRIUS XM P 56 3 5 Vol Adjusts volume 4 AUD Displays Graphic Equalizer screen P 94 Pressing for 1 second switches camera view display on off 5 NAV Displays the navigation screen Pressing for 1 second switches AV out sources 6 MENU Displays the Top Menu screen P 11 Pressing for 1 ...

Страница 37: ... 2Touch desired angle number and For detailed operation see Monitor angle control P 82 iPod AV Interface Use Set the terminal which your iPod is connected to Default is iPod 1Touch iPod or AV IN2 Color Set the screen and button illumination color You can select whether to allow color scan operation or select a fixed color for operation 1Touch SET 2Touch ON or OFF of Panel Color Scan 3If you want t...

Страница 38: ...od and playback starts To disconnect the device Touch on the screen and then touch 0 for 1 second Disconnect the iPod from the cable 1 2 1 1 Operating With The Top Menu Screen Most functions can be performed from the Top Menu screen Touch Menu on any screen NOTE If Menu is not displayed during video picture playback press the MENU button P 6 Top Menu screen appears NOTE You can select the hiding i...

Страница 39: ...s the SETUP Menu screen Displays the Audio Control Menu screen Displays the control screen of current source Icon feature differs depending on the source Closes the menu List screen There are some common function keys in the list screens of most sources Scroll Scrolls the displayed text etc Touch keys with various functions are displayed here Displayed keys differ depending on the current audio so...

Страница 40: ...e the source control screen is displayed Touch the information bar The navigation screen with audio information appears 1 1 Touch or in the navigation screen Touching this area displays the audio screen Displays the navigation and control keys of the current source Displays the navigation and current video picture playback display NOTE The screen switches between playback screen and camera view ea...

Страница 41: ...eat chapter repeat function off VCD PBC On Does not repeat VCD PBC Off track repeat function off Hides all keys Touch Fast forward or fast backward Touch 1 or Each time you touch the key the speed changes standard 2 times 3 times Confirms play time See DVD You can switch the time display between title play time chapter play time and title remaining time Each time you touch the display switches bet...

Страница 42: ...eration You can set up some items in the DVD VIDEO disc menu 1 Touch illustrated area during playback Menu Control screen appears 2 Perform desired operation as follows Displays the top menu Touch Top Displays the menu Touch Menu Displays the previous menu Touch Return Enters selected item Touch Enter Enables direct operation Touch Highlight to enter the highlight control mode P 19 Moves the curso...

Страница 43: ... disc NOTE You cannot touch the menu keys directly on the screen when zooming DVD Setup You can set up the DVD playback functions NOTE Each operation in this section can be started from the Top Menu screen For details see Operating With The Top Menu Screen P 11 1 Touch in the control screen Multi function menu appears 2 Touch SETUP SETUP Menu screen appears 3 Touch Source Source SETUP Menu screen ...

Страница 44: ...l To clear the entered code touch Clear Current parental level appears as Level 3 Touch 2 or 3 to select a parental level NOTE If a disc has higher parental lock level you need to enter the code number The parental lock level varies depending on a loaded disc If a disc has no parental lock anybody can play it back even when you have set the parental lock Disc setup Performs setup when using disc m...

Страница 45: ...etween the Simple Control and List Control screen 3 Multi function key Touch to switch the multi function menu For details on the menu see Multi function menu P 28 CD Audio And Visual Files iPod Operation 4 Multi function menu Various functions can be performed by using keys in this area For details on the menu see Multi function menu P 28 5 Sub function key Touch to display Sub function menu 7 in...

Страница 46: ... see Multi function menu P 28 4 Multi function menu Various functions can be performed by using keys in this area For details on the keys see Multi function menu P 28 5 Sub function key Touch to display Sub function menu 7 in this table 6 Content list Displays the list and content The content of the list differ depending on the playback status and source 7 Sub function menu Various functions can b...

Страница 47: ...upply For details see External Device Control P 88 REAR Touch to mute the rear speaker Sub function menu Music CD iPod Disc media USB device The following functions can be performed by using keys in this area Repeats the current track folder Each time you touch the key repeat mode switches in the following sequence CD iPod track repeat repeat off Disc media USB device file repeat folder repeat rep...

Страница 48: ...a file of same artist album genre composer as the current track P 31 Folder List You can search a file according to hierarchy P 32 Thumbnail Viewer You can search a picture file P 32 NOTE For disc media you can display the folder list directly by touching Categorysearch USBdeviceandiPodonly 1 Touch the desired category from the left part of the screen 2 The list is sorted by selected category 3 To...

Страница 49: ...k 1 Touch Sub function menu appears 2 Touch Favorite screen appears 3 Touch desired artwork in the lower line NOTE The key in the upper side of the screen functions differently depending on the status When Load Albums appears You have not yet loaded any artworks Touch the key to start loading When Load More Albums appears Some artworks are not loaded Touch the key to load all artworks If you touch...

Страница 50: ...lete the album from the favorite list touch and drag it to the lower line You can change the playing order of the favorite list by dragging the artwork in the list The favorite list mode is canceled in the following situations Playing another album from other list folder list category list etc Playing another album by touching the artwork in the lower line in the artwork list screen The favorite l...

Страница 51: ... information Displays the information of the current content being played 7 Play time Displays the elapsed time since when you select the station and status bar which shows current location 8 List switching key Touch to switch between the content list and the current content information Multi function menu The following functions can be performed by using keys in this area Searches the station For...

Страница 52: ... NOTE Install the latest version of the Aha application on your iPhone or Android P 119 iPhone Search for Aha in the Apple iTunes App Store to find and install the most current version Android Search for Aha in the Android Market to find and install the most current version For how to register the Bluetooth device Android see Registering the Bluetooth Unit P 63 3 3 4 4 6 6 5 1 2 2 Content List scr...

Страница 53: ...the station Touch the station name in the list NOTE You cannot select iPod as rear source when you select Aha as main source in dual zone function Multi function menu The following functions can be performed by using keys in this area Sets the content backward 15 seconds Sets the content forward 30 seconds Sets the received location information at the destination of navigation See Navigate P 42 Po...

Страница 54: ...JPEG picture file in the screen Select from Short Middle and Long default On Screen USB Sets how to display the information of the USB device Auto Default Information appears for 5 seconds when updated OFF Does not display any information Voice memo 1 Touch in the control screen Status bar Confirms the current location Start Starts recording the voice memo Stop Stops recording the voice memo Send ...

Страница 55: ...erica sales area 1 Set each item as follows DivX R Registration Code Checks the registration code This code is needed when making a disc which has DRM Digital Rights Management DivX R Deactivation Deregisters the unit which is already registered After you touch the key a confirmation message appears Follow the message and complete the operation NOTE DivX R Registration Code is disabled when a DVD ...

Страница 56: ...nu The following functions can be performed by using keys in this area Switches the band Touch AM or FM Tunes in a station Touch 1 The method of frequency switching can be changed See Multi function menu P 47 Selects a channel Touch CH or CH5 Tunes in by entering direct number Touch and enter the desired number For details see Direct search P 53 8 List switching key Touch to switch between the pre...

Страница 57: ...vate the SiriusXM Vehicle Connect tuner you will need the Radio ID Make a note of your Radio ID For each SiriusXM Vehicle Connect tuner peculiar Radio ID is assigned To confirm your Radio ID tune to channel 0 The letters I O S and F are not used in any Radio ID How to activate your SiriusXM Service Go to www siriusxm com activatenow or call 1 866 635 2349 to activate your SiriusXM Vehicle Connect ...

Страница 58: ...functions of each key are as follows P1 P6 Selects the preset channel Touch for 2 seconds to store the current station into the preset memory Selects the method of searching from preset channel selecting or category channel searching For details on search operation see Selecting Operation P 52 SEEK Switches the seek mode in the following sequence SEEK1 SEEK2 SEEK1 Tunes channels one after the othe...

Страница 59: ...the desired number from P1 to P6 The unit will tune to the selected station or channel Selecting from the preset list 1 Touch illustrated area List Control screen appears 2 Select a station or channel from the list NOTE Touching and then Preset List displays the preset channel list You can also select your desired channel from the list Search by program type HD Radio tuner only You can tune to a s...

Страница 60: ... information automatically when a traffic bulletin starts However this feature requires a Radio Broadcast Data System that includes the TI information 1 Touch in the control screen The multi function menu appears 2 Touch TI in the multi function menu Traffic information mode is set When the traffic bulletin starts The Traffic Information screen appears automatically NOTE It is necessary to have Tr...

Страница 61: ...agging You can tag your music using an iTunes Tagging enabled HD Radio tuner and SIRIUS XM receiver When you hear a song you enjoy on your local HD Radio tuner or SIRIUS XM you only have to press the ATT button for 1 second The song s information will then be saved on this unit The saved songs will then show up in a playlist called Tagged in iTunes the very next time you sync your iPod to your com...

Страница 62: ...NOTE The code number is set to 0000 as default 2 Enter the current code number Parental Pass 1st entering screen appears 3 Enter the new code number and touch Enter Parental Pass 2nd entering screen appears 4 Enter the same code number as you input in step 3 and touch Enter The code number is confirmed and SIRIUS XM parental code is now set Instant Replay SIRIUS XM only You can replay last 30 minu...

Страница 63: ... is to be received with the Content alerts function 1 Touch 2 and 3 of Traffic Weather Jump City Select to select a city Parental lock You can select the channels to enable SIRIUS XM Parental Lock function 1 Touch SET of Parental Lock Channel Select in the SIRIUS XM SETUP screen Parental Pass Check screen appears NOTE You need to complete Parental code P 59 beforehand To delete the parental lock c...

Страница 64: ... SETUP Bluetooth SETUP screen appears See the following section for each setting Registering the Bluetooth Unit P 63 Connecting the Bluetooth unit P 64 Bluetooth Control Registering the Bluetooth Unit 1 Touch SET of Regist New Device Searched Device List screen appears NOTE A new device cannot be registered if there are 5 registered Bluetooth units Delete unnecessary registration See Connecting th...

Страница 65: ...device name you want to register from the list Special Device Select Confirm screen appears 3 Confirm the device name and touch Yes NOTE If you touch No operation is cancelled The devices not listed cannot be registered Playing Bluetooth Audio Device Bluetooth basic operation 2 2 3 3 5 Simple Control screen List Control screen 1 4 1 Information display Displays the name of the track information If...

Страница 66: ...ng the phonebook data operate the cell phone Making a call 1 Press the TEL button Hands Free screen appears 2 Select a dialing method See the following table for each method Call by entering a phone number 1Touch Direct Number 2Enter a phone number with number keys 3Touch Call using call records 1 Touch Incoming Calls Outgoing Calls or Missed Calls 2Select the phone number from the list 3Touch Red...

Страница 67: ... touch the calling party is switched Terminate the current call Touch The call switches to the waiting one Bluetooth Setup You can register PIN code select the device to connect and perform output setup 1 Press the TEL button Hands Free screen appears 2 Touch BT SETUP Bluetooth SETUP screen appears See the following section for each setting Register the PIN code P 69 Select the unit to connect P 6...

Страница 68: ... SMS Receive Beep Select whether to beep at an incoming SMS ON Default Beeps OFF Not beeps Phone Information Use Sets whether to download phonebook for outgoing incoming and missed calls list ON Default Yes OFF No SMS Use Select whether to use SMS ON Default Uses SMS OFF Not uses SMS Sort Order Sets how to arrange the cell phone phonebook First Arranges in the order of first name Last Default Arra...

Страница 69: ...eating a new message 1 Touch Create Message in the SMS Select screen SMS Create Menu screen appears 2 Touch or Direct Number Select from the phonebook Touch Enter the phone number Touch Direct Number 3 Touch SET of Message in the SMS Create Menu screen Create SMS Message screen appears 4 Enter a message using keys and touch SET Moves the cursor Use 2 3 Switches the keyboard layout Use 5 The layout...

Страница 70: ...e Hands Free screen NOTE When there is no preset number touching the key momentarily moves to the step 2 2 Touch desired key and enter the number you want to register See the table below for explanations for each key Register from received SMS messages Touch Register from sent SMS messages Touch Register from phonebook Touch Register from outgoing calls list Touch Register from incoming call list ...

Страница 71: ...on for 1 second Camera view screen appears 2 Touch illustrated area during Camera view screen View modes are switched each time you touch the illustrated area Switching the View Camera Swithing between the front view camera and the rear view camera 1 Press the AUD button for 1 second Camera view screen appears 2 Touch illustrated area during Camera view screen Switches between the front view camer...

Страница 72: ...Setting Up System Setup NOTE Each operation in this section can be started from the multi function menu 1 Touch Menu on any screen TOP Menu screen appears 2 Touch SETUP 3 Touch System System screen appears See the following section for each setting Set up the user interface P 79 Adjust touch panel P 80 Set up security P 80 Set up external switch P 81 Set up memory P 81 User interface You can setup...

Страница 73: ...m Menu screen Security screen appears 2 Touch ON or OFF of SI EXT SW setup Set up the external switch power mode 1 Touch EXT SW in the System Menu screen EXT SW screen appears 2 Set each item as follows SW Name Sets the name of the external device Output Pattern Sets the power signal output mode among Pulse Level Default is Pulse You can set to turn output on off each time the button on the EXT SW...

Страница 74: ...an store the current monitor angle as the angle during power off Touch Memory when the desired angle is selected Panel color coordinate You can set the screen and button illumination color The selectable items differ depending on the unit 1 Touch Color in the Display Menu screen Color screen appears 2 Touch SET of Panel Color Coordinate Panel Color Coordinate screen appears NOTE You can touch SET ...

Страница 75: ...kground and touch Enter NOTE SeePlayableMediaAndFiles P 108 forreadable image specifications Touching Delete in the Background screen deletes the background image After you touch Delete a confirmation message appears Follow the message and complete the operation Navigation Setup You can set navigation parameters 1 Touch Menu on any screen 2 Touch SETUP SETUP Menu screen appears 3 Touch Navigation ...

Страница 76: ...the instruction manual of your camera 1 These settings become settable only when the parking brake is on 2 This setting becomes settable only when the parking brake is on and the CMOS 310 CMOS 300 series is selected 3 This setting becomes settable only when the parking brake is on and Front Camera is set to ON Software Information Check the software version of this unit 1 Touch Menu on any screen ...

Страница 77: ...T to VIDEO DISC iPod or OFF External Device Control Control the external device power supply 1 Touch EXT SW in the Source Control screen EXT SW Control screen appears NOTE If EXT SW is not displayed touch 2 Touch the desired switch key You can turn on or off the external device power supply NOTE You must connect a commercially available relay unit in order to use this function Connect the external...

Страница 78: ...hen you selected the speaker type Fordetails seeCrossovernetworksetup P 91 3 Select a speaker size using 2 and 3 The speaker size is different depending on the speaker type and the unit Front OEM 3 1 2 inch 4 inch 4 3 4 inch 5 inch 6 1 2 inch 6 3 4 inch 7 inch 4x6 5x7 6x8 6x9 7x10 Rear None OEM 3 1 2 inch 4 inch 4 3 4 inch 5 inch 6 1 2 inch 6 3 4 inch 7 inch 4x6 5x7 6x8 6x9 7x10 Subwoofer None 6 1...

Страница 79: ...P Digital Signal Processor System 1 Touch Bypass or Through of DSP Select in the Audio SETUP screen Bypass There is no effect by DSP Through There is an effect by DSP NOTE When the mode is set to Bypass DSP System cannot be adjusted Controlling General Audio 1 Touch Audio Control 2 Set each item as follows Fader Balance Adjust the volume balance around the touched area 2 and 3 adjust the right and...

Страница 80: ...3 to select a frequency and 5 and to set the level EQ INIT Returns to the previous level which the gain level is adjusted Flat Tone curve becomes flat Bass EXT Bass Extend Settings When turned on the frequency lower than 62 5 Hz is set to the same gain level as 62 5 Hz Loudness Sets the amounts of boost of low and high tones OFF Low High SW Level Adjusts the subwoofer volume This setting is not av...

Страница 81: ...evel2 Level3 Supreme Turns ON OFF the Supreme function Technology to extrapolate and supplement with proprietary algorithm the high frequency range that is cut off when encoding This function works on DVD MEDIA USB and iPod sources Zone Control You can select different sources for both front and rear positions in the vehicle 1 Touch Zone Control Zone Control screen appears 2 Touch Dual Zone 3 Set ...

Страница 82: ... the differences calculated in step 3 for individual speakers 5 Adjust gain for individual speakers A sound image will be shifted to the speaker with increased gain Example When Front All is selected as the listening position 1 6feet 2 5feet 5feet 2 5feet 0feet 3 4feet Listening Position You can adjust the sound effects according to your listening position 1 Touch Position Position screen appears ...

Страница 83: ...g the operation mode The functions operated from the remote controller differ depending on the position of the mode switch DVD T V NAV AUD AUD mode Switch to this mode when controlling a selected source or tuner source etc DVD mode Switch to this mode when playing a disc media including DVD VCD and CD NAV mode Switch to this mode when controlling navigation function NOTE When controlling a player ...

Страница 84: ...2D and 3D map displays 11 MAP DIR AUD DVD Switches the display angle each time it is pressed NAV Switches between the heading up navigation and north up navigation map displays 12 5 AUD DVD Selects the folder to be played During HD Radio and SIRIUS XM source in AUD mode switches the bands to be received 13 2 3 AUD DVD Selects the track or file to be played During HD Radio and SIRIUS XM source in A...

Страница 85: ...m Reason Solution The Touch Sensor Tone doesn t sound The preout jack is being used The Touch Sensor Tone cannot be output from the preout jack Error Messages When you fail to operate the unit correctly the cause of the failure appears as the message on the screen Error Message Cause Solution Protect Protective circuit has been activated because a speaker cord has shorted or it has come in contact...

Страница 86: ...on The Aha application is an older version which the unit can not support Confirm that the Aha application is the latest version SIRIUS XM Error Message Cause Solution Check Tuner A SiriusXM tuner is not connected to this unit Check that the connected SiriusXM tuner is connected Subscription Updated Press Return To Continue The SiriusXM subscription has been renewed Pressing the Control knob will ...

Страница 87: ...e impossible A DualDisc is a disc with one surface containing DVD standard signals and the other surface containing music CD signals About disc format The disc format should be the one of the following ISO 9660 Level 1 2 Joliet Romeo Long file name About files The following audio video and picture files are supported Audio files AAC LC m4a MP3 mp3 WMA wma Linear PCM WAVE wav Mass storage class USB...

Страница 88: ...harged through the USB cable Install the USB device in the place where it will not affect safe driving You cannot connect a USB device via a USB hub and Multi Card Reader Take backups of the audio files used with this unit The files can be erased depending on the operating conditions of the USB device We shall have no compensation for any damage arising from any erased data No USB device comes wit...

Страница 89: ...VD disc marks ALL Indicates a region number The discs with this mark can be played with any DVD player 8 Indicates the number of audio languages recorded Up to 8 languages can be recorded in a movie You can select a favorite language 32 Indicates the number of subtitled languages recorded Up to 32 languages can be recorded 9 If a DVD disc has scenes shot from multiple angles you can select a favor...

Страница 90: ... rw Kinyarwanda sa Sanskrit sd Sindhi sg Sangho sh Serbo Croatian si Singhalese sk Slovak sl Slovenian sm Samoan sn Shona so Somali sq Albanian sr Serbian ss Siswati st Sesotho su Sundanese sv Swedish sw Swahili ta Tamil te Telugu tg Tajik th Thai ti Tigrinya tk Turkmen tl Tagalog tn Setswana to Tongan tr Turkish ts Tsonga tt Tatar tw Twi uk Ukrainian ur Urdu uz Uzbek vi Vietnamese vo Volapuk wo W...

Страница 91: ... 9 MHz 200 kHz Frequency Response 3 0 dB 20 Hz 20 kHz S N Ratio dB 70 dB STEREO AM tuner section Frequency Range 10 kHz 530 kHz 1700 kHz Usable Sensitivity 28 dBμ Digital AM tuner section Frequency Range 10 kHz 530 kHz 1700 kHz Frequency Response 3 0 dB 40 Hz 15 kHz S N Ratio dB 70 dB STEREO Video section Color System of External Video Input NTSC PAL External Video Input Level RCA mini jack 1 Vp p...

Страница 92: ...device that plays DivX video Visit divx com for more information and software tools to convert your files into DivX videos ABOUT DIVX VIDEO ON DEMAND This DivX Certified device must be registered in order to play purchased DivX Video on Demand VOD movies To obtain your registration code locate the DivX VOD section in your device setup menu Go to vod divx com for more information on how to complete...

Страница 93: ...uctions of labels on or inside the product relating to laser product safety JVC KENWOOD Corporation 2967 3 ISHIKAWA MACHI HACHIOJI SHI TOKYO JAPAN THIS PRODUCT COMPLIES WITH DHHS RULES 21 CFR SUBCHAPTER J IN EFFECT AT DATE OF MANUFACTURE Location Top plate IC Industry Canada Notice Operation is subject to the following two conditions 1 This device may not cause interference and 2 this device must ...

Страница 94: ...This HD Radio receiver enables ...

Страница 95: ...IGATION SYSTEM SYSTEME DE NAVIGATION GPS SISTEMA DE NAVEGACIÓN GPS DNX9990HD GPS NAVIGATION INSTRUCTION MANUAL MANUEL D INSTRUCTIONS DE NAVIGATION DU GPS MANUAL DE INSTRUCCIONES DE NAVEGACIÓN GPS B64 4944 08A ...

Страница 96: ... 19 Saving and Modifying the Active Route 19 Navigating a Saved Route 19 Deleting All Saved Routes 19 Stopping Your Route 19 Adding a Detour to a Route 20 Taking a Detour Around Specified Areas 20 Adding a Custom Avoidance 20 Using Multiple Route Preview 20 Using trafficTrends 20 Where To 13 Searching Near Another Location 13 Go Page Options 13 Finding an Address 13 Finding a Place by Spelling the...

Страница 97: ...Security 25 Icons Used in This Manual Important precautions are described to prevent injuries and potentially dangerous situations Special instructions supplementary explanations limitations and reference pages are described Traffic Information 23 Understanding FM TMC Traffic 23 Traffic in Your Area 23 Traffic on Your Route 23 Viewing the Traffic Map 23 Viewing Traffic Delays 23 Manual Conventions...

Страница 98: ...and affiliated companies on the other hand IMPORTANT READ THIS LICENCE CAREFULLY BEFORE USING THIS PRODUCT INSTALLING COPYING OR OTHERWISE USING THIS PRODUCT INDICATES YOUR ACKNOWLEDGEMENT THAT YOU HAVE READ THIS LICENCE AND AGREE TO ITS TERMS IF YOU DO NOT AGREE RETURN THE COMPLETE PRODUCT WITHIN 7 DAYS OF THE DATE YOU ACQUIRED IT IF PURCHASED NEW FOR A FULL REFUND TO THE DEALER FROM WHICH YOU PU...

Страница 99: ...usions so to that extent the above exclusion may not apply to you Disclaimer of liability GARMIN AND ITS LICENSORS INCLUDING THEIR LICENSORS AND SUPPLIERS SHALL NOT BE LIABLE TO YOU IN RESPECT OF ANY CLAIM DEMAND OR ACTION IRRESPECTIVE OF THE NATURE OF THE CAUSE OF THE CLAIM DEMAND OR ACTION ALLEGING ANY LOSS INJURY OR DAMAGES DIRECT OR INDIRECT WHICH MAY RESULT FROM THE USE OR POSSESSION OF THE I...

Страница 100: ...for Australia is based on data NAVTEQ has licensed from PSMA Australia Limited www psma com au In addition the Product incorporates data which is 2010 Telstra Corporation Limited GM Holden Limited Intelematics Australia Pty Ltd Sentinel Content Pty Limited and Continental Pty Ltd If your Product uses RDS TMC Codes contained in the Map Data the traffic location codes are 2010 Telstra Corporation Li...

Страница 101: ...ays of purchase RETURN THE PRODUCTS AND ANY ACCOMPANYING ITEMS including written materials TO Garmin INTERNATIONAL INC CUSTOMER SERVICE 1200 EAST 151ST STREET OLATHE KANSAS 66062 FOR A REFUND DMTI Spatial hereby grants to you a non exclusive non transferable license to use the data contained on the media in this package the Licensed Product solely for personal non commercial use or internal use in...

Страница 102: ...graphic Data produced under license from Her Majesty the Queen in Right of Canada with permission of Natural Resources Canada NAVTEQ Traffic End User License Agreement Your Garmin product may be equipped to receive traffic data If it is so equipped the following terms and conditions apply to your use of your Garmin product NAVTEQ North America LLC and or its affiliates including Traffic com NAVTEQ...

Страница 103: ...aw The above terms and conditions shall be governed by the laws of the State of Illinois without giving effect to i its conflict of laws provisions or ii the United Nations Convention for Contracts for the International Sale of Goods which is explicitly excluded You agree to submit to the jurisdiction of the State of Illinois for any and all disputes claims and actions arising from or in connectio...

Страница 104: ...igating this displays Kenwood audio When using audio this displays navigation information The hands free phone feature is only available if your mobile phone has Bluetooth wireless technology and has been paired to the navigation system See the other Kenwood manuals and your phone manual for setup and pairing instructions Help When You Need It Touch Tools Help to get more information about using y...

Страница 105: ...ies and other locations The detailed map loaded in your navigation system contains millions of points of interest such as restaurants hotels and auto services Finding a Restaurant 1 Touch Where To 2 Select a category 3 Select a subcategory 4 Select a type 5 Select a place 6 Select Press for More to see the Review page 7 Touch Go ...

Страница 106: ...our route The navigation system gives you directions to the stop and to your final destination 1 With a route active touch back icon Where To 2 Search for the extra stop 3 Touch Go 4 Touch Add As a Via Point to add this stop before your destination If you want to add more than one stop to the route edit the current route See page 19 Taking a Detour If a road on your route is closed you can take a ...

Страница 107: ...Favorites Touch to create a turn by turn route to this location Touch to return to the previous page Touch to view more information about the location Touch to switch between a 3D three dimensional map and a 2D two dimensional map Touch to rotate the viewing angle in 3D view Finding an Address The steps to find an address can vary depending on the maps that are loaded on your navigation system Not...

Страница 108: ... touch a letter or a number to enter it Touch to add a space Touch and to move the cursor Touch to delete the character or touch and hold to delete the entire entry Touch to change the keyboard language mode Touch to enter special characters Finding Places in a Different Area You can search for locations in a different area such as a different city or near your destination 1 From the subcategories...

Страница 109: ...or the place you return to most often 1 Touch Where To Go Home 2 Select an option Enter My Address enter an address for the location using the on screen keyboard Use My current location set your current location as your Home Location Choose from Recently Found select a location from your recently found locations After you set your Home Location touch Tools My Data Set Home Location Favorites You c...

Страница 110: ...for More 4 Touch Edit 5 Touch the item you want to edit Change Name enter a new name for the location using the on screen keyboard Change Map Symbol touch a new symbol Change Phone Number enter a phone number Change Categories create or change the category in which this location is saved Deleting a Favorite 1 Touch Tools My Data 2 Touch Delete Favorite s 3 Select the Favorite to delete 4 Touch Del...

Страница 111: ... are driving to a common destination and displays the destination and estimated time of travel in the navigation bar on the map 1 From the Main page touch Settings Navigation myTrends Enabled 2 Save a common destination like your home or workplace as a Favorite page 15 3 Drive to the Favorite several times 4 When myTrends information appears in the navigation bar touch it to view route information...

Страница 112: ... page or touch any turn on the Turn List page About Junction View When available the Lane Assist page may display a view of the upcoming junction and in which lane you should be driving You must be navigating a route before you can view the junction You can also view junctions from the Turn List page When available junctions appear on a split screen The Lane Assist page with Junction View is not a...

Страница 113: ...om the route Manually Reorder Points change the order of points along your route Optimally Reorder Points automatically order the points Recalculate recalculate the route Delete remove this route Your changes are saved automatically when you exit any of the route edit pages Saving and Modifying the Active Route 1 Touch Where To or Tools Routes 2 Touch Active Route 3 Touch Add or Remove Points 4 Ad...

Страница 114: ...elect an option Select Next 1 2 mile 0 5 km on Route Select Next 2 miles 2 km on Route Select Next 5 miles 5 km on Route Select Detour by Roads on Route and select a road Adding a Custom Avoidance Custom avoidances allow you to avoid specific areas and sections of road You can enable and disable custom avoidances as needed 1 Select Settings Navigation Custom Avoidances 2 If necessary select Add Ne...

Страница 115: ...The ecoChallenge helps you maximize your fuel economy by scoring your driving habits The higher your ecoChallenge scores the more fuel you save The ecoChallenge collects data and calculates a score whenever you are moving The ecoChallenge icon displays your current score on the map Touch Tools ecoRoute ecoChallenge To view detailed ecoChallenge scores touch the icon The leaf color on the driving c...

Страница 116: ...e average fuel economy and the fuel cost of navigating to a destination A mileage report is created for every route that you drive If you stop a route on the device a mileage report is created for the distance you traveled Mileage reports are created automatically when you stop or complete routes Viewing a Mileage Report You can view the 20 most recent mileage reports 1 Touch Tools ecoRoute Mileag...

Страница 117: ...sted or stopped Gray No data Traffic data has not updated Traffic on Your Route When calculating your route the navigation system examines the current traffic and automatically optimizes the route for the shortest time If a severe traffic delay occurs on your route while you are navigating the navigation system automatically recalculates the route You might still be routed through traffic if no be...

Страница 118: ...ngs Changing the Navigation Settings Touch Settings Navigation Route Preference select a preference for calculating your route Avoidances select the road types you want to avoid or you would prefer to use on your routes Restore restore the original navigation settings Voice Prompts turn voice prompts on or off Custom Avoidance select a specific area on a specific road to avoid Advanced Detours sel...

Страница 119: ...anguages Touch Settings Language Voice Language select a voice Keyboard select the keyboard for your language You can also change the keyboard language mode from any keyboard by touching the Mode button Restore restore the original languages Adding Security Touch Settings Security Safe Mode turn safe mode on or off When your vehicle is moving safe mode disables all functions that require significa...

Страница 120: ...nwood service center for details 1 Go to www garmin com Kenwood 2 Select Order Map Updates for your Kenwood unit 3 Follow the Web site instructions to update your map Safety Cameras WARNING Garmin and Kenwood are not responsible for the accuracy of or the consequences of using a safety camera database Safety camera information is available in some locations Go to http my garmin com for availabilit...

Страница 121: ...se the USB mass storage device to load the POIs The POI Loader is available at www garmin com products poiloader Refer to the POI Loader Help file for more information click Help to open the Help file Each time you load custom POIs to the navigation system any other custom POIs already saved in the system will be overwritten Finding Custom POIs To view a list of the custom POIs loaded in your navi...

Страница 122: ...91 Rev A Garmin and the Garmin logo are trademarks of Garmin Ltd or its subsidiaries registered in the USA and other countries ecoRoute myTrends and trafficTrends are trademarks of Garmin Ltd or its subsidiaries These trademarks may not be used without the express permission of Garmin NAVTEQ is a trademark of NAVTEQ Inc or its affiliates and is registered in one or more countries including the U S...

Страница 123: ...KENWOOD Ver 1 0 WOl 2030 05 ...

Отзывы: