background image

Bluetooth Control

63

English


Ñ

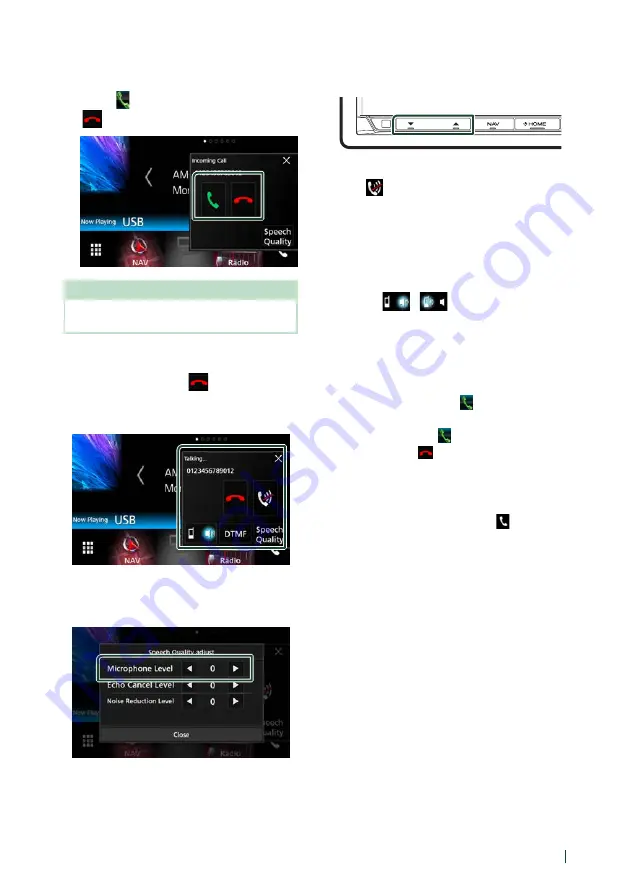
Receive a call

Touch 

[

]

 to answer a phone call or  

[

]

 to reject an incoming call.

NOTE

•  While monitoring the view camera, this screen 

does not appear even if a call comes in.

To end call

While talking, touch 

[

]

.


Ñ

Operations during a call


Adjust the volume of your voice 

1) Touch 

[

Speech Quality

]

.

2) Touch 

[

T

]

 or 

[

U

]

 of 

[

Microphone Level

]

.


Adjust the receiver volume

Press the 

[

S

]

 or 

[

R

]

 button.


Mute your voice

Touch 

[

]

 to mute or not to mute your voice.


Output the dial tone

Touch 

[

DTMF

]

 to display the tone input screen.

You can send tones by touching desired keys 

on the screen.


Switching the speaking voice output

Touching 

[

]

[

]

 each time switches 

the speaking voice output between cell-phone 

and speaker.


Call-waiting

When you receive a call while talking on 

another call, you can answer the newly 
received call by touching 

[

]

. The current call 

is on hold.
Each time you touch 

[

]

, the caller will change.

When you touch 

[

]

, the current call will end 

and switch to the call in hold.


To close the Hands-Free popup screen

Touching 

[

×

]

 closes the Hands-Free popup 

screen. To display it again, touch 

[

]

.

Содержание DNX775RVS

Страница 1: ...in the space provided below Refer to the model and serial numbers whenever you call upon your KENWOOD dealer for information or service on the product Model DNX775RVS Serial number US Residence Only Register Online Register your KENWOOD product at www kenwood com usa Updated information the latest Instruction Manual system updates new functions etc is available from http www kenwood com cs ce The ...

Страница 2: ...vigation Operation 16 Disc 20 Playing a disc 20 DVD VCD Basic Operation 20 Music CD Disc media Basic Operation 22 File search Operation 23 DVD Disc Menu Operation 24 DVD Setup 25 APPS Android Auto Apple CarPlay 26 Apple CarPlay Operation 26 Android Auto Operation 27 WebLink Waze Operation 29 Pandora Operation 30 Spotify Operation 32 USB microSD 34 Connecting a USB device 34 Inserting the microSD 3...

Страница 3: ... Dashboard Camera 67 External audio video players AV IN 68 OEM Features Operation 68 Setting Up 69 Monitor Screen Setup 69 System Setup 69 User Interface Setup 69 Special Setup 71 Display Setup 71 AV Setup 73 Controlling Audio 74 Speaker X over setup 74 Controlling General Audio 75 Equalizer Control 76 Volume Offset 77 Zone Control 77 Sound Effect 78 Listening Position DTA 79 Remote control 81 Bat...

Страница 4: ... spray cleaner directly to the unit may affect its mechanical parts Wiping the faceplate with a hard cloth or using a volatile liquid such as thinner or alcohol may scratch the surface or erase screened print Ñ Ñ Lens fogging When you turn on the car heater in cold weather dew or condensation may form on the lens in the disc player of the unit Called lens fogging this condensation on the lens may ...

Страница 5: ... the instructions in this manual WARNING Failure to avoid the following potentially hazardous situations could result in an accident or collision resulting in death or serious injury When navigating carefully compare information displayed on the navigation system to all available navigation sources including information from street signs visual sightings and maps For safety always resolve any disc...

Страница 6: ...ation This navigation system can be used when the ignition key is turned to ON or ACC To preserve the battery however it should be used with the engine running whenever possible Using the navigation system for a long time with the engine switched off can cause the battery to run down Map Data Information One of the goals of Garmin is to provide customers with the most complete and accurate cartogr...

Страница 7: ...r off When the power is off turns the power on 5 MENU Displays the popup menu screen Pressing for 1 second switches view camera display on off P 66 The camera whose view is displayed first changes according to the Camera Setup setting and the shift lever position in the shift gate 6 Displays the APP CarPlay Android Auto WebLink screen Pressing for 1 second displays the Voice Recognition screen P 6...

Страница 8: ... the map update file remains in the SD card you cannot play audio visual files Do not pull out the MAP SD while Loading Maps is being displayed Turning on the Unit The method of turning on is different depending on the model 1 Press the HOME button h h The unit is turned on To turn off the unit 1 Press the HOME button for 1 second NOTE If it is your first time turning the unit on after installatio...

Страница 9: ...ation see User Interface Setup P 69 Display Set the button illumination color If it is hard to see the image on the screen even adjust the viewing angle 1 Touch Display 2 Touch Key Color 3 Select the desired color 4 Touch 5 Touch Viewing Angle 6 Select an angle 7 Touch For detailed operation see Display Setup P 71 Camera Set the parameters for the camera 1 Touch Camera 2 Set each item and touch Fo...

Страница 10: ...ust If you select Manual for Clock adjust the date and time manually P 70 NOTE Please set the date and time If it is not set it may not work with some functions Adjusting the volume To adjust the volume 0 to 40 Press R to increase and press S to decrease Holding R increases the volume continuously to level 15 Monitor Angle Control You can adjust the position of the monitor 1 Press the G button h h...

Страница 11: ...r finger up or down on the screen to scroll the screen HOME screen descriptions Most functions can be performed from the HOME screen 5 4 6 7 1 2 3 1 Displays the control screen of current source The artwork is displayed if available from current content 2 Widget You can change the widget by touching or flicking left or right on the widget area Touch the widget to display the detailed screen 3 Page...

Страница 12: ...popup menu See HOME screen descriptions P 11 Ejects the disc To forcibly eject the disc press it for 2 seconds and touch Yes after the message is displayed Turn off the screen 1 Select Display OFF on the popup menu To turn on the screen 1 Touch the display Source selection screen descriptions You can display all playback sources and options on the source selection screen 3 5 2 4 1 1 Changes the pl...

Страница 13: ... terminal P 68 Displays the WebLink screen P 29 Displays the Waze screen P 29 Displays the Audio screen P 74 Puts the unit in standby P 14 For sources and information displayed when an ADS adapter is connected see OEM Features Operation P 68 1 When iPhone compatible with CarPlay is connected Apple CarPlay is displayed When an Android device compatible with Android Auto is connected Android Auto is...

Страница 14: ...d the icon which you want to move to go into the customizing mode 3 Drag it where you want to move Changes the page Source control screen descriptions There are some functions which can be operated from most screens Indicators 1 2 3 4 Navigation information Short cut buttons 1 Connected Bluetooth device information Lights up when quick charging battery of the connected iPod iPhone Smartphone 2 All...

Страница 15: ...o Customize Short cut buttons on HOME screen P 14 4 Û Touch to display the Hands Free screen P 61 When connecting as Apple CarPlay or Android Auto it works as a phone provided in Apple CarPlay or Android Auto List screen There are some common function keys in the list screens of most sources 6 1 2 3 4 5 1 Displays list type selection window 2 Displays music movie file list 3 Text scroll Scrolls th...

Страница 16: ...ood com edition im395 2 Enter your destination and start the guidance Finding points of interest 1 Touch Where To 2 Select a category and a subcategory 3 Select a destination 4 Touch Go NOTE To enter letters contained in the name touch the Search bar and enter the letters 3 Follow your route to the destination NOTE The speed limit icon feature is for information only and does not replace the drive...

Страница 17: ...avigating a route touch 2 Touch Manually avoiding traffic on your route 1 From the map touch 2 Touch Traffic On Route 3 If necessary touch the arrows to view other traffic delays on your route 4 Touch Avoid Viewing the traffic map 1 The traffic map shows color coded traffic flow and delays on nearby About traffic Traffic service is not available in some areas or countries Garmin and JVC KENWOOD ar...

Страница 18: ... screen switches as follows Displays the navigation and control keys of the current source Displays the navigation and current video playback display NOTE The screen switches between playback screen and view camera each time the viewing area is touched Returns to the full navigation screen NOTE For details on control keys refer to the instructions in each section It does not appear if the control ...

Страница 19: ... connecting your iPhone or Android smartphone in which the KENWOOD Traffic Powered By INRIX application is installed to this unit Preparation Install the latest version of the KENWOOD Traffic Powered By INRIX application on your iPhone or Android iPhone Search for KENWOOD Traffic Powered By INRIX in the Apple App Store to find and install the most current version Android Search for KENWOOD Traffic...

Страница 20: ...creen and playback screen NOTE Set the remote control mode switch to DVD mode before starting operation for DVD and VCD see Switch the operation mode P 81 The screen shot below is for DVD It may be different from the one for VCD 1 When the operation buttons are not displayed on the screen touch the 7 area Control screen 1 2 3 4 5 Video screen 7 6 8 6 1 Information display Displays the following in...

Страница 21: ...r 2 1chST 2chST Identifies the stereo audio output of channel 1 or 2 LL Identifies the left audio output LR Identifies the monaural audio output RR Identifies the right audio output ST Identifies the stereo audio output PBC The PBC function is on VER1 The VCD version is 1 VER2 The VCD version is 2 6 Searching area Touch to search the next previous content 7 Key display area Touch to display the co...

Страница 22: ...e Track random Music CD only Folder random Disc media only Random off 2 Track information Displays the information of the current track file Only a file name and a folder name are displayed if there is no tag information Disc media only 3 Operation keys 1 Disc media only Searches file For details on search operation see File search Operation P 23 E F Searches the previous next content Touch and ho...

Страница 23: ... display the control screen File search Operation Disc media only You can search a file according to hierarchy NOTE For operations in the list screen see List screen P 15 1 Touch 1 h h Folder List screen appears 2 Touch the desired folder h h When you touch a folder its contents are displayed 3 Touch desired item from the content list h h Playback starts ...

Страница 24: ...uch R S C D Switches the subtitle language Touch Subtitle Each time you touch this key language is switched Switches the audio language Touch Audio Each time you touch this key language is switched Switches the picture angle Touch Angle Each time you touch this key picture angle is switched These keys may not function depending on the disc Ñ Ñ Highlight control Highlight control lets you control t...

Страница 25: ...Dolby Digital software Screen Ratio Sets the screen display mode 16 9 Default Displays wide pictures 4 3 LB Displays wide pictures in the Letter Box format having black stripes at the top and bottom of screen 4 3 PS Displays wide pictures in the Pan Scan format showing pictures cut at the right and left ends Ñ Ñ Language setup This setting is for the language used in the menu subtitle and voice 1 ...

Страница 26: ...6s Plus iPhone 6s iPhone 6 Plus iPhone 6 iPhone 5s iPhone 5c iPhone 5 Ñ Ñ Preparation 1 Connect iPhone using KCA iP103 via USB Black terminal P 90 When iPhone compatible with CarPlay is connected to the USB Black terminal the Bluetooth Hands Free phone currently connected is disconnected 2 Unlock your iPhone Ñ Ñ Operation buttons and available Apps on the home screen of CarPlay You can use the App...

Страница 27: ...sic and access convenient functions on the Android device while driving For details about Android Auto visit https www android com auto and https support google com androidauto Compatible Android devices You can use Android Auto with Android devices of Android version 5 0 Lollipop or later NOTE Android Auto may not be available on all devices and is not available in all countries or regions Ñ Ñ Pr...

Страница 28: ...o icon in the source selection screen P 13 1 1 Application information buttons Starts the application or displays information To exit the Android Auto screen 1 Press the HOME button Ñ Ñ Using voice control 1 Press the button for 1 second Press for 1 second To cancel 1 Press the button Ñ Ñ Switch to the Android Auto screen while listening to another source 1 Press the button NOTE If sound is output...

Страница 29: ...id device via USB terminal P 90 Connect iPhone using KCA iP103 via USB Black terminal P 90 When the smartphone is connected to the unit a confirmation message to communicate each other appears on the smartphone Touch Allow to establish connection or Ignore to cancel the connection You can check the connection status on the WebLink screen on your smartphone Ñ Ñ Operation buttons and available Apps ...

Страница 30: ...ent For confirmation of play time 2 Operation keys Searches for a station For details on searching see Station list screen P 30 Thumbs down Thumbs down to the current contents and skip to the next contents Thumbs up Registers the current contents as favorite content D H Plays or pauses the content of the current station F Skips the current song Note this function is disabled when the Pandora skip ...

Страница 31: ...plication on your device log in and create an account with Pandora If you are not already a registered user an account can also be created at www pandora com Establish an Internet connection Pandora is only available in certain countries Please visit http www pandora com legal for more information Because Pandora is a third party service the specifications are subject to change without prior notic...

Страница 32: ...nnect the Bluetooth device P 58 1 2 3 4 1 Artwork Playing time The picture data is displayed if available from current content For confirmation of play time 2 Operation keys Displays the Menu screen New radio station that relates to the artist of the currently playing song is selected and playback starts Skips the current song Plays or pauses the content of the current station Saves currently play...

Страница 33: ...r smartphone or at www spotify com Because Spotify is a third party service the specifications are subject to change without prior notice Accordingly compatibility may be impaired or some or all of the services may become unavailable Some functions of Spotify cannot be operated from this unit For issues using the application contact Spotify at www spotify com Establish an Internet connection ...

Страница 34: ...a a USB hub and Multi Card Reader Take backups of the audio files used with this unit The files can be erased depending on the operating conditions of the USB device We shall have no compensation for any damage arising from any erased data Inserting the microSD 1 Press the G button 2 Touch OPEN to the panel fully opens 3 Insert the SD card into the slot until it clicks 4 Press the G button 5 Press...

Страница 35: ...ation see Search Operation P 36 E F Searches the previous next track file Touch and hold to fast forward or fast backward DH Plays or pauses Displays the Graphic Equalizer screen P 76 4 Function panel Touch on the left side of the screen to display the function panel Touch again to close the panel Searches previous next folder USB DEVICE CHANGE Switches to another USB device when two USB devices a...

Страница 36: ...rs 4 Touch to select desired item in the list Repeat this step until you find the desired file Ñ Ñ Link search You can search a file of same artist album genre as the current track 1 Touch Link Search 2 Touch the desired tag type You can select from artists albums and genres h h The list corresponding to your selection appears 3 Touch desired item from the content list Ñ Ñ Folder search You can se...

Страница 37: ...on Preparation Connect an iPod iPhone with the KCA iP103 optional accessory while CarPlay is not connected With a CarPlay capable iPhone turn off CarPlay by operating the iPhone at functional setup before connecting iPhone For details of the setup method contact the manufacturer of the terminal Plug the iPod iPhone into the gray USB terminal with the KCA iP103 optional accessory Only one iPod iPho...

Страница 38: ...e category list screen See Category search P 39 3 Operation keys 1 Searches track file For details on search operation see Search Operation P 39 E F Searches the previous next track file Touch and hold to fast forward or fast backward DH Plays or pauses Displays the Graphic Equalizer screen P 76 4 Content list Touch on the right side of the screen to display the Content list Touch again to close t...

Страница 39: ...ry List 2 Touch the desired category h h The list corresponding to your selection appears 3 Touch to select desired item in the list Repeat this step until you find the desired file Ñ Ñ Link search You can search a file of same artist album genre composer as the current track 1 Touch Link Search 2 Touch the desired tag type You can select from artists albums genres and composers h h The list corre...

Страница 40: ...eption automatically AUTO2 Tunes in stations in memory one after another MANUAL Switches to the next frequency manually 3 Operation keys E F Tunes in a station The method of frequency switching can be changed see 2 in table Displays the Graphic Equalizer screen P 76 4 Preset list Recalls the memorized station or channel When touched for 2 seconds stores the current receiving station or channel in ...

Страница 41: ...ils see Search by program type P 42 MONO FM only Select the Monaural reception Memory Operation Ñ Ñ Auto memory You can store stations with good reception in memory automatically 1 Touch desired band key 2 Touch on the left side of the screen Touch AME 3 Touch Yes h h Auto memory starts Ñ Ñ Manual memory You can store the current receiving station or channel in memory 1 Select a station or channel...

Страница 42: ...formation FM only You can listen and watch the traffic information automatically when a traffic bulletin starts However this feature requires a Radio Broadcast Data System that includes the TI information 1 Touch on the left side of the screen Touch TI h h Traffic information mode is set Ñ Ñ When the traffic bulletin starts The Traffic Information screen appears automatically It is necessary to ha...

Страница 43: ... Listener Care at 1 866 635 2349 For users in Canada Online Visit http www siriusxm ca help activation help Phone Call XM customer Care at 1 877 438 9677 NOTE Set the remote control mode switch to AUD mode before starting operation see Switch the operation mode P 81 To use SiriusXM Satellite Radio the optional accessory is necessary Control screen 3 6 4 2 5 Preset list screen 1 5 7 1 Indicator dis...

Страница 44: ...r Now allows you to access the latest report whenever you want to hear it Select your city at the set up menu Select a City for Traffic Weather P 54 and press the Traffic Weather button to check the latest report It will start from the beginning White Played already Green New information arrived Purple Playing Gray No information For SXV200 or SXV100 2 Turns the Traffic Weather Jump function on or...

Страница 45: ...p the preset number SXM 1 4 P 1 6 in which you want to store the channel Preset select You can list and select memorized station or channel To select from the preset list 1 Touch on the right side of the screen Select a channel from the list Direct search You can tune to a channel directly 1 Touch on the left side of the screen Touch Direct Channel 2 Enter the channel number and touch Enter NOTE T...

Страница 46: ...s Featured Favorite channels are dynamic and can change often allowing you to discover new channels You can set whether to be notified when the featured seasonal theme is updated P 54 Replay You can replay the last 60 minutes of the current channel 1 Touch L or Replay on the function panel E F Press to skip to the previous next track Press and hold to rewind or fast forward DH Plays or pauses Repl...

Страница 47: ... When tuning from a SmartFavorites channel songs will play from the beginning of each track TuneStart You can enable disable TuneStart see TuneStart P 54 NOTE Compatible with SXV200 or later tuner models TuneScan TuneScan is a feature that plays samples from the starts of multiple buffered songs from each of the SmartFavorites channels that predominantly play music selections You have easy access ...

Страница 48: ...with SXV300 or later tuner models Content Alerts When a broadcast program related to the registered artist song or team starts an Alert Content List screen appears to allow you to switch the current channel to the relevant channel 1 When the broadcast of the registered content starts an Alert Content List screen appears 2 Select a content from the list NOTE Touch Info Change Select a desired item ...

Страница 49: ...erts for this game Cancel Touch to cancel the SportsFlash alert No alerts from this game will be displayed afterward NOTE Compatible with SXV300 or later tuner models To learn how to set up the SportsFlash alert function see SportsFlash setup P 53 SiriusXM Setup 1 Touch on the left side of the screen Touch SETUP h h SiriusXM SETUP screen appears See the following sections for each setting Set up t...

Страница 50: ...horized access to mature content and user selected channels 1 Touch Parental Control in the SiriusXM SETUP screen 2 Touch Mature User or OFF OFF Deactivates the parental mature and user locks Mature Locks channels classified as mature only User Locks only the selected channels 3 Enter the parental code you originally input in Parental code P 50 and touch Enter When selecting User This allows you t...

Страница 51: ... title Category name Ñ Ñ Skip channel select You can set the undesired channels to skip 1 Touch Skip Channel Select h h Skip Category Select screen appears 2 Touch the desired category from the list h h Displays all the channels in the selected category 3 Touch each channel on the list and set to ON or OFF NOTE To delete the skip channel setting touch Disable All and then touch YES on the confirma...

Страница 52: ...ch YES on the confirmation screen Select OFF for the content you want to deactivate the content alert for 3 Touch each content list item you want to set check or uncheck NOTE You can select þ for up to 60 Artists or Songs To delete the Artist and Song 1 Touch Delete 2 Touch the content name to check þ All Select all content All Erases all check marks 3 Touch Delete and then touch YES on the confir...

Страница 53: ...ortsFlash Beep is turned on or off Default is ON Selecting the teams for SportsFlash 1 Touch SportsFlash Team Set in the SiriusXM SETUP screen h h Team Set screen appears 2 Touch Edit 3 Touch the desired league from the list 4 Touch each team in the list you want to set ON or OFF 5 Touch twice Edit Sets and removes teams Priority Sets the priority of a team to be posted Clear Removes all teams tha...

Страница 54: ...ear them from the beginning 1 Touch Traffic Weather City Select in the SiriusXM SETUP screen 2 Touch T and U to select a city Ñ Ñ Selecting Featured Bands Update Messages You can set whether to be notified when the featured seasonal theme is updated 1 Touch Featured Bands Update Messages in the SiriusXM SETUP screen The Featured Bands Update Messages is turned on or off Default is ON Ñ Ñ TuneStart...

Страница 55: ... the Bluetooth version of the device This unit may not work for some Bluetooth devices Connecting conditions may vary depending on your environment For some Bluetooth devices the device is disconnected when the unit is turned off Ñ Ñ About the cell phone and Bluetooth audio player This unit conforms to the following Bluetooth specifications Version Bluetooth Ver 3 0 Profile Cell phone HFP V1 6 Han...

Страница 56: ... Bluetooth device 1 Search the unit DNX from your smartphone cell phone 2 Input the PIN Code in your smartphone cell phone PIN Code is set to 0000 as the default SSP Secure Simple Pairing of Bluetooth 2 1 or later 1 Search the unit DNX from your smartphone cell phone 2 Confirm the request both on the smartphone cell phone and the unit Step 2 Connection settings When the HFP profile is supported Ha...

Страница 57: ...a The data transmission will start with your permission When the data transmission and connection have completed the Bluetooth connection icon appears on the screen Bluetooth Setup 1 Press the MENU button h h Popup menu appears 2 Touch SETUP h h SETUP Menu screen appears 3 Touch Bluetooth h h Bluetooth SETUP screen appears See the following section for each setting Connect the Bluetooth device P 5...

Страница 58: ...ice 3 Set each profile as follows TEL HFP 1 TEL HFP 2 The device is connected with the unit as hands free phone 1 or 2 Audio A2DP App SPP Set to interwork with an application installed in a smartphone or to use as an audio player 4 Touch Close To delete the registered Bluetooth device 1 Touch Delete 2 Touch the device name to check þ All Select all Bluetooth device All Erases all check marks 3 Tou...

Страница 59: ...source selection screen P 13 Ñ Ñ Bluetooth basic operation Control screen 3 4 5 2 1 1 Device name Connected device name Repeats the current track folder Each time you touch the key repeat mode switches in the following sequence File repeat Folder repeat All songs repeat Repeat off Randomly plays all tracks in current folder Each time you touch the key random mode switches in the following sequence...

Страница 60: ...displayed on the screen differ depending on the connected device If the operation keys do not appear operate from the player Depending on your cell phone or audio player audio may be heard and controlled but text information may not appear If the volume is too low raise it on your cell phone or audio player Ñ Ñ Connect the Bluetooth audio Selects the device to connect via Bluetooth audio A2DP or A...

Страница 61: ...up to 1000 entries Up to 50 entries including dialed calls received calls and missed calls 2 Select a dialing method Call using call records Call using the phonebook Call using the preset number Call by entering a phone number Voice Recognition P 62 Select the cell phone to use When you connect two cell phones 1 Touch to select the phone you want to use Bluetooth SETUP 1 Touch Bluetooth SETUP scre...

Страница 62: ...ct the person you want to call from the list 5 Select the phone number from the list NOTE You can set the list to arrange in the order of last name or first name For details see Hands Free Setup P 65 Ñ Ñ Voice Recognition You can access the voice recognition function of the cell phone connected to this unit You can search the cell phone phonebook by voice The functionality depends on the cell phon...

Страница 63: ...r not to mute your voice Output the dial tone Touch DTMF to display the tone input screen You can send tones by touching desired keys on the screen Switching the speaking voice output Touching each time switches the speaking voice output between cell phone and speaker Call waiting When you receive a call while talking on another call you can answer the newly received call by touching The current c...

Страница 64: ... See Call using the phonebook P 62 Add number direct Enter the telephone number directly and touch SET See Call by entering a phone number P 61 Delete To delete the preset number touch Delete and then touch OK on the confirmation screen Ñ Ñ Phonebook transfer You can transfer the phonebook in your Bluetooth smartphone via PBAP 1 Touch 2 Touch h h The phonebook data transmission starts Phonebook de...

Страница 65: ...s not available 1 5 10 15 20 25 30 Set calling ring time second Auto Pairing When set to ON the Apple Auto Pairing function is turned on to automatically register the iPod touch or iPhone connected to this unit ON Default Uses Apple Auto Pairing function OFF Not uses Apple Auto Pairing function Sort Order Sets how to arrange the cell phone phonebook First Arranges in the order of first name Last D...

Страница 66: ... angles 1 Available when Dashboard Camera Front Camera Rear Camera is set to CMOS 3 Series Camera Ñ Ñ Camera Setup 1 Press the MENU button h h Popup menu appears 2 Touch SETUP h h SETUP Menu screen appears 3 Touch Camera h h Camera screen appears 4 Set each item as follows Rear Camera CMOS 3 Series Camera Select this when the CMOS 3xx series with ID 1 Rear Camera set is connected Rear Camera Inter...

Страница 67: ... in the appropriate position according to the instructions supplied with the rear view camera When adjusting the parking guidelines make sure to use the parking brake to prevent the car from moving 1 Touch ON of Parking Guidelines in the Camera screen P 66 2 Touch Guidelines SETUP in the Camera screen 3 Adjust the parking guidelines by selecting the mark 4 Adjusting the position of the selected ma...

Страница 68: ... Displays the control screen of the satellite radio source provided for the vehicle Displays the control screen of the media player source provided for the vehicle Displays the control screen of the Bluetooth Hands Free function provided for the vehicle Displays the control screen of the Bluetooth streaming source provided for the vehicle Displays information about the instruments such as a speedo...

Страница 69: ... Full and video of 4 3 ratio is displayed in Regular USB device and SD card Displays video fully on vertical or horizontal with no ratio change NOTE Adjusting items are different depending on the current source System Setup NOTE Each operation in this section can be started from the multi function menu 1 Press the MENU button h h Popup menu appears 2 Touch SETUP See the following section for each ...

Страница 70: ...ive items Language Select Selects a language Touch Panel Adjust Adjust the sensing position of touch panel P 70 Clock NAV SYNC Default Synchronizes the clock time with navigation GPS data Manual Sets the clock manually Time Zone If you have selected Manual for Clock select the time zone Clock Adjust If you select Manual for Clock adjust the date and time manually P 70 If you select Advanced for La...

Страница 71: ...ition DTA Sound Effect P 74 Audio SETUP Recall Recalls the memorized audio setting Audio SETUP Clear Clears the AUDIO SETUP Memory and the currently memorized audio setting Software Information Check the software version of this unit P 71 Open Source Licenses Displays the open source licenses Initialize Touch Initialize and then touch Yes to set all the settings to the initial default settings Aud...

Страница 72: ...t the viewing angle The smaller the negative value the more whitish the image on the screen looks 0 Default 1 2 3 Ñ Ñ Customizing the key color You can set the button illumination color 1 Touch Key Color in the Display screen 2 Touch the desired color User The color you have set in the process of Adjust is registered Scan You can set the key color to continuously scan through the color spectrum Ca...

Страница 73: ...es counter clockwise Touching rotates clockwise Picture files JPEG jpg jpeg PNG png BMP bmp AV Setup You can set AV parameters 1 Press the MENU button h h Popup menu appears 2 Touch SETUP h h SETUP screen appears 3 Touch AV h h AV screen appears 4 Set each item as follows AV OUT You can select an AV source to be output from the AV OUTPUT port OFF AV IN DISC USB SD or iPod You cannot select iPod if...

Страница 74: ...ffect P 78 Speaker X over setup 1 Press the MENU button h h Popup menu appears 2 Touch Audio h h Audio screen appears 3 Touch Speaker Xʼover 4 Select a car type You can setup the car type and speaker network etc If your car type is selected the Delay Time Alignment is set automatically for timing adjustment of sound output for each channel to have the highest surround effects 5 Touch the speaker 1...

Страница 75: ...ssover slope Gain Adjusts the front speaker rear speaker or subwoofer level TW Gain 2 Adjusts the tweeter level When front is selected on Speaker Select screen Phase Inversion 3 Sets the phase of subwoofer output Check Phase Inversion to shift the phase 180 degrees When subwoofer is selected on Speaker Select screen 1 Only when LPF FREQ HPF FREQ is set to a mode other than Through in Xʼover 2 Only...

Страница 76: ...t equalizer curve Memory Saves the adjusted equalizer curve from User1 to User4 Initialize The current EQ curve returns to flat ALL SRC Apply the adjusted equalizer to all sources Touch ALL SRC and then touch OK on the confirmation screen Bass EXT Bass Extend Settings When turned on the frequency lower than 62 5 Hz is set to the same gain level as 62 5 Hz SW Level Adjusts the subwoofer volume This...

Страница 77: ...ced the volume using the Volume Offset the sound generated if you suddenly switch to another source may be extremely loud Zone Control You can select different sources for both front and rear positions in the vehicle 1 Press the MENU button h h Popup menu appears 2 Touch Audio h h Audio screen appears 3 Touch Zone Control h h Zone Control screen appears 4 Touch Zone Select 5 Touch Dual Zone 6 Set ...

Страница 78: ...ink Waze Apple CarPlay or Android Auto as the Front Source you cannot select DISC Music CD Disc media USB SD or iPod as the Rear Source Sound Effect You can set sound effects 1 Press the MENU button h h Popup menu appears 2 Touch Audio h h Audio screen appears 3 Touch Sound Effect 4 Set each item as follows Bass Boost Sets the amount of bass boost among OFF 1 2 3 Loudness Sets the amounts of boost...

Страница 79: ...dio screen appears 3 Touch Position DTA Set up Listening Position P 79 Set up Front Focus P 80 Ñ Ñ Listening Position Adjust the sound delay time as nearer speakers to the selected seat have more delay time so that the sound from each speaker arrive a listener at the same time 1 Touch Listening Position in the Position DTA screen 2 Select listening position from Front R Right front Front L Left fr...

Страница 80: ...as follows Sound Image LR Front Adjust the sound image to focus on in front of front seats Sound Image LR Rear Adjust the sound image to focus on in front of rear seats Size of the Virtual Sound Field Adjust the size of sound image to meet your taste If the sound image is shifted from the front adjust it by Sound Image LR Front or Sound Image LR Rear Subwoofer Delay Adjust the delay time of subwoo...

Страница 81: ...hildren In the unlikely event that a child swallows the battery immediately consult a physician Battery Installation If the remote control operates only over shorter distances or does not operate at all it is possible that the batteries are depleted In such instances replace the both batteries with new ones 1 Insert two AAA R03 size batteries with the and poles aligned properly following the illus...

Страница 82: ...he C or D button h h The content you entered is played Ñ Ñ Basic operations 1 2 5 17 19 21 22 23 24 25 26 18 20 3 6 7 8 10 12 13 14 15 16 9 11 4 Key Name Mode switch Function 1 SRC AUD DVD Switches to the source to be played In hands free mode hangs up the phone 2 NAV Switches the screen between the navigation the current source and the App screen from the connected iPhone Android 3 MENU DVD Stops...

Страница 83: ...tations received by the unit During DVD VCD source in DVD mode selects the chapter scene track to be played 14 Numeric Keypad AUD Specifies the number to search in direct search For details on the direct search mode see Direct search mode P 82 DVD Press 1 2 to fast forward backward Press 4 5 to slow forward backward Switches the slow playback speed each time you press this key DVD only 15 DVD Duri...

Страница 84: ...be checked If your car s ignition does not have an ACC position connect the ignition wires to a power source that can be turned on and off with the ignition key If you connect the ignition wire to a power source with a constant voltage supply such as with battery wires the battery may be drained If the console has a lid make sure to install the unit so that the front panel will not hit the lid whe...

Страница 85: ... unit to the vehicle Otherwise scars damage or failure may result Reception may drop if there are metal objects near the Bluetooth antenna Bluetooth antenna unit Ñ Ñ Supplied accessories for installation 1 x1 2 Black 1 m x1 3 Gray 1 m x1 4 3 m x1 5 M5 x 8 mm x6 6 M5 x 8 mm x6 7 x1 8 5 m x1 9 x1 ...

Страница 86: ...t the wiring harness wires in the following order ground battery ignition 5 Connect the wiring harness connector to the unit 6 Install the unit in your car 7 Reconnect the terminal of the battery 8 Perform the Initial Setup See Initial setup P 9 Installing the unit Ñ Ñ Japanese cars 5 or 6 5 or 6 Car Bracket NOTE Make sure that the unit is installed securely in place If the unit is unstable it may...

Страница 87: ...allation Please install this GPS antenna in an area away from any antennas that are used with CB radios or satellite televisions The GPS antenna should be installed at a position that is spaced at least 12 inch 30 cm from cellular phone or other transmitting antennas Signals from the GPS satellite may be interfered with by these types of communication Painting the GPS antenna with metallic paint m...

Страница 88: ... Purple White Reverse sensor wire 2 m Light Blue Yellow Steering remote control wire Connect to vehicle s reverse lamp harness when using the optional rear view camera To steering remote To use the steering wheel remote control feature you need an exclusive remote adapter not supplied matched to your car If no connections are made do not let the cable come out from the tab Purple Black To rear rig...

Страница 89: ...uner 5 iDatalink connector 6 AV IN CA C3AV Optional Accessory input 7 Dashboard camera interface Connect a Dashboard Camera DRV N520 optional accessory P 90 8 Accessory 8 GPS Antenna 9 Accessory 4 Bluetooth Microphone 10 Rear view camera input Yellow 11 Front view camera Dashboard camera input Yellow 12 Visual Output Yellow Ñ Ñ Connecting a USB device USB device 2 USB Gray terminal 1 USB Black ter...

Страница 90: ...old separately 3 Optional accessory 4 See Securing the USB extension cable P 89 Ñ Ñ Connecting an Android smartphone Micro USB to USB cable 2 Android smartphone 2 USB Gray terminal 1 USB Black terminal 1 Accessory 2 Black 1 m 3 Accessory 3 Gray 1 m 3 1 USB maximum power supply current DC 5 V 1 5 A 2 Sold separately 3 See Securing the USB extension cable P 89 Ñ Ñ Connecting a Dashboard camera DRV N...

Страница 91: ...m repeat play during VCD playback The PBC function is enabled Turn off the PBC function The specified disc does not play but another one plays instead The disc is quite dirty Clean the disc See Precautions on handling discs P 4 The disc is severely scratched Try another disc instead The sound skips when an audio file is being played The disc is scratched or dirty Clean the disc See Precautions on ...

Страница 92: ...imit Check the USB device Some trouble may have occurred to the connected USB device Change the source to any source other than USB Remove the USB device Navigation Error Please turn on power again later The communication error has occurred due to severely cold temperature Turn on power again after warming your car interior Ñ Ñ SiriusXM Check Tuner A SiriusXM tuner is not connected to this unit Ve...

Страница 93: ...RW v DTS CD Video CD VCD v Super video CD Photo CD CD EXTRA r Only music CD session can be played HDCD r Normal music CD sound quality CCCD Others Dualdisc Super audio CD r Only CD layer can be played v Playback is possible r Playback is partly possible Playback is impossible 1 Incompatible with 8 cm 3 inch discs Use of DualDisc When playing a DualDisc on this unit the surface of the disc that is ...

Страница 94: ... conditions of media or device This unit supports playback of High Resolution Audio files It is recommended that a car audio system should be configured with all High Resolution Audio compatible products from player to speaker to enjoy its high quality sound Acceptable Video files Profile Max Picture size Max bit rate Audio format MPEG 1 mpg mpeg 352 240 352 288 1 5 Mbps MPEG Audio Layer 2 MPEG 2 ...

Страница 95: ...shot from multiple angles you can select a favorite angle 16 9 LB Indicates the type of screen for the image The left mark indicates that a wide image picture 16 9 is displayed on a standard TV set screen 4 3 with a black band at both the top and bottom of the screen letter box Operation regulatory marks With this DVD some functions of this unit such as the play function may be restricted dependin...

Страница 96: ... Kannada ko Korean ks Kashmiri ku Kurdish ky Kirghiz la Latin lb Luxembourgish ln Lingala lo Laotian lt Lithuanian lv Latvian Lettish mg Malagasy mi Maori mk Macedonian ml Malayalam mn Mongolian mo Moldavian mr Marathi ms Malay mt Maltese my Burmese na Nauru ne Nepali nl Dutch no Norwegian oc Occitan om Afan Oromo or Oriya pa Punjabi pl Polish ps Pashto Pushto pt Portuguese qu Quechua rm Rhaeto Ro...

Страница 97: ... Distortion 0 010 1 kHz S N Ratio dB 90 5 dB Dynamic Range 89 dB Disc Format DVD Video VIDEO CD CD DA Quantifying Bit Number 16 20 24 bit USB interface section USB Standard USB 2 0 High Speed File System FAT 16 32 exFAT NTFS Maximum Power Supply Current DC 5 V 1 5 A 2 D A Converter 24 32 bit Audio Decoder MP3 WMA AAC WAV FLAC Vorbis DSD Video Decoder MPEG1 MPEG2 MPEG4 WMV H 264 MKV SD section SD S...

Страница 98: ...3 2 1 0 1 2 3 4 5 6 7 8 9 dB 2Way X Over High pass filter Frequency Through 30 40 50 60 70 80 90 100 120 150 180 220 250 Hz Slope 6 12 18 24 dB Oct Low pass filter Frequency 30 40 50 60 70 80 90 100 120 150 180 220 250 Hz Through Slope 6 12 18 24 dB Oct Position Front Rear Subwoofer Delay 0 20 01 ft 0 03 or 0 04 ft Step Gain 8 0 dB Subwoofer level 50 10 dB FM tuner section Frequency Range step 87 ...

Страница 99: ...ver High sensitivity GPS receiver Reception Frequency 1575 42 MHz C A code Acquisition Times Cold 29 seconds typ All satellites at 130 dBm Without aiding Update Rate 1 second continuous Accuracy Position 2 5 meters CEP at 130 dBm Velocity 0 1 meter sec Position Method GPS Antenna External GPS antenna General Operating Voltage 14 4 V 10 5 16 V allowable Maximum Current Consumption 15 A Installation...

Страница 100: ...names of the Licensor Abalta Technologies Inc except as required for reasonable and customary use in describing the origin of the WEBLINK Product Waze and Waze logo are registered trademarks of Google LLC YouTube and the YouTube logo are registered trademarks of Google LLC BlackBerry RIM Research In Motion and related trademarks names and logos are the property of Research In Motion Limited and ar...

Страница 101: ...materials provided with the distribution Neither the name of the Xiph org Foundation nor the names of its contributors may be used to endorse or promote products derived from this software without specific prior written permission THIS SOFTWARE IS PROVIDED BY THE COPYRIGHT HOLDERS AND CONTRIBUTORS AS IS AND ANY EXPRESS OR IMPLIED WARRANTIES INCLUDING BUT NOT LIMITED TO THE IMPLIED WARRANTIES OF ME...

Страница 102: ... which the receiver is connected Consult the dealer or an experienced radio TV technician for help CAUTION Use of controls or adjustments or performance of procedures other than those specified herein may result in hazardous radiation exposure In compliance with Federal Regulations following are reproductions of labels on or inside the product relating to laser product safety JVC KENWOOD Corporati...

Страница 103: ...recto del reciclaje y la eliminación de residuos ayuda a conservar los recursos y evita al mismo tiempo efectos perjudiciales en la salud y el medio ambiente Informação sobre a eliminação de pilhas Este produto não deve ser eliminado como lixo doméstico geral Devolva a pilha usada ao revendedor ou entidade autorizada para que a mesma seja devolvida ao fabricante ou importador A reciclagem e a elim...

Страница 104: ......

Отзывы: