background image

English

    39

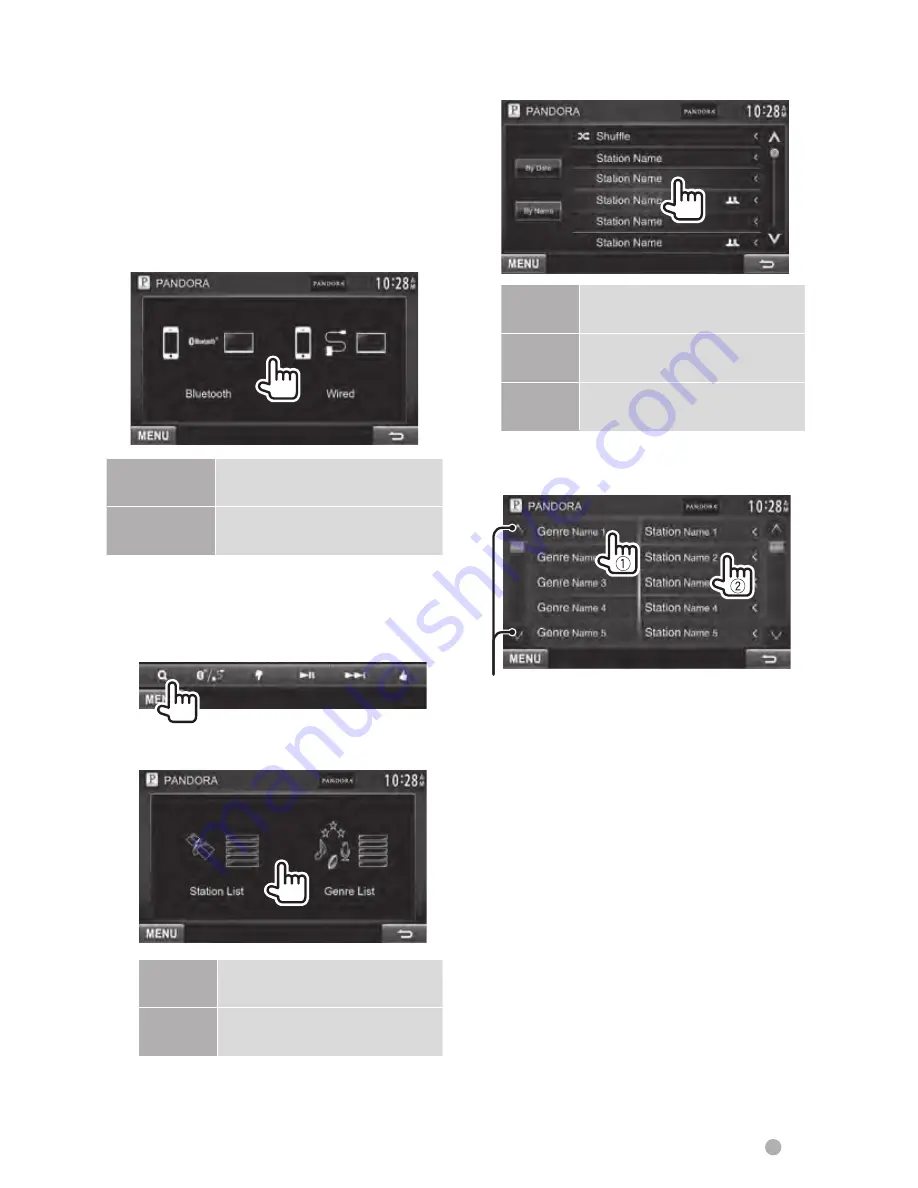
 Selecting a device to connect for 
Pandora reception (Only for DDX790/
DDX770/DDX470 )

You can connect the device for Pandora 
reception either with Bluetooth connection 
or wired connection. Select the connecting 
method.
•  For Bluetooth connection, 

 page 56.

•  For wired connection, 

 page 82 .

Bluetooth

Selects to connect Android/
BlackBerry via Bluetooth.

Wired

Selects to connect iPhone/
iPod touch via USB.

 Selecting a station from the list

1

  Display the list selecting 

screen.

2

  Select the list type.

Station 
List

Selects from the station 
names (Station List).

Genre 
List

Selects from the genre 
names (Genre List).

3

  Select a station from the list.

On the Station List:

Shuffle

Plays all the songs in the 
registered stations randomly.

By Date

Sorts the list in reverse 
chronological order.

By 
Name

Sorts the list in alphabetical 
order. 

On the Genre List:
Select a genre (

1

), then a station (

2

).

Changes the page

EN_GET0907-001A_KR.indb   39

12/11/13   10:13

Содержание DDX3070

Страница 1: ...he best performance from your new DVD Receiver For your records Record the serial number found on the back of the unit in the spaces designated on the warranty card and in the space provided below Refer to the model and serial numbers whenever you call upon your Kenwood dealer for information or service on the product Model DDX790 DDX770 DDX7070BT DDX470 DDX4070BT DDX370 DDX3070 Serial number US R...

Страница 2: ... Satellite Radio 31 Pandora operations 38 Using other external components 41 AV IN 41 Using the external navigation unit 42 Sound adjustment 43 Using the sound equalization 43 Adjusting the crossover frequency 44 Changing the display design 45 Setting for video playback 47 Picture adjustment 47 Changing the aspect ratio 48 Zooming picture 48 Using a rear view camera 49 Setting menu items 50 Memori...

Страница 3: ...much as this will make driving dangerous by blocking outside sounds and may cause hearing loss Stop the car before performing any complicated operations Temperature inside the car If you have parked the car for a long time in hot or cold weather wait until the temperature in the car becomes normal before operating the unit How to reset your unit DDX790 DDX770 DDX7070BT Reset button DDX470 DDX4070B...

Страница 4: ...rate or use radio frequency energy Changes or modifications to this equipment may cause harmful interference unless the modifications are expressly approved in the instruction manual The user could lose the authority to operate this equipment if an unauthorized change or modification is made FCC NOTE This equipment has been tested and found to comply with the limits for a Class B digital device pu...

Страница 5: ...ration buttons and menu items in the selected language Local initially selected or English English Angle 1 Adjust the panel angle page 11 AV Input Select an external component to play AV IN2 or iPod page 52 External BUS 2 Select the component connected to EXT I F input terminal OEM for ADS adapter or SXi for SiriusXM Connect VehicleTuner page 52 R CAM Interrupt Select ON when connecting the rear v...

Страница 6: ... Application Version Updates the System application DVD Version Updates the DVD System application It may take a while If the update has been complete successfully Update Completed appears Reset the unit If the update has failed turn the power off and then on and retry the update Even if you have turned off the power during update you can restart the update after the power is turned on The update ...

Страница 7: ...he security function You can activate security function to protect your receiver system against theft 1 On Top Menu 2 The security indicator on the monitor panel flashes when the vehicle ignition is off To cancel select OFF ...

Страница 8: ... Press Displays the current source screen AV OUT button Hold Selects the AV source for external monitor or amplifier 7 MENU button Turns off the power Hold Turns on the power Press Displays the Top Menu screen Press page 13 8 TEL button Press Displays the Handsfree screen page 60 VOICE button Hold Activates voice dialing page 60 9 0 Eject button Ejects the disc Tilts the monitor panel fully Opens ...

Страница 9: ...reen Press Selects the AV source for external monitor or amplifier Hold 7 For DDX470 DDX4070BT VOL ATT AUD knob page 11 Attenuates the sound Press Adjusts the audio volume Turn Displays the Tone screen Hold page 43 For DDX370 DDX3070 VOL ATT knob page 11 Attenuates the sound Press Adjusts the audio volume Turn 8 For DDX470 DDX4070BT TEL VOICE button Displays the Handsfree screen Press page 60 The ...

Страница 10: ...ock time with the connected navigation unit Radio Data System Synchronizes the clock time with FM RBDS OFF Sets the clock manually below When selecting OFF 1 Adjust the hour 2 Adjust the minute Reset Sets the minute to 00 Example AM 3 00 AM 3 29 AM 3 00 AM 3 30 AM 3 59 AM 4 00 5 Finish the procedure Only for DDX7070BT DDX4070BT DDX3070 Appears only when the navigation unit is connected ...

Страница 11: ... can change the panel angle 1 Select an angle 0 6 To set the current position as the power off position select Memory Common operations Adjusting the volume To adjust the volume 00 to 35 DDX790 DDX770 DDX7070BT Increase Decrease DDX470 DDX4070BT DDX370 DDX3070 Increase Decrease To attenuate the sound DDX790 DDX770 DDX7070BT DDX470 DDX4070BT DDX370 DDX3070 The ATT indicator lights up To cancel the ...

Страница 12: ...DDX4070BT 1 Hold DDX370 DDX3070 2 Hold The screen is turned off To turn on the screen press MENU You can also turn on the screen by touching the display 1 This operation works only when TEL Key Long Press is set to V OFF page 53 2 This operation works only when AUD Key Long Press is set to V OFF page 53 ...

Страница 13: ...oes to the previous chapter track 2 Goes to the next chapter track 2 Displays the video control menu while playing a video The operation buttons disappear by touching the screen or when no operation is done for about 5 seconds 2 Not available for video from an external component and rear view camera Top Menu Changes the AV source Displays the Setup screen Switching screens You can arrange the item...

Страница 14: ...etooth audio player AV IN 1 AV IN 2 2 page 41 Switches to an external component connected to AV IN1 and iPod AV IN2 input terminals OEM Features 4 page 83 Switches to the sources via connected ADS adapter 1 Only for DDX7070BT DDX4070BT DDX3070 When no navigation unit is connected No Navigation appears 2 Select an appropriate input setting on AV Input page 52 3 Only for DDX790 DDX770 DDX470 DDX370 ...

Страница 15: ...X7070BT DDX4070BT DDX370 Customizing the Top Menu screen You can arrange the items to display on the Top Menu screen 1 On Top Menu 2 3 Select the position to place the icon 1 then select the item you want to display on the selected position 2 4 Repeat step 3 to place icons for other items ...

Страница 16: ...again The monitor panel closes Disc operations Playing a disc If a disc does not have a disc menu all tracks on it will be played repeatedly until you change the source or eject the disc Inserting a disc DDX790 DDX770 DDX7070BT Label side DDX470 DDX4070BT DDX370 DDX3070 Label side The source changes to DISC and playback starts The IN indicator lights up while a disc is inserted If appears on the s...

Страница 17: ...iet CD DA VCD Video CD DivX 5 MPEG1 MPEG2 JPEG MP3 WMA WAV AAC MPEG4 1 If you insert a DVD Video disc of an incorrect Region Code Region code error appears on the screen 2 DVD R recorded in multi border format is also playable except for dual layer discs DVD RW dual layer discs are not playable 3 It is possible to play back finalized R RW Video format only discs DVD is selected as its disc type wh...

Страница 18: ...ses playback 7 3 Stops playback 4 Selects a chapter track Press Reverse forward search 4 Hold 1 Reverse forward search during playback 4 Plays back in slow motion during pause MODE 5 Enters the DISC Mode settings page 22 MENU Displays the Top Menu screen For DivX MPEG1 MPEG2 JPEG the following buttons also appear Selects a folder Displays the folder track list page 19 1 To display the Original Pro...

Страница 19: ...eturns to the upper layer For CD MP3 WMA WAV AAC Media type File type Playback status 3 play 8 pause Playing time MP3 WMA WAV AAC Folder no Track no CD Track no Track file information Pressing scrolls the text if not all of the text is shown While playing the jacket picture is shown if the file has the tag data including the jacket picture Playback mode Selects playback mode page 21 1 Displays the...

Страница 20: ...t Displays the picture adjustment screen page 47 Audio Selects the audio type For DVD VR Selects the audio channel ST stereo L left R right Subtitle Selects the subtitle type Angle Selects view angle MENU Displays the disc menu DVD playlist DVD VR T MENU Displays the disc menu DVD original program DVD VR Highlight Switches to the direct disc menu mode Press the target item to select To restore the...

Страница 21: ...ct a track number Selecting playback mode For DVD DVD VR Selects Repeat playback mode For VCD without PBC CD DivX MPEG1 MPEG2 MP3 WMA WAV AAC Selects Repeat playback mode Selects Random playback mode You cannot activate the repeat mode and the random mode at the same time Each time you press the button the playback mode changes The corresponding indicator lights up Available items differ depending...

Страница 22: ...ou can change the dynamic range while playing Dolby Digital software Wide Select this to enjoy a powerful sound at a low volume level with its full dynamic range Normal Select this to reduce the dynamic range a little Dialog Select this to reproduce the movie dialog more clearly For discs except VCD CD Screen Ratio Select the monitor type to watch a wide screen picture on the external monitor 16 9...

Страница 23: ...using a USB extension cable USB devices equipped with special functions such as data security functions cannot be used with the unit Do not use a USB device with 2 or more partitions Depending on the shape of the USB devices and connection ports some USB devices may not be attached properly or the connection might be loose This unit may not recognize a memory card inserted into the USB card reader...

Страница 24: ... between internal and external memory source of the connected device such as mobile phone To display the source control screen page 14 To change settings for video playback page 20 File type Playback status 3 play 8 pause Playing time DivX MPEG1 MPEG2 MP3 WMA WAV AAC Folder no Track no JPEG Folder no File no Track file information for MP3 WMA WAV AAC Pressing scrolls the text if not all of the tex...

Страница 25: ...e for iPod with video iPod classic iPod nano 6th Generation iPod nano 5th Generation iPod nano 4th Generation iPod nano 3rd Generation iPod touch 4th Generation iPod touch 3rd Generation iPod touch 2nd Generation iPod touch 1st Generation iPhone 4S iPhone 4 iPhone 3GS iPhone 3G iPhone Settings for iPod playback When the source is iPod 1 Listening to the iPod iPhone device 2 Audiobooks Selects the ...

Страница 26: ...ts an audio video file 3 1 Reverse forward search APP Select to control playback from the iPod iPhone iPod iPhone control mode 4 page 27 MENU Displays the Top Menu screen 1 For changing the Artwork display setting page 25 2 To cancel random or repeat mode press the button repeatedly until the indicator disappears Not available in iPod control mode page 27 3 Resume playback is unavailable for video...

Страница 27: ...dio and video Available categories differ depending on the type of your iPod iPhone Controlling playback from the iPod iPhone You can play back the audio video files or use App by operating iPod iPhone itself instead of the unit When you are using Garmin StreetPilot Onboard the screen appears For Garmin StreetPilot Onboard for iPhone visit the Garmin web site www garmin com Garmin App The current ...

Страница 28: ...the information of the current station page 29 PTY Enters the PTY search mode page 30 AM Selects AM band FM Selects FM band SEEK Changes the seek mode AUTO1 Auto Search AUTO2 Tunes in stations in memory one after another MANU Manual Search 4 Searches for a station The search method differs according to the selected seek mode above MENU Displays the Top Menu screen Appears only when FM is selected ...

Страница 29: ...stations in memory You can preset six stations for each band Automatic presetting AME Auto Memory 1 2 Hold Local stations with the strongest signals are searched and stored automatically Manual presetting 1 Tune in to a station you want to preset page 28 2 Select a preset number Hold The station selected in step 1 is stored Selecting a preset station ...

Страница 30: ...ame PTY code as you have selected that station is tuned in Activating deactivating TI Standby Reception TI indicator TI indicator TI Standby Reception Lights in white The unit will temporarily switch to Traffic Information TI if available Lights in orange Not yet activated Tune in to another station providing the RBDS signals Goes off Deactivated The volume adjustment for Traffic Information is au...

Страница 31: ...nfo Category Changes the displayed information each time this button is pressed MODE Enters the SiriusXM Mode settings page 36 DIRECT Displays the Direct Channel Select screen page 33 TEXT Displays Hides the information on the current channel page 33 REPLAY Displays the Replay screen page 35 Obtain information on channels or select a category and then a channel page 34 BAND Changes the band SXM1 S...

Страница 32: ...ll need the Radio ID 1 Make a note of your Radio ID For each SiriusXM Connect Vehicle Tuner peculiar Radio ID is assigned To confirm your Radio ID tune to channel 0 The letters I O S and F are not used in any Radio ID 2 Activate your SiriusXM Service Go to www siriusxm com activatenow or call 1 866 635 2349 to activate your SiriusXM Connect Vehicle Tuner 3 When the following screen appears press E...

Страница 33: ... channels for each band 24 in total 1 Tune in to a channel you want to preset page 31 2 Select a preset number Hold The channel selected in step 1 is stored Selecting a preset channel Selecting a channel directly 1 2 Enter a channel no 1 and then confirm 2 To clear the entry press Clear To cancel selecting the channel press Cancel ...

Страница 34: ... or Channel List 3 Preset List Select a band 1 and then a preset channel 2 Channel List Select a category 1 and then a channel 2 Changes the page To list all the channels select All Channels Pressing the info change button above the list displays information in the following order Channel Name Artist Name Song Title Content Info Info change button ...

Страница 35: ...e amount of recorded data blue If you have already recorded fully the entire bar is indicated in blue Updated every second Time code Shows you the point of Replay you are listening to Example 5 00 You are listening to the data of 5 minutes before the current broadcast Updated every second 4 Returns to the previous track if pressed within 2 seconds from the beginning of the current track Returns to...

Страница 36: ...digit code 1 and then confirm 2 To clear the entry press Clear To cancel setting the code press Cancel The initial setting is 0000 3 Enter a new four digit code 1 and then confirm 2 To clear the entry press Clear To cancel setting the code press Cancel 4 Enter the four digit code and then press Enter again to confirm the code Activating Deactivating the parental mature lock You can set the parenta...

Страница 37: ...tiple channels Checkmarks appear beside the locked channels and the channels are disabled Deactivating the parental lock Enter the parental code All the locked channels will be deactivated Skipping unwanted channels If you do not want to receive some channels you can skip them Activating the channel skipping 1 2 Select a category 1 and then a channel 2 To list all the channels select All Channels ...

Страница 38: ...wn The picture data is displayed if available from the current content and when iPhone iPod touch is connected via USB Displays the list selecting screen page 39 Displays the connection mode selection screen page 39 Thumbs down to the current song and skips to the next song 38 Starts Pauses playback Skips the current song Not available when the Pandora skip reaches its limit Registers the current ...

Страница 39: ...etooth Wired Selects to connect iPhone iPod touch via USB Selecting a station from the list 1 Display the list selecting screen 2 Select the list type Station List Selects from the station names Station List Genre List Selects from the genre names Genre List 3 Select a station from the list On the Station List Shuffle Plays all the songs in the registered stations randomly By Date Sorts the list i...

Страница 40: ...owser to download the Pandora application Bluetooth must be built in and the following profiles must be supported SPP Serial Port Profile A2DP Advanced Audio Distribution Profile NOTE Ensure you are logged in to your smartphone application If you do not have a Pandora account you can create one for free from your smartphone or at www pandora com Pandora is available only in the U S Australia New Z...

Страница 41: ...ol screen page 14 MODE Changes the AV IN name Press 2 or 3 to select an AV IN name This setting does not affect the source name AV IN 1 AV IN 2 displayed on Top Menu MENU Displays the Top Menu screen 3 Turn on the connected component and start playing the source You can connects external components to the AV IN1 and iPod AV IN2 input terminals Preparation If you want to use AV IN2 select AV IN2 fo...

Страница 42: ...Only for DDX7070BT DDX4070BT DDX3070 You can connect a navigation unit KNA G630 optional accessory to the navigation input terminal so that you can view the navigation screen page 83 The navigation guidance comes out of the front speakers even when you listen to an audio source 2 3 Guidance Select front speakers used for the navigation guidance Volume Adjust the volume of the navigation guidance 0...

Страница 43: ...adjustments are stored and User is activated You can also display the Tone screen by pressing AUD for DDX790 DDX770 DDX7070BT DDX370 DDX3070 or VOL ATT AUD knob for DDX470 DDX4070BT on the monitor panel Adjustable only when the subwoofer is activated page 50 Using the sound equalization The adjustment is memorized for each source until you adjust the sound again If the source is a disc the adjustm...

Страница 44: ...only when the subwoofer is activated page 50 2 Not selectable when Freq is set to Through Adjusting the sound precisely 1 Perform steps 1 and 2 of Selecting a preset sound mode then 2 3 Adjust the sound of each band Selects the band Flat Changes level of Bass Middle Treble to 0 Frequency Selects frequency Level Adjusts level Q Factor Adjusts the width of the frequency Bass EXT Activates deactivate...

Страница 45: ...User is selected 1 2 3 User color adjuster You can make your own color adjustment stored in User Dimmer setting You can make the color adjustment for each dimmer setting 1 On Top Menu 2 3 Select an item to change Background or Panel Color 4 Select a background panel color To select a background For setting your favorite scene as the background page 46 Changing the display design You can change the...

Страница 46: ...he actual scene 1 Play a video or JPEG 2 Display the User Customize screen page 45 3 4 Adjust the image 38 Starts Pauses playback 3 Advances scenes frame by frame Magnifies the scene OFF Zoom1 Zoom3 5 2 3 Moves the zooming frame To cancel the capture screen press Cancel Not displayed when playing an external component connected to AV IN1 or iPod AV IN2 input terminal 5 Capture the image displayed ...

Страница 47: ...an adjust the picture quality 1 Display the adjustment menu 2 Select DIM ON dimmer on or DIM OFF dimmer off 3 Adjust the picture 15 to 15 Adjusts the brightness Adjusts the contrast Adjusts the tint Adjusts the color Adjusts the blackness Adjusts the sharpness Adjustable only when the incoming signal is NTSC ...

Страница 48: ... DISC USB only The aspect ratio is automatically selected to match to the incoming signals While DivX is played back with Screen Ratio set to 16 9 for disc page 22 for USB page 24 the aspect ratio is not set correctly Zooming picture You can zoom the picture Zoom1 to Zoom3 When Aspect is set to JUST or Auto the left column the picture is zoomed with the aspect ratio of the FULL setting 1 2 5 2 3 M...

Страница 49: ...nnection is required For connecting a rear view camera page 83 To display the picture from the rear view camera manually DDX790 DDX770 DDX7070BT Hold DDX470 DDX4070BT 1 DDX370 DDX3070 2 Hold Hold When displaying the picture from the rear view camera manually you can change the setting of the picture pages 47 and 48 To erase the rear view screen press and hold the same button again 1 This operation...

Страница 50: ...each source page 43 Natural Rock Pops Easy Top40 Jazz User Loudness You can activate deactivate the loudness function ON Boost low and high frequencies to produce a well balanced sound at a low volume level The LOUD indicator lights up OFF Cancels X over Adjust the crossover frequency page 44 Volume Offset Adjust and store the auto adjustment volume level for each source For discs the adjustment i...

Страница 51: ...Repeats scrolling Once Scrolls the displayed information once OFF Cancels Pressing scrolls the text regardless of the setting Menu Customize Change the items to display on the Top Menu screen page 15 Screen Adjust Adjust the brightness and blackness of the screen Select the dimmer mode DIM ON or DIM OFF for adjustment then change the following settings Bright Adjusts brightness 15 to 15 Initial 0 ...

Страница 52: ...es on Top Menu page 14 Navigation Only for DDX7070BT DDX4070BT DDX3070 Change the navigation settings page 42 NAV Mute Only for DDX790 DDX770 DDX470 DDX370 Attenuate the sound coming out of speakers other than the front speakers during navigation guidance System Language Select the text language used for on screen information English Spanish French German Italian Dutch Russian Portuguese Chinese S...

Страница 53: ... DDX4070BT Assigns the function of the TEL button when held V OFF Turns off the screen page 12 VOICE Activates voice dialing page 60 R CAM Displays the picture from the rear view camera page 49 AUD Key Long Press Only for DDX370 DDX3070 Assigns the function of the AUD button when held V OFF Turns off the screen page 12 R CAM Displays the picture from the rear view camera page 49 DivX R VOD Only fo...

Страница 54: ...tings To cancel press Cancel Confirmation message appears Press Yes Locking the settings You can lock the settings to prevent them from being changed is shown beside the settings that can be locked 1 On Setup 2 To unlock the setting press Unlock Adjusting the touch position You can adjust the touch position on the touch panel if the position touched and the operation performed do not match 1 On Se...

Страница 55: ...ng on circumstances around you When the unit is turned off the device is disconnected BLUETOOTH OPERATIONS Only for DDX790 DDX770 DDX7070BT DDX470 DDX4070BT Bluetooth is a short range wireless radio communication technology for the mobile device such as mobile phones portable PCs and other devices The Bluetooth devices can be connected without cables and communicate with each other Bluetooth opera...

Страница 56: ... to 5 devices can be registered in total Only one device for Bluetooth phone and one for Bluetooth audio can be connected at a time To use the Bluetooth function you need to turn on Bluetooth function of the device To use the registered device you need to connect the device to the unit page 57 Pairing a Bluetooth device using SSP for Bluetooth 2 1 When the Bluetooth device is compatible with Bluet...

Страница 57: ... device connect the device on Paired Device List below Connecting a registered Bluetooth device 1 Display the Bluetooth Setup screen page 56 2 Select the device you want to connect 1 then select the usage of the device TEL HFP for mobile phone Audio A2DP for Bluetooth audio player and PANDORA SPP for Pandora 2 Selectable items depend on the device you are operating If you connect a device while an...

Страница 58: ...n on the Bluetooth device KENWOOD BT MM 7U2 Device Address Shows the device address of the unit Auto Connect ON OFF The connection is automatically established with the last connected Bluetooth device when the unit is turned on Cancels Bluetooth HF Audio Select the speakers used for Bluetooth both phone and audio player Front Only All From front speakers only From all speakers Auto Pairing ON OFF ...

Страница 59: ...ect the volume level of the other sources To adjust the volume of calls earpiece use VOLUME for DDX790 DDX770 DDX7070BT or VOL ATT AUD knob for DDX470 DDX4070BT on the monitor panel Switching between handsfree mode and phone mode While talking Each time you press the button the talking method is switched handsfree mode phone mode Notifying SMS reception If the mobile phone is compatible with SMS S...

Страница 60: ...ition system Or DDX790 DDX770 DDX7070BT DDX470 DDX4070BT Hold Hold Speak the name you want to call To cancel press Cancel This operation works only when TEL Key Long Press is set to VOICE page 53 Adjusting the echo cancel level While talking Making a call 1 On Top Menu 2 Select a method to make a call Preset list For presetting page 62 Direct number entry the right column Voice dialing the right c...

Страница 61: ...ying the phonebook page 62 2 To use the A Z search on the phonebook When Phonebook is selected you can search by initial 1 2 Select the initial If the initial is not a letter or number press Others 3 Select a phone number from the list To display the details of an entry When Phonebook is selected 1 Display the details of the desired entry 2 Select a phone number to call ...

Страница 62: ... To delete the preset phone numbers initialize the settings from Initialize in Bluetooth Setup page 58 Copying the phonebook You can copy the phonebook memory of a mobile phone into the unit up to 400 entries 1 On Top Menu 2 3 PIN code initial 0000 Numbers of the phonebook entries copied 4 Operate the target mobile phone Refer to the instruction manual supplied with your mobile phone To cancel the...

Страница 63: ...s Dialed calls received calls and missed calls up to 50 entries each To display the phonebook call lists of the mobile phone or the unit Unit Connected mobile phone Deleting the phone number entries in the unit 1 Display the phonebook call list you want to delete page 61 2 You cannot delete data when Phone is selected 3 Select the item you want to delete Deletes all the numbers names in the select...

Страница 64: ...ms you of the arrival of a message by ringing and displaying Receiving Message The unit does not inform you of the arrival of a message Ring Mode System Phone The ring tone set on the unit is used The ring tone set on the mobile phone is used This function may not work depending on the mobile phone Ring Tone Change When Ring Mode is set to System press Enter then select the ring tone for received ...

Страница 65: ... scrolls the text if not all of the text is shown Playback status 3 play 8 pause Playing time The operation buttons indications and information displayed on the screen differ depending on the connected device 3 Starts playback 8 Pauses 4 Selects a track Press Reverse forward search Hold MENU Displays the Top Menu screen Available only for the devices compatible with AVRCP 1 3 ...

Страница 66: ...n inside the case If the Remote Controller operates only over shorter distances or does not operate at all it is possible that the batteries are depleted In such instances replace the both batteries with new ones Remote Controller mode switch The functions operated from the remote controller differ depending on the position of the mode switch DVDt T Vt AUDt AUD mode Switch to this mode when contro...

Страница 67: ...olume NAV V SEL Switches to the navigation screen Cursor key Moves the cursor when displaying menu ENTER Enters options Hands free communication When a call comes in it answers the call Function Switches the control screen MODE Switches the aspect ratio Aspect ratio changes each time you press this key OPEN Only for DDX790 DDX770 DDX7070BT Adjusts the panel angle The panel angle changes each time ...

Страница 68: ... VR Chapter number Program Playlist Cancel VCD 1 X VCD 2 X PBC OFF Track number Cancel VCD 2 X PBC ON Track number Cancel Once you have switched to the direct search feature specify the search number from the numeric keypad and then press ENTER key Numeric keypad Specify the number to search in direct search Press 1 2ABC to fast forward backward Switches the fast forward backward speed each time y...

Страница 69: ...cts the folder to be played Track search and file search Selects the track or file to be played Play Pause Pauses the track Press again to resume playing Direct search Pressing this key switches the features that can be searched directly Music Disc Track number Cancel Audio files in DVD CD disc Folder number File number Cancel Once you have switched to the direct search feature specify the search ...

Страница 70: ...le 92 1MHz FM 9WXYZ 2ABC 1 or Example 810kHz AM 8TUV 1 0 or Numeric keypad To use preset tuning press the number of a programmed broadcast station 1 6MNO Press the direct tuning key first then specify the frequency of the station to receive iPod AUD mode Music Video search Selects the music video to be played Play Pause Pauses the music video Press again to resume playing USB AUD mode Folder searc...

Страница 71: ... edges Do not touch its recording surface When storing a disc in its case gently insert the disc around the center holder with the printed surface facing up Make sure to store discs in their cases after use Center holder To keep discs clean A dirty disc may not play correctly If a disc does become dirty wipe it with a soft cloth in a straight line from center to edge Do not use any solvents for ex...

Страница 72: ...iles which have the data such as AIFF ATRAC3 etc File playback Playing DivX files Only for DDX7070BT DDX4070BT DDX3070 This unit can play back DivX files with the extension code divx div or avi regardless of the letter case upper lower Audio stream should conform to MP3 or Dolby Digital The file encoded in the interlaced scanning mode may not be played back correctly Playing MPEG1 MPEG2 files This...

Страница 73: ...uru TG Tajik BG Bulgarian IK Inupiak NE Nepali TH Thai BH Bihari IN Indonesian NO Norwegian TI Tigrinya BI Bislama IS Icelandic OC Occitan TK Turkmen BN Bengali Bangla IW Hebrew OM Afan Oromo TL Tagalog BO Tibetan JA Japanese OR Oriya TN Setswana BR Breton JI Yiddish PA Panjabi TO Tonga CA Catalan JW Javanese PL Polish TR Turkish CO Corsican KA Georgian PS Pashto Pushto TS Tsonga CS Czech KK Kazak...

Страница 74: ... USB Device Error The USB power voltage is abnormal Turn off and turn on the unit Connect another USB device Panel Mecha Error The panel does not work properly Reset the unit No Navigation No navigation unit is connected Bluetooth Only for DDX790 DDX770 DDX7070BT DDX470 DDX4070BT Message Remedy Cause No BT Dongle The Bluetooth adapter KS UBT1 is removed Connection Error The device is registered bu...

Страница 75: ...operation again SiriusXM Only for DDX790 DDX770 DDX470 DDX370 Message Remedy Cause Check Tuner The SiriusXM Connect Vehicle Tuner is disconnected or the unit is having trouble communicating with the Tuner Connect the Tuner or check the Tuner connection to the back of the unit Subscription Updated Press Enter to Continue Your subscription status has been updated Chan Unavailable The selected channe...

Страница 76: ...dable Rewritable discs cannot be skipped Insert a finalized disc Finalize the discs with the component which you used for recording Playback does not start The format of files is not supported by the unit No picture appears on the external monitor Connect the video cord correctly Select the correct input on the external monitor DivX MPEG1 MPEG2 JPEG MP3 WMA WAV AAC Disc cannot be played back Recor...

Страница 77: ...one A lot of noise is generated Turn off uncheck the VoiceOver feature of the iPod For details visit http www apple com No operations are available when playing back a track containing Artwork Operate the unit after the Artwork is loaded page 25 Sound does not synchronize with the video Select iPod for AV Input page 52 Videos cannot be played No sound of videos comes out Connect USB Audio and Vide...

Страница 78: ...trolled Check whether the connected audio player supports AVRCP Audio Video Remote Control Profile Bluetooth device does not detect the unit Check whether the Bluetooth adapter KS UBT1 is inserted correctly Search from the Bluetooth device again The unit does not make pairing with the Bluetooth device For the device compatible with Bluetooth2 1 Register the device by using a PIN code page 56 For t...

Страница 79: ... supply must be connected to the wires via the fuse Mounting and wiring this product requires skills and experience For best safety leave the mounting and wiring work to professionals Make sure to ground the unit to a negative 12V DC power supply Do not install the unit in a spot exposed to direct sunlight or excessive heat or humidity Also avoid places with too much dust or the possibility of wat...

Страница 80: ...ed check whether the brake lamps blinkers wipers etc on the car are working properly Mount the unit so that the mounting angle is 30 or less Do not press hard on the panel surface when installing the unit to the vehicle Otherwise scars damage or failure may result This unit has the cooling fan to decrease the internal temperature Do not mount the unit in a place where the cooling fan of the unit i...

Страница 81: ...conversation To connect the Kenwood navigation system consult your navigation manual To car light control switch Dimmer control wire Orange White Depending on what antenna you are using connect either to the control terminal of the motor antenna or to the power terminal for the booster amplifier of the film type antenna Max 300 mA 12 V Antenna control wire Blue When using the optional power amplif...

Страница 82: ...rminal CA U1EX Optional Accessory USB device commercially available 0 8 m 2 6 ft 1 8 m 5 9 ft KCA iP202 Optional Accessory iPod commercially available iPod Audio Visual input 2 iPod AV IN2 iPod AV Input 2 switchable USB terminal CA U1EX Optional Accessory USB device commercially available 0 8 m 2 6 ft Use CA U1EX for extending the cable if necessary Max 500 mA 5V Use CA U1EX for extending the cabl...

Страница 83: ... plug Navigation System Optional Accessory DDX7070BT DDX4070BT DDX3070 only Connection cable Included in the Navigation System Navigation units that can be connected to this unit as of December 2012 KNA G630 For latest information access the www kenwood com cs ce SiriusXM Connect Vehicle Tuner for DDX790 DDX770 DDX470 DDX370 only commercially available or ADS adapter for DDX370 only commercially a...

Страница 84: ...shi Car using Brackets Car Bracket Accessory 3 M5x6mm or accessory 4 M5x7mm Accessory 3 M5x6mm or accessory 4 M5x7mm Installing the Trim Plate 1 Attach accessory 5 to the unit Accessory 5 Removing the Trim Plate DDX470 DDX4070BT DDX370 DDX3070 only 1 Engage the catch pins on the extraction key 6 and remove the two locks on the lower part Lower the frame and pull it forward as shown in the figure A...

Страница 85: ... tool 4 Pull the unit all the way out with your hands being careful not to drop it Installing the Microphone Unit DDX790 DDX770 DDX7070BT DDX470 DDX4070BT only 1 Check the installation position of the microphone accessory 9 2 Remove oil and other dirt from the installation surface 3 Install the microphone 4 Wire the microphone cable up to the unit with it secured at several positions using tape or...

Страница 86: ...Total Harmonic Distortion 0 010 1 kHz S N Ratio dB 99 dB DVD Video 96 kHz Dynamic Range 98 dB DVD Video 96 kHz Disc Format DVD Video DVD VR VIDEO CD CD DA Sampling frequency 44 1 48 96 kHz Quantifying Bit Number 16 20 24 bit USB interface section USB Standard USB 2 0 Full Speed File System FAT 16 32 Maximum Power Supply Current DC 5 V 1 A D A Converter 24 Bit Video Decoder MPEG1 MPEG2 DivX DDX7070...

Страница 87: ...1 2 V 10 kΩ Analog RGB input Only for DDX7070BT DDX4070BT DDX3070 0 7 Vp p 75 Ω Audio section Maximum Power Front Rear 50 W 4 Full Bandwidth Power Front Rear 4 Ω 14 4 V 1 THD 22 W 4 Preout Level V 4 V 10 kΩ Preout Impedance 600 Ω Speaker Impedance 4 Ω 8 Ω Tone Bass 100 Hz 8 dB Middle 1 kHz 8 dB Treble 12 5 kHz 8 dB General Operating Voltage 14 4 V 10 5 V 16 V allowable Maximum Current Consumption ...

Страница 88: ... U S and other countries iTunes is a trademark of Apple Inc DivX DivX Certified and associated logos are trademarks of Rovi Corporation or its subsidiaries and are used under license ABOUT DIVX VIDEO DivX is a digital video format created by DivX LLC a subsidiary of Rovi Corporation This is an official DivX Certified device that plays DivX video Visit divx com for more information and software too...

Страница 89: ...Bluetooth Ver 2 1 EDR Power Class Class2 Radio Service Area 10 m 10 9 yd USB Standards USB V1 1 Full Speed Power Consumption 54 3 mA 5 V max Dimensions L W H 15 mm 19 mm 5 6 mm 5 8 3 4 1 4 Keep the Bluetooth adapter inserted when using the Bluetooth function When the adapter is removed store it in a safe place Distributor name JVC KENWOOD DO BRASIL COMERCIO DE ELETRONICOS LTDA CNPJ of distributor ...

Страница 90: ... connected Consult the dealer or an experienced radio TV technician for help IC Industry Canada Notice This device complies with Industry Canada licence exempt RSS standard s Operation is subject to the following two conditions 1 This device may not cause interference and 2 this device must accept any interference including interference that may cause undesired operation of the device The term IC ...

Страница 91: ......

Страница 92: ......

Страница 93: ...TATION OF IMPLIED WARRANTIES Any and all implied warranties including warranties ol merchantability and Illness foraparticular purpose shall be limited in duration tothe lengthof this warranty EXCLUSION OF CERTAIN DAMAGES KENWOOD s l bility for a ny d efe ctive product is limited to the repair or replacement of saidproduct at our potion and shall not include damages of any kind whether incidental ...

Страница 94: ...fects covered by this warranty GARANTIE KENWOOD KENWOOD ELEC TRONICS CANADA INC ci apres appelee KENWOOD donneparecritIagaranliesuivanleal acheteur original dechaque nouveau produit Kenwood distribueau CanadaparKENWOODetacheteaunconcessionnaireautorisll par KENWO OD KENWOODgarantil sousreservedestermesetdesconditions l nonces ci dessous que chaquen ouveauproduil Kenwood dans des conditionsd emploi...

Отзывы: