background image

11

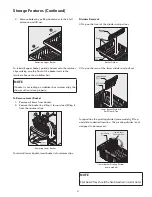
NOTE

DO NOT remove the ground screw from hinge.

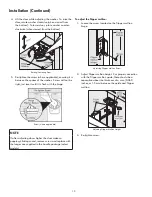
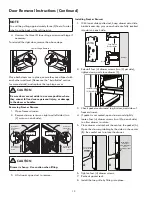
Door Removal Instructions

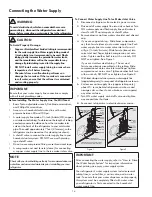
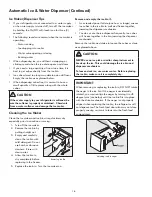
To remove the refrigerator doors:

  1.  Trace lightly around the door’s top hinges with a 

pencil. This makes reinstallation easier.

  2.  Disconnect the harness by grasping both sides of the 

connector firmly, depress the latch, and pull apart.  
Remove the two (2) screws from the top hinge. Lift 
the door off of the bottom hinge and set it aside. 

  3.  Detach the water tube from the connector   located 

behind the refrigerator and pull the tube back out to 
the front of the unit. The connector releases when you 
press inward on the outer sleeve while pushing the 
tube toward the connector then while continuing to 
hold in the sleeve, pull the tube away.

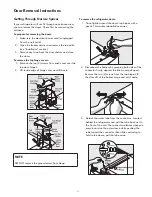
Getting Through Narrow Spaces 

If your refrigerator will not fit through an entrance area, 
you can remove the doors. Check first by measuring the 

entrance. 

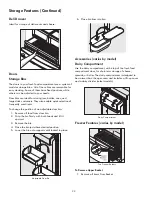
To prepare for removing the doors:

  1.  Make sure the electrical power cord is unplugged 

from the wall outlet.

  2.  Open the freezer drawer and remove the toe grille 

(see “Installation” section).

  3.  Remove any food from the door shelves and close 

the doors.

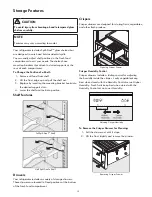
To remove the top hinge covers:

  1.  Remove the two (2) screws from each cover over the 

top door hinges.

  2.  Lift inside edge of hinge cover and tilt back.

Содержание 970-7090

Страница 1: ...t d entretien English Français Models Modèles 970 7090 P N 242162900 1106 Sears Canada Inc Toronto Ontario Canada M5B 2C3 www sears ca Kenmore Elite French Door Bottom Freezer Compartiments Superposés Color number le noméro de la couleur ...

Страница 2: ... and Saving Energy 22 Normal Operating Sounds and Sights 23 Changing the Filter 24 25 Care Cleaning 26 28 Before You Call 29 31 Table of Contents 970 Safety Precautions Do not attempt to install or operate your unit until you have read the safety precautions in this manual Safety items throughout this manual are labeled with a Danger Warning or Caution based on the risk type Definitions This is th...

Страница 3: ...ualified service technician Grounding type wall receptacle Power cord with 3 prong grounded plug Do not under any circumstances cut remove or bypass the grounding prong Electrical Information The appliance must be plugged into its own dedicated 115 Volt 60 Hz AC only electric outlet The power cord of the appliance is equipped with a three prong grounding plug for your protection against electrical...

Страница 4: ...perated or maintained according to the all instructions supplied with the product 5 Damage to or failure of this product resulting from accident abuse misuse or use for other than its intended purpose 6 Damage to or failure of this product caused by the use of detergents cleaners chemicals or utensils other than those recommended in all instructions supplied with the product 7 Damage to or failure...

Страница 5: ...help by phone we call it Rapid Resolution phone support from a Sears representative on all products Think of us as a talking owner s manual Power surge protection against electrical damage due to power fluctuations 250 Food Loss Protection annually for any food spoilage that is the result of mechanical failure of any covered refrigerator or freezer Rental reimbursement if repair of your covered pr...

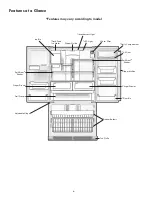
Страница 6: ...e Bin Fresh Food Ice Maker Flipper Guide Incandescent Light LED Light Water Filter Dairy Compartment Air Filter Flipper Mullion Crisper Drawer Door Bin Freezer Baskets Toe Grille Adjustable Hinges Spill Proof Shelves Crisper Drawer Deli Drawer Spill Proof Shelves ...

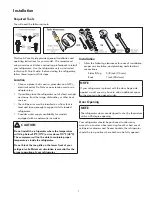
Страница 7: ...If possible place the refrigerator out of direct sunlight and away from the range dishwasher or other heat sources The refrigerator must be installed on a floor that is level and strong enough to support a fully loaded refrigerator Consider water supply availability for models equipped with an automatic ice maker Installation Allow the following clearances for ease of installation proper air circu...

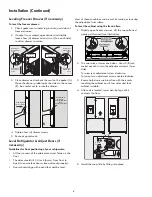
Страница 8: ...positioning of your refrigerator All four corners of the cabinet must rest firmly on the floor The sides should tilt 1 4 inch 6 mm from front to back to ensure that doors close and seal properly Doors should align with each other and be level Pull Drawer Out From Both Sides Grab Drawer At Center Then Push Against Freezer Drawer A B Raise Lower Anti tip Leg Door Door 2 You can raise or lower each d...

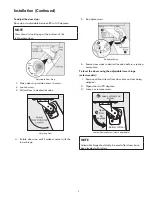
Страница 9: ...crew Loosen or Remove Screw Open Door 90 degrees Bottom of Door A B Loosen Remove Screw where applicable 6 Ensure door stops in desired location before resuming normal use To level the doors using the adjustable lower hinge select models 1 Remove all food items from door bins on door being adjusted 2 Open doors to 90 degrees 3 Loosen or remove screw Adjusting Door Re tighten Screw Adjustable Door ...

Страница 10: ...e should be a separation about the thickness of a coin 0 060 inches or 1 5 mm between the guide and flipper mullion 3 Re tighten screw 4 Lift the door while adjusting the washer To raise the door rotate washer clockwise when viewed from the bottom To lower door rotate washer counter clockwise when viewed from the bottom 5 Re tighten the screw where applicable ensuring it is between the spokes of t...

Страница 11: ... the unit The connector releases when you press inward on the outer sleeve while pushing the tube toward the connector then while continuing to hold in the sleeve pull the tube away Getting Through Narrow Spaces If your refrigerator will not fit through an entrance area you can remove the doors Check first by measuring the entrance To prepare for removing the doors 1 Make sure the electrical power...

Страница 12: ...er onto slide brackets ensuring pins on each side are fully inserted into slots on each side 6 Tighten four 4 drawer screws 7 Recheck gasket seal 8 Install the toe grille by fitting into place 2 Reinstall four 4 drawer screws two 2 per side tighten down and close drawer C Pull Drawer Out From Both Sides Grab Drawer At Center Then Push Against Freezer Drawer A B Fully Extend Assembly Drawer Slides ...

Страница 13: ...fastened into door ensuring the holes for the set screws are facing towards the opposite door 3 While holding handle firmly against door fasten upper and lower Allen set screws B with supplied Allen wrench 4 Repeat steps 2 and 3 to install opposite handle Ensure the holes for the set screws are facing towards the first door 5 Position freezer handle end over left and right pre installed handle mou...

Страница 14: ...e maker inlet valve To Connect Water Supply Line To Ice Maker Inlet Valve 1 Disconnect refrigerator from electric power source 2 Place end of water supply line into sink or bucket Turn ON water supply and flush supply line until water is clear Turn OFF water supply at shutoff valve 3 Remove plastic cap from water valve inlet and discard cap 4 If you use copper tubing Slide brass compression nut th...

Страница 15: ...ndicator light will be illuminated above the active feature light On Off control lock Press and hold for three 3 seconds to activate and deactivate This restricts undesired changes to the refrigerator s settings and prevents use of the ice and water dispenser water filter Touch to display filter condition status Press and hold for three 3 seconds to reset after filter change air filter Touch to di...

Страница 16: ...the desired setting The temperature display will begin to blink with the first touch After five 5 seconds of inactivity the display will beep to accept the new temperature After 10 seconds the display times out and returns to the basic display Sabbath Mode The Sabbath Mode is a feature that disables portions of the refrigerator and its controls in accordance with observance of the weekly Sabbath a...

Страница 17: ...dispense water CAUTION For proper dispenser operation recommended water supply pressure should fall between 30 psi and 100 psi Excessive pressure may cause water filter to malfunction NOTE The water dispenser has a built in device that shuts off the water flow after three 3 minutes of continuous use To reset this shutoff device simply release the dispenser paddle IMPORTANT On occasion unusually sm...

Страница 18: ...fore replacing in the freezer 5 Replace the ice bin Turn the ice maker on Adjusting Ice Bin Auger Removing Ice Bin Remove and empty the ice bin if An extended power failure one hour or longer causes ice cubes in the ice bin to melt and freeze together jamming the dispenser mechanism You do not use the ice dispenser frequently Ice cubes will freeze together in the bin jamming the dispenser mechanis...

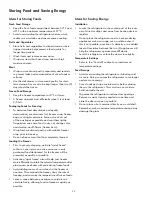
Страница 19: ... and other fresh produce Drawers Your refrigerator includes a variety of storage drawers These drawers are located in fixed positions at the bottom of the fresh food compartment Crisper Humidity Control Crisper drawers include a sliding control for adjusting the humidity inside the crisper Leafy vegetables keep best when stored with the Humidity Control set on Higher Humidity Fresh fruits keep bes...

Страница 20: ...le door bin 1 Remove all food from door bin 2 Grip the bin firmly with both hands and lift it upward 3 Remove the bin 4 Place the bin just above desired position 5 Lower the bin onto supports until locked in place Accessories varies by model Dairy Compartment Use the dairy compartment at the top of the fresh food compartment door for short term storage of cheese spreads or butter The dairy compart...

Страница 21: ...der Spill Guard Tray Lift up on the rear of the lower divider and pull out Basket Divider Basket NOTE If basket is not resting on stabilizer bar retainer clips the drawer will not close properly To reinstall upper basket position basket onto the retainer clips making sure the front of the basket rests in the retainer clips on the stabilizer bar To reposition the pivoting divider some models lift u...

Страница 22: ... ensure your newly purchased food designated for the freezer will be preserved as quickly as possible Activating quick freeze also will help your freezer more efficiently maintain the selected temperature after placing new purchases with pre existing frozen foods Avoid adding too much warm food to the freezer at one time This overloads the freezer slows the rate of freezing and can raise the tempe...

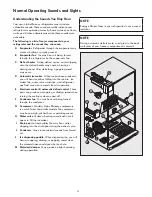
Страница 23: ...nt gas fluid may create sounds from its operation E Electronic control automatic defrost control These parts can produce a snapping or clicking sound when turning the cooling system on and off F Condenser fan You may hear air being forced through the condenser G Compressor Modern high efficiency compressors run much faster than older models The compressor may have a high pitched hum or pulsating s...

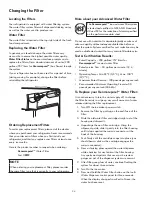
Страница 24: ...allons per minute 1 9 L minute Operating Temp Min 33 F 0 5 C Max 100 F 37 7 C Maximum Rated Pressure 100 pounds per square inch Recommended Minimum Operating Pressure 30 pounds per square inch 206 kPa To Replace your Kenmorepure TM Water Filter It is not necessary to turn the water supply off to change the filter Be ready to wipe up any small amounts of water released during the filter replacement...

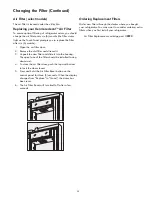
Страница 25: ...you should change the air filter every six 6 months the filter status light on the Touch Panel prompts you to replace the filter after six 6 months 1 Open the air filter door 2 Remove the old filter and discard it 3 Unpack the new filter and slide it into the housing The open face of the filter should be installed facing downward 4 To close the air filter door push the top and bottom to lock the d...

Страница 26: ...e one 1 month or more Turn the cooling system off see Controls section for location of On Off button and disconnect power cord Turn water supply valve to closed position Clean interior thoroughly Leave both doors open to prevent odors and mold build up Block doors open if necessary Moving Remove all food and ice If using a handcart load from the side Adjust rollers all the way up to protect them d...

Страница 27: ...s Never use CHLORIDE or cleaners with bleach to clean stainless steel Clean stainless steel front and handles with non abrasive soapy water and a dishcloth Rinse with clean water and a soft cloth Use a non abrasive stainless steel cleaner These cleaners can be purchased at most home improvement or major department stores Always follow manufacturer s instruction Do not use household cleaners contai...

Страница 28: ...al Replacing Light Bulbs select models Both the freezer and fresh food compartments of your refrigerator include incandescent light bulbs that will need replacing from time to time Some lights have covers that need to be removed before replacing the bulbs Always use bulbs that are designed for appliance lighting To Replace Light Bulbs 1 Unplug your refrigerator s power cord 2 Wear protective glove...

Страница 29: ...er may be clogged with foreign material The water supply line is kinked Saddle valve on cold water pipe is clogged or restricted by for eign material The fresh food and freezer ice makers will each produce approximately 2 5 pounds of ice every 24 hours depending on usage conditions If water dispenses slower than normal or if the filter is six 6 months old or older it should be replaced Ensure that...

Страница 30: ...hat drawers slide on is dirty Remove top layer of items in drawer Ensure drawer is properly installed on track Clean drawer rollers and track See Care Cleaning RUNNING OF REFRIGERATOR Compressor does not run Freezer control is set to OF or 0 Refrigerator is in defrost cycle Plug at electrical outlet is dis connected House fuse blown or tripped circuit breaker Power outage Set freezer control This ...

Страница 31: ...smosis system is in regenerative phase Have someone turn up the cut off and cut on pres sure on the water pump system well systems only It is normal for a reverse osmosis system to be below 20 psi during the regenerative phase WATER MOISTURE FROST INSIDE REFRIGERATOR Moisture collects on inside of refrigerator walls Weather is hot and humid Door is slightly open The rate of frost buildup and inter...

Страница 32: ... owner s manuals that you need to do it yourself For Sears professional installation of home appliances and items like garage door openers and water heaters 1 800 4 MY HOME 1 800 469 4663 Call anytime day or night U S A and Canada www sears com www sears ca Our Home For repair of carry in items like vacuums lawn equipment and electronics call anytime for the location of your nearest Sears Parts Re...

Отзывы: