Kenmore 970. 5032 Series Скачать руководство пользователя страница 20

20

Oven Controls

Warm & Hold™

Warm & Hold will keep cooked foods warm and ready for 
serving for up to 3 hours after cooking has finished. After 3 
hours the Warm & Hold will shut off automatically. Warm & 
Hold should only be used with foods that are already at serving 
temperatures. Warm & Hold will maintain the oven temperature 
at 170° F (77°C).

Example - To set Warm & Hold:

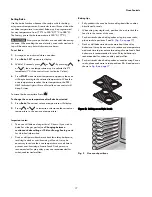
If needed, arrange oven racks and place cooked food in 
oven.

Press Warm & Hold. HLd will appear in the display. If no 
other keys are touched within 25 seconds the request for 
Warm & Hold will clear.

Press START. Warm & Hold will automatically turn off after 
3 hours.

To turn Warm & Hold off at any time press 

.

To set Warm & Hold to start after a Timed Bake automatically

1.

Press 

Bake

. Press 

or 

to set temperature.

2.

Press 

START

.

3.

Press 

Cook Time. 

Press

 or

 to set time.

4. Press START.

5. Press Warm & Hold.

6. Press START. Warm & Hold is set to turn on automatically 

after the Timed Bake or Delay Timed Bake has finished. The 
Warm & Hold indicator light will glow indicating that the 
Warm & Hold feature is set to start when the timed bake is 
finished.

Operating Oven Light

The oven light will automatically turn on when the oven door is 
opened.

Press 

OVEN LIGHT

 on the control panel to turn the oven light on 

or off whenever the oven door is closed. Oven light will not 
operate during a self clean cycle.

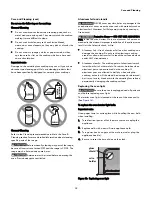
The oven light is located at the upper left rear wall of the oven 
interior and is covered with a glass shield held in place by a 
wire holder. The glass shield protects the bulb from high tem-
peratures and should always be in place when the oven is in 
use.

To replace the interior oven light see 

Replacing oven light

 in 

the 

Care and Cleaning

 section.

Adjusting oven temperature

Your appliance has been factory calibrated and tested to 
ensure an accurate baking temperature. For the first few uses, 
follow your recipe times and temperature recommendations 
carefully. If you think the oven is cooking too hot or too cool for 
your recipe times, you may adjust the UPO (User Programmable 
Offset) so the oven cooks hotter or cooler than the oven temper-
ature displayed.

The oven temperature may be increased as much as +35 °F 
(+19 °C) or decreased -35 °F (-19 °C) from the factory cali-
brated settings.

To adjust oven temperature

1.

Press 

Bake

. and hold for 3 seconds. The UPO value will 

appear in the display with a degree sign. 

2.

The display now indicates the amount of degrees offset 
from the original factory temperature setting. If the control 
still has the original factory calibration, the display will 
read 

0

.

3.

The temperature may be adjusted up or down 35 °F 
(19°C), in 1°F increments by pressing and holding 

 or 

. Adjust until the desired amount of temperature off-

set appears in the display and press 

START

 to save.

4.

If the 

STOP

 key is pressed during the programming mode, 

the UPO value will remain unchanged.

Important notes:

Oven temperature adjustments made will not change the 
Broil or Self-Clean operating temperatures.

Do not use oven thermometers such as those found in 
grocery stores to check the temperature settings inside your 
oven. These oven thermometers may vary as much as 20 to 
40 °F degrees from actual temperatures.

The oven temperature adjustment may be made if your 
oven control has been set to display °C (Celsius) 
temperatures. Minimum and maximum settings for Celsius is 
plus (+) or minus (-) 19 °C.

If the display mode is set for Celsius, adjustments made will 

be in 1 °C increments on each press of 

 or 

STOP

STOP

Содержание 970. 5032 Series

Страница 1: ...sinière électrique color number numéro de color Use Care Guide Guide d utilisation et d entretien English Français Model Modèles 970 6030 6032 6034 P N 316902146 Rev A Sears Canada Inc Toronto Ontario Canada M5B 2C3 www sears ca ...

Страница 2: ...e of this product resulting from accident abuse misuse or use for other than its intended purpose 8 Damage to or failure of this product caused by the use of detergents cleaners chemicals or utensils other than those recom mended in all instructions supplied with the product 9 Damage to or failure of parts or systems resulting from unauthorized modifications made to this product Disclaimer of impl...

Страница 3: ... Call 1 800 4 MY HOME TM Sears ca parts_ MAJOR APPLIANCES And a whole lot more We have access to over 1 million parts and accessories REFRIGERATORS Water Air Filters Ice Maker Stainless Steel Water Line Thermometers Environmentally Friendly Appliance Cleaners VACUUMS Bags Belts Hoses Wands Brushes Nozzles Filters LAWN GARDEN Tune up Kits Oil Fuel Stabilizers Filters Blades Belts Spark Plugs Shear ...

Страница 4: ...is attached to the lower right oven frame Record the date of purchase model and serial number of your product in the corresponding space below Model Number _________________________________ Serial Number ________________________________________ Date of Purchase ________________________________________ Save your sales receipt for future reference 2500 10 ...

Страница 5: ...ns and drip pans are in place Do not use aluminum foil to line drip bowls Improper installation could cause a fire hazard Stepping leaning or sitting on the door or drawers of an oven can result in serious injuries and also cause damage to the appliance Do not allow children to climb or play around the oven The weight of a child on an open over door may cause the oven to tip resulting in serious b...

Страница 6: ...rfaces of ovens become hot enough to cause burns During and after use do not touch or let clothing or other flammable materials contact heating elements or interior surfaces of oven until they have sufficient time to cool Other surfaces of the appliance may become hot enough cause burns such as the oven door windows and the oven vent Proper Installation Be sure your appliance is properly installed...

Страница 7: ...urned inward and not extend over other cooking areas Never leave surface elements unattended Boil overs may cause smoking and greasy spills may ignite A pan that has boiled dry could be damaged and may damage the cooktop Only certain types of glazed cookware glass ceramic earthenware or other types of glazed utensils are suitable for use on the cooktop Improper cookware may break due to sudden cha...

Страница 8: ...d injury Clean ventilating hoods frequently Grease should not be allowed to accumulate on the hood or filter Follow the manufacturer s instructions for cleaning hoods SELF CLEANING OVENS Use the self clean cycle to clean only the parts listed in this manual Before using self clean remove the broiler pan any food utensils and bakeware from the oven Remove oven racks unless otherwise instructed Do n...

Страница 9: ... If the cookware melts it will damage the cooktop Be sure to follow all the cookware manufacturer s suggestions when using any type of cookware on the ceramic cooktop About the ceramic glass cooktop The ceramic cooktop has radiant surface elements located below the surface of the glass The design of the ceramic cooktop outlines the area of the surface element underneath Be sure to match the pan si...

Страница 10: ...g and Before You Call sections of this Use Care Guide Types of cooktop surface elements The ceramic glass cooktop has radiant surface elements located below the surface of the glass The patterns on the ceramic glass will outline the size and type of element available The single radiant element or elements will have one round outline pattern shown on the cooktop The warmer zone feature on some mode...

Страница 11: ... correctly sized cookware on single radiant surface element 2 Push in and turn the surface control knob in either direction to the desired setting Figure 3 3 When cooking is complete turn the radiant surface element off before removing the cookware Important notes For efficient cooking turn off the element several minutes before cooking is complete This will allow residual heat to complete the coo...

Страница 12: ...s porcelain cookware or ANY material that can melt to make contact with the ceramic cooktop If these items melt on the cooktop they may damage the ceramic cooktop Important notes For efficient cooking turn off the element several minutes before cooking is complete This will allow residual heat to complete the cooking process The surface control knobs do not have to be set exactly on a particular s...

Страница 13: ...mportant notes Use only plates utensils and cookware recommended for oven and ceramic cooktop use Do not use plastic wrap or aluminum foil to cover food Plastic or aluminum foil can melt onto the cooktop Refer to the warmer zone recommended food settings below If a particular food is not listed start with the medium level and adjust as needed Unlike other radiant surface elements the warmer zone w...

Страница 14: ... For best baking results allow 2 4 5 10 cm around the cookware for proper air circulation and be sure pans and cookware do not touch each other the oven door sides or back of the oven cavity Hot air must be able to circulate around the cookware in the oven for even heat to reach around the food Type of oven racks The flat oven rack some models or flat handle oven rack some models may be used for m...

Страница 15: ...t a specific amount of time needed for cooking Automatically cancels cooking process at end of set time 15 Delay Start Use with Bake and Self Clean functions to program a delayed start bake or delayed start self clean cycle 16 LIGHT Use to turn internal oven light on and off Setting Clock When the appliance is first powered up or when the power sup ply to the appliance has been interrupted 12 00 w...

Страница 16: ...he OVEN LOCK feature is active Changing between continuous bake setting or 12 Hour Energy Saving feature The oven control has a factory preset 12 Hour Energy Saving feature that will turn the oven off automatically if the oven is left on for more than 12 hours The control may be programmed to override this feature to continuously bake To set continuous bake mode or 12hr Energy Saving Press and hol...

Страница 17: ...e the current set temperature to the new oven temperature Important notes The oven will bake no longer than 12 hours If you wish to bake for a longer period see Changing between continuous bake setting or 12 Hour Energy Saving mode for detailed information Dark or dull pans absorb more heat than shiny bakeware resulting in dark or over browning of foods It may be necessary to reduce the oven tempe...

Страница 18: ...art allows you to set a delayed starting time to the oven baking or cleaning functions FOOD POISONING HAZARD Do not let food sit for more than one hour before or after cooking Doing so can result in food poisoning or sickness Foods that can easily spoil such as milk eggs fish meat or poultry should be chilled in the refrigerator first Even when chilled they should not stand in the oven for more th...

Страница 19: ...fire occur close the oven door and turn the oven off If the fire continues use a fire extin guisher Do not put water or flour on fire Flour may be explo sive Important notes Always arrange oven racks when the oven is cool For best results when broiling use a broil pan with broil pan insert designed to drain the fat from the food and help avoid spatter and reduce smoking To purchase them call Sears...

Страница 20: ...n light see Replacing oven light in the Care and Cleaning section Adjusting oven temperature Your appliance has been factory calibrated and tested to ensure an accurate baking temperature For the first few uses follow your recipe times and temperature recommendations carefully If you think the oven is cooking too hot or too cool for your recipe times you may adjust the UPO User Programmable Offset...

Страница 21: ...res from a self clean cycle and will melt Do not use oven cleaners or oven protective coatings in or around any part of the oven interior Clean any soil from the oven frame the door liner outside the oven door gasket and the small area at the front center of the oven bottom Fig 13 on page 21 These areas heat sufficiently to burn soil on Clean using soap and water prior to starting Self Clean Remov...

Страница 22: ...bout 1 hour and the OVEN LOCK indicator light has turned off the oven door may be opened 3 When the oven interior has completely cooled wipe away any residue or powdered ash with a damp cloth or paper towel Delayed Start Self Clean To start Delay Start Self Clean 1 Be sure the oven is empty and all oven racks are removed Remove all items from the cooktop Be sure oven door is completely closed 2 Be...

Страница 23: ...l cleaners or any other types of cleaners containing any abrasive chlorides chlorine or ammonia It is recommended to use mild dish soap and water or a 50 50 solution of water and vinegar Porcelain enamel broiler pan and insert available by mail order Door liner and body parts Gentle scouring with a soapy scouring pad will remove most spots Rinse with a 1 1 solution of clear water and ammonia If ne...

Страница 24: ...us to your health and can chemically damage the ceramic glass surface Before cleaning the cooktop be sure the controls are turned to OFF and the cooktop is COOL The glass surface could be hot and burns may occur if the glass surface is touched before it has cooled sufficiently For light to moderate soil Apply a few drops of CookTop Cleaning Creme directly to the cooktop Use a paper towel or use a ...

Страница 25: ...oil linings may trap heat causing a fire hazard Protective Liners DO NOT USE ALUMINUM FOIL to line the oven bottom Only use aluminum foil as recom mended in this manual Improper installation of these liners may result in risk of electric shock or fire Aluminum foil Use of aluminum foil on a hot cooktop can damage the cooktop Do not use thin aluminum cooking utensils or allow aluminum foil to touch...

Страница 26: ...Figure 19 2 Holding the oven door at the same angle as the removal position See Figure 19 seat the hook of the hinge arm over the roller pins located on each side of the oven door frame See Figure 20 The hook of the hinge arms must be fully seated onto the roller pins 3 Fully open the oven door horizontal with floor See Figure 17 4 Push the door hinge locks up toward and into the oven frame on bot...

Страница 27: ... temperature before placing food in the oven Use proper rack position for baking needs Set oven temperature 25 F 13 C lower than recommended Cakes not done in center Oven too hot Incorrect pan size Pan not centered in oven Set oven temperature 25 F 13 C lower than recommended Use pan size suggested in recipe Use proper rack position and place pan so there is 5 1 cm to 10 2 cm 2 to 4 of space on al...

Страница 28: ...acks from oven cavity before starting a self clean cycle Clean using a mild abrasive cleaner following manufac turer s instructions Rinse with clean water dry and replace in oven Oven smokes excessively when broiling Incorrect setting Follow broiling instructions in Setting Broil on page 19 Meat too close to the broil element Reposition broil rack to provide proper clearance between the meat and b...

Страница 29: ......

Страница 30: ...424712 10 20 08 SR Printed in the U S A 02488 ...

Отзывы: