background image

10

REFRIGERATOR INSTALLATION

1.

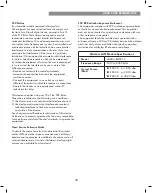
  To avoid noise and vibration, the unit must be leveled 

and installed on a solidly constructed 

floor

. If required, 

adjust the leveling legs to compensate for unevenness 

of the 

floor

. The front should be slightly higher than 

the rear to aid in door closing. Leveling legs can be 

turned easily by tipping the cabinet slightly. Turn the 

leveling legs to the left to raise the unit or to the right to 

lower it. (See LEVELING AND DOOR ALIGNMENT.) 

NOTE: Installing on carpeting, soft tile surfaces, 

a platform or weakly supported structure is not 

recommended.  

2.

 Install this appliance in an area where the temperature 

is between 55°F (13°C) and 110°F (43°C). If the 

temperature around the appliance is too low or high, 

cooling ability may be adversely affected.

3. 

Select a place where a water supply can be easily 

connected for the automatic icemaker.

NOTE: The water pressure must be from 20-120 psi or 

138-827 kPa or 1.4-8.4 kgf/cm². If the refrigerator is 

installed in an area with low water pressure (below 20 

psi), you can install a booster pump to compensate for 

the low pressure.

4.

 Too small of a distance from adjacent items may 

result in lowered freezing capability and increased 

electricity consumption charges. Allow at least 24 

inches (61 cm) in front of the refrigerator to open the 

doors and at least 2 inches (5.08 cm) between the 

back of the refrigerator and the wall.  

INSTALLATION

The refrigerator should always be plugged into its own 

individual properly grounded electrical outlet rated for 

115 Volts, 60 Hz, AC only, and fused at 15 or 20 amperes. 

This provides the best performance and also prevents 

overloading house wiring circuits which could cause a 

fir

hazard from overheated wires. It is recommended that a 

separate circuit serving only this appliance be provided.

REFRIGERATOR INSTALLATION

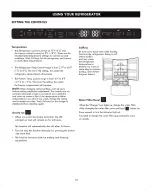
2" (5.08 cm)

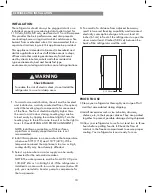
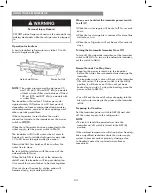
Shock Hazard:

To reduce the risk of electric shock, do not install the 

refrigerator in a wet or damp area.


WARNING

This appliance is intended to be used in household and 

similar applications such as staff kitchen areas in shops, 

offices and other working environments; farm houses 

and by clients in hotels, motels and other residential 

type environments; bed and breakfast type 

environments; catering and similar non-retail applications.

PRIOR TO USE

1. Clean your refrigerator thoroughly and wipe off all 

dust that accumulated during shipping.

2. Install accessories such as ice cube bin, drawers, 

shelves, etc., in their proper places. They are packed 

together to prevent possible damage during shipment.

3. Allow your refrigerator to run for at least two to three 

hours before putting food in it. Check the flow of 

cold air in the freezer compartment to ensure proper 

cooling. Your refrigerator is now ready for use. 

Содержание 795.7410 Series

Страница 1: ...Rev 02_011719 ...

Страница 2: ...od Storage Guide 25 Refrigerator Shelves 26 Humidity Controlled Crisper 27 Temperature Controlled Pantry Drawer 27 Door Bin 27 Air Filter 28 Freezer Section 28 n i B e c I a r t x E Durabase 29 29 r e d i v i D e s a b a r u D 29 Pullout Drawers Water Filter 30 33 Care and Cleaning 4 3 3 3 3 3 s p i T g n i n a e l C l a r e n e G Exterior 33 Inside Walls 33 33 s t e k s a G d n a r e n i L r o o ...

Страница 3: ... private household purposes Warranty coverage applies to door bins drawer bins and basket bins Defects must be verified by a Sears authorized service representative For warranty coverage details to obtain free repair or replacement visit the web page www kenmore com warranty This warranty covers ONLY defects in material and workmanship and will NOT pay for 1 Expendable items that can wear out from...

Страница 4: ...d on an identification label located on the interior liner of the refrigerator compartment Have these items of information available whenever you contact Sears concerning your product Model No ___________________ Date of Purchase ___________________ Serial No ___________________ Save these instructions and attach your sales receipt for future reference ...

Страница 5: ......

Страница 6: ...ned refrigerators are dangerous even if they are sitting for only a few days If you are getting rid of your old refrigerator please follow the instructions at right to help prevent accidents child entrapment and suffocation DO NOT touch the automatic ice making mechanism while the refrigerator is plugged in DO NOT refreeze frozen foods which have thawed completely The United States Department of A...

Страница 7: ...nal responsibility and obligation to have it replaced with a properly grounded three prong wall outlet Electrical Shock Hazard FOR PERSONAL SAFETY this appliance must be properly grounded Have the wall outlet and the circuit checked by a qualified electrician to make sure the outlet is properly grounded If you are throwing away your old refrigerator make sure the refrigerant is removed for proper ...

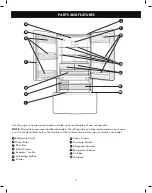
Страница 8: ...Mullion Crisper Pantry Drawer Durabase Divider PARTS AND FEATURES Use this page to become more familiar with the parts and features of your refrigerator NOTE This guide covers several different models The refrigerator you have purchased may have some or all of the items listed below The locations of the features shown below may not match your model A E F G H I J K L M C D B C ...

Страница 9: ......

Страница 10: ...nt of the refrigerator to open the doors and at least 2 inches 5 08 cm between the back of the refrigerator and the wall INSTALLATION The refrigerator should always be plugged into its own individual properly grounded electrical outlet rated for 115 Volts 60 Hz AC only and fused at 15 or 20 amperes This provides the best performance and also prevents overloading house wiring circuits which could c...

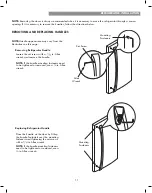
Страница 11: ... or removed use a in Allen wrench NOTE Removing the doors is always recommended when it is necessary to move the refrigerator through a narrow opening If it is necessary to remove the handles follow the directions below Place the handle on the door by fitting the handle footprints over the mounting fasteners and tightening the set screws with a in Allen wrench NOTE If the handle mounting fasteners ...

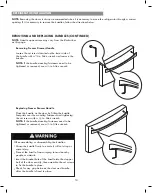
Страница 12: ...er the mounting fasteners and tightening the set screws with a in Allen wrench NOTE If the handle mounting fasteners need to be tightened or removed use a in Allen wrench REMOVING AND REPLACING HANDLES CONTINUED NOTE Handle appearance may vary from the illustrations on this page Removing Freezer Drawer Handle Loosen the set screws located on the lower side of e h t e v o m e r d n a h c n e r w n ...

Страница 13: ...13 ...

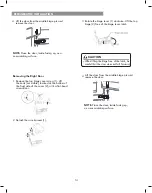
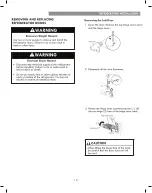
Страница 14: ...otate the hinge lever 1 clockwise Lift the top hinge 2 free of the hinge lever latch CAUTION When lifting the hinge free of the latch be careful that the door does not fall forward 4 Lift the door from the middle hinge pin and remove the door NOTE Place the door inside facing up on a nonscratching surface 4 Lift the door from the middle hinge pin and remove the door NOTE Place the door inside faci...

Страница 15: ... Hinge Lever Latch 3 Connect all the wire harnesses 4 Place the cover in place Insert and tighten the cover screw Install the right side door first Replacing the Right Door 1 Make sure that the plastic sleeve is inserted in the bottom of the door Lower the door onto the middle hinge pin as shown in the figure 2 Fit the hinge 1 over the hinge lever latch and slot it into place Rotate the lever 2 co...

Страница 16: ... not shown for clarity Pull the drawer open to full extension Gently lift and pull out the ice bin Lift the front of the drawer up then pull it straight out Hold both rails and push them in simultaneously CAUTION When you remove the freezer drawer do not hold the handle The handle may come off and it could cause personal injury Remove the Durabase basket from the rails Remove the screws from the r...

Страница 17: ...r DO NOT step or sit down on the freezer drawer Grasp the drawer on each side and hook the drawer supports into the rail tabs located on both sides tighten the screws located on both sides Lower the door into its final position and Insert the drawer and push it back until it clicks into place Replace the ice bin in the drawer Insert the Durabase basket in the rail assembly WARNING Use two or more ...

Страница 18: ...t slight pressure on the doors to get them to close completely REFRIGERATOR INSTALLATION LEVELING AND DOOR ALIGNMENT Leveling After installing plug the refrigerator s power cord into a 3 prong grounded outlet and push the refrigerator into the final position Your refrigerator has two front leveling legs one on the right and one on the left Adjust the legs to alter the tilt from front to back or sid...

Страница 19: ......

Страница 20: ...h Function F C To convert F to C or vice versa press and hold the Freezer Temp and Refrigerator Temp buttons at the same time for approximately five seconds Demo Mode For Store Use Only To Deactivate Demo Mode With either refrigerator door opened press and hold the Refrigerator Temp and Accela Ice buttons at the same time for five seconds The control panel will beep and the temperature settings wil...

Страница 21: ...pp SMART FEATURES OVERVIEW Kenmore Smart connectivity transforms your relationship with your home You can personalize the way Kenmore Smart products operate based on your schedule and daily routines making life easier and providing greater peace of mind This appliance is a connected ready appliance allowing you to remotely monitor and control it from your smart phone via p p a t r a m S e r o m n ...

Страница 22: ...his Use Care Guide contains information and instructions for operating your appliance from the appliance control panel For additional assistance visit http www kenmore com smart NOTE If no connection is made after five minutes the blinking SMART GRID button LED will turn off Smart Grid Operation Once connected and registered the appliance is capable of accepting a signal from your electrical compan...

Страница 23: ...5 of the FCC Rules Operation is subject to the following two conditions 1 this device may not cause harmful interference and 2 this device must accept any interference received including interference that may cause undesired operation of the device Any changes or modifications in construction of this device which are not expressly approved by the party responsible for compliance could void the user...

Страница 24: ...ain the water supply to flooding caused by ruptured water lines or connections Operation Instructions Personal Injury Hazard DO NOT place fingers or hands on the automatic ice making mechanism while the refrigerator is plugged in A newly installed refrigerator may take 12 to 24 hours to begin making ice Auto shutoff Arm Power Switch If the refrigerator is used before the water connection is made t...

Страница 25: ...ight sided canning freezing jars Heavy duty aluminum foil Plastic coated paper Non permeable plastic wraps Specified freezer grade self sealing plastic bags Follow package or container instructions for proper freezing methods Do not use Bread wrappers Non polyethylene plastic containers Containers without tight lids Wax paper or wax coated freezer wrap Thin semi permeable wrap CAUTION Do not keep ...

Страница 26: ...ath the back half of the shelf Pull the front of the shelf toward you to return to a full shelf CAUTION Make sure that shelves are level from one side to the other Failure to do so may result in the shelf falling or food spilling 2 Pull the shelf out To reinstall a shelf Tilt the front of the shelf up and guide the shelf hooks into the slots at a desired heigh Then l ow er the front of the shelf s...

Страница 27: ...t he s helf falli ng or sp illi ng f oo d USING YOUR REFRIGERATOR REFRIGE RATO R SHELVES The shelves in your refrigerator are adjustable to meet your individual storage needs Your model may have glass or wire shelves Adjusting the shelves tot di erent heights of items will make nding the exact item you want easier Doing so will also reduce the amount of time the refrigerator door is open which wil...

Страница 28: ...28 ...

Страница 29: ...rabase push it to the back as much as possible Tilt up the front of the Durabase and pull straight out 2 To replace insert the Durabase in the rail assembly WARNING If the Durabase divider is removed there is enough open space for children or pets to crawl inside To prevent accidental child and pet entrapment or suffocation risk DO NOT allow children or pets to touch or go near the drawer DURABASE...

Страница 30: ...s to remove trapped air and contaminants from the system Do not dispense the entire 2 5 gallon amount continuously Depress and release the dispenser pad for cycles of 30 seconds ON and 60 seconds OFF NOTE To purchase a replacement filter visit your local Sears store or call 1 844 553 6667 You may also purchase online at www kenmore com 25 REFRIGERATOR SHELVES The shelves in your refrigerator are ad...

Страница 31: ...31 WATER FILTER ...

Страница 32: ...ter leakage Read and follow the Water Filter instructions before installation and use of this system Installation and use MUST comply with all state and local plumbing codes Do not install if water pressure exceeds 120 psi 827 kPa Contact a plumbing professional if you are uncertain of how to check your water pressure Do not install where water hammer conditions may occur If water hammer condition...

Страница 33: ......

Страница 34: ...removal more easily ...

Страница 35: ...e below 20 psi you can install a booster pump to compensate for the low pressure If a reverse osmosis water filtration system is connected to your cold water supply this water line installation is not covered by the refrigerator warranty Follow the instructions carefully to minimize the risk of expensive water damage ...

Страница 36: ...setts Plumbing Codes 248CMR shall be adhered to Saddle valves are illegal and use is not permitted in Massachusetts Consult with your licensed plumber 5 TIGHTEN THE PIPE CLAMP Tighten the clamp screws until the sealing washer begins to swell NOTE Do not overtighten clamp or you may crush the tubing 6 ROUTE THE TUBING Route the tubing between the cold water line and the refrigerator Route the tubin...

Страница 37: ...Set the icemaker power switch to the On I position NOTE A newly installed refrigerator may take several hours to start producing ice ...

Страница 38: ...n or power restored The refrigerator will take up to 24 hours to cool completely Door opened often or a large amount of food hot food was added Adding food and opening the door warms the refrigerator requiring the compressor to run longer in order to cool the refrigerator back down In order to conserve energy try to get everything you need out of the refrigerator at once keep food organized so it ...

Страница 39: ...more information Defrost cycle has recently completed During the defrost cycle the temperature of each compartment may rise slightly and condensation may form on the back wall Wait 30 minutes and confirm the proper temperature has been restored once the defrost cycle has completed Interior moisture buildup Doors are opened often or for long periods of time When the doors are opened often or for lon...

Страница 40: ...densation from food with a high water content has frozen inside of the food package This is normal for food items with a high water content Food has been left in the freezer for a long period of time Do not store food items with high water content in the freezer for a long period of time The icemaker will produce approximately 70 182 Icemaker is not making enough ice Demand exceeds ice storage cap...

Страница 41: ...41 ...
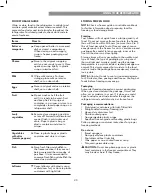
Страница 42: ...mal Operation Gurgling Refrigerant flowing through the cooling system Normal Operation Popping Contraction and expansion of the inside walls due to changes in temperature Normal Operation Sizzling Water dripping on the defrost heater during a defrost cycle Normal Operation Vibrating If the side or back of the refrigerator is touching a cabinet or wall some of the normal vibrations may make an audi...

Страница 43: ...oor warmer air enters the refrigerator As the warm air cools it can create a vacuum If the door is hard to open wait one minute to allow the air pressure to equalize then see if it opens more easily Refrigerator wobbles or seems unstable Leveling legs are not adjusted properly Refer to the Leveling and Door Alignment section Floor is not level It may be necessary to add shims under the leveling le...

Страница 44: ...agnostics Team agent 1 Lock the display To lock the display press and hold the Control Lock button for three seconds If the display has been locked for over five minutes you must deactivate the lock and then reactivate it e h t f o t n o r f n i e n o h p r u o y f o e c e i p h t u o m e h t d l o H 3 speaker that is located on the right hinge of the refrigerator door when instructed to do so by t...

Отзывы: