background image

Содержание 790.9731 Series

Страница 1: ...spaiol Models Modelos 790 9731 _ 790 9732 _ I enmore Elite Doub Ov r siuf_ con un _ Color numbed t nOmero de color dob P N 808574601A 1407 Sears Brands Management Corporation Hofl man Estates IL 60179 U S A www kenmore com www sears com i IIIII ii I ...

Страница 2: ...rvice technician to instruct the user in correct product installation operation or maintenance 5 A service technician to clean or maintain this product 6 Damage to or failure of this product if it is not installed operated or maintained according to all instructions supplied with the product 7 Damage to or failure of this product resulting from accident abuse misuse or use for other than its inten...

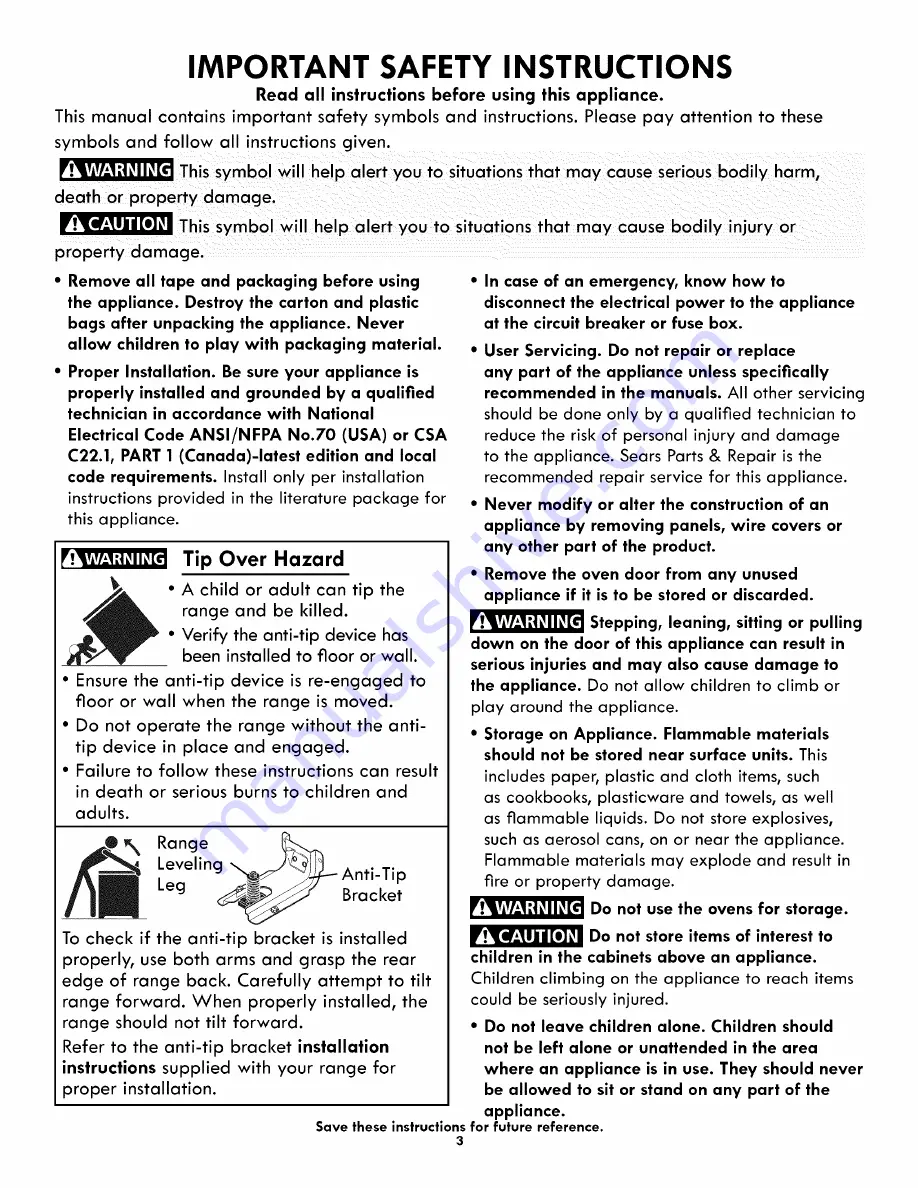
Страница 3: ...range for proper installation In case of an emergency know how to disconnect the electrical power to the appliance at the circuit breaker or fuse box User Servicing Do not repair or replace any part of the appliance unless specifically recommended in the manuals All other servicing should be done only by a qualified technician to reduce the risk of personal injury and damage to the appliance Sears...

Страница 4: ... period of time make sure that it has been exposed to a temperature above 0 C 32 F for at least 3 hours before connecting it to the power supply IMPORTANT INSTRUCTIONS FOR USING YOUR COOl TOP Know which knob controls each surface heating unit Place a pan of food on the unit before turning it on and then turn the unit off before removing the pan Use proper pan size This appliance is equipped with o...

Страница 5: ...ght bulb with a damp cloth Doing so could cause the bulb to break Disconnect the appliance or shut off the power to the appliance before removing and replacing the bulb Protective linersmDO NOT USE ALUMINUM FOIL TO LINE THE OVEN BOTTOM Only use aluminum foil as recommended in this manual Improper installation of these liners may result in risk of electric shock or fire SELF CLEANING OVEN MODELS FO...

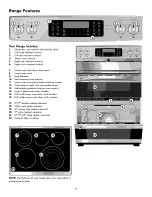
Страница 6: ...n interior 11 Lower oven convection bake cooking system 12 Oven interior light with removable cover 13 Adjustable porcelain interior oven rack s 14 Large 1 piece oven door handle 15 Full width lower oven door with window 16 Full width upper oven door with window 17 5 7 double radiant element 18 Warm and ready element 19 6 simmer flex radiant element 20 9 turbo radiant element 21 6 9 12 triple radi...

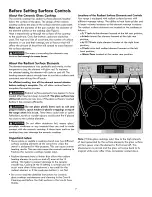
Страница 7: ...oking turn off the element several minutes before cooking is complete This will allow residual heat to complete the cooking process _ Radiant surface elements may appear to have cooled after they have been turned off The glass surface may still be hot and burns may occur if the glass surface is touched before it has cooled sufficiently Do not place plastic items such as salt and pepper shakers spo...

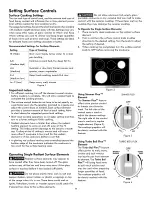
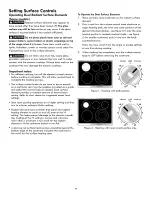
Страница 8: ... A glowing red surface heating area extending beyond the bottom edge of the cookware indicates the cookware is too small for the surface heating area Operating Single Radiant Surface Elements _Jl_ Radiant surface elements may appear to have cooled after they have been turned off The glass surface may still be hot and burns may occur if the glass surface is touched before it has cooled sufficiently...

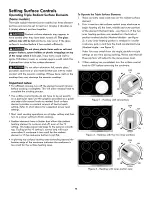
Страница 9: ... a constant amount of heat at each setting Refer to chart above for suggested power level settings Start most cooking operations on a higher setting and then turn to a lower setting to finish cooking Radiant elements have a limiter that allows the radiant heating element to cycle on and off even at the HI setting This helps prevent damage to the ceramic smooth top Cycling at the HI setting is norm...

Страница 10: ...ower level settings Start most cooking operations on a higher setting and then turn to a lower setting to finish cooking Radiant elements have a limiter that allows the radiant heating element to cycle on and off even at the HI setting This helps prevent damage to the ceramic smooth top Cycling at the HI setting is normal and will occur more often if cookware is too small for the radiant element o...

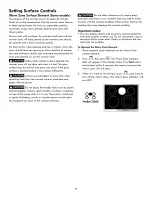
Страница 11: ...ne as cookware and plates will not be hot _Do not place flammable items such as plastic salt and pepper shakers spoon holders or plastic wrappings on top of the range when it is in use These items could melt or ignite Potholders towels or wooden spoons could catch fire if placed too close to the surface elements Do not allow aluminum foil empty glass porcelain cookware or any material that can mel...

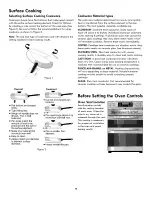
Страница 12: ...pan bottom The most popular materials available are ALUMINUM Excellent heat conductor Some types of food will cause it to darken Anodized aluminum cookware resists staining pitting If aluminum pans slide across the ceramic glass cooktop they may leave metal marks which will resemble scratches Remove these marks immediately COPPER Excellent heat conductor but discolors easily May leave metal marks ...

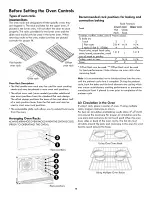
Страница 13: ... baking Rack Positions Food Lower oven Upper oven Flat Glide Rack Rack Cookies muffins cakes pies frozen pizzas To bake on 1 rack 2 1 2 2 Flat racks 2 4 N A N A 2 racks 1 fiat 1 Glide 4 1 N A Frozen pies angel food cake 1 or 2 1 or 2 yeast bread casseroles small 1 cuts of meat or poultry Turkey r roast or ham 1_ N A N A Pizza 3 _ 2 2 Offset Rack can be used _ Offset Rack must be used for best perf...

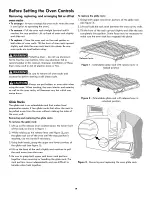
Страница 14: ... that allow the rack to be pulled away from the oven without rubbing the sides of the oven wall Removing and replacing the glide racks To remove the glide rack 1 Lift up on the release lever located across the lower front of the rack as shown in figure 1 2 While holding up the release lever see figure 2 pull the glide rack out of the oven until the stop position is reached use two hands if necessa...

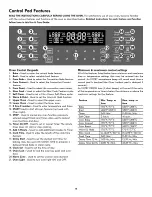
Страница 15: ... or stop cooking 15 Add 1 Minute Used to add additional minutes to Timer 16 Cook Time Used to enter the length of the cook time desired 17 Delay Start Used to set the desired start time for baking May be used with COOl TIME to program a delayed timed bake or clean cycle 18 Clock Set Used to set the time of day 19 Oven Lock Used to lock the oven key pads and oven door 20 Warm Zone Used to set the w...

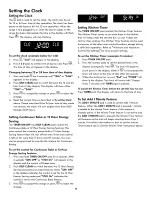
Страница 16: ...e oven control has a factory preset built in 12 Hour Energy Saving feature that will shut off the oven if the oven control is left on for more than 11 hours and 59 minutes The oven can be programmed to override this feature for Continuous Baking To set the Kitchen Timer example 5 minutes 1 Press TIMER ON OFF pad 2 Press the number pads to set the desired time in the display example 5 Press Q The t...

Страница 17: ...d hold DELAY START pad for 6 seconds After 6 seconds bEEP On will appear in the display 2 Press SELF CLEAN pad to switch between normal sound operation and silent operation mode 3 Press Q to accept the change or press _ to reject the change Note The control will always beep at the end of a kitchen timer and will beep when a set temperature has been reached even if the control is set to silent oper...

Страница 18: ...0 F Setting Bake The BAKE pad controls normal baking If preheating is necessary refer to the Preheat Feature for instructions The oven can be programmed to bake at any temperature from 170 F to 550 F 77 C to 288 C To set the Bake Temperature to 350 F 1 Arrange interior oven racks and place food in oven 2 Press _ or pad 3 Press BAKE pad 350 will automatically appear in the display 4 Press Q The act...

Страница 19: ...equently Corrections Allow oven to preheat to the selected temperature before placing food in oven Choose pan sizes that will permit 5 1 cm to 10 2 cm 2 to 4 of air space on all sides when placed in the oven Use a medium weight aluminum baking sheet Allow oven to preheat to the selected temperature before placing food in the oven Use proper rack position for baking needs Set oven temperature 25 F ...

Страница 20: ...splay mode the Delayed Timed Bake or Delayed Timed Convection Bake cycle can never be set to start more than 12 hours in advance To program the oven for a delayed BAKE start time and to shut off automatically example baking at 350 F for 30 minutes and starting at 5 30 1 Be sure that the clock is set with the correct time of day 2 Arrange interior oven rack s and place the food in the oven 3 Press ...

Страница 21: ...roiler pan directly under the broiler element Make sure the oven door is in the broil stop position 9 Broil on one side until food is browned turn and cook on the second side Season and serve Note Always pull the rack out to the stop position before turning or removing food 10 To cancel broiling or if finished broiling press _ Broiling Times and Searing Grill if equipped Use the following table fo...

Страница 22: ...rt running in the display The bake broil and convection elements icon will show intermittently in the display indicating which element is on to help the oven reaching the desired temperature A beep will sound once the oven temperature reaches 350 F Note The convection fan will start AS SOON AS the oven is set for Convection Bake Press _ to cancel Convection Bake at any time Setting Convection Roas...

Страница 23: ... results much the same way as a Slow Cooker or Crock Pot The Slow Cook feature is ideal for roasting beef pork poultry Slow Cooking meats may result in the exterior of meats becoming dark but not burnt This is normal There are 2 settings available high Hi or low Lo The low setting is best for cooking foods from 8 to 9 hour time period The high setting is best for cooking foods from 4 to 5 hour tim...

Страница 24: ...or use on the Jewish Sabbath Holidays The COOK TIME and DELAY START pads are used to set the Sabbath feature The Sabbath feature may only be used with the BAKE pad The oven temperature may be set higher or lower after setting the Sabbath feature the oven temperature adiustment feature should be used only during Jewish Holidays however the display will not visibly show or provide any audible tones ...

Страница 25: ...er that it is set for the Sabbath and the oven display will show the message SF for Sabbath failure The food may be safely removed from the oven while still in the Sabbath feature however the oven cannot be turned back on until after the Sabbath holidays After the Sabbath observance turn off the Sabbath feature Press and hold both COOK TIME and DELAY START pads for at least 3 seconds simultaneousl...

Страница 26: ...an any soil from the oven frame the door liner outside the oven door gasket and the small area at the front center of the oven These surfaces are not in the self cleaning area Clean with soap and water Burned on residue can be cleaned off with a stiff nylon brush and water or nylon scrubber DO NOT hand clean the oven door gasket or it will be permanently damaged During the self cleaning cycle the ...

Страница 27: ...START pad CLEAN DELAY LOCK and DOOR will be displayed 8 The control will start the self cleaning at the set start time for the period of time previously selected At that time the icon DELAY will go out When the Self Clean Cycle is Completed 1 HOT will appear in the display The time of day the DOOR LOCKED will remain in the display 2 Once the oven has cooled down for approximately 1 HOUR and the DO...

Страница 28: ...iance To replace knobs after cleaning line up the fiat sides of both the knob and the shaft then push the knob into place Clean stainless steel with hot soapy water and a dishcloth Rinse with clean water and a cloth Do not use cleaners with high concentrations of chlorides or chlorines Do not use harsh scrubbing cleaners Only use kitchen cleaners that are especially made for cleaning stainless ste...

Страница 29: ...ratch cleaning pad to clean the entire cooktop surface Make sure the cooktop is cleaned thoroughly leaving no residue For heavy burned on soil Apply a few drops of CookTop Cleaning Creme directly to the soiled area Rub the soiled area using a non abrasive plastic type no scratch cleaning pad applying pressure as needed Do not use the pad you use to clean the cooktop for any other purpose If soils ...

Страница 30: ...source or plug the appliance back in 5 The clock will then need to be reset Figure 1 Glass shield removal Figure 2 Pull bulb out Replacing the Rectangle Halogen Oven Light 1 Turn the power off at the main source or unplug the appliance 2 Remove light shield as illustrated below fig 4 3 Replace bulb with a new 1 4 type 40 Watt halogen appliance bulb fig 5 Please note do not allow your fingers to to...

Страница 31: ...e oven door at the same angle as the removal position seat the hook of the hinge arm onto the roller pins located on each side of the oven door frame See Fig 4 Also seat the notch of the hinge arm onto the bottom of the slot at the same time you seat the hook The hook and the notch of the hinge arms must be fully seated onto the roller pins 3 Fully open the oven door horizontal with floor See Fig ...

Страница 32: ...lf clean cycle and when the rack becomes difficult to reposition in the oven To lubricate the glide rack 1 Remove the rack from the oven and place the rack on a large fiat surface covered with newspaper or scrap cloth Fully extend the rack 2 Wipe away debris and crumbs from the glide track using a cloth or sponge 4 Extend and return the glide rack several times along the tracks to distribute the l...

Страница 33: ... slightly Voltage is incorrect Be sure appliance is properly connected to the power source specified in the installation instructions If you are not sure about this requirement call 1 800 4 MY HOME for service See back cover Lightweight or warped pans were used Be sure to use proper cookware Use only fiat bottom evenly balanced medium or heavyweight cookware Heavy and medium weight pans heat evenl...

Страница 34: ...ovide more clearance between the meat and the broiler Preheat broil burner for quick searing operation Meat not properly prepared Remove excess fat from meat Slash remaining fatty edges to prevent curling but do not cut into the lean Grid on broiler pan wrong side up Grease does not drain into broiler pan Always place the grid on the broiler pan with the ribs up and the slots down to allow grease ...

Страница 35: ... other major home items in the U S A or Canada call 1 800 4 MY HOME Piezas y mano de obra necesarias para contribuir a mantener el funcionamiento adecuado de los productos utilizados en condiciones normales de uso no s61o en caso de defectos de los productos Nuestra cobertura va mucho mas alia que la garantia del producto No se aplican deducibles ni exclusiones por fallas del funcionamiento es dec...

Страница 36: ...n items like vacuums lawn equipment and electronics call anytime for the location of your nearest Sears Parts Repair Service Center 1 800 488 1222 U S A 1 800 469 4663 Canada www sears com www sears ca To purchase a protection agreement on a product serviced by Sears 1 800 827 6655 U S A Para pedir servicio de reparaci6n a domicilio y para ordenar piezas 1 888 SU HOGAR 1 888 784 6427 1 800 361 666...

Отзывы: